


1.ScollView控件
1.1 ScrollView简介
-
ScrollView就是可以滚动的用户布局容器
-
如果手机显示不下子布局,那么可以使用scrollView
1.2 ScrollView使用
-
不要在scrollView中添加
RecyclerView或者是ListView布局,这样会引起不好的体验因为会有滑动冲突的问题出现。 -
ScrollView的直接子View只能有一个。也就是说如果你要在滚动视图中添加多个视图,你需要一个标准的容器,如
LinearLayout、RelativeLayout
<?xml version="1.0" encoding="utf-8"?>
<LinearLayout xmlns:android="http://schemas.android.com/apk/res/android"
    xmlns:app="http://schemas.android.com/apk/res-auto"
    xmlns:tools="http://schemas.android.com/tools"
    android:layout_width="match_parent"
    android:layout_height="match_parent"
    tools:context=".MainActivity">

    <ScrollView
        android:layout_width="match_parent"
        android:layout_height="match_parent">
        <LinearLayout
            android:layout_width="match_parent"
            android:layout_height="wrap_content"
            android:orientation="vertical">
            <TextView
                android:id="@+id/textView"
                android:layout_width="match_parent"
                android:layout_height="wrap_content"
                android:text="Hello World1" />

            <TextView
                android:id="@+id/textView2"
                android:layout_width="match_parent"
                android:layout_height="wrap_content"
                android:text="Hello World2" />
        </LinearLayout>
    </ScrollView>
</LinearLayout>
- ScrollView只支持竖直滑动,想要水平滑动需要使用
HorizontalScrollView。
<?xml version="1.0" encoding="utf-8"?>
<LinearLayout xmlns:android="http://schemas.android.com/apk/res/android"
    xmlns:app="http://schemas.android.com/apk/res-auto"
    xmlns:tools="http://schemas.android.com/tools"
    android:layout_width="match_parent"
    android:layout_height="match_parent"
    android:orientation="vertical"
    tools:context=".MainActivity">
    <HorizontalScrollView
        android:layout_width="match_parent"
        android:layout_height="match_parent">
        <LinearLayout
            android:layout_width="wrap_content"
            android:layout_height="match_parent"
            android:orientation="vertical" >
        </LinearLayout>
    </HorizontalScrollView>
</LinearLayout>
1.3常用属性及方法
可以直接利用ScrollView给我们提供的:fullScroll()方法:
scrollView.fullScroll(ScrollView.FOCUS_DOWN);滚动到底部
scrollView.fullScroll(ScrollView.FOCUS_UP);滚动到顶部

隐藏滑块:
android:scrollbars="none"

设置滚动速度:
继承ScrollView,然后重写一个 public void fling (int velocityY)的方法:
@Override
public void fling(int velocityY) {
  super.fling(velocityY / 2);   //速度变为原来的一半
}
public class ScrollViewActivity extends AppCompatActivity implements
View.OnClickListener {
  private Button btn_down;
  private Button btn_up;
  private ScrollView scrollView;
  private TextView txt_show;
  @Override
  public void onCreate(Bundle savedInstanceState) {
    super.onCreate(savedInstanceState);
    setContentView(R.layout.scrollview_layout);
    bindViews();
 }
  private void bindViews() {
    btn_down = (Button) findViewById(R.id.btn_down);
    btn_up = (Button) findViewById(R.id.btn_up);
    scrollView = (ScrollView) findViewById(R.id.scrollView);
    txt_show = (TextView) findViewById(R.id.txt_show);
    btn_down.setOnClickListener(this);
    btn_up.setOnClickListener(this);
    StringBuilder sb = new StringBuilder();
    for (int i = 1; i <= 100; i++) {
      sb.append("我是一条文本内容 * " + i + "\n");
   }
    txt_show.setText(sb.toString());
 }
  @Override
  public void onClick(View v) {
    switch (v.getId()) {
      case R.id.btn_down:
        scrollView.fullScroll(ScrollView.FOCUS_DOWN);
        break;
      case R.id.btn_up:
        scrollView.fullScroll(ScrollView.FOCUS_UP);
        break;
   }
 }
}
<?xml version="1.0" encoding="utf-8"?>
<LinearLayout xmlns:android="http://schemas.android.com/apk/res/android"
  android:layout_width="match_parent"
  android:layout_height="match_parent"
  android:orientation="vertical">
  <Button
    android:id="@+id/btn_down"
    android:layout_width="match_parent"
    android:layout_height="wrap_content"
    android:text="滚动到底部" />
  <Button
    android:id="@+id/btn_up"
    android:layout_width="match_parent"
    android:layout_height="wrap_content"
    android:text="滚动到顶部" />
  <ScrollView
    android:id="@+id/scrollView"
    android:layout_width="match_parent"
    android:layout_height="wrap_content"
    android:layout_weight="1">
    <TextView
      android:id="@+id/txt_show"
      android:layout_width="wrap_content"
      android:layout_height="wrap_content"
      android:text="" />
  </ScrollView>
</LinearLayout>
2.ProgressBar进度条
2.1 简介
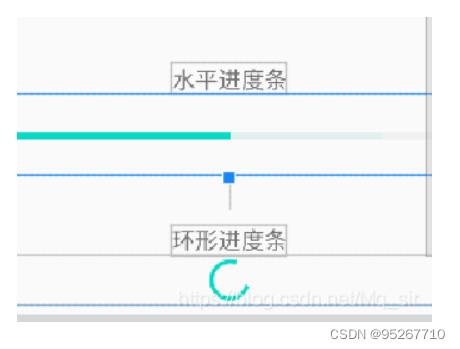
进度条是UI界面中一种非常实用的组件,通常用于向用户像是某个耗时操作完成的百分比。进度条可动态地显示进度,因此避免长时间地执行某个操作时,让用户感觉程序失去了响应,从而更好地提高用户界面的友好性。
进度条大体分为 水平型(条形)和 环形 如图所示:几乎所有的花样的进度条都主要为这两种类型。
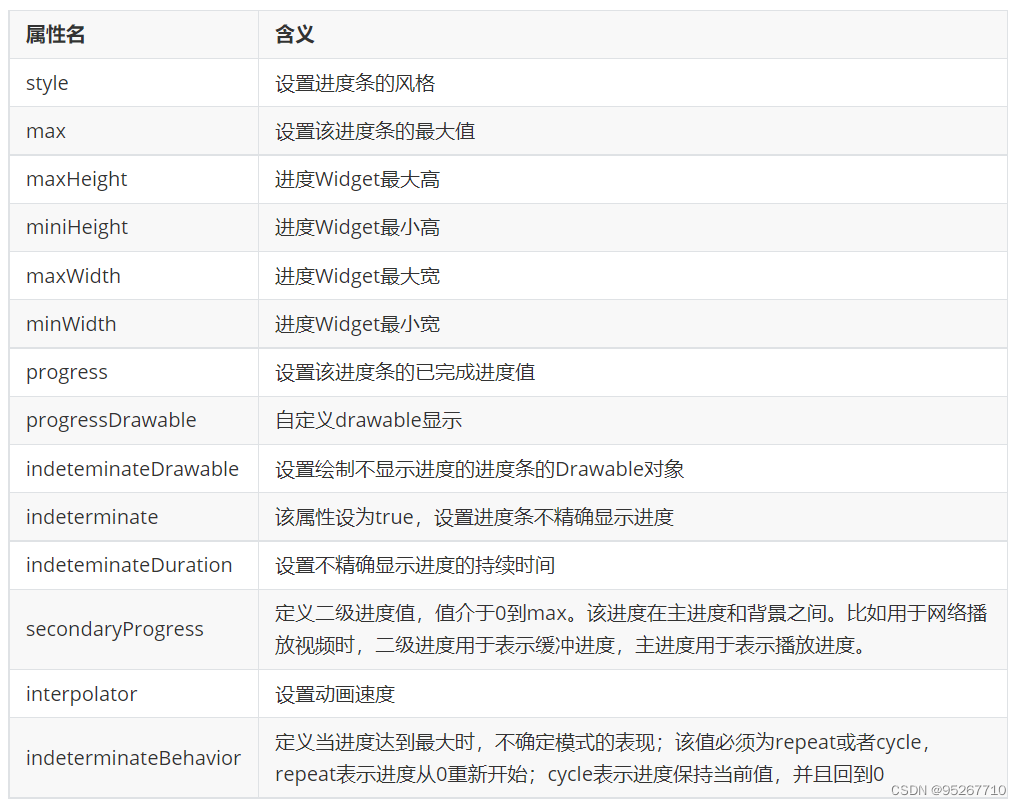
2.2 常用属性
 style属性:
-
@android:style/Widget.ProgressBar.Horizontal:水平进度条
-
@android:style/Widget.ProgressBar.Inverse:普通大小的进度条
-
@android:style/Widget.ProgressBar.Large:大环形进度条
-
@android:style/Widget.ProgressBar.Large.Inverse:大环形进度条
-
@android:style/Widget.ProgressBar.Small:小环形进度条
-
@android:style/Widget.ProgressBar.Small.Inverse:小环形进度条
2.3常用方法
getMax() //返回这个进度条的范围的上限getProgress():返回进度
getsecondaryProgress() //返回二级进度
incrementProgressBy(int diff) //指定增加的进度
isIndeterminate() //指示进度条是否在不确定模式下
setIndeterminate(boolean indeterminate) //设置不确定模式下
2.4 简单的使用
1.编写布局文件
<!--系统提供的进度条-->
<TextView
    android:layout_width="wrap_content"
    android:layout_height="wrap_content"
    android:text="水平进度条"
    android:layout_marginTop="50dp"
    android:layout_gravity="center"/>
<ProgressBar
    android:id="@+id/progress_01"
    android:layout_width="match_parent"
    android:layout_height="30dp"
    android:max="100"
    android:layout_marginTop="100dp"
    android:padding="20dp"
    style="@style/Widget.AppCompat.ProgressBar.Horizontal"/>
<TextView
    android:id="@+id/tv_progress"
    android:layout_width="wrap_content"
    android:layout_height="wrap_content"
    android:layout_below="@id/progress_01"
    android:layout_centerHorizontal="true"/>
3. PopupWindow控件
3.1简介
PopupWindow,顾名思义弹窗.PopupWindow是与AlertDialog在形式上类似的弹窗功能,都是为了在activity最上层显示一个弹窗.但是区别是PopupWindow可以自定义出现的位置,并且可以添加入自己需要的View或者导入自己写好的XML布局
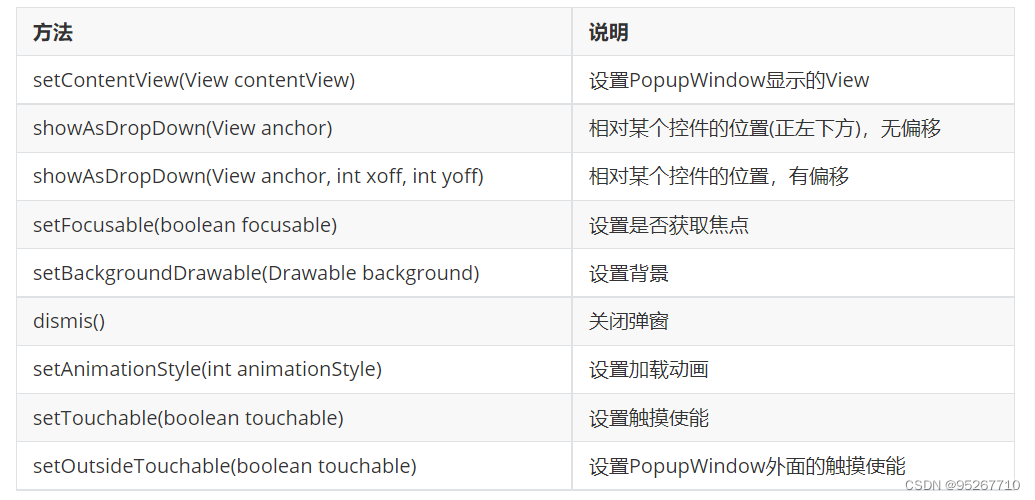
3.2 常用方法
3.3创建流程
- 用LayoutInflater获得xml布局View .或者直接在代码上new一个View
- 实例化一个PopupWindow,将View在实例化作为参数传入
- 配置PopupWindow参数
代码:
@Override protected void onCreate(Bundle savedInstanceState) { super.onCreate(savedInstanceState);
setContentView(R.layout.activity_main2);
// 方法1:自定义xml,然后用LayoutInflater获得xml布局View
// View popupView = getLayoutInflater().inflate(R.layout.popupview,null);
// 方法2:直接在代码上new一个View
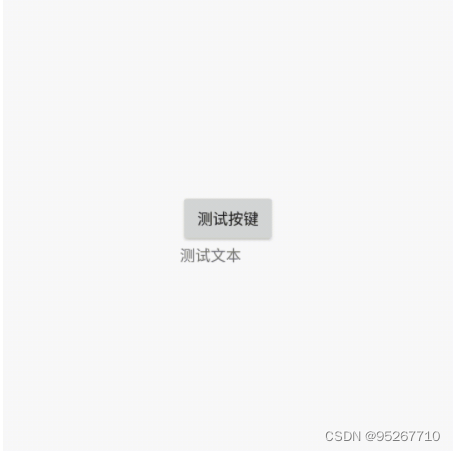
TextView textView = new TextView(Main2Activity.this);
textView.setText("测试文本");
final PopupWindow popupWindow = new PopupWindow(textView,200,300);//参数为1.View 2.宽度 3.高度
popupWindow.setOutsideTouchable(true);//设置点击外部区域可以取消popupWindow
mTestButton = (Button)findViewById(R.id.test_btn);
mTestButton.setOnClickListener(new View.OnClickListener() {
@Override
public void onClick(View v) {
popupWindow.showAsDropDown(mTestButton);//设置popupWindow显示,并且告诉它显示在那个View下面
}
});
}
效果图:
3.4 PopupWindow的配置参数详解
3.4.1设置内容View
- setContentView(View contentView)
除了正常在实例化PopupWindow的时候直接将view传入也可以用这个方法在实例化后重新配置需要的view
3.4.2设置PopupWindow宽度与高度
setWidth(int width)
setHeight(int height)
除了正常实例化的时候传入宽度与高度,也可以用这个2个方法在实例化后在重新配置需要的宽度与高度
3.4.3设置PopupWindow背景
setBackgroundDrawable(Drawable background)
final PopupWindow popupWindow = new PopupWindow(textView,200,300);
popupWindow.setOutsideTouchable(true);
popupWindow.setBackgroundDrawable(getResources().getDrawable(R.drawable.ic\_launcher\_background));//设置背景
mTestButton = (Button)findViewById(R.id.test_btn);
mTestButton.setOnClickListener(new View.OnClickListener() {
	@Override
	public void onClick(View v) {
  	 	popupWindow.showAsDropDown(mTestButton);
 	}
});
3.4.4设置外部点击退出
setOutsideTouchable(boolean touchable)
3.4.5设置PopupWindow可聚焦
setFocusable(boolean focusable)
除了一般的聚焦选中功能,还有一个用处重点!重点!重点!设置了可聚焦后,返回back键按下后,不会直接退出当前activity而是先退出当 前的PopupWindow.
3.4.6设置弹窗弹出的动画高度
setElevation(float elevation)
原本没有设置,弹窗的弹出动画效果位置就只会在控件附件,但是设置后弹窗的起始动画位置就变更远了.请看下面的效果图:
3.4.7设置显示方法参数
`
// 传入 AnchorView ,锚点实际为 Window
// Gravity.TOP 在该锚点的正上方
// Gravity.LEFT 在屏幕左侧
// Gravity.NO_GRAVITY,在屏幕左上角
// x 为坐标系 x轴方向的偏移量,左负右正
// y 为坐标系 y轴方向的偏移量,上负下正

popupWindow.showAtLocation(view, Gravity.TOP, 0, y);


popupWindow.showAtLocation(view, Gravity.NO_GRAVITY,x, y);

popupWindow.showAtLocation(view, Gravity.TOP, 0, y);
3.4.7.1showAtLocation()显示View的内部在指定位置()
显示提供了两种形式:
有两个方法重载:
这个属性一般使用在在整个Activity的window里显示,也就是在整个屏幕内,这个也支持在指定View的内部找到锚点.
例子1:如果你需要在一个布局的里面的下方显示就只需要设置属性为
popupWindow.showAtLocation(view,Gravity.BOTTOM,0,0);
例子2:如果你需要在Activity的window里显示的下方显示就需要设置属性为:
popupWindow.showAtLocation(activity.getWindow().getDecorView(),Gravity.BOTTOM,0,0);

public void showAtLocation(View parent, int gravity, int x, int y)
public void showAtLocation(IBinder token, int gravity, int x, int y)
1234
3.4.7.2showAsDropDown()显示在一个参照物View的外部周围
有三个方法重载:
注意!这里参照物View的周围,使用这个方法是无法在View的内部找到锚点,它的锚点都是围绕者View的外部四周
  public void showAsDropDown(View anchor)
public void showAsDropDown(View anchor, int xoff, int yoff)
public void showAsDropDown(View anchor, int xoff, int yoff, int gravity)
带Gravity参数的方法是API 19新引入的。
这里的xoff与yoff是对应view的坐标偏移量,对应的初始坐标位置是view的左下角.
**请注意!**在实际使用showAsDropDown()方法的时候,如果只使用showAsDropDown(View anchor, int xoff, int yoff),这个形参会出 现在一些品牌的机型上出现一些问题。原因是有些机型初始坐标其实不一定在左下角,而是在左上角。所以,你这个时候设置yoff值就 会出现2种不同去情况。怎么解决这个问题呢? 就是尽量使用showAsDropDown(View anchor, int xoff, int yoff, int gravity),这个形 参主动设置第4个int gravity的值,来确定初始坐标的位置。
这里我们用一个demo演示一下,假设我现在需要把显示位置移动到目标控件的右上角就需要如下代码:
popupWindow.showAsDropDown(mTestButton,mTestButton.getWidth(),-mTestButton.getHeight())
3.4.8设置PopupWindow叠放效果
setOverlapAnchor(true);
当然你把PopupWindow的位置设置到可以完全覆盖你指定位置显示PopupWindow的view时,如果设置这个方法为true,那么你无论如何都无法覆盖这个view始终会让这个view漏出一小部分,如效果图所示:
3.4.9设置PopupWindow可触摸
setTouchable(true);
设置false后,将会阻止PopupWindow窗口里的所有点击事件
3.4.10设置PopupWindow监听拦截指定触摸事件
popupWindow.setTouchInterceptor(new View.OnTouchListener() {
            @Override
            public boolean onTouch(View v, MotionEvent event) {          //如果这里设置返回true,说明你会消耗这个触摸事件,不会向下传递到内容view里
                return false;
            }
        });
123456
3.4.11设置PopupWindow覆盖状态栏或者超过屏幕尺寸
允许弹出窗口扩展到屏幕范围之外。默认情况下,窗口被裁剪到屏幕边界。将其设置为false将允许精确定位窗口
popupWindow.setClippingEnabled(false);
3.4.12设置PopupWindow监听取消事件
popupWindow.setOnDismissListener(new PopupWindow.OnDismissListener() {
    @Override
    public void onDismiss() {

    }
});
3.4.13设置PopWindow遮罩层
WindowManager.LayoutParams lp = getWindow().getAttributes();
        lp.alpha = 0.5f;
        getWindow().setAttributes(lp);
        pop.setOnDismissListener(new PopupWindow.OnDismissListener() {

            @Override
            public void onDismiss() {
                WindowManager.LayoutParams lp = getWindow().getAttributes();
                lp.alpha = 1f;
                getWindow().setAttributes(lp);
            }
        });


 3074
3074


 被折叠的 条评论
为什么被折叠?
被折叠的 条评论
为什么被折叠?
 到【灌水乐园】发言


