


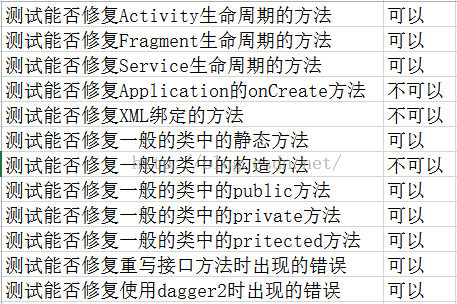
使用一览
代码引入
- 引用
dependencies {
    compile 'com.alipay.euler:andfix:0.3.1@aar'
}

或者

使用module的方式添加andfix,这样可以直接查看编辑源码。记得新建jniLibs文件夹,将AndFix里面的libs里的so文件移到jniLibs里。- 初始化
patchManager = new PatchManager(context);
patchManager.init(appversion);//current version- 加载补丁,尽量在 Applicat ion 的 onCreate 方法中使用
patchManager.loadPatch();- 应用补丁
patchManager.addPatch(path);//path是补丁的存放路径ProGuard混淆
- Andfix使用到的native方法类
com.alipay.euler.andfix.AndFix- 注解保留
com.alipay.euler.andfix.annotation.MethodReplace- 添加混淆文件声明
-keep class * extends java.lang.annotation.Annotation-keepclasseswithmembernames class * { native <methods>;}使用生成patch工具类命令
项目中提供了一个生成补丁(后缀为 .apatch )的工具 apkpatch
- 生成补丁
usage: apkpatch
-f <new>
-t <old>
-o <output>
-k <keystore>
-p <***>    秘钥密码
-a <alias>
-e <***>  别名密码

-a,--alias <alias> keystore entry alias.
-e,--epassword <***> keystore entry password.
-f,--from <loc> new Apk file path.
-k,--keystore <loc> keystore path.
-n,--name <name> patch name.
-o,--out <dir> output dir.
-p,--kpassword <***> keystore password.
-t,--to <loc> old Apk file path.
例如:
./apkpatch.sh -f /Users/e0uoq/AndfixDemo2/app-release.apk -t /Users/e0uoq/AndfixDemo2/app/app-release.apk -o /Users/e0uoq/andfixpatch -k /Users/e0uoq/andfixkey.jks -p andfix_key -a andfixsign -e andfix_sign- 此外还提供了apatch合并的命令,将多个apatch合并为一个
usage: apkpatch
-m <apatch_path...>
-o <output>
-k <keystore>
-p <***>
-a <alias>
-e <***>
-a,--alias <alias> keystore entry alias.
-e,--epassword <***> keystore entry password.
-k,--keystore <loc> keystore path.
-m,--merge <loc...> path of .apatch files.
-n,--name <name> patch name.
-o,--out <dir> output dir.
-p,--kpassword <***> keystore password.
适用场景
实例演示
前提是环境基本已经配好
相关资料工具及demo下载地址:http://pan.baidu.com/s/1hsdcs7a
1-Application中进行初始化
package com.example.lhx.andfixdemo;

import android.app.Application;
import android.os.Environment;
import android.util.Log;

import com.alipay.euler.andfix.patch.PatchManager;

import java.io.File;
import java.io.IOException;

/**
 * sample application
 *
 */
public class MainApplication extends Application {
    private static final String TAG = " andrew";

    private static final String APATCH_PATH = "/out.apatch";

    private static final String DIR = "apatch";//补丁文件夹
    /**
     * patch manager
     */
    private PatchManager mPatchManager;

    @Override
    public void onCreate() {
        super.onCreate();
        // initialize
        mPatchManager = new PatchManager(this);
        mPatchManager.init("1.0");
        Log.d(TAG, "inited.");

        // load patch
        mPatchManager.loadPatch();
        try {
            // .apatch file path
            String patchFileString = Environment.getExternalStorageDirectory()
                    .getAbsolutePath() + APATCH_PATH;
            mPatchManager.addPatch(patchFileString);
            Log.d(TAG, "apatch:" + patchFileString + " added.");

            //复制且加载补丁成功后,删除下载的补丁
            File f = new File(this.getFilesDir(), DIR + APATCH_PATH);
            if (f.exists()) {
                boolean result = new File(patchFileString).delete();
                if (!result)
                    Log.e(TAG, patchFileString + " delete fail");
            }
        } catch (IOException e) {
            Log.e(TAG, "", e);
        }
    }
}
2-生成不同的新旧包
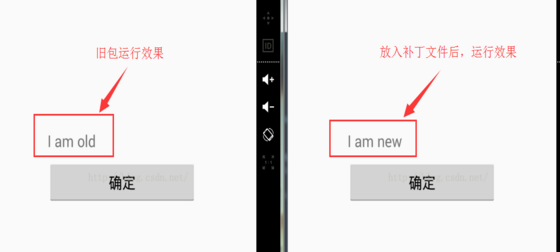
demo的场景就是一开始点击确定按钮textview显示I am old.然后假设这个方法有问题,我改为I am new.区分新包和旧包。
打包1.apk后,修改textviewt内容,打包2.apk
package com.example.lhx.andfixdemo;

import android.app.Activity;
import android.os.Bundle;
import android.view.View;
import android.widget.Button;
import android.widget.TextView;


/**
 * main activity
 */
public class MainActivity extends Activity {
    private TextView mShowTextView;
    private Button mSureButton;

    @Override
    public void onCreate(Bundle savedInstanceState) {
        super.onCreate(savedInstanceState);
        setContentView(R.layout.activity_main);
        mShowTextView = (TextView) this.findViewById(R.id.show_tv);
        mSureButton = (Button) this.findViewById(R.id.sure_btn);

        //打包1.apk后,修改textviewt内容,打包2.apk
        mSureButton.setOnClickListener(new View.OnClickListener() {
            @Override
            public void onClick(View v) {
                mShowTextView.setText("I am new");
            }
        });
    }
}
3-混淆
# Add project specific ProGuard rules here.
# By default, the flags in this file are appended to flags specified
# in E:\android_sdk/tools/proguard/proguard-android.txt
# You can edit the include path and order by changing the proguardFiles
# directive in build.gradle.
#
# For more details, see
#   http://developer.android.com/guide/developing/tools/proguard.html

# Add any project specific keep options here:

# If your project uses WebView with JS, uncomment the following
# and specify the fully qualified class name to the JavaScript interface
# class:
#-keepclassmembers class fqcn.of.javascript.interface.for.webview {
#   public *;
#}
-optimizationpasses 5                                                           # 指定代码的压缩级别
-dontusemixedcaseclassnames                                                     # 是否使用大小写混合
-dontskipnonpubliclibraryclasses                                                # 是否混淆第三方jar
-dontpreverify                                                                  # 混淆时是否做预校验
-verbose                                                                        # 混淆时是否记录日志
-optimizations !code/simplification/arithmetic,!field/*,!class/merging/*        # 混淆时所采用的算法

#重要,別忘了這些,不混淆andfix包,不混淆native方法
-dontwarn android.annotation
-dontwarn com.alipay.euler.**
-keep class com.alipay.euler.** {*;}
-keep class * extends java.lang.annotation.Annotation
-keepclasseswithmembernames class * {
    native <methods>;
}<span style="font-size:18px;"></span>
4-使用工具打包补丁文件:apkpatch-1.0.3
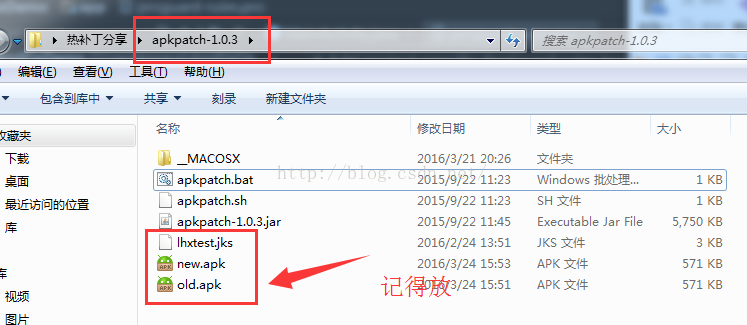
- 注意要把你的keystone文件,新包和旧包一同放在apkpatch-1.0.3文件里面。这里注意下,apk指的是没有经过第三方加固的。
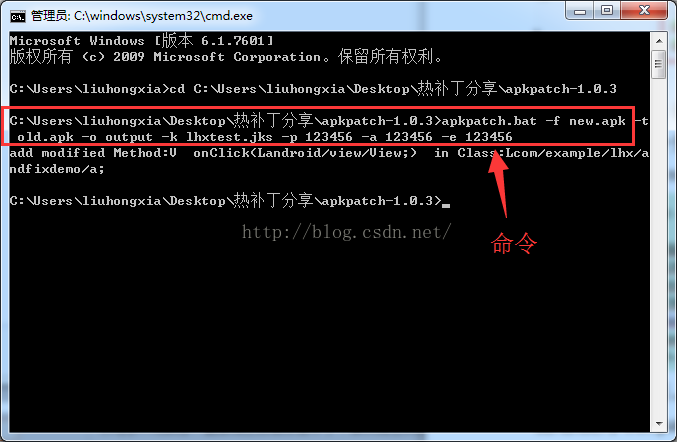
- 然后win+R调出cmd命令
- 这里对命令先做一个简单介绍,后面也会特意分析这个打包工具。
apkpatch.bat -f new.apk -t old.apk -o output -k lhxtest.jks -p 123456 -a 123456 -e 123456
- 命令成功后,会在目录下生成一个输出文件夹,文件夹里面就有扩展名为.patch的文件,把它改为out.patch.(PS:新手不熟悉命令行的话,记得一定要cd到apkpatch-1.0.3目录下,你可以直接cd然后加上那个目录的路径就可以了,然后再输入命令)
- 为了检测,首先运行旧包,然后把out.patch文件负责到在手机根目录下,再重新打开app,你会发现点击确定按钮,textview显示为”I am new”就表示方法修复成功了


 1万+
1万+

 被折叠的 条评论
为什么被折叠?
被折叠的 条评论
为什么被折叠?
 到【灌水乐园】发言


