


Description:
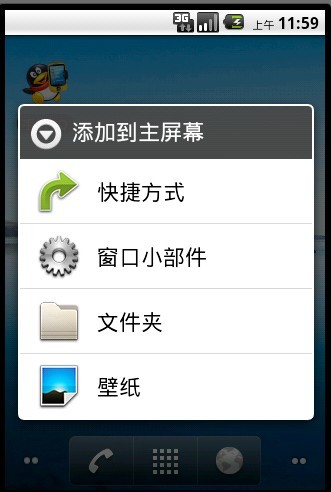
When you take a look at android sdk document on Context Menu, you would notice that current Context Menu does not support for Icon. But if you do a long click on the home screen of your phone, you would see something like the image below. So how google did that? This tutorial will guide you through the steps to archive something like that.
Creating Demo Application:
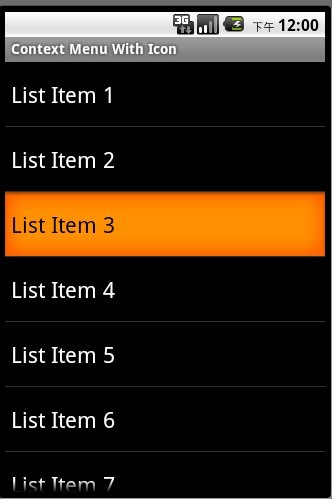
First of all, we will create a demo application on which our context menu will be displayed. The demo application is just a simple one which shows a list of items (using ListView), when you do a long click on an item, the Context Menu will appear. This is a simple application with only a ListView, so we will skip through this step.
Implement Context Menu:
I've looked through the code of Android Launcher Application, and realized that the application did not actually use Context Menu. It was implemented by using a dialog with a custom list view. So I decided to take this approach for the tutorial.
1. Create IconContextMenuItem:
This class will hold our menu item's information, including: menu title, menu icon, and menu id.
import android.content.res.Resources; import android.graphics.drawable.Drawable; public class IconContextMenuItem { public final CharSequence text; public final Drawable image; public final int actionTag; public IconContextMenuItem(Resources res, int textResourceId, int imageResourceId, int actionTag) { text = res.getString(textResourceId); if (imageResourceId != -1) { image = res.getDrawable(imageResourceId); } else { image = null; } this.actionTag = actionTag; } public IconContextMenuItem(Resources res, CharSequence title, int imageResourceId, int actionTag) { text = title; if (imageResourceId != -1) { image = res.getDrawable(imageResourceId); } else { image = null; } this.actionTag = actionTag; } }
2. Create IconMenuAdapter:
This will be the menu item list adapter, holding all items of context menu. So in this class, there will be an array list of type IconContextMenuItem as below:
protected class IconMenuAdapter extends BaseAdapter { private ArrayList<IconContextMenuItem> mItems = new ArrayList<IconContextMenuItem>(); }
In this class, we need to override the method getView, in which we will create custom view for our menu item (that will be an Icon followed by a TextView)
@Override public View getView(int position, View convertView, ViewGroup parent) { IconContextMenuItem item = (IconContextMenuItem) getItem(position); Resources res = parentActivity.getResources(); if (convertView == null) { TextView temp = new TextView(context); AbsListView.LayoutParams param = new AbsListView.LayoutParams( AbsListView.LayoutParams.FILL_PARENT, AbsListView.LayoutParams.WRAP_CONTENT); temp.setLayoutParams(param); temp.setPadding((int) toPixel(res, 15), 0, (int) toPixel(res, 15),0); temp.setGravity(android.view.Gravity.CENTER_VERTICAL); Theme th = context.getTheme(); TypedValue tv = new TypedValue(); if (th.resolveAttribut(android.R.attr.textAppearanceLargeInverse, tv, true)) { temp.setTextAppearance(context, tv.resourceId); } temp.setMinHeight(LIST_PREFERED_HEIGHT); temp.setCompoundDrawablePadding((int) toPixel(res, 14)); convertView = temp; } TextView textView = (TextView) convertView; textView.setTag(item); textView.setText(item.text); textView.setCompoundDrawablesWithIntrinsicBounds(item.image, null,null, null); return textView; }
3. Create IconContextMenu:
This class is the main class of the context menu, which creates a context-menu-liked dialog for the application. In this class, we will write createMenu() method that return a Dialog object.
public class IconContextMenu implements DialogInterface.OnCancelListener, DialogInterface.OnDismissListener { /** * Create menu */ public Dialog createMenu(String menuItitle) { final AlertDialog.Builder builder = new AlertDialog.Builder(parentActivity); builder.setTitle(menuItitle); builder.setAdapter(menuAdapter, new DialogInterface.OnClickListener() { @Override public void onClick(DialogInterface dialoginterface, int i) { IconContextMenuItem item = (IconContextMenuItem) menuAdapter.getItem(i); if (clickHandler != null) { clickHandler.onClick(item.actionTag); } } }); builder.setInverseBackgroundForced(true); AlertDialog dialog = builder.create(); dialog.setOnCancelListener(this); dialog.setOnDismissListener(this); return dialog; } /** * Add menu item * @param menuItem */ public void addItem(Resources res, CharSequence title, int imageResourceId, int actionTag) { menuAdapter.addItem(new IconContextMenuItem(res, title, imageResourceId, actionTag)); } /** * Set menu onclick listener * @param listener */ public void setOnClickListener(IconContextMenuOnClickListener listener) { clickHandler = listener; } }
You would also notice that in this class there two other methods: addItem (which adds new Menu Item to Context Menu) and setOnClickListener (which adds menu's click handler method).
So we have finished our implement of Context Menu with Icon supported. Next step will show you how to use the above implemented class in our activity.
Use Context Menu with Icon in Activity:
Firstly, we need to initialize our context menu (declare context menu, add items,...)
public class MainActivity extends Activity { private IconContextMenu iconContextMenu = null; @Override public void onCreate(Bundle savedInstanceState) { //.... //init the menu iconContextMenu = new IconContextMenu(this, CONTEXT_MENU_ID); iconContextMenu.addItem(res, "Menu Item 1", R.drawable.ic_1, MENU_ITEM_1_ACTION); iconContextMenu.addItem(res, "Menu Item 2", R.drawable.ic_2, MENU_ITEM_2_ACTION); iconContextMenu.addItem(res, "Menu Item 3", R.drawable.ic_3, MENU_ITEM_3_ACTION); iconContextMenu.addItem(res, "Menu Item 4", R.drawable.ic_4, MENU_ITEM_4_ACTION); //set onclick listener for context menu iconContextMenu.setOnClickListener(new IconContextMenu.IconContextMenuOnClickListener() { @Override public void onClick(int menuId) { switch(menuId) { case MENU_ITEM_1_ACTION: Toast.makeText(getApplicationContext(), "You've clicked on menu item 1", 1000).show(); break; case MENU_ITEM_2_ACTION: Toast.makeText(getApplicationContext(), "You've clicked on menu item 2", 1000).show(); break; case MENU_ITEM_3_ACTION: Toast.makeText(getApplicationContext(), "You've clicked on menu item 3", 1000).show(); break; case MENU_ITEM_4_ACTION: Toast.makeText(getApplicationContext(), "You've clicked on menu item 4", 1000).show(); break; } } }); } }
Our Context Menu is actually a Dialog, so in order to use it in activity, we have to override the onCreateDialog method of the Activity.
/** * create context menu */ @Override protected Dialog onCreateDialog(int id) { if (id == CONTEXT_MENU_ID) { return iconContextMenu.createMenu("Menu Title"); } return super.onCreateDialog(id); }
Here, we have finished implementing our Context Menu with Icon on Android. The result of this implementation is as the image below: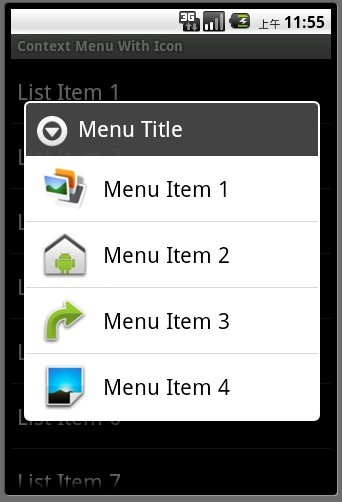
Notice:
The above is just the major steps to show you how to implement a Context Menu with Icon, not a complete runable source. So, you should refer to the source code for the full implementation of this tutorial.
Source:
You can get source from: http://download.csdn.net/source/3213566


 被折叠的 条评论
为什么被折叠?
被折叠的 条评论
为什么被折叠?
 到【灌水乐园】发言


