


在 Linux下驱动开发之二(LED驱动)-------Tiny6410这篇博文中,讨论了编写LED驱动的两种实现方法,一种是使用miscdevice驱动,一种是使用标准的字符设备驱动开发方法,但是在读写I/O口的时候都是直接使用系统提供的S3C64XX_GPKDAT等相应地址,一直以为它就对应的是S3C6410数据手册上的物理地址,但今天使用后才发现原来已经被转化成虚拟地址了,在linux中只能使用虚拟地址来访问,使用前都需要ioremap将要访问的物理地址映射到虚拟地址中,然后才能访问.不能直接访问物理地址。。。
	gpkcon = (volatile unsigned long *)ioremap(0x7F008800,16);//将GPKCON映射到虚拟地址空间
	gpkdat = gpkcon + 2;
同理在模块注销代码中增加unmap函数来取消映射.
iounmap(gpkcon);上一篇LED驱动中没有实现read功能,只是实现了使用ioctl来控制LED灯的亮灭,但是有时候需要读取LED的状态,此时就需要编写驱动来支持它,方法类似,在read函数中修改GPIO的配置属性,将其修改为输入,然后读取输入,并返回给用户程序即可,下面是详细的实现代码:
ssize_t led_read (struct file *filp, char __user *buf, size_t count, loff_t *ppos)
{
	volatile unsigned long temp;
	temp = ioread32(gpkcon);
	temp = (temp & (~(0xFF<<16))) ;//configure LED to output
	iowrite32(temp,gpkcon);
	temp = ioread32(gpkdat);
	temp = (temp & (0xF<<4))>>4;//get the 4~7
	printk("read temp = %lx.\n",temp);
	buf = copy_to_user((char*)buf,(char*)&temp,4);
	printk("led_read\n");
	return 0;
}
static struct class * tiny6410_led_class = NULL;
static struct  device * tiny6410_led_device = NULL;
//注册成功,则使用class自动创建设备
tiny6410_led_class = class_create(THIS_MODULE, "tiny6410led");
if (IS_ERR(tiny6410_led_class)) {
err = PTR_ERR(tiny6410_led_class);
printk("create class error.\n");
}
tiny6410_led_device = device_create(tiny6410_led_class, NULL, MKDEV(tiny6410_led_major, 0), NULL,
"leds");
#include <stdio.h>
#include <unistd.h>
#include <fcntl.h>
int main()
{
int fd = 0;
char buf[4]={0x1,0x2,0x3,0x4};
char rbuf;
fd = open("/dev/leds",O_RDWR);
if(fd < 0){
printf("open /dev/leds error.\n");
return -1;
}
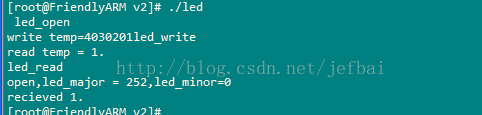
write(fd,buf,1);
read(fd,buf,1);
printf("recieved %x.\n",*(unsigned int*)buf);
close(fd);
return 0;
}


 1263
1263


 被折叠的 条评论
为什么被折叠?
被折叠的 条评论
为什么被折叠?
 到【灌水乐园】发言


