


opencv中提供了很多绘图函数,在进行图像处理,对感兴趣区域进行标定时,就需要利用这些绘图函数。现在集中做一个归纳介绍。
1. Point
Point常用来指定一幅二维图像中的点。如
Point pt;
pt.x = 10;
pt.y = 8;
或
Point pt = Point(10,8);
其指向的是在图像中(10, 8)位置的一个像素点。
查找Point引用可以在”core.hpp”文件发现如下语句:
typedef Point_<int> Point2i;
typedef Point2i Point;
即Point_与Point2i和Point是等价的。查看Point_定义出现很多模板如下:
template<typename _Tp> inline Point_<_Tp>::Point_(_Tp _x, _Tp _y) : x(_x), y(_y) {}其从Point_继承而来,继续查看Point_定义如下:
template<typename _Tp> class Point_
{
public:
    typedef _Tp value_type;

    // various constructors
    Point_();
    Point_(_Tp _x, _Tp _y);
    Point_(const Point_& pt);
    Point_(const CvPoint& pt);
    Point_(const CvPoint2D32f& pt);
    Point_(const Size_<_Tp>& sz);
    Point_(const Vec<_Tp, 2>& v);

    Point_& operator = (const Point_& pt);
    //! conversion to another data type
    template<typename _Tp2> operator Point_<_Tp2>() const;

    //! conversion to the old-style C structures
    operator CvPoint() const;
    operator CvPoint2D32f() const;
    operator Vec<_Tp, 2>() const;

    //! dot product
    _Tp dot(const Point_& pt) const;
    //! dot product computed in double-precision arithmetics
    double ddot(const Point_& pt) const;
    //! cross-product
    double cross(const Point_& pt) const;
    //! checks whether the point is inside the specified rectangle
    bool inside(const Rect_<_Tp>& r) const;

    _Tp x, y; //< the point coordinates
};
整个Point类的定义就很明显了。可以通过制定(x,y)来指定二维图像中的点。
2. Scalar
表示颜色的类,Scalar代表了一个四元素的vector容器,在opencv中常用来传递像素值。在本篇博客中将主要用来表示BGR三个像素的值。如果不使用则最后一个参数不用设置。如
Scalar(a, b, c);其中a,b,c分别代表像素点Blue,Green,Red的值。
同样查看Scalar类的引用在”core.hpp”头文件发现如下语句:
typedef Scalar_<double> Scalar;查看Scalar_定义:
template<typename _Tp> class Scalar_ : public Vec<_Tp, 4>
{
public:
    //! various constructors
    Scalar_();
    Scalar_(_Tp v0, _Tp v1, _Tp v2=0, _Tp v3=0);
    Scalar_(const CvScalar& s);
    Scalar_(_Tp v0);

    //! returns a scalar with all elements set to v0
    static Scalar_<_Tp> all(_Tp v0);
    //! conversion to the old-style CvScalar
    operator CvScalar() const;

    //! conversion to another data type
    template<typename T2> operator Scalar_<T2>() const;

    //! per-element product
    Scalar_<_Tp> mul(const Scalar_<_Tp>& t, double scale=1 ) const;

    // returns (v0, -v1, -v2, -v3)
    Scalar_<_Tp> conj() const;

    // returns true iff v1 == v2 == v3 == 0
    bool isReal() const;
};
从定义语句Scalar_(_Tp v0, _Tp v1, _Tp v2=0, _Tp v3=0);中可以看出Scalar最后两个参数都有默认值,故在不适用第四个参数时可以直接忽略。
3. Size
表示尺寸的类,依旧查看其引用和定义如下:
typedef Size_<int> Size2i;
typedef Size_<double> Size2d;
typedef Size2i Size;
所以针对int类型的size参数,其可以直接使用Size类,而对于double类型的size参数,只能使用Size2d。查看Size_定义
template<typename _Tp> class Size_
{
public:
    typedef _Tp value_type;

    //! various constructors
    Size_();
    Size_(_Tp _width, _Tp _height);
    Size_(const Size_& sz);
    Size_(const CvSize& sz);
    Size_(const CvSize2D32f& sz);
    Size_(const Point_<_Tp>& pt);

    Size_& operator = (const Size_& sz);
    //! the area (width*height)
    _Tp area() const;

    //! conversion of another data type.
    template<typename _Tp2> operator Size_<_Tp2>() const;

    //! conversion to the old-style OpenCV types
    operator CvSize() const;
    operator CvSize2D32f() const;

    _Tp width, height; // the width and the height
};
里面有很多方法。在本篇博客中将使用Size_(_Tp _width, _Tp _height);直接指定size的宽和高。
4. line
绘制直线类。其定义如下:
CV_EXPORTS_W void line(CV_IN_OUT Mat& img, Point pt1, Point pt2, const Scalar& color,
                     int thickness=1, int lineType=8, int shift=0);
参数解释
.Mat& img: 输入输出图像
.Point pt1和pt2: 二维Point类的点坐标,由Point指定
.Scalar& color: 直线颜色
. int thickness = 1: 直线宽度,有默认值1
. int lineType = 8: 直线类型,默认值为8
5. ellips
绘制椭圆。其定义如下:
CV_EXPORTS_W void ellipse(CV_IN_OUT Mat& img, Point center, Size axes,
                        double angle, double startAngle, double endAngle,
                        const Scalar& color, int thickness=1,
                        int lineType=8, int shift=0);
参数解释
. Mat& img: 输入输出图像
. Point center: 由Point类指定的椭圆中心坐标
. Size axes: 由Size类指定的椭圆所在区域矩形
. double angle: 椭圆长轴偏离角度
. double startAngle: 绘制椭圆起始角度
. double endAngle: 绘制椭圆终点角度。如果设置startAngle为0,设置endAngle为360则表示整个椭圆
. const Scalar& color: 椭圆颜色
. int thickness = 1: 椭圆边的线宽
. int lineType = : 椭圆变线的类型
6. rectangle
绘制矩形,其定义如下:
CV_EXPORTS_W void rectangle(CV_IN_OUT Mat& img, Point pt1, Point pt2,
                          const Scalar& color, int thickness=1,
                          int lineType=8, int shift=0);

//! draws the rectangle outline or a solid rectangle covering rec in the image
CV_EXPORTS void rectangle(CV_IN_OUT Mat& img, Rect rec,
                          const Scalar& color, int thickness=1,
                          int lineType=8, int shift=0);
可以看出其有两种参数传入方式。一类是用Point指定点,另一类是用Rect函数指定边长。
. 针对第一类指定方式,Point类指定的两个点分别为矩形的左上角点坐标和矩形左下角点坐标
. Rect指定边长,查看其定义有如下语句
typedef Rect_<int> Rect;说明Rect是int类型的数据结构,与Rect_等价。查看Rect_定义,看其用法,如下:
template<typename _Tp> class Rect_
{
public:
    typedef _Tp value_type;

    //! various constructors
    Rect_();
    Rect_(_Tp _x, _Tp _y, _Tp _width, _Tp _height);
    Rect_(const Rect_& r);
    Rect_(const CvRect& r);
    Rect_(const Point_<_Tp>& org, const Size_<_Tp>& sz);
    Rect_(const Point_<_Tp>& pt1, const Point_<_Tp>& pt2);

    Rect_& operator = ( const Rect_& r );
    //! the top-left corner
    Point_<_Tp> tl() const;
    //! the bottom-right corner
    Point_<_Tp> br() const;

    //! size (width, height) of the rectangle
    Size_<_Tp> size() const;
    //! area (width*height) of the rectangle
    _Tp area() const;

    //! conversion to another data type
    template<typename _Tp2> operator Rect_<_Tp2>() const;
    //! conversion to the old-style CvRect
    operator CvRect() const;

    //! checks whether the rectangle contains the point
    bool contains(const Point_<_Tp>& pt) const;

    _Tp x, y, width, height; //< the top-left corner, as well as width and height of the rectangle
};
常用 Rect_(Tp _x, _Tp _y, _Tp _width, _Tp _height);来定义一个矩形;也可以使用函数Rect(const Point_<Tp>& pt1, const Point<_Tp>& pt2);指定矩形左上角的点和右下角的点。
7. circle
绘制圆。查看其定义
CV_EXPORTS_W void circle(CV_IN_OUT Mat& img, Point center, int radius,
                       const Scalar& color, int thickness=1,
                       int lineType=8, int shift=0);
参数解释
. Mat& img: 输入输出图像
. Point center: Point指定的一个二维点作为圆心
. int radius: 圆的半径
. const Scalar& color: Scalar指定的绘制圆的颜色
. int thickness = 1: 圆边的线宽
. int lineType = 8: 圆边线的类型
8. filled polygon
填充多边形。其定义有两种形式
CV_EXPORTS void fillPoly(Mat& img, const Point** pts,
                         const int* npts, int ncontours,
                         const Scalar& color, int lineType=8, int shift=0,
                         Point offset=Point() );

CV_EXPORTS_W void fillPoly(InputOutputArray img, InputArrayOfArrays pts,
                           const Scalar& color, int lineType=8, int shift=0,
                           Point offset=Point() );
. 第一种形式定义,有Point** pts,是一个二阶指针,用来指定多边形顶点。多边形顶点不是某个特定点,而是多个点,所以用Point类定义的数组来表示顶点坐标,如下
Point points[1][10];        //定义一个Point类数组,大小为一行十列
points[0][0] = Point(w / 4.0, 7 * w / 8.0);
points[0][1] = Point(w / 4.0,  w / 8.0);
...
const Point* ppt[1] = { points[0] };    //points[0]为第一行元素指针
/*此时定义一个Point* 类型的指针用来存放point[0]的指针,而ppt就是二阶指针*/
const int* npts是说明多边形顶点个数,与上述顶点个数保持一致。如
int npt[] = { 10 };之后调用函数进行图形绘制
.第二种形式定义同样给出输入点数组。
综合示例:
结合上面的函数介绍,给出一个综合的示例程序
#include <iostream>
#include <opencv2/core.hpp>
#include <opencv2/highgui.hpp>
using namespace std;
using namespace cv;
void MyEllipse(Mat img, double angle);
void MyFilledCircle(Mat img, Point center);
void MyLine(Mat img, Point start, Point end);
void MyPolygon(Mat img);
const int w = 400;
int main()
{
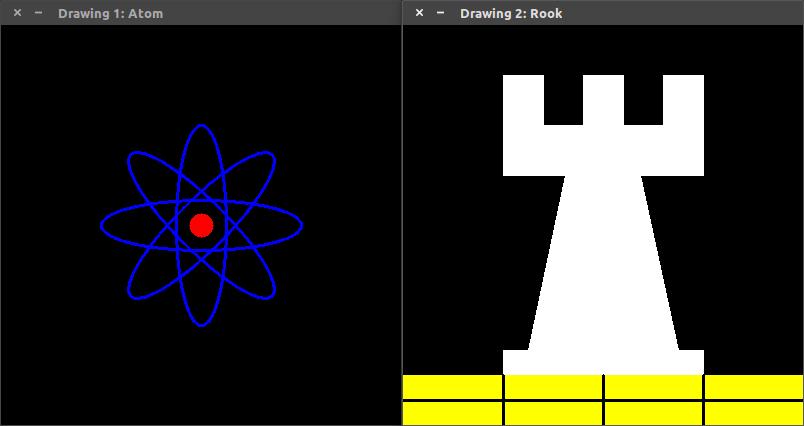
char atom_window[] = "Drawing 1: Atom";
char rook_window[] = "Drawing 2: Rook";
//创建两个空的图像
Mat atom_image = Mat::zeros(w, w, CV_8UC3);
Mat rook_image = Mat::zeros(w, w, CV_8UC3);
//使用ellipse和circle函数绘制一个简单的原子结构
MyEllipse(atom_image,90);
MyEllipse(atom_image,0);
MyEllipse(atom_image,45);
MyEllipse(atom_image,-45);
MyFilledCircle(atom_image,Point(w/2.0, w/2.0));
namedWindow(atom_window,WINDOW_AUTOSIZE);
imshow(atom_window,atom_image);
//使用line,rectangle,polygon(多边形)绘制一个rook
MyPolygon(rook_image);
//创建一个矩形
rectangle(rook_image,Point(0, 7*w/8.0),Point(w,w),Scalar(0,255,255),-1, 8);
//创建直线
MyLine(rook_image,Point(0,15*w/16),Point(w, 15*w/16));
MyLine(rook_image,Point(w/4, 7*w/8),Point(w/4,w));
MyLine(rook_image,Point(w/2, 7*w/8),Point(w/2,w));
MyLine(rook_image,Point(3*w/4, 7*w/8), Point(3*w/4,w));
//显示绘制的图像
namedWindow(rook_window,WINDOW_AUTOSIZE);
imshow(rook_window,rook_image);
waitKey(0);
return 0;
}
void MyEllipse(Mat img, double angle)
{
int thickness = 2; //线宽
int lineType = 8; //线的类型
ellipse(img,Point(w/2.0, w/2.0),Size(w/4.0, w/16.0),angle,0,360,Scalar(255,0,0),thickness,lineType);
}
void MyFilledCircle(Mat img, Point center)
{
int thickness = -1;
int lineType = 8;
circle(img,center,w/32.0,Scalar(0,0,255),thickness,lineType);
}
void MyLine(Mat img, Point start, Point end)
{
int thickness = 2;
int lineType = 8;
line(img, start, end, Scalar(0,0,0),thickness,lineType);
}
void MyPolygon(Mat img)
{
int lineType = 8;
//生成一些点
Point rook_points[1][20];
rook_points[0][0] = Point(w/4.0, 7*w/8.0);
rook_points[0][1] = Point(3*w/4.0, 7*w/8.0);
rook_points[0][2] = Point(3*w/4.0, 13*w/16.0);
rook_points[0][3] = Point(11*w/16.0, 13*w/16.0);
rook_points[0][4] = Point(19*w/32.0, 3*w/8.0);
rook_points[0][5] = Point(3*w/4.0, 3*w/8.0);
rook_points[0][6] = Point(3*w/4.0, w/8.0);
rook_points[0][7] = Point(26*w/40.0, w/8.0);
rook_points[0][8] = Point(26*w/40.0, w/4.0);
rook_points[0][9] = Point(22*w/40.0, w/4.0);
rook_points[0][10] = Point(22*w/40.0, w/8.0);
rook_points[0][11] = Point(18*w/40.0, w/8.0);
rook_points[0][12] = Point(18*w/40.0, w/4.0);
rook_points[0][13] = Point(14*w/40.0, w/4.0);
rook_points[0][14] = Point(14*w/40.0, w/8.0);
rook_points[0][15] = Point(w/4.0, w/8.0);
rook_points[0][16] = Point(w/4.0, 3*w/8.0);
rook_points[0][17] = Point(13*w/32.0, 3*w/8.0);
rook_points[0][18] = Point(5*w/16.0, 13*w/16.0);
rook_points[0][19] = Point(w/4.0, 13*w/16.0);
const Point* ppt[1] = {rook_points[0]};
int npt[] = {20};
fillPoly(img,ppt,npt,1,Scalar(255,255,255),lineType);
}运行结果如图所示:


 1883
1883


 被折叠的 条评论
为什么被折叠?
被折叠的 条评论
为什么被折叠?
 到【灌水乐园】发言


