


 本文指导您创建使用APNs的iOS应用,包括生成证书请求、创建AppID、配置应用程序、创建推送通知应用、创建PushNotificationProvider等关键步骤。
iPhone 对于应用程序在后台运行有诸多限制(除非你越狱)。因此,当用户切换到其他程序后,原先的程序无法保持运行状态。对于那些需要保持持续连接状态的应用程序(比如社区网络应用),将不能收到实时的信息。
为解决这一限制,苹果推出了APNs(苹果推送通知服务)。APNs 允许设备与苹果的推送通知服务器保持常连接状态。当你想发送一个推送通知给某个用户的iPhone上的应用程序时,你可以使用 APNs 发送一个推送消息给目标设备上已安装的某个应用程序。
本文中,你将学到创建使用 APNs 的iOS 应用的详细步骤。
创建证书请求
使用APNs 的第一步是生成一个证书请求,使用该证书请求来申请一个用于开发的 SSL 证书。
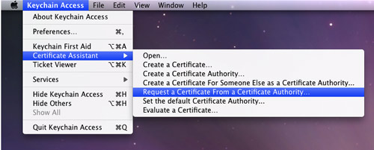
1. 打开“钥匙串访问”应用程序。
2. 选择“KeychainAccess -> Certificate Assistant -> Request a Certificate From CertificateAuthority”(如图1 所示):
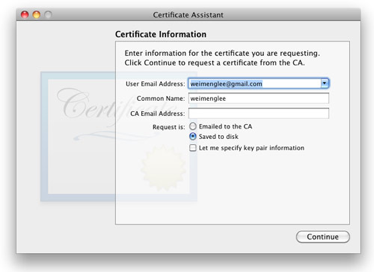
3. 输入所需的信息,勾选“Saved to disk”选项,点击 Continue(如图2 所示):
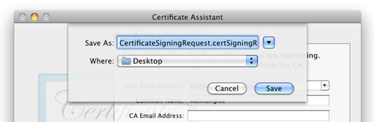
4. 使用默认文件名把证书请求进行保存(图3):在弹出窗口中,点击Done。
创建 App ID
每个使用 APNs 的 iOS 应用必须有一个唯一的 App ID。在本步骤中,你将学到如何创建推送通知中要用到的App ID。
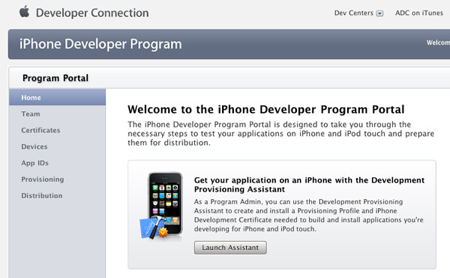
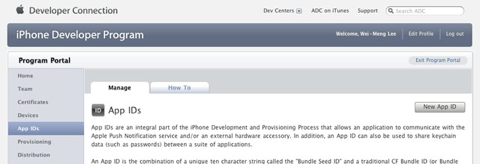
1. 登录iPhoneDeveloper Program:http://developer.apple.com/iphone/。点击页面右边的“ iPhone Developer Program Portal ”(图4):

2. 首先看到的是欢迎页面(图5):
3. 点击左边的“App ID”,然后点击右边的“New App ID”按钮(图6):
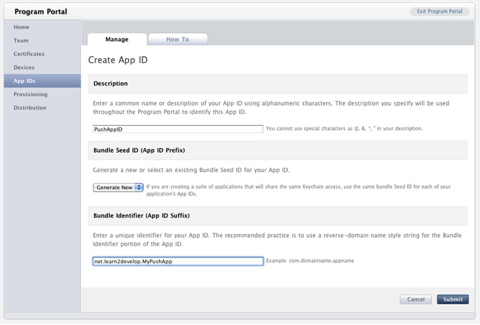
4. 在 Description 栏输入“PushAppID”,在“Bundle Seed ID”栏中选择“Generate New”。在“Bundle Identifier”栏,输入“net.learn2develop.MyPushApp”,然后点击“Submit”(图7):
5. 现在你应该能看到所创建的 App ID 了(图8):

配置 App
一旦创建了 App ID,你还要为推送通知对 App ID 进行一些配置。
1. 点击App ID 右边的 Configure 链接,会看到如下选项(图9):
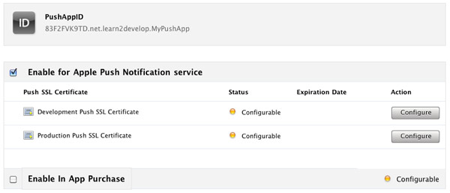
勾选“Enable for Apple Push Notificationservice”,点击“Development Push SSL Certificate”右边的“Configure”按钮。
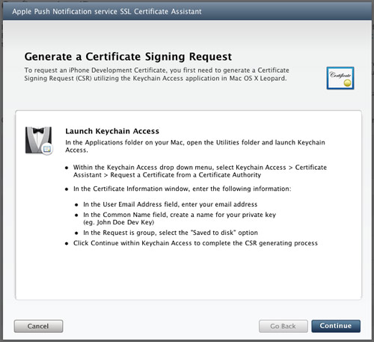
2. 接下来你会看到“Apple Push Notification service SSL Certificate Assistant”页面。点击Continue(图10):
3. 点击Choose File 按钮,选择前面保存的证书请求文件存放地址。点击 Generate(图11):

4. 你的SSL 证书会被生成。点击 Continue(图12):
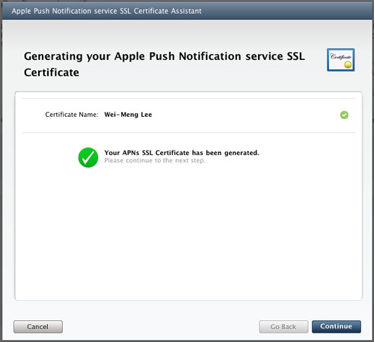
5. 点击Download Now 按钮,下载 SSL 证书。点击 Done(图13):

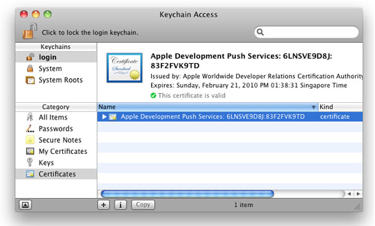
6. 下载的 SSL 证书文件名为 aps.developer.identity.cer。双击,将证书安装到钥匙串中(图14)。这个证书会在你的程序中用到,它允许程序接收 APNs 发送来的推送通知。
创建 Provisioning Profile
接下来,需要创建 provisioning profile 以便允许应用程序安装到真实设备上。
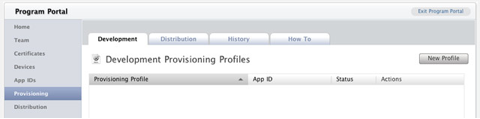
1. 回到iPhone Development Program Portal,点击 Provisioning 栏,点击 New Profile 按钮(图15):
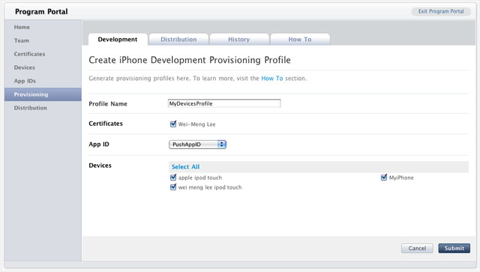
2. Profile Name 栏输入 MyDevicesProfile,在 App ID 栏选择 PushAppID。在Devices 栏,勾选所有你想激活的设备(在 iPhone Developer Program Portal 的 Devices 页中注册的所有设备)。点击 Submit(图16)。
3. provisioning profile 会等待审核。几秒钟后,它会显示在页面上。点击Download 按钮下载该 provisioning profile(图17):
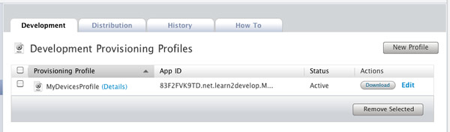
4. 下载下来的provisioning profile 名为 MydevicesProfile.mobileprovision。
激活设备
创建 provision profile 后,你可以将它安装到真实设备中。
1. 将iPhone 或 iPod 连接到 Mac。
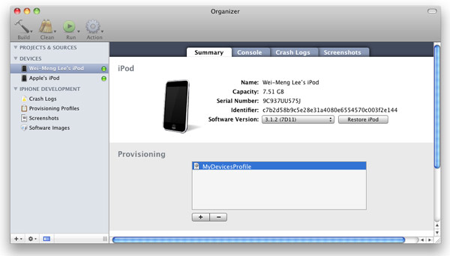
2. 把下载下来的 MyDevicesProfile.mobileprovision 文件拖到Dock 栏的 Xcode 图标上。
3. Xcode 的 Organizer 程序将启动,选择当前连机的设备。可以看到MyDevicesProfile 已自动安装到设备上了(图18)。
创建 iPhone 应用程序
1. 打开Xcode,创建 View-Based Application 项目,命名为 ApplePushNotification。
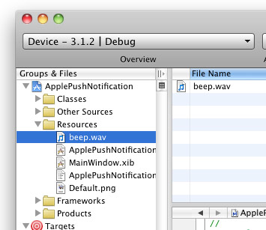
2. 把一个 WAV 文件(本例是 beep.wav)拖到Xcode 的 Resouces 文件夹(图19)。
3. 展开Xcode 中的 Targets 项目,选择ApplePushNotification,按下 ⌘+i,在 info 出口,点击Properties 标签栏(图20):
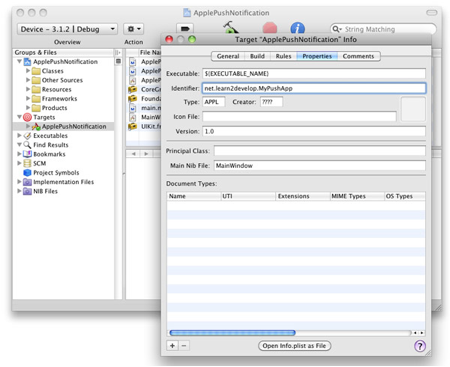
在 Identifier 文本框,输入net.learn2develop.MyPushApp.
4. 点击 Build 标签栏,在 search 输入框中键入Code Signing。在 Any iPhone OS Device 选项,选择正确的 profile(图21):

5. 在 ApplePushNotificationAppDelegate.m 文件中,输入以下代码(加粗部分):
#import "ApplePushNotificationAppDelegate.h"
#import "ApplePushNotificationViewController.h"
@implementation ApplePushNotificationAppDelegate
@synthesize window;
@synthesize viewController;
- (void)applicationDidFinishLaunching:(UIApplication*)application {
[window addSubview:viewController.view];
[window makeKeyAndVisible];
NSLog(@"Registeringfor push notifications...");
[[UIApplication sharedApplication]
registerForRemoteNotificationTypes:
(UIRemoteNotificationTypeAlert |
UIRemoteNotificationTypeBadge |
UIRemoteNotificationTypeSound)];
}
- (void)application:(UIApplication*)appdidRegisterForRemoteNotificationsWithDeviceToken:(NSData *)deviceToken {
stringWithFormat:@"Device Token=%@",deviceToken];
NSLog(str);
}
- (void)application:(UIApplication*)appdidFailToRegisterForRemoteNotificationsWithError:(NSError *)err {
NSString *str = [NSStringstringWithFormat: @"Error: %@", err];
NSLog(str);
}
- (void)application:(UIApplication*)application didReceiveRemoteNotification:(NSDictionary *)userInfo {
for (id key in userInfo) {
NSLog(@"key: %@, value: %@", key, [userInfo objectForKey:key]);
}
}
- (void)dealloc {
[viewController release];
[window release];
[super dealloc];
}
@end
6. 按下 ⌘+R 运行程序(在真实设备)。按下 shift+⌘+R 显示Debugger Console 窗口。查看设备输出到控制台的 device token(图22)。在下图,device token 是 38c866dd bb323b39 ffa73487 5e157ee5 a85e0b7c e90d56e9fe145bcc 6c2c594b。记下device token(复制、粘贴到一个文本文件里)

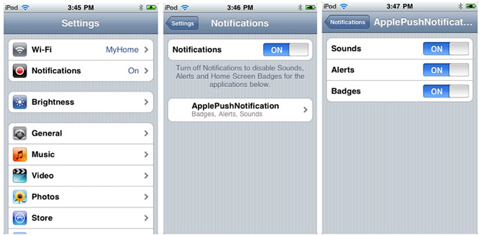
7. 如果查看 iPhone/iPod 上的“Settings”程序,你会发现一个 Notifications 的项(图23):
创建 Push Notification Provider
Push Notification Provider 是一个应用程序,用于通过 APNs 发送推送通知给 iPhone 应用。
通过 APNs 发送推送通知有几个步骤:
1. 使用前面创建的 SSL 证书与 APNs 通讯;
2. 构造所要发送的消息载体;
3. 发送载体到APNs;
APNs 是一个基于流的 TCP socket,你的 provider 以 SSL 协议与其通讯。推送通知(包括载体)是以二进制流的方式发送的。和APNs 建立连接后,你可以维持该连接并在连接中断之前发送多个通知。
技巧: 应避免每发送一次推送通知就建立、关闭一次连接。频繁的建立、关闭连接可能会被 APNs 认为是 DOS 攻击,从而拒绝发送 provider 的推送通知发送请求。
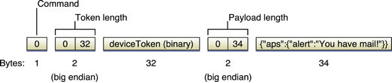
一个推送通知消息的格式如图24 所示:
更多细节,请参考 Apple Push Notification Service Programming Guide。
载体(payload)是 JSON 字符串(最长 256 字节),封装了你发送给 iOS 应用的信息。这是一个 payload 的例子:
{
"aps": {
"alert" : "Yougot a new message!" ,
"badge" : 5,
"sound" : "beep.wav"},
"acme1" : "bar",
"acme2" : 42
}
写provider之前,我们需要生成php Push Notification sender需要的证书文件:
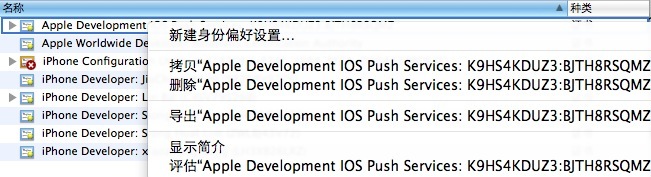
1)在Keychain Access.app里选定这个新证书(Apple Development Push Services*),导出到桌面,保存为Certificates.p12.

2)然后运行如下命令:
1. openssl pkcs12 -clcerts -nokeys -out cert.pem -in Certificates.p12
2. openssl pkcs12 -nocerts -out key.pem -in Certificates.p12
3. openssl rsa -in key.pem -out key.unencrypted.pem
4. cat cert.pem key.unencrypted.pem > ck.pem
下面是一个简单的push notification proivder写法:
<?php

$deviceToken = '38c866dd bb323b39 ffa73487 5e157ee5 a85e0b7ce90d56e9 fe145bcc 6c2c594b'; // masked for security reason
// Passphrase for the private key (ck.pem file)
// $pass = '';
// Get the parameters from http get or from command line
$message = $_GET['message'] or $message = $argv[1] or $message = 'Message received from javacom';
$badge = (int)$_GET['badge'] or $badge = (int)$argv[2];
$sound = $_GET['sound'] or $sound = $argv[3];
// Construct the notification payload
$body = array();
$body['aps'] = array('alert' => $message);
if ($badge)
$body['aps']['badge'] = $badge;
if ($sound)
$body['aps']['sound'] = $sound;

/* End of Configurable Items */
$ctx = stream_context_create();
stream_context_set_option($ctx, 'ssl', 'local_cert', 'ck.pem');
// assume the private key passphase was removed.
// stream_context_set_option($ctx, 'ssl', 'passphrase', $pass);
$fp = stream_socket_client('ssl://gateway.sandbox.push.apple.com:2195', $err, $errstr, 60, STREAM_CLIENT_CONNECT, $ctx);
if (!$fp) {
print "Failed to connect $err $errstrn";
return;
}
else {
print "Connection OKn";
}
$payload = json_encode($body);
$msg = chr(0) . pack("n",32) . pack('H*', str_replace(' ', '', $deviceToken)) . pack("n",strlen($payload)) . $payload;
print "sending message :" . $payload . "n";
fwrite($fp, $msg);
fclose($fp);
?>运行结果:Connection OKnsending message :{"aps":{"alert":"Message received from javacom"}}n
效果图在下面。
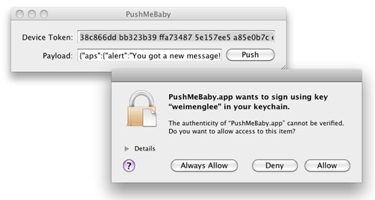
为了省去自己编写 push notification provider 的麻烦,你也可以使用 Stefan Hafeneger 写的一个 Mac OS X 应用程序:PushMeBaby,下载地址
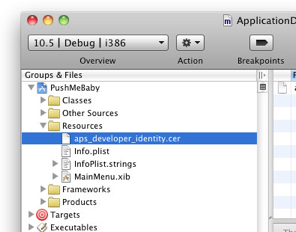
1. 在Xcode 中打开 PushMeBaby。
2. 右击 Resouces 文件夹,选择 Add Existing Files…,选择前面所下载到的aps.developer.identity.cer 文件(图25)。
3. 在 ApplicationDelegate.m 文件中,修改如下代码(加粗部分):
- (id)init {
self = [super init];
if(self != nil) {
self.deviceToken = @"38c866dd bb323b39 ffa73487 5e157ee5 a85e0b7ce90d56e9 fe145bcc 6c2c594b";
self.payload = @"{\"aps\":{\"alert\":\"Yougot a new message!\",\"badge\":5,\"sound\":\"beep.wav\"},\"acme1\":\"bar\",\"acme2\":42}";
self.certificate = [[NSBundle mainBundle]
pathForResource:@"aps_developer_identity" ofType:@"cer"];
}
return self;
}
4. 按下 ⌘+R,运行程序。将会问你是否允许使用证书,点击Always Allow(总是允许)(图26):
在 iPhone/iPod,确认 ApplePushNotification 程序未运行。点击 Push 按钮,会向设备发送一条推送通知。服务器实际上发送了下列消息给APN 服务器:
{
"aps": {
"alert" : "Yougot a new message!" ,
"badge" : 5,
"sound" : "beep.wav"},
"acme1" : "bar",
"acme2" : 42
}
5. 如果消息推送成功,将会在 iPhone/iPod 上出现下图(图27):

6. 如果现在按下 ⌘+R 调试 ApplePushNotification 程序,然后从 PushMeBaby 中发送一条消息,控制台会显示如下输出:
2009-11-24 21:11:49.182 ApplePushNotification[1461:207]key: acme1, value: bar
2009-11-24 21:11:49.187 ApplePushNotification[1461:207]key: aps, value: {
alert = "You got a new message!";
badge = 5;
sound = "beep.wav";
}
2009-11-24 21:11:49.191 ApplePushNotification[1461:207]key: acme2, value: 42
几个注意的问题:
1.如果申请ssl 证书时不是用的新的apple id,而是原来已经存在的,那么设置好之后要把对应的provisioning profile
也更新一下, 然后去下载新的profile替换掉老的,不然运行会有错。
2.如果你用的是企业版的开发者证书,别人可能没有权限去申请这个ssl 证书,当你替他申请好证书后,应该把证书和证书对
的私钥一起发给他,这样他在本地安装私钥时才会有对应的密钥。
3.当push notification到达时,程序状态不同,效果也是不一样的,一般来说程序可以分为下面三种状态:
1)程序不在运行(后台和前台都不在运行)
这时候如果push notification到了,会弹出一个alertview,当你点击action按钮时,会启动程序,并执行程序delegate.m文件里的
- (BOOL)application:(UIApplication *)application didFinishLaunchingWithOptions:(NSDictionary *)launchOptions
    //看是否有push notification到达,并做相应处理,这个方法和local notification相同,但注意key要对应就行
    UILocalNotification * remoteNotification = [launchOptions objectForKey:UIApplicationLaunchOptionsRemoteNotificationKey];
    if (remoteNotification) {
        //弹出一个alertview,显示相应信息
        UIAlertView * al = [[UIAlertView alloc]initWithTitle:@"receive remote notification!" message:@"hello" delegate:self cancelButtonTitle:@"Ok" otherButtonTitles:nil, nil];
        [al show];
        [al release];
    }
2)程序在运行(不论是在前台还是后台)
当push notification到达时,如果程序在前台运行并不会弹出alertview,而是直接执行下面方法:
/**
 * Remote Notification Received while application was open.
 */
- (void)application:(UIApplication *)application didReceiveRemoteNotification:(NSDictionary *)userInfo {

UIAlertView * al = [[UIAlertView alloc]initWithTitle:@"receive remote notification!" message:@"hey" delegate:self cancelButtonTitle:@"ok" otherButtonTitles:nil, nil];
    [al show];
    [al release];
}
在这个方法里你可以获取到userInfo字典来进行相应处理。
如果程序是在后台运行,则会弹出一个alertview,当你点击action按钮,也会执行上面一样的方法。
所以如果你想要程序在push notification到达时,针对前台和后台运行做区分处理,你可以在上面方法里先做一个状态的
判断:
	//可以根据application状态来判断,程序当前是在前台还是后台
	UIApplicationState state = [application applicationState];
	if (state == UIApplicationStateInactive) {

		// Application was in the background when notification
		// was delivered.
	}
原文链接:http://blog.csdn.net/kmyhy/article/details/6688370


 5429
5429

 被折叠的 条评论
为什么被折叠?
被折叠的 条评论
为什么被折叠?
 到【灌水乐园】发言


