


Glide是一个高效、开源、 Android设备上的媒体管理框架,它遵循BSD、MIT以及Apache 2.0协议发布。Glide具有获取、解码和展示视频剧照、图片、动画等功能,它还有灵活的API,这些API使开发者能够将Glide应用在几乎任何网络协议栈里。创建Glide的主要目的有两个,一个是实现平滑的图片列表滚动效果,另一个是支持远程图片的获取、大小调整和展示。近日,Glide 3.0发布,现已提供jar包下载,同时还支持使用Gradle以及Maven进行构建。该版本包括很多值得关注的新功能,如支持Gif 动画和视频剧照解码、智能的暂停和重新开始请求、支持缩略图等,具体新增功能如下如下:GIF动画的解码:通过调用Glide.with(context).load(“图片路径“)方法,GIF动画图片可以自动显示为动画效果。如果想有更多的控制,还可以使用Glide.with(context).load(“图片路径“).asBitmap()方法加载静态图片,使用Glide.with(context).load(“图片路径“).asGif()方法加载动画图片
1.本地视频剧照的解码:通过调用Glide.with(context).load(“图片路径“)方法,Glide能够支持Android设备中的所有视频剧照的加载和展示
2.缩略图的支持:为了减少在同一个view组件里同时加载多张图片的时间,可以调用Glide.with(context).load(“图片路径“).thumbnail(“缩略比例“).into(“view组件“)方法加载一个缩略图,还可以控制thumbnail()中的参数的大小,以控制显示不同比例大小的缩略图
3.Activity生命周期的集成:当Activity暂停和重启时,Glide能够做到智能的暂停和重新开始请求,并且当Android设备的连接状态变化时,所有失败的请求能够自动重新请求4.转码的支持:Glide的toBytes() 和transcode() 两个方法可以用来获取、解码和变换背景图片,并且transcode() 方法还能够改变图片的样式
5.动画的支持:新增支持图片的淡入淡出动画效果(调用crossFade()方法)和查看动画的属性的功能
6.OkHttp和Volley的支持:默认选择HttpUrlConnection作为网络协议栈,还可以选择OkHttp和Volley作为网络协议
7.其他功能:如在图片加载过程中,使用Drawables对象作为占位符、图片请求的优化、图片的宽度和高度可重新设定、缩略图和原图的缓存等功能
Glide.class
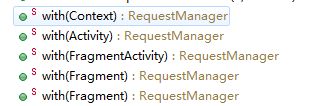
利用这个方法可以获得一个RequestManager对象.
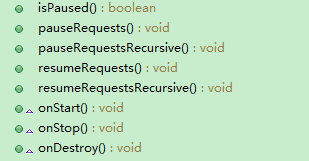
RequestManager.class
这个类主要是用来处理低内存的时候的处理;管理请求,比如请求的开始,暂停,结束;还有通过加载方法获得一个DrawableTypeRequest对象。
低内存处理方法:

管理请求的方法:与activity或者fragment的生命周期同步。
加载的方法:
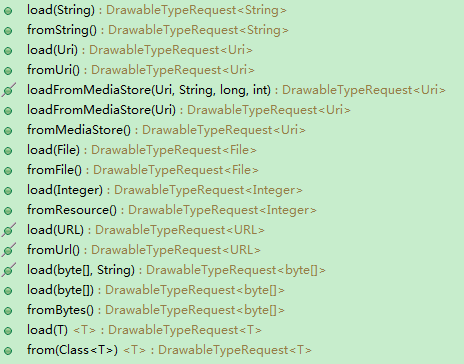
load方法都是设置了一个泛型,最后都调用了:
DrawableRequestBuilder.class
- @Override
- public DrawableRequestBuilder<ModelType> load(ModelType model) {
- super.load(model);
- return this;
- }
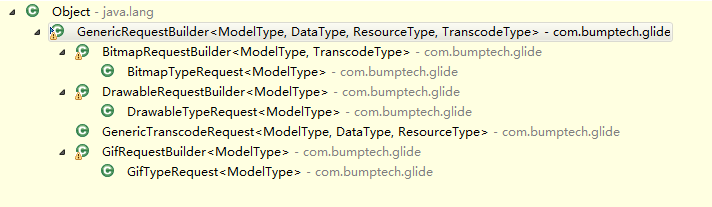
GenericRequestBuilder.class
- public GenericRequestBuilder<ModelType, DataType, ResourceType, TranscodeType> load(ModelType model) {
- this.model = model;
- isModelSet = true;
- return this;
- }
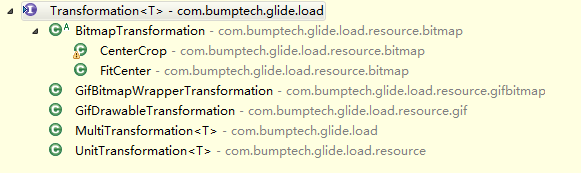
由GenericRequestBuilder得四种泛型参数可以看出, 这个类提供了加载各种资源的方法,是各种资源请求构建类的父类:

通过以上方法来加载缩略图。


第一个是对原数据的解码。
第二个是对磁盘缓存的数据进行解码。
第三个是对请求的数据进行编码,然后存到缓存里,之后从缓存中拿出的时候要通过解码。

设置磁盘缓存的内容,DiskCacheStrategy类是个枚举类,他提供了四个参数:
- /** Caches with both {@link #SOURCE} and {@link #RESULT}. */
- ALL(true, true),
- /** Saves no data to cache. */
- NONE(false, false),
- /** Saves just the original data to cache. */
- SOURCE(true, false),
- /** Saves the media item after all transformations to cache. */
- RESULT(false, true);
none:不作任何磁盘缓存
source:缓存源资源
result:缓存转换后的资源
- priority(Priority priority)
- transform(Transformation<ResourceType>... transformations)
对于加载一般的图片到Imageview中,默认提供了CenterCrop和FitCenter两种实现。
- dontTransform()
- transcoder(ResourceTranscoder<ResourceType, TranscodeType> transcoder)

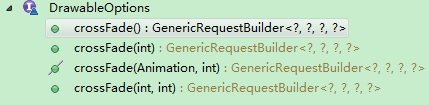
设置资源加载完成后的动画,不包括从内存缓存中获取。
- dontAnimate()
- placeholder(int resourceId)
- placeholder(Drawable drawable)
- error(int resourceId)
- error(Drawable drawable)
- listener(RequestListener<? super ModelType, TranscodeType> requestListener)
这个监听接口中有两个回调方法:

- skipMemoryCache(boolean skip)
- override(int width, int height)
- signature(Key signature)
- load(ModelType model)

通过上面的方法开启加载,中间的方法直接加载到view上,前后的方法用于预加载。

预加载,真正调用的是上面的两个into方法。
接着看子类DrawableRequestBuilder里面特有的方法:
DrawableRequestBuilder类不仅继承了父类GenericRequestBuilder里面的方法,还显示了BitmapOptions和DrawableOptions两个接口:

一个是控制bitmap的显示的位置或者大小(就是bitmap的转换),一个是控制图片显示出来时候的动画效果(不包括从内存中获取的图片资源)。接着看这些方法的具体实现:
- public DrawableRequestBuilder<ModelType> centerCrop() {
- return transform(glide.getDrawableCenterCrop());
- }
- public DrawableRequestBuilder<ModelType> fitCenter() {
- return transform(glide.getDrawableFitCenter());
- }
- public final DrawableRequestBuilder<ModelType> crossFade() {
- super.animate(new DrawableCrossFadeFactory<GlideDrawable>());
- return this;
- }
而设置淡入淡出效果其实是设置了默认动画实现的DrawableCrossFadeFactory类到父类animationFactory属性中。
- public <Y extends Target<TranscodeType>> Y into(Y target) {
- Util.assertMainThread();
- if (target == null) {
- throw new IllegalArgumentException("You must pass in a non null Target");
- }
- if (!isModelSet) {
- throw new IllegalArgumentException("You must first set a model (try #load())");
- }
- Request previous = target.getRequest();
- if (previous != null) {
- previous.clear();
- requestTracker.removeRequest(previous);
- previous.recycle();
- }
- Request request = buildRequest(target);
- target.setRequest(request);
- lifecycle.addListener(target);
- requestTracker.runRequest(request);
- return target;
- }
- @Override
- public void begin() {
- startTime = LogTime.getLogTime();
- if (model == null) {
- onException(null);
- return;
- }
- status = Status.WAITING_FOR_SIZE;
- if (Util.isValidDimensions(overrideWidth, overrideHeight)) {
- onSizeReady(overrideWidth, overrideHeight);
- } else {
- target.getSize(this);
- }
- if (!isComplete() && !isFailed() && canNotifyStatusChanged()) {
- target.onLoadStarted(getPlaceholderDrawable());
- }
- if (Log.isLoggable(TAG, Log.VERBOSE)) {
- logV("finished run method in " + LogTime.getElapsedMillis(startTime));
- }
- }
- public void onSizeReady(int width, int height) {
- if (Log.isLoggable(TAG, Log.VERBOSE)) {
- logV("Got onSizeReady in " + LogTime.getElapsedMillis(startTime));
- }
- if (status != Status.WAITING_FOR_SIZE) {
- return;
- }
- status = Status.RUNNING;
- width = Math.round(sizeMultiplier * width);
- height = Math.round(sizeMultiplier * height);
- ModelLoader<A, T> modelLoader = loadProvider.getModelLoader();
- final DataFetcher<T> dataFetcher = modelLoader.getResourceFetcher(model, width, height);
- if (dataFetcher == null) {
- onException(new Exception("Got null fetcher from model loader"));
- return;
- }
- ResourceTranscoder<Z, R> transcoder = loadProvider.getTranscoder();
- if (Log.isLoggable(TAG, Log.VERBOSE)) {
- logV("finished setup for calling load in " + LogTime.getElapsedMillis(startTime));
- }
- loadedFromMemoryCache = true;
- loadStatus = engine.load(signature, width, height, dataFetcher, loadProvider, transformation, transcoder,
- priority, isMemoryCacheable, diskCacheStrategy, this);
- loadedFromMemoryCache = resource != null;
- if (Log.isLoggable(TAG, Log.VERBOSE)) {
- logV("finished onSizeReady in " + LogTime.getElapsedMillis(startTime));
- }
- }
- public <T, Z, R> LoadStatus load(Key signature, int width, int height, DataFetcher<T> fetcher,
- DataLoadProvider<T, Z> loadProvider, Transformation<Z> transformation, ResourceTranscoder<Z, R> transcoder,
- Priority priority, boolean isMemoryCacheable, DiskCacheStrategy diskCacheStrategy, ResourceCallback cb) {
- Util.assertMainThread();
- long startTime = LogTime.getLogTime();
- final String id = fetcher.getId();
- EngineKey key = keyFactory.buildKey(id, signature, width, height, loadProvider.getCacheDecoder(),
- loadProvider.getSourceDecoder(), transformation, loadProvider.getEncoder(),
- transcoder, loadProvider.getSourceEncoder());
- EngineResource<?> cached = loadFromCache(key, isMemoryCacheable);
- if (cached != null) {
- cb.onResourceReady(cached);
- if (Log.isLoggable(TAG, Log.VERBOSE)) {
- logWithTimeAndKey("Loaded resource from cache", startTime, key);
- }
- return null;
- }
- EngineResource<?> active = loadFromActiveResources(key, isMemoryCacheable);
- if (active != null) {
- cb.onResourceReady(active);
- if (Log.isLoggable(TAG, Log.VERBOSE)) {
- logWithTimeAndKey("Loaded resource from active resources", startTime, key);
- }
- return null;
- }
- EngineJob current = jobs.get(key);
- if (current != null) {
- current.addCallback(cb);
- if (Log.isLoggable(TAG, Log.VERBOSE)) {
- logWithTimeAndKey("Added to existing load", startTime, key);
- }
- return new LoadStatus(cb, current);
- }
- EngineJob engineJob = engineJobFactory.build(key, isMemoryCacheable);
- DecodeJob<T, Z, R> decodeJob = new DecodeJob<T, Z, R>(key, width, height, fetcher, loadProvider, transformation,
- transcoder, diskCacheProvider, diskCacheStrategy, priority);
- EngineRunnable runnable = new EngineRunnable(engineJob, decodeJob, priority);
- jobs.put(key, engineJob);
- engineJob.addCallback(cb);
- engineJob.start(runnable);
- if (Log.isLoggable(TAG, Log.VERBOSE)) {
- logWithTimeAndKey("Started new load", startTime, key);
- }
- return new LoadStatus(cb, engineJob);
- }
- public void run() {
- if (isCancelled) {
- return;
- }
- Exception exception = null;
- Resource<?> resource = null;
- try {
- resource = decode();
- } catch (Exception e) {
- if (Log.isLoggable(TAG, Log.VERBOSE)) {
- Log.v(TAG, "Exception decoding", e);
- }
- exception = e;
- }
- if (isCancelled) {
- if (resource != null) {
- resource.recycle();
- }
- return;
- }
- if (resource == null) {
- onLoadFailed(exception);
- } else {
- onLoadComplete(resource);
- }
- }
- private Resource<?> decode() throws Exception {
- if (isDecodingFromCache()) {
- return decodeFromCache();
- } else {
- return decodeFromSource();
- }
- }
- private Resource<?> decodeFromCache() throws Exception {
- Resource<?> result = null;
- try {
- result = decodeJob.decodeResultFromCache();
- } catch (Exception e) {
- if (Log.isLoggable(TAG, Log.DEBUG)) {
- Log.d(TAG, "Exception decoding result from cache: " + e);
- }
- }
- if (result == null) {
- result = decodeJob.decodeSourceFromCache();
- }
- return result;
- }
- public Resource<Z> decodeResultFromCache() throws Exception {
- if (!diskCacheStrategy.cacheResult()) {
- return null;
- }
- long startTime = LogTime.getLogTime();
- Resource<T> transformed = loadFromCache(resultKey);
- if (Log.isLoggable(TAG, Log.VERBOSE)) {
- logWithTimeAndKey("Decoded transformed from cache", startTime);
- }
- startTime = LogTime.getLogTime();
- Resource<Z> result = transcode(transformed);
- if (Log.isLoggable(TAG, Log.VERBOSE)) {
- logWithTimeAndKey("Transcoded transformed from cache", startTime);
- }
- return result;
- }
第二个,decodeJob.decodeSourceFromCache(),如果设置缓存的是DiskCacheStrategy.SOURCE,那么磁盘缓存中缓存的是原始数据,所以就会调用该方法:
- public Resource<Z> decodeSourceFromCache() throws Exception {
- if (!diskCacheStrategy.cacheSource()) {
- return null;
- }
- long startTime = LogTime.getLogTime();
- Resource<T> decoded = loadFromCache(resultKey.getOriginalKey());
- if (Log.isLoggable(TAG, Log.VERBOSE)) {
- logWithTimeAndKey("Decoded source from cache", startTime);
- }
- return transformEncodeAndTranscode(decoded);
- }
- private Resource<Z> transformEncodeAndTranscode(Resource<T> decoded) {
- long startTime = LogTime.getLogTime();
- Resource<T> transformed = transform(decoded);
- if (Log.isLoggable(TAG, Log.VERBOSE)) {
- logWithTimeAndKey("Transformed resource from source", startTime);
- }
- writeTransformedToCache(transformed);
- startTime = LogTime.getLogTime();
- Resource<Z> result = transcode(transformed);
- if (Log.isLoggable(TAG, Log.VERBOSE)) {
- logWithTimeAndKey("Transcoded transformed from source", startTime);
- }
- return result;
- }
- private Resource<?> decodeFromSource() throws Exception {
- return decodeJob.decodeFromSource();
- }
- public Resource<Z> decodeFromSource() throws Exception {
- Resource<T> decoded = decodeSource();
- return transformEncodeAndTranscode(decoded);
- }
- private Resource<T> decodeSource() throws Exception {
- Resource<T> decoded = null;
- try {
- long startTime = LogTime.getLogTime();
- final A data = fetcher.loadData(priority);
- if (Log.isLoggable(TAG, Log.VERBOSE)) {
- logWithTimeAndKey("Fetched data", startTime);
- }
- if (isCancelled) {
- return null;
- }
- decoded = decodeFromSourceData(data);
- } finally {
- fetcher.cleanup();
- }
- return decoded;
- }
- private Resource<T> decodeFromSourceData(A data) throws IOException {
- final Resource<T> decoded;
- if (diskCacheStrategy.cacheSource()) {
- decoded = cacheAndDecodeSourceData(data);
- } else {
- long startTime = LogTime.getLogTime();
- decoded = loadProvider.getSourceDecoder().decode(data, width, height);
- if (Log.isLoggable(TAG, Log.VERBOSE)) {
- logWithTimeAndKey("Decoded from source", startTime);
- }
- }
- return decoded;
- }
- private Resource<T> cacheAndDecodeSourceData(A data) throws IOException {
- long startTime = LogTime.getLogTime();
- SourceWriter<A> writer = new SourceWriter<A>(loadProvider.getSourceEncoder(), data);
- diskCacheProvider.getDiskCache().put(resultKey.getOriginalKey(), writer);
- if (Log.isLoggable(TAG, Log.VERBOSE)) {
- logWithTimeAndKey("Wrote source to cache", startTime);
- }
- startTime = LogTime.getLogTime();
- Resource<T> result = loadFromCache(resultKey.getOriginalKey());
- if (Log.isLoggable(TAG, Log.VERBOSE) && result != null) {
- logWithTimeAndKey("Decoded source from cache", startTime);
- }
- return result;
- }
但是如果不需要保存源数据,就直接decode源数据:
- private Resource<T> decodeFromSourceData(A data) throws IOException {
- final Resource<T> decoded;
- if (diskCacheStrategy.cacheSource()) {
- decoded = cacheAndDecodeSourceData(data);
- } else {
- long startTime = LogTime.getLogTime();
- decoded = loadProvider.getSourceDecoder().decode(data, width, height);
- if (Log.isLoggable(TAG, Log.VERBOSE)) {
- logWithTimeAndKey("Decoded from source", startTime);
- }
- }
- return decoded;
- }
- private Resource<Z> transformEncodeAndTranscode(Resource<T> decoded) {
- long startTime = LogTime.getLogTime();
- Resource<T> transformed = transform(decoded);
- if (Log.isLoggable(TAG, Log.VERBOSE)) {
- logWithTimeAndKey("Transformed resource from source", startTime);
- }
- writeTransformedToCache(transformed);
- startTime = LogTime.getLogTime();
- Resource<Z> result = transcode(transformed);
- if (Log.isLoggable(TAG, Log.VERBOSE)) {
- logWithTimeAndKey("Transcoded transformed from source", startTime);
- }
- return result;
- }
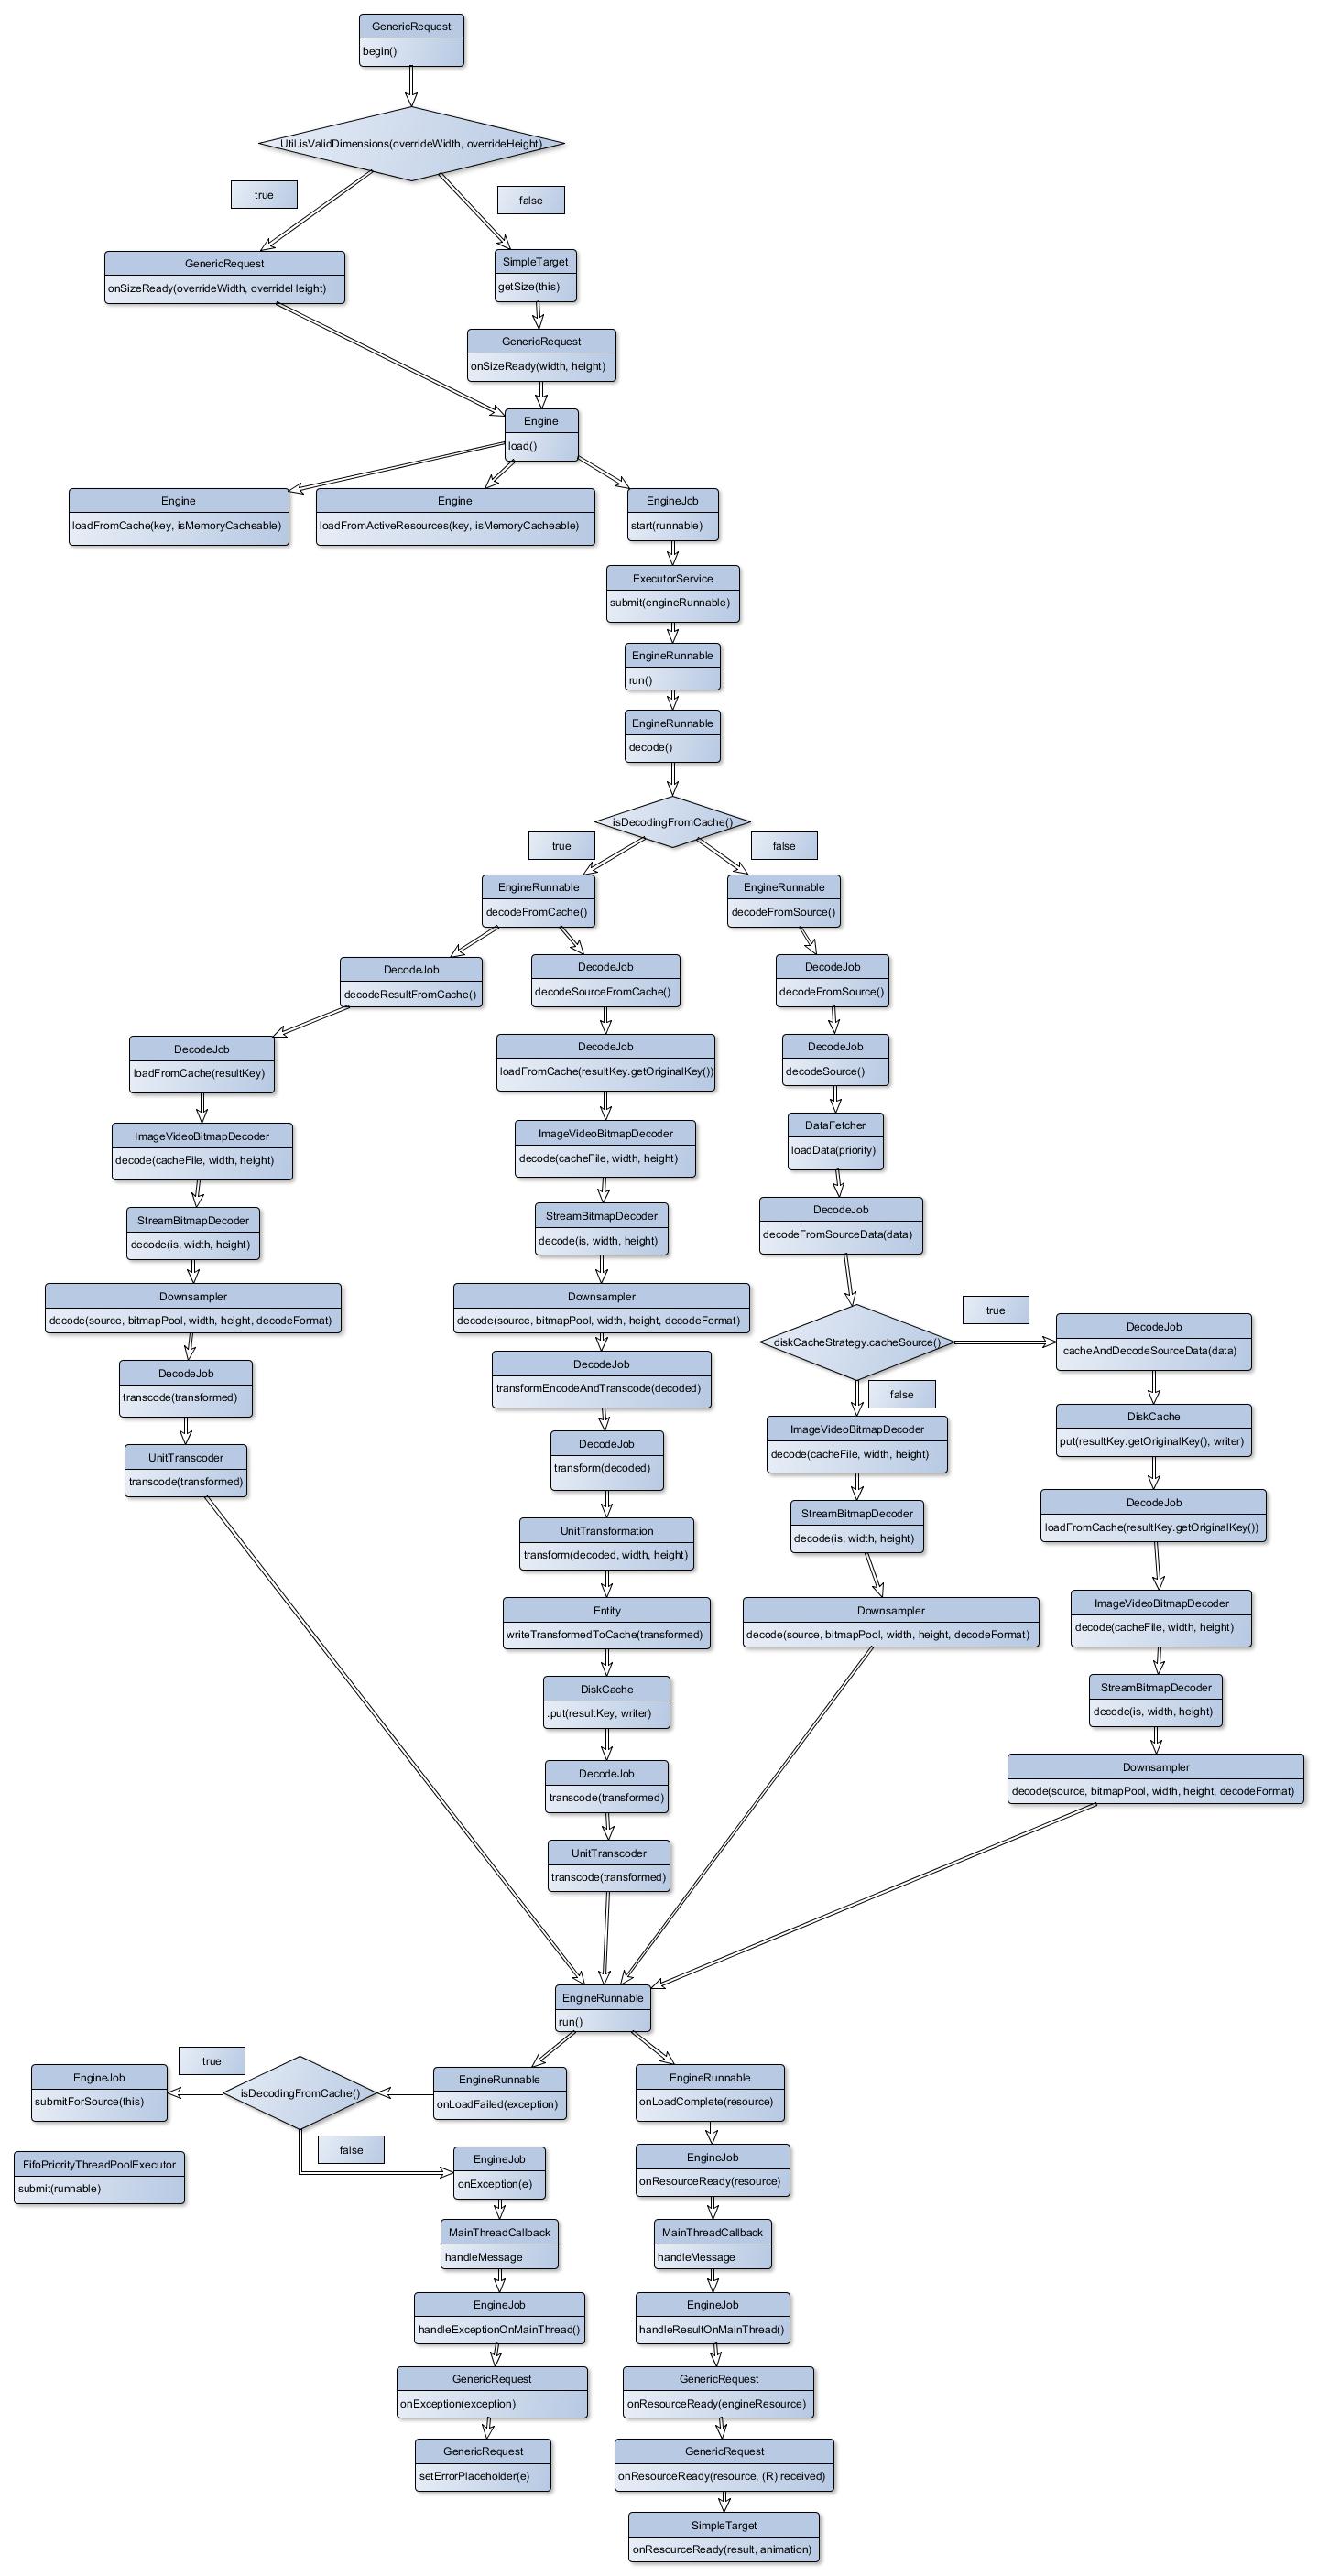
这里是将直接从源数据decode出来资源后,经过transform的转换,然后将transform后的资源存进磁盘缓存,然后在经过transcode方法来进行资源类型的转换(默认是使用UnitTranscoder,没有做任何操作)。还是提供逻辑图,一目了然吧:
使用方法:
1.设置的不是imageview,可以用SimpleTarget来接受,然后在回调里面设置view的现实(但是缺少目标view的设置,似乎在列表中会出现错乱)
- Glide.with(StaggeredGridViewDemo.this).load(mImages.get(arg0).getPic()).asBitmap().override(250, 250).into(new SimpleTarget<Bitmap>() {
- @Override
- public void onResourceReady(Bitmap arg0, GlideAnimation<? super Bitmap> arg1) {
- Log.i("llj", "arg0.getWidth()+arg0.getHeight()" + arg0.getWidth() + arg0.getHeight());
- holder.textView.setBackgroundDrawable(new BitmapDrawable(arg0));
- }
- });

也可以通过SimpleTarget的构造函数传参数:
- Glide.with(StaggeredGridViewDemo.this).load(mImages.get(arg0).getPic()).asBitmap().into(new SimpleTarget<Bitmap>(250, 250) {
- @Override
- public void onResourceReady(Bitmap arg0, GlideAnimation<? super Bitmap> arg1) {
- Log.i("llj", "arg0.getWidth()+arg0.getHeight()" + arg0.getWidth() + ";" + arg0.getHeight());
- // holder.textView.setBackgroundDrawable(new BitmapDrawable(arg0));
- }
- });
但是SimpleTarget的构造函数穿进去的参数也没有起作用:
2.设置预加载:(可以提前将资源加载到磁盘缓存中,默认的缓存目录是data\data下的250M空间,自己可以根据需求更改)
- final PreloadTarget<Bitmap> target = PreloadTarget.obtain(250, 250);
- Glide.with(StaggeredGridViewDemo.this).load(mImages.get(arg0).getPic()).asBitmap().listener(new RequestListener<String, Bitmap>() {
- @Override
- public boolean onException(Exception e, String model, Target<Bitmap> target, boolean isFirstResource) {
- return false;
- }
- @Override
- public boolean onResourceReady(Bitmap resource, String model, Target<Bitmap> target, boolean isFromMemoryCache, boolean isFirstResource) {
- Log.i("llj", "arg0.getWidth()+arg0.getHeight()" + resource.getWidth() + resource.getHeight());
- return false;
- }
- }).into(target);
- final PreloadTarget<Bitmap> target = PreloadTarget.obtain(0, 0);
- Glide.with(StaggeredGridViewDemo.this).load(mImages.get(arg0).getPic()).asBitmap().override(250, 250).listener(new RequestListener<String, Bitmap>() {
- @Override
- public boolean onException(Exception e, String model, Target<Bitmap> target, boolean isFirstResource) {
- return false;
- }
- @Override
- public boolean onResourceReady(Bitmap resource, String model, Target<Bitmap> target, boolean isFromMemoryCache, boolean isFirstResource) {
- Log.i("llj", "arg0.getWidth()+arg0.getHeight()" + resource.getWidth() + resource.getHeight());
- return false;
- }
- }).into(target);
3.加载到imageview上
- Glide.with(StaggeredGridViewDemo.this).load(mImages.get(arg0).getPic()).asBitmap().override(250, 250).listener(new RequestListener<String, Bitmap>() {
- @Override
- public boolean onException(Exception e, String model, Target<Bitmap> target, boolean isFirstResource) {
- return false;
- }
- @Override
- public boolean onResourceReady(Bitmap resource, String model, Target<Bitmap> target, boolean isFromMemoryCache, boolean isFirstResource) {
- Log.i("llj", "arg0.getWidth()+arg0.getHeight()" + resource.getWidth() + resource.getHeight());
- return false;
- }
- }).into(holder.imageview);

但是如果设置了centerCrop():
而用Picasso转换后的图片是250:250:
- Picasso.with(StaggeredGridViewDemo.this).load(mImages.get(arg0).getPic()).resize(250, 250).into(new com.squareup.picasso.Target() {
- @Override
- public void onPrepareLoad(Drawable arg0) {
- }
- @Override
- public void onBitmapLoaded(Bitmap arg0, LoadedFrom arg1) {
- Log.i("llj", "arg0.getWidth()+arg0.getHeight()" + arg0.getWidth() + ";" + arg0.getHeight());
- }
- @Override
- public void onBitmapFailed(Drawable arg0) {
- }
- });

说明两者的按比例缩放的方法不一样!
自定义缓存
好吧,既然是定制 Glide,我们就需要创建一个新的 Glide module。就如你在以前博客中看到的那样, applyOptions 方法使我们获取了 GlideBuilder 对象。该GlideBuilder 为我们提供了几个方法去定制 Glide 的缓存。首先,来看看内存缓存。
内存缓存是在设备的 RAM 中去维护图片的。这里没有 IO 行为,所以这个操作是很快的。另一方面是 RAM(内存) 的大小是非常有限的。寻找一个大内存缓存的平衡点(大量图像空间)与一个小内存缓存(最大限度减少我们 App 的资源消耗)并不容易。Glide 内部使用了 MemorySizeCalculator 类去决定内存缓存大小以及 bitmap 的缓存池。bitmap 池维护了你 App 的堆中的图像分配。正确的 bitmpa 池是非常必要的,因为它避免很多的图像重复回收,这样可以确保垃圾回收器的管理更加合理。
幸运的是,你已经得到了 Glide 的 MemorySizeCalculator 类以及默认的计算:
MemorySizeCalculator calculator = new MemorySizeCalculator(context);
int defaultMemoryCacheSize = calculator.getMemoryCacheSize();
int defaultBitmapPoolSize = calculator.getBitmapPoolSize();
上面这段代码相当有用,如果我们想要用默认值作为基准,然后调整它。比如,如果你认为你的 app 需要 20% 大的缓存作为 Glide 的默认值,用我们上面的变量去计算他们:
int customMemoryCacheSize = (int) (1.2 * defaultMemoryCacheSize);
int customBitmapPoolSize = (int) (1.2 * defaultBitmapPoolSize);
因为我们已经计算出了我们的内存缓存和 bitmap 池的大小,我们可以在我们的 Glide module 代码里去得到。在 applyOptions() 方法中,我们可以在GlideBuilder 对象中调用相应的方法。
public class CustomCachingGlideModule implements GlideModule {
    @Override public void applyOptions(Context context, GlideBuilder builder) {
        MemorySizeCalculator calculator = new MemorySizeCalculator(context);
        int defaultMemoryCacheSize = calculator.getMemoryCacheSize();
        int defaultBitmapPoolSize = calculator.getBitmapPoolSize();

        int customMemoryCacheSize = (int) (1.2 * defaultMemoryCacheSize);
        int customBitmapPoolSize = (int) (1.2 * defaultBitmapPoolSize);

        builder.setMemoryCache( new LruResourceCache( customMemoryCacheSize );
        builder.setBitmapPool( new LruBitmapPool( customBitmapPoolSize );
    }

    @Override public void registerComponents(Context context, Glide glide) {
        // nothing to do here
    }
}
正如你看到的,在 applyOptions() 方法的最后两行,我们不能直接设置大小。我们需要创建一个 LruResourceCache 和 LruBitmapPool 的实例。这两个都是 Glide 的默认实现。因此,如果你仅仅想要调整大小,就可以继续使用它们通过传两个不同的大小的值给构造函数。
自定义磁盘缓存
调整磁盘缓存和和刚才的很像,但是我们有一个更大的决定去做,磁盘缓存可以位于应用的私有目录(换句话说,除了它自己,没有别的应用可以访问)。否则,磁盘缓存也可以位于外部存储,公有目录(更多信息,请看 Storage Options )。不能一起设置这两个为之。Glide 为这两个选项都提供了它的实现:InternalCacheDiskCacheFactory 和 ExternalCacheDiskCacheFactory。就像内存缓存的构造函数一样,在它们的构造函数内都传一个磁盘缓存的工厂类:
public class CustomCachingGlideModule implements GlideModule {
    @Override
    public void applyOptions(Context context, GlideBuilder builder) {
        // set size & external vs. internal
        int cacheSize100MegaBytes = 104857600;

        builder.setDiskCache(
            new InternalCacheDiskCacheFactory(context, cacheSize100MegaBytes)
        );

        //builder.setDiskCache(
        //new ExternalCacheDiskCacheFactory(context, cacheSize100MegaBytes));
    }

    @Override
    public void registerComponents(Context context, Glide glide) {
        // nothing to do here
    }
}
上面的代码将设置磁盘缓存到应用的内部目录,并且设置了最大的大小为 100M。下面注释的那行代码会设置磁盘缓存到外部存储(也设置了最大大小为 100M)。
这两个选项都不让你选一个特点的目录。如果你要让磁盘缓存到指定的目录,你要使用 DiskLruCacheFactory :
// or any other path
String downloadDirectoryPath = Environment.getDownloadCacheDirectory().getPath();

builder.setDiskCache(
        new DiskLruCacheFactory( downloadDirectoryPath, cacheSize100MegaBytes )
);

// In case you want to specify a cache sub folder (i.e. "glidecache"):
//builder.setDiskCache(
//    new DiskLruCacheFactory( downloadDirectoryPath, "glidecache", cacheSize100MegaBytes )
//);


 561
561


 被折叠的 条评论
为什么被折叠?
被折叠的 条评论
为什么被折叠?
 到【灌水乐园】发言


