


知道Volley的使用方法,但是我们要知其然还要知其所以然,所以来看看源码究竟是怎么样实现的,下面是Volley的工作流程图
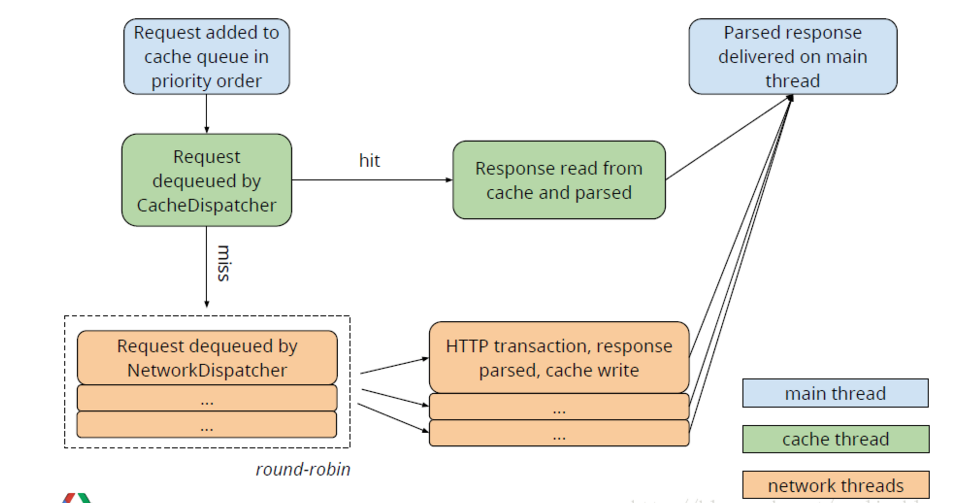
首先可以看到蓝色代表主线程,绿色代表缓存线程,橙色代表网络线程。从左上角开始看,首先是把请求按顺序加入到缓存队列中,然后把它从缓存线程移出,如果这时有相应的缓存结果就取出缓存交给主线程处理;如果没有缓存那么就交由网络线程,发出HTTP请求获得相应结果写入缓存,最后也是把结果给主线程处理,这样就结束了。如果现在还不是很清楚,那么看完这篇文章你再看看这个图就很清楚了!!
Volley中的一些类的介绍
Request:表示一个请求的抽象类。StringRequest、JsonRequest、ImageRequest 都是它的子类,表示某种类型的请求。
RequestQueue:表示请求队列,里面包含一个CacheDispatcher(用于处理走缓存请求的调度线程)、NetworkDispatcher数组(用于处理走网络请求的调度线程),一个ResponseDelivery(返回结果分发接口),通过 start() 函数启动时会启动CacheDispatcher和NetworkDispatchers。
CacheDispatcher:一个线程,用于调度处理走缓存的请求。启动后会不断从缓存请求队列中取请求处理,队列为空则等待,请求处理结束则将结果传递给ResponseDelivery去执行后续处理。当结果未缓存过、缓存失效或缓存需要刷新的情况下,该请求都需要重新进入NetworkDispatcher去调度处理。
NetworkDispatcher:一个线程,用于调度处理走网络的请求。启动后会不断从网络请求队列中取请求处理,队列为空则等待,请求处理结束则将结果传递给ResponseDelivery去执行后续处理,并判断结果是否要进行缓存。
ResponseDelivery:返回结果分发接口,目前只有基于ExecutorDelivery的在入参 handler 对应线程内进行分发。
HttpStack:处理 Http 请求,返回请求结果。目前 Volley 中有基于 HttpURLConnection 的HurlStack和 基于 Apache HttpClient 的HttpClientStack。
Network:调用HttpStack处理请求,并将结果转换为可被ResponseDelivery处理的NetworkResponse。
Cache:缓存请求结果,Volley 默认使用的是基于 sdcard 的DiskBasedCache。NetworkDispatcher得到请求结果后判断是否需要存储在 Cache,CacheDispatcher会从 Cache 中取缓存结果。
Volley的使用是从Volley.newRequestQueue(this)开始的,所以首先看看这个函数
public static RequestQueue newRequestQueue(Context context) {
        return newRequestQueue(context, null);
    }
 public static RequestQueue newRequestQueue(Context context, HttpStack stack)
    {
    	return newRequestQueue(context, stack, -1);
    }
public static RequestQueue newRequestQueue(Context context, HttpStack stack, int maxDiskCacheBytes) {
        File cacheDir = new File(context.getCacheDir(), DEFAULT_CACHE_DIR);

        String userAgent = "volley/0";
        try {
            String packageName = context.getPackageName();
            PackageInfo info = context.getPackageManager().getPackageInfo(packageName, 0);
            userAgent = packageName + "/" + info.versionCode;
        } catch (NameNotFoundException e) {
        }

        if (stack == null) {
            if (Build.VERSION.SDK_INT >= 9) {
                stack = new HurlStack();
            } else {
                // Prior to Gingerbread, HttpUrlConnection was unreliable.
                // See: http://android-developers.blogspot.com/2011/09/androids-http-clients.html
                stack = new HttpClientStack(AndroidHttpClient.newInstance(userAgent));
            }
        }

        Network network = new BasicNetwork(stack);

        RequestQueue queue;
        if (maxDiskCacheBytes <= -1)
        {
        	// No maximum size specified
        	queue = new RequestQueue(new DiskBasedCache(cacheDir), network);
        }
        else
        {
        	// Disk cache size specified
        	queue = new RequestQueue(new DiskBasedCache(cacheDir, maxDiskCacheBytes), network);
        }

        queue.start();

        return queue;
}在12行如果传入的HttpStack为null就判断手机版本号,如果大于9使用HurlStack,否则使用HttpClientStack,在HurlStack内部就是使用HttpURLConnection进行通信,而HttpClientStack是使用HttpClient通信的,因为在在9以下的版本使用HttpClient更稳定少Bug,然而大于9使用HttpURLConnection更好了。
在22行把HttpStack传入Network,这是一个接口,BasicNetwork是它的实现,其中实现了performRequest方法,这个方法主要就是通过传入的HttpStack处理网络请求。
接着就开始创建RequestQueue,并且传入Network和缓存相关的类,RequestQueue前面说过就是一个请求队列。
最后及时调用RequestQueue的start方法。那么接着看start方法
 public void start() {
        stop();  // Make sure any currently running dispatchers are stopped.
        // Create the cache dispatcher and start it.
        mCacheDispatcher = new CacheDispatcher(mCacheQueue, mNetworkQueue, mCache, mDelivery);
        mCacheDispatcher.start();

        // Create network dispatchers (and corresponding threads) up to the pool size.
        for (int i = 0; i < mDispatchers.length; i++) {
            NetworkDispatcher networkDispatcher = new NetworkDispatcher(mNetworkQueue, mNetwork,
                    mCache, mDelivery);
            mDispatchers[i] = networkDispatcher;
            networkDispatcher.start();
        }
    }
这段代码主要就是CacheDispatcher调用它的start方法,然后一个for循环创建NetworkDispatcher,这里创建的个数就是传入的线程池的大小,默认是四个,所以这里创建了四个NetworkDispatcher,然后分别调用它们的start方法。CacheDispatcher和NetworkDispatcher在前面提过,前者是调度缓存请求的,后者是调度执行网络请求的。
所以总的来说这个newRequestQueue里面主要就做了几件事:初始化缓存对象、创建RequestQueue、创建缓存线程CacheDispatcher并开启、初始化用于网络请求的HttpStack、创建四个网络线程NetworkDispatcher并开启!
在获得了RequestQueue之后,我们就开始调用add方法向里面添加Request
public <T> Request<T> add(Request<T> request) {
        // Tag the request as belonging to this queue and add it to the set of current requests.
        request.setRequestQueue(this);
        synchronized (mCurrentRequests) {
            mCurrentRequests.add(request);
        }

        // Process requests in the order they are added.
        request.setSequence(getSequenceNumber());
        request.addMarker("add-to-queue");

        // If the request is uncacheable, skip the cache queue and go straight to the network.
        if (!request.shouldCache()) {
            mNetworkQueue.add(request);
            return request;
        }

        // Insert request into stage if there's already a request with the same cache key in flight.
        synchronized (mWaitingRequests) {
            String cacheKey = request.getCacheKey();
            if (mWaitingRequests.containsKey(cacheKey)) {
                // There is already a request in flight. Queue up.
                Queue<Request<?>> stagedRequests = mWaitingRequests.get(cacheKey);
                if (stagedRequests == null) {
                    stagedRequests = new LinkedList<Request<?>>();
                }
                stagedRequests.add(request);
                mWaitingRequests.put(cacheKey, stagedRequests);
                if (VolleyLog.DEBUG) {
                    VolleyLog.v("Request for cacheKey=%s is in flight, putting on hold.", cacheKey);
                }
            } else {
                // Insert 'null' queue for this cacheKey, indicating there is now a request in
                // flight.
                mWaitingRequests.put(cacheKey, null);
                mCacheQueue.add(request);
            }
            return request;
        }
}在十三行判断当前的请求是否可以缓存,如果不能缓存 mNetworkQueue.add(request)直接添加到网络请求队列中,返回;否则执行下面的同步代码块。可以调用Request的setShouldCache(false)方法来改变这一默认行为,下面继续执行的就是一些缓存操作,最后添加到缓存队列中后,在后台默默等待的缓存线程就可以执行了,下面就继续看CacheDispatcher
public class CacheDispatcher extends Thread {

    private static final boolean DEBUG = VolleyLog.DEBUG;

    /** The queue of requests coming in for triage. */
    private final BlockingQueue<Request<?>> mCacheQueue;

    /** The queue of requests going out to the network. */
    private final BlockingQueue<Request<?>> mNetworkQueue;

    /** The cache to read from. */
    private final Cache mCache;

    /** For posting responses. */
    private final ResponseDelivery mDelivery;

    /** Used for telling us to die. */
    private volatile boolean mQuit = false;

    /**
     * Creates a new cache triage dispatcher thread.  You must call {@link #start()}
     * in order to begin processing.
     *
     * @param cacheQueue Queue of incoming requests for triage
     * @param networkQueue Queue to post requests that require network to
     * @param cache Cache interface to use for resolution
     * @param delivery Delivery interface to use for posting responses
     */
    public CacheDispatcher(
            BlockingQueue<Request<?>> cacheQueue, BlockingQueue<Request<?>> networkQueue,
            Cache cache, ResponseDelivery delivery) {
        mCacheQueue = cacheQueue;
        mNetworkQueue = networkQueue;
        mCache = cache;
        mDelivery = delivery;
    }

    /**
     * Forces this dispatcher to quit immediately.  If any requests are still in
     * the queue, they are not guaranteed to be processed.
     */
    public void quit() {
        mQuit = true;
        interrupt();
    }

    @Override
    public void run() {
        if (DEBUG) VolleyLog.v("start new dispatcher");
        Process.setThreadPriority(Process.THREAD_PRIORITY_BACKGROUND);

        // Make a blocking call to initialize the cache.
        mCache.initialize();

        Request<?> request;
        while (true) {
            // release previous request object to avoid leaking request object when mQueue is drained.
            request = null;
            try {
                // Take a request from the queue.
                request = mCacheQueue.take();
            } catch (InterruptedException e) {
                // We may have been interrupted because it was time to quit.
                if (mQuit) {
                    return;
                }
                continue;
            }
            try {
                request.addMarker("cache-queue-take");

                // If the request has been canceled, don't bother dispatching it.
                if (request.isCanceled()) {
                    request.finish("cache-discard-canceled");
                    continue;
                }

                // Attempt to retrieve this item from cache.
                Cache.Entry entry = mCache.get(request.getCacheKey());
                if (entry == null) {
                    request.addMarker("cache-miss");
                    // Cache miss; send off to the network dispatcher.
                    mNetworkQueue.put(request);
                    continue;
                }

                // If it is completely expired, just send it to the network.
                if (entry.isExpired()) {
                    request.addMarker("cache-hit-expired");
                    request.setCacheEntry(entry);
                    mNetworkQueue.put(request);
                    continue;
                }

                // We have a cache hit; parse its data for delivery back to the request.
                request.addMarker("cache-hit");
                Response<?> response = request.parseNetworkResponse(
                        new NetworkResponse(entry.data, entry.responseHeaders));
                request.addMarker("cache-hit-parsed");

                if (!entry.refreshNeeded()) {
                    // Completely unexpired cache hit. Just deliver the response.
                    mDelivery.postResponse(request, response);
                } else {
                    // Soft-expired cache hit. We can deliver the cached response,
                    // but we need to also send the request to the network for
                    // refreshing.
                    request.addMarker("cache-hit-refresh-needed");
                    request.setCacheEntry(entry);

                    // Mark the response as intermediate.
                    response.intermediate = true;

                    // Post the intermediate response back to the user and have
                    // the delivery then forward the request along to the network.
                    final Request<?> finalRequest = request;
                    mDelivery.postResponse(request, response, new Runnable() {
                        @Override
                        public void run() {
                            try {
                                mNetworkQueue.put(finalRequest);
                            } catch (InterruptedException e) {
                                // Not much we can do about this.
                            }
                        }
                    });
                }
            } catch (Exception e) {
                VolleyLog.e(e, "Unhandled exception %s", e.toString());
            }
        }
    }
}
首先是设置了线程的优先级,然后初始化缓存,接着就进入了while死循环,保证着这个线程一直运行。
第61行从阻塞队列中取出Request,如果没有就阻塞,mQuit是退出的标志。
第73行判断是否取消了Request,取消了就结束continue
第79行尝试从缓存中取出相应结果,接着就继续判断这个相应结果,如果是null或者是过期了的那么就把这个Request加入到网络线程,否则的话就认为不需要重新获取直接使用这个相应的缓存结果就好了。
第91行就调用 request.parseNetworkResponse来解析响应的结果,再把解析的结果进行回调。
Request的parseNetworkResponse这个方法是个抽象方法,是不是很熟悉,在上一篇博客中说要自定义Request就需要实现这个方法,所以这个方法都是需要子类来实现的。
当获取了解析后的响应结果就调用mDelivery.postResponse(request, response)分发出去。ResponseDelivery的子类的是ExecutorDelivery,这个类是在构造RequestQueue的时候实例化的,RequestQueue(Cache cache, Network network, int threadPoolSize,ResponseDelivery delivery),看看ExecutorDelivery里面postResponse是怎么实现的
 @Override
    public void postResponse(Request<?> request, Response<?> response, Runnable runnable) {
        request.markDelivered();
        request.addMarker("post-response");
        mResponsePoster.execute(new ResponseDeliveryRunnable(request, response, runnable));
    }
public void run() {
            // If this request has canceled, finish it and don't deliver.
            if (mRequest.isCanceled()) {
                mRequest.finish("canceled-at-delivery");
                return;
            }

            // Deliver a normal response or error, depending.
            if (mResponse.isSuccess()) {
                mRequest.deliverResponse(mResponse.result);
            } else {
                mRequest.deliverError(mResponse.error);
            }

            // If this is an intermediate response, add a marker, otherwise we're done
            // and the request can be finished.
            if (mResponse.intermediate) {
                mRequest.addMarker("intermediate-response");
            } else {
                mRequest.finish("done");
            }

            // If we have been provided a post-delivery runnable, run it.
            if (mRunnable != null) {
                mRunnable.run();
            }
       }
public void run() {
        Process.setThreadPriority(Process.THREAD_PRIORITY_BACKGROUND);
        Request<?> request;
        while (true) {
            long startTimeMs = SystemClock.elapsedRealtime();
            // release previous request object to avoid leaking request object when mQueue is drained.
            request = null;
            try {
                // Take a request from the queue.
                request = mQueue.take();
            } catch (InterruptedException e) {
                // We may have been interrupted because it was time to quit.
                if (mQuit) {
                    return;
                }
                continue;
            }

            try {
                request.addMarker("network-queue-take");

                // If the request was cancelled already, do not perform the
                // network request.
                if (request.isCanceled()) {
                    request.finish("network-discard-cancelled");
                    continue;
                }

                addTrafficStatsTag(request);

                // Perform the network request.
                NetworkResponse networkResponse = mNetwork.performRequest(request);
                request.addMarker("network-http-complete");

                // If the server returned 304 AND we delivered a response already,
                // we're done -- don't deliver a second identical response.
                if (networkResponse.notModified && request.hasHadResponseDelivered()) {
                    request.finish("not-modified");
                    continue;
                }

                // Parse the response here on the worker thread.
                Response<?> response = request.parseNetworkResponse(networkResponse);
                request.addMarker("network-parse-complete");

                // Write to cache if applicable.
                // TODO: Only update cache metadata instead of entire record for 304s.
                if (request.shouldCache() && response.cacheEntry != null) {
                    mCache.put(request.getCacheKey(), response.cacheEntry);
                    request.addMarker("network-cache-written");
                }

                // Post the response back.
                request.markDelivered();
                mDelivery.postResponse(request, response);
            } catch (VolleyError volleyError) {
                volleyError.setNetworkTimeMs(SystemClock.elapsedRealtime() - startTimeMs);
                parseAndDeliverNetworkError(request, volleyError);
            } catch (Exception e) {
                VolleyLog.e(e, "Unhandled exception %s", e.toString());
                VolleyError volleyError = new VolleyError(e);
                volleyError.setNetworkTimeMs(SystemClock.elapsedRealtime() - startTimeMs);
                mDelivery.postError(request, volleyError);
            }
        }
}在32行调用mNetwork.performRequest(request)来获取响应的结果,这里的mNetwork是在创建RequestQueue创建的,它的子类BasicNetwork来实现其中的performRequest方法,这个BasicNetwork就是根据传入的HttpStack来获取响应的结果,具体怎么实现就不说了,至此整个流程就完成了!
总结
这时再回头看看最初的流程图应该就很清楚了吧,在梳理一下
1.在创建RequestQueue时默认创建了一个缓存线程CacheDispatcher和默认四个网络线程NetworkDispatcher,并且创建了用于请求网络的HttpStack、BasicNetwork
2.CacheDispatcher是缓存线程,会不断从缓存队列中取出Request,没有就阻塞,取出之后如果需要会网络获取数据那么直接把Request扔给NetworkDispatcher,如果不需要就从缓存中去数据,最后回调结果
3.NetworkDispatcher是网络线程,真正处理网络请求的地方,可以指定多个,获取到数据后如果需要缓存则缓存,然后回调
4.ResponseDelivery用于分发结果,它的实现类是ExecutorDelivery,最终会触发我们知道的Listener。
5.当创建Request,通过add方法添加到RequestQueue里面后,之前的CacheDispatcher就可以获取到Request,开始执行起来。


 1931
1931

 被折叠的 条评论
为什么被折叠?
被折叠的 条评论
为什么被折叠?
 到【灌水乐园】发言


