


最近在研究iPhone内置的一些传感器的使用。
这句话本来在底部的,还是穿插到头部好了,方便找类似API的朋友们第一时间看到:
光线(光线感应器)和温度(温度感应器)的API接口 估计是私有API。因为,我谷歌、百度都没找到关于这方面的相关代码,咨询老师他也说十有八九是私有的。
以上是个人结论,不代表官方说法,如有误请评论补充,若认同可继续看得出结论的根据:
根据一:自己下了个电子书app,上面有调亮度功能,测试了一下,实际上控制的是它自己app的背景亮度,并不是iPhone上的屏幕亮度。
根据二:iPhone上手机管家之类的工具有看到电池温度,查看了一下开发文档没找到相关属性,通过与老师的探讨,得出那个是:假数据 的结论。
Ps:以上均属于个人结论,不代表真实官方说法。
如果有兴趣的朋友可以深入研究,并指出文章不足之出,我将及时纠正错误。
想看电池状态获取的相关内容详见下一篇,本篇重点是传感器。
关于部分传感器的使用正式开始,具体内容如下:
一、距离传感器。
大概解释一下距离传感器的功能:它会根据你和iphone间距离不同做出不同的响应。
//打开距离传感器
[UIDevice currentDevice].proximityMonitoringEnabled = YES;
//监听距离传感器状态变化通知
[[NSNotificationCenter defaultCenter] addObserver:self selector:@selector(sensorStateChange:)name:UIDeviceProximityStateDidChangeNotification object:nil];
//传感器距离状态变化后调用的方法
-(void)sensorStateChange:(NSNotificationCenter *)notification;
{
    if ([[UIDevice currentDevice] proximityState] == YES) {
        NSLog(@"屏幕黑屏");
        //在此写接近时,要做的操作逻辑代码

    }else{
        NSLog(@"屏幕打开");
    }
}
运行,将手靠近感应器与离开时的结果:

二、加速计(UIAccelerometer/CoreMotion),也称为重力感应。
UIAccelerometer虽然已经停止更新,但是目前还是有一定数量的应用中使用到了该技术。
下面也就再继续使用UIAccelerometer进行编写了:
@interface ViewController ()<UIAccelerometerDelegate>
@property (strong, nonatomic) UILabel *graView;
@property (assign, nonatomic) UIAccelerationValue speedX;
@property (assign, nonatomic) UIAccelerationValue speedY;
@end
//创建并设置接收加速度通知的时间间隔:1.0/60.0 表示一秒接收60次。次数越多,灵敏度越高。
UIAccelerometer *accelerometer = [UIAccelerometer sharedAccelerometer];
accelerometer.updateInterval = 1.0/60.0;
//添加代理,开启加速度传感器。若代理设置为空,关闭加速传感器(不用的时候记得关闭)
accelerometer.delegate = self;
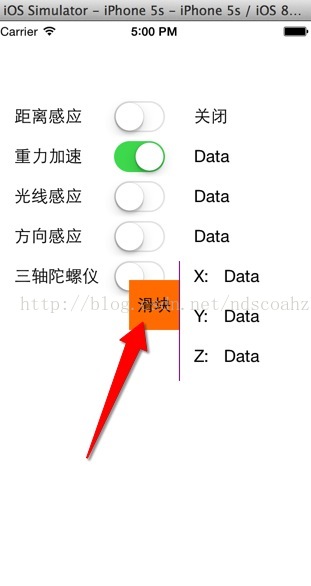
//创建小滑块
_graView = [[UILabel alloc]initWithFrame:CGRectMake(0, 0, 50, 50)];
_graView.center = self.view.center;
_graView.backgroundColor = [UIColor orangeColor];
_graView.text = @"滑块";
_graView.textAlignment = NSTextAlignmentCenter;
[self.view addSubview:_graView];
//代理方法
- (void)accelerometer:(UIAccelerometer *)accelerometer didAccelerate:(UIAcceleration *)acceleration
{
//x、y轴方向的速度加上对应轴方向获得的加速度
_speedX += acceleration.x;
_speedY += acceleration.y;
/**
* 小方块将要移动到的xy轴坐标.
* 若posX < 0.0 的时候,posX != 0.0,允许反弹,小方块会一直弹跳
* 若posX < 10.0时,posX = 10.0,关闭反弹,小方块不会沿着反方向滑动,除非达到一定的加速度
*/
CGFloat posX = _graView.center.x + _speedX;
CGFloat posY = _graView.center.y - _speedY;
//碰撞检测
if (posX < 0.0) {
posX = 0.0;
//碰到屏幕左边以0.4倍的速度反弹
_speedX *= -0.4;
}else if(posX > self.view.bounds.size.width){
posX = self.view.bounds.size.width;
//碰到屏幕右边以0.4倍的速度反弹
_speedX *= -0.4;
}
if (posY < 0.0) {
posY = 0.0;
//碰到屏幕上边不反弹
_speedY = 0.0;
}else if (posY > self.view.bounds.size.height){
posY = self.view.bounds.size.height;
//碰到屏幕下边以0.8倍的速度反弹
_speedY *= -0.8;
}
//移动小方块
_graView.center = CGPointMake(posX, posY);
}
三、三轴陀螺仪
声明一个CMMotionManager属性,可用来获取三轴坐标与加速计。
@property (strong, nonatomic) CMMotionManager *motionManager;self.motionManager = [[CMMotionManager alloc] init];NSOperationQueue *queue = [[NSOperationQueue alloc] init];用自己创建的label接收三轴坐标信息:
//陀螺仪
if (motionManager.gyroAvailable) {
motionManager.gyroUpdateInterval = 1.0/10.0;//更新频率
//后台线程 开始更新
[motionManager startGyroUpdatesToQueue:queue withHandler:^(CMGyroData *gyroData,NSError *error){
NSString *labelText;
if (error) {
[motionManager stopGyroUpdates];
labelText = [NSString stringWithFormat:@"错误: %@",error];
}else{
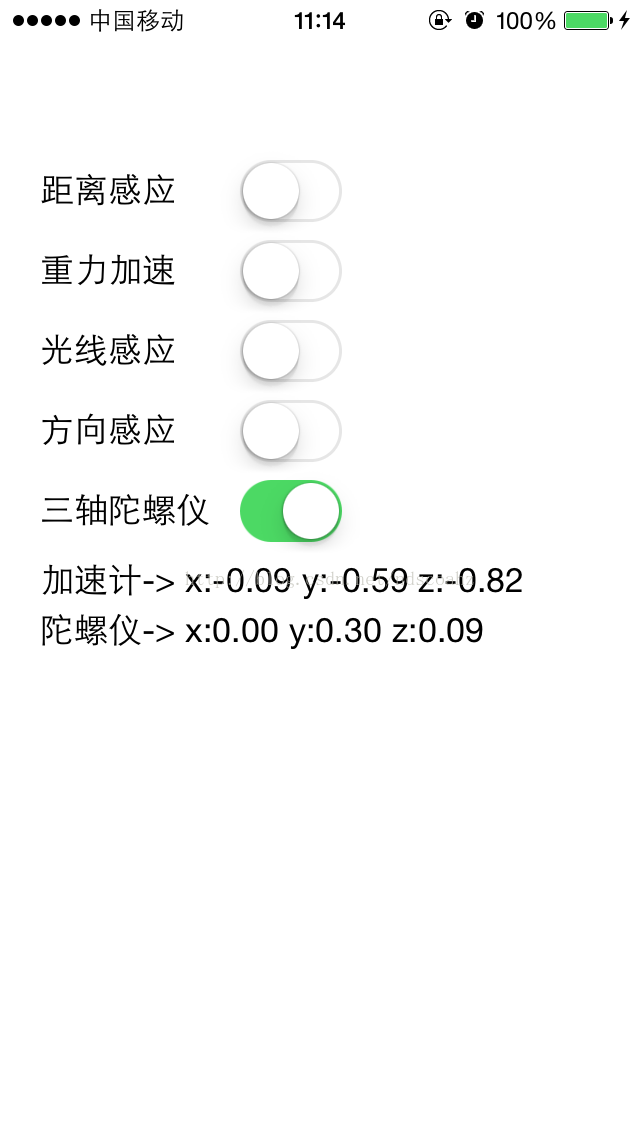
labelText = [NSString stringWithFormat:@"陀螺仪-> x:%.2f y:%.2f z:%.2f",gyroData.rotationRate.x,gyroData.rotationRate.y,gyroData.rotationRate.z];
}
[_gyroscopeLabel performSelectorOnMainThread:@selector(setText:) withObject:labelText waitUntilDone:NO];
}];
}else{
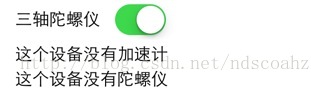
_gyroscopeLabel.text = @"这个设备没有陀螺仪";
}
刚才说过,也可用来获取加速计(重力感应)
Ps:_accelerometerLabel也是自己另外创建的label,用来接收加速计信息。大家自己另外创建即可。
        //加速计。这也算是重力感应的另一种实现方法
        if (motionManager.accelerometerAvailable) {
            motionManager.accelerometerUpdateInterval = 1.0/10.0;//更新频率
            //后台线程 开始更新
            [motionManager startAccelerometerUpdatesToQueue:queue withHandler:^(CMAccelerometerData *accelerometerData,NSError *error){
                NSString *labelText;
                if (error) {
                    [motionManager stopAccelerometerUpdates];
                    labelText = [NSString stringWithFormat:@"错误: %@",error];
                }else{
                    labelText = [NSString stringWithFormat:@"加速计-> x:%.2f y:%.2f z:%.2f",accelerometerData.acceleration.x,accelerometerData.acceleration.y,accelerometerData.acceleration.z];
                }
                [_accelerometerLabel performSelectorOnMainThread:@selector(setText:) withObject:labelText waitUntilDone:NO];
            }];
        }else{
            _accelerometerLabel.text = @"这个设备没有加速计";
        }
虚拟器运行结果:
真机测试结果:
磁力计的数据也是基于CMMotionManager获取到得。关于CMMotionManager的创建跟三轴陀螺仪一样:
Ps:_directionLabel自己创建的label。
CMMotionManager *motionManager = [[CMMotionManager alloc] init]; NSOperationQueue *queue = [[NSOperationQueue alloc] init];
if (motionManager.magnetometerAvailable) {
motionManager.magnetometerUpdateInterval = 1/10.0;//更新频率
//后台线程 开始更新
[motionManager startMagnetometerUpdatesToQueue:queue withHandler:^(CMMagnetometerData *magnetometerData, NSError *error) {
NSString *labelText;
if (error) {
[motionManager stopMagnetometerUpdates];
labelText = [NSString stringWithFormat:@"错误: %@",error];
}else{
labelText = [NSString stringWithFormat:@"磁力计-> x:%.2f y:%.2f z:%.2f",magnetometerData.magneticField.x,magnetometerData.magneticField.y,magnetometerData.magneticField.z];
}
[_directionLabel performSelectorOnMainThread:@selector(setText:) withObject:labelText waitUntilDone:NO];
}];
}else{
NSLog(@"设备没有磁力计");
}


 8917
8917


 被折叠的 条评论
为什么被折叠?
被折叠的 条评论
为什么被折叠?
 到【灌水乐园】发言


