


参考文档:http://hadoop.apache.org/common/docs/current/single_node_setup.html
环境:WinXP+cygwin+hadoop-0.20.2
解压hadoop到E:\hadoop-0.20.2,配置文件
conf/hadoop-env.sh:
# The java implementation to use.  Required.
export JAVA_HOME=/cygdrive/e/Java/jdk1.6.0_29conf/core-site.xml:
<configuration>
     <property>
         <name>fs.default.name</name>
         <value>hdfs://localhost:9000</value>
     </property>
</configuration>conf/hdfs-site.xml:
<configuration>
     <property>
         <name>dfs.replication</name>
         <value>1</value>
     </property>
</configuration>conf/mapred-site.xml:
<configuration>
     <property>
         <name>mapred.job.tracker</name>
         <value>localhost:9001</value>
     </property>
</configuration>
Setup passphraseless ssh
在cygwin控制台,输入ssh-host-config,一路yes,提示CYGWIN值时,输入netsec。
在windows系统服务中启动Cygwin sshd服务。
Now check that you can ssh to the localhost without a passphrase:
$ ssh localhost
If you cannot ssh to localhost without a passphrase, execute the following commands:
$ ssh-keygen -t dsa -P '' -f ~/.ssh/id_dsa
$ cat ~/.ssh/id_dsa.pub >> ~/.ssh/authorized_keys
Execution
Format a new distributed-filesystem:
$ bin/hadoop namenode -format
Start the hadoop daemons:
$ bin/start-all.sh
The hadoop daemon log output is written to the ${HADOOP_LOG_DIR} directory (defaults to${HADOOP_HOME}/logs).
Browse the web interface for the NameNode and the JobTracker; by default they are available at:
- NameNode - http://localhost:50070/
- JobTracker - http://localhost:50030/
Copy the input files into the distributed filesystem:
$ bin/hadoop fs -put conf input
Run some of the examples provided:
$ bin/hadoop jar hadoop-examples-*.jar grep input output 'dfs[a-z.]+'
Examine the output files:
Copy the output files from the distributed filesystem to the local filesytem and examine them:
$ bin/hadoop fs -get output output
$ cat output/*
or
View the output files on the distributed filesystem:
$ bin/hadoop fs -cat output/*
When you're done, stop the daemons with:
$ bin/stop-all.sh
按照文档执行到$ bin/hadoop jar hadoop-examples-*.jar grep input output 'dfs[a-z.]+',会出现错误
11/11/29 13:01:32 INFO mapred.JobClient: Task Id : attempt_201111291300_0001_m_000014_0, Status : FAILED
java.io.FileNotFoundException: File E:/tmp/hadoop-SYSTEM/mapred/local/taskTracker/jobcache/job_201111291300_0001/attempt_201111291300_0001_m_000014_0/work/tmp does not exist.
        at org.apache.hadoop.fs.RawLocalFileSystem.getFileStatus(RawLocalFileSystem.java:361)
        at org.apache.hadoop.fs.FilterFileSystem.getFileStatus(FilterFileSystem.java:245)
        at org.apache.hadoop.mapred.TaskRunner.setupWorkDir(TaskRunner.java:519)
        at org.apache.hadoop.mapred.Child.main(Child.java:155)
     <property>
         <name>mapred.child.tmp</name>
         <value>/hadoop-0.20.2/tmp</value>
     </property>
-------------------------------
如果最开始在core-site.xml中修改了默认tmp文件夹位置,如
     <property>
         <name>hadoop.tmp.dir</name>
         <value>/hadoop-0.20.2/tmp</value>
</property>程序会一直卡在一行死循环,停滞不前……

2011-11-29 13:54:56,515 INFO org.apache.hadoop.mapred.TaskTracker: attempt_201111291353_0001_r_000000_0 0.30769235% reduce > copy (12 of 13 at 0.00 MB/s) >
2011-11-29 13:54:59,515 INFO org.apache.hadoop.mapred.TaskTracker: attempt_201111291353_0001_r_000000_0 0.30769235% reduce > copy (12 of 13 at 0.00 MB/s) >
2011-11-29 13:55:05,515 INFO org.apache.hadoop.mapred.TaskTracker: attempt_201111291353_0001_r_000000_0 0.30769235% reduce > copy (12 of 13 at 0.00 MB/s) >
解决方法:猜测是hadoop.tmp.dir和mapred.child.tmp同文件夹导致的问题,将mapred.child.tmp的值修改为/hadoop-0.20.2/tasktmp,问题得到解决。
eclipse中配置使用Hadoop(转)
参考链接:Hadoop学习全程记录——在Eclipse中运行第一个MapReduce程序
1.复制 hadoop安装目录/contrib/eclipse-plugin/hadoop-0.20.2-eclipse-plugin.jar 到 eclipse安装目录/plugins/ 下。
2.重启eclipse,配置hadoop installation directory。
如果安装插件成功,打开Window-->Preferens,你会发现Hadoop Map/Reduce选项,在这个选项里你需要配置Hadoop installation directory。配置完成后退出。
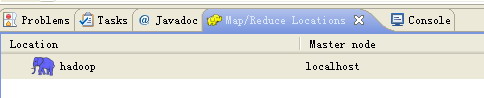
3.配置Map/Reduce Locations。
在Window-->Show View中打开Map/Reduce Locations。
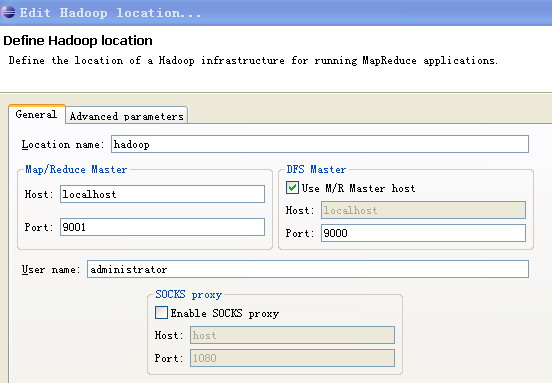
在Map/Reduce Locations中新建一个Hadoop Location。在这个View中,右键-->New Hadoop Location。在弹出的对话框中你需要配置Location name,如myubuntu,还有Map/Reduce Master和DFS Master。这里面的Host、Port分别为mapred-site.xml、core-site.xml中配置的地址及端口。
4.新建项目。
File-->New-->Other-->Map/Reduce Project
项目名可以随便取,如hadoop-test。
复制 hadoop安装目录/src/example/org/apache/hadoop/example/WordCount.java到刚才新建的项目下面。
5.上传模拟数据文件夹。
为了运行程序,我们需要一个输入的文件夹,和输出的文件夹。输出文件夹,在程序运行完成后会自动生成。我们需要给程序一个输入文件夹。
在当前目录(如hadoop安装目录)下新建文件夹input,并在文件夹下新建两个文件file01、file02,这两个文件内容分别如下:
file01:Hello World Bye World
file02:Hello Hadoop Goodbye Hadoop
6.运行项目。
a..在新建的项目hadoop-test,点击WordCount.java,右键-->Run As-->Run Configurations
b..在弹出的Run Configurations对话框中,点Java Application,右键-->New,这时会新建一个application名为WordCount
c..配置运行参数,点Arguments,在Program arguments中输入“你要传给程序的输入文件夹和你要求程序将计算结果保存的文件夹”,如
hdfs://localhost:9000/user/Administrator/input01 hdfs://localhost:9000/user/Administrator/output017.点击Run,运行程序。
8.等运行结束后,可以在终端中用命令bin/hadoop fs -cat output01/* 查看生成的文件内容。


 274
274

 被折叠的 条评论
为什么被折叠?
被折叠的 条评论
为什么被折叠?
 到【灌水乐园】发言


