


最近两个月断断续续的学习了Android,并编写了一个小软件,功能还在完善中,又要忙于毕业设计,只好抽空把Android学习过程中的一些知识记录下来,当做学习笔记。由于没有系统的学习Android,也许文章内某些内容或代码会略显幼稚甚至错误百出,请指正,望见谅。
先放上一个界面,目前主要实现了软件的功能,界面还很简陋。由于作品还在参加某个校园比赛,某些界面文字就直接删除掉了,望见谅。
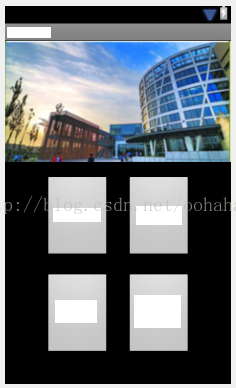
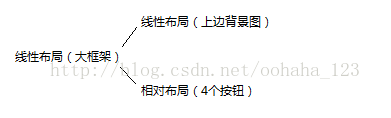
该界面的布局如下:
推荐一个Android 界面编辑工具DroidDraw,它实现了所见即所得的界面设计,可以直接进行拖拽操作。
下载地址:http://code.google.com/p/droiddraw/
下面主要介绍一下常见的布局:
关于布局介绍已经有很多人写博文介绍过了,我就找其中一篇贴上来好了,以下内容的原始出处:http://xys289187120.blog.51cto.com/3361352/656986
- <?xml version="1.0" encoding="utf-8"?>
- <LinearLayout xmlns:android="http://schemas.android.com/apk/res/android"
- android:layout_width="fill_parent"
- android:layout_height="fill_parent"
- android:orientation="vertical"
- >
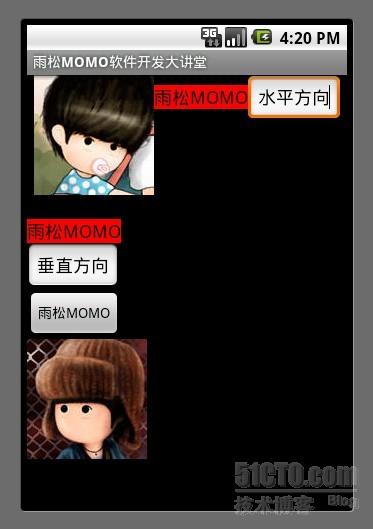
- <LinearLayout
- android:layout_width="fill_parent"
- android:layout_height="fill_parent"
- android:orientation="horizontal"
- android:gravity="center_horizontal"
- android:layout_weight="2"
- >
- <ImageView
- android:layout_width="wrap_content"
- android:layout_height="wrap_content"
- android:src="@drawable/jay"
- />
- <TextView
- android:layout_width="wrap_content"
- android:layout_height="wrap_content"
- android:text="雨松MOMO"
- android:background="#FF0000"
- android:textColor="#000000"
- android:textSize="18dip"
- />
- <EditText
- android:layout_width="wrap_content"
- android:layout_height="wrap_content"
- android:text="水平方向"
- />
- </LinearLayout>
- <LinearLayout
- android:layout_width="fill_parent"
- android:layout_height="fill_parent"
- android:orientation="vertical"
- android:layout_weight="1"
- >
- <TextView
- android:layout_width="wrap_content"
- android:layout_height="wrap_content"
- android:text="雨松MOMO"
- android:background="#FF0000"
- android:textColor="#000000"
- android:textSize="18dip"
- />
- <EditText
- android:layout_width="wrap_content"
- android:layout_height="wrap_content"
- android:text="垂直方向"
- />
- <Button
- android:layout_width="wrap_content"
- android:layout_height="wrap_content"
- android:text="雨松MOMO"
- />
- <ImageView
- android:layout_width="wrap_content"
- android:layout_height="wrap_content"
- android:src="@drawable/image"
- />
- </LinearLayout>
- </LinearLayout>
- <?xml version="1.0" encoding="utf-8"?>
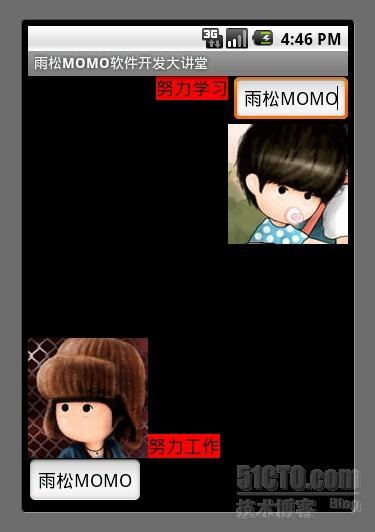
- <RelativeLayout xmlns:android="http://schemas.android.com/apk/res/android"
- android:layout_width="fill_parent"
- android:layout_height="fill_parent"
- >
- <EditText
- android:id="@+id/re_edit_0"
- android:layout_width="wrap_content"
- android:layout_height="wrap_content"
- android:text="雨松MOMO"
- android:layout_alignParentRight="true"
- />
- <ImageView
- android:id="@+id/re_iamge_0"
- android:layout_width="wrap_content"
- android:layout_height="wrap_content"
- android:src="@drawable/jay"
- android:layout_below="@id/re_edit_0"
- android:layout_alignParentRight="true"
- />
- <TextView
- android:layout_width="wrap_content"
- android:layout_height="wrap_content"
- android:background="#FF0000"
- android:text="努力学习"
- android:textColor="#000000"
- android:textSize="18dip"
- android:layout_toLeftOf="@id/re_iamge_0"
- />
- <EditText
- android:id="@+id/re_edit_1"
- android:layout_width="wrap_content"
- android:layout_height="wrap_content"
- android:text="雨松MOMO"
- android:layout_alignParentBottom="true"
- />
- <ImageView
- android:id="@+id/re_iamge_1"
- android:layout_width="wrap_content"
- android:layout_height="wrap_content"
- android:src="@drawable/image"
- android:layout_above="@id/re_edit_1"
- />
- <TextView
- android:layout_width="wrap_content"
- android:layout_height="wrap_content"
- android:background="#FF0000"
- android:text="努力工作"
- android:textColor="#000000"
- android:textSize="18dip"
- android:layout_toRightOf="@id/re_iamge_1"
- android:layout_above="@id/re_edit_1"
- />
- </RelativeLayout>
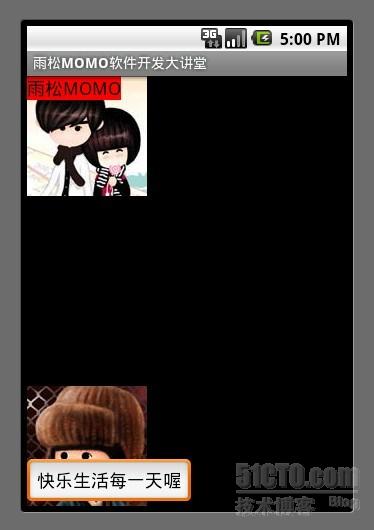
- <FrameLayout
- xmlns:android="http://schemas.android.com/apk/res/android"
- android:layout_width="fill_parent"
- android:layout_height="fill_parent">
- <ImageView
- android:layout_width="wrap_content"
- android:layout_height="wrap_content"
- android:src="@drawable/g"
- />
- <TextView
- android:layout_width="wrap_content"
- android:layout_height="wrap_content"
- android:text="雨松MOMO"
- android:background="#FF0000"
- android:textColor="#000000"
- android:textSize="18dip"
- />
- <ImageView
- android:layout_width="wrap_content"
- android:layout_height="wrap_content"
- android:src="@drawable/image"
- android:layout_gravity="bottom"
- />
- <EditText
- android:layout_width="wrap_content"
- android:layout_height="wrap_content"
- android:text="快乐生活每一天喔"
- android:layout_gravity="bottom"
- />
- </FrameLayout>
4.绝对布局(AbsoluteLayout)
使用绝对布局可以设置任意控件的 在屏幕中 X Y 坐标点,和帧布局一样后绘制的控件会覆盖住之前绘制的控件,笔者不建议大家使用绝对布局还是那句话因为android的手机分辨率五花八门所以使用绝对布局的话在其它分辨率的手机上就无法正常的显示了。
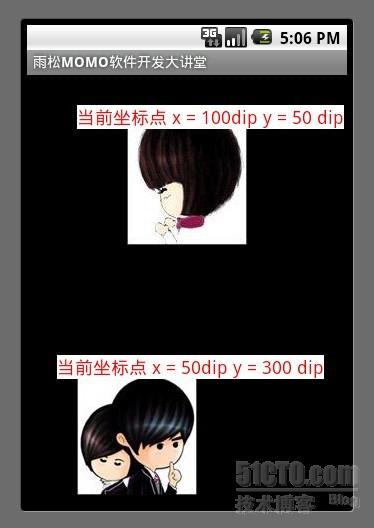
设置控件的显示坐标点
- android:layout_x="50dip"
- android:layout_y="30dip"
- <?xml version="1.0" encoding="utf-8"?>
- <AbsoluteLayout xmlns:android="http://schemas.android.com/apk/res/android"
- android:layout_width="fill_parent"
- android:layout_height="fill_parent">
- <ImageView
- android:layout_width="wrap_content"
- android:layout_height="wrap_content"
- android:src="@drawable/f"
- android:layout_x="100dip"
- android:layout_y="50dip"
- />
- <TextView
- android:layout_width="wrap_content"
- android:layout_height="wrap_content"
- android:text="当前坐标点 x = 100dip y = 50 dip"
- android:background="#FFFFFF"
- android:textColor="#FF0000"
- android:textSize="18dip"
- android:layout_x="50dip"
- android:layout_y="30dip"
- />
- <ImageView
- android:layout_width="wrap_content"
- android:layout_height="wrap_content"
- android:src="@drawable/h"
- android:layout_x="50dip"
- android:layout_y="300dip"
- />
- <TextView
- android:layout_width="wrap_content"
- android:layout_height="wrap_content"
- android:text="当前坐标点 x = 50dip y = 300 dip"
- android:background="#FFFFFF"
- android:textColor="#FF0000"
- android:textSize="18dip"
- android:layout_x="30dip"
- android:layout_y="280dip"
- />
- </AbsoluteLayout>
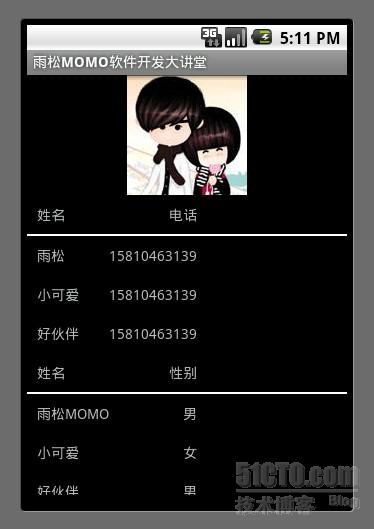
- <?xml version="1.0" encoding="utf-8"?>
- <TableLayout xmlns:android="http://schemas.android.com/apk/res/android"
- android:layout_width="fill_parent"
- android:layout_height="fill_parent"
- >
- <ImageView
- android:layout_width="wrap_content"
- android:layout_height="wrap_content"
- android:src="@drawable/g"
- android:layout_gravity="center"
- />
- <TableRow
- android:layout_width="wrap_content"
- android:layout_height="fill_parent"
- android:padding="10dip">
- <TextView
- android:text="姓名"
- android:gravity="left"
- />
- <TextView
- android:text="电话"
- android:gravity="right"/>
- </TableRow>
-
- <View
- android:layout_height="2dip"
- android:background="#FFFFFF" />
-
- <TableRow
- android:layout_width="wrap_content"
- android:layout_height="fill_parent"
- android:padding="10dip">
- <TextView
- android:text="雨松"
- android:gravity="left"
- />
- <TextView
- android:text="15810463139"
- android:gravity="right"/>
- </TableRow>
-
- <TableRow
- android:layout_width="wrap_content"
- android:layout_height="fill_parent"
- android:padding="10dip">
- <TextView
- android:text="小可爱"
- android:gravity="left"
- />
- <TextView
- android:text="15810463139"
- android:gravity="right"/>
- </TableRow>
-
- <TableRow
- android:layout_width="wrap_content"
- android:layout_height="fill_parent"
- android:padding="10dip">
- <TextView
- android:text="好伙伴"
- android:gravity="left"
- />
- <TextView
- android:text="15810463139"
- android:gravity="right"/>
- </TableRow>
-
- <TableRow
- android:layout_width="wrap_content"
- android:layout_height="fill_parent"
- android:padding="10dip"
- >
- <TextView
- android:text="姓名"
- android:gravity="left"
- />
- <TextView
- android:text="性别"
- android:gravity="right"/>
- </TableRow>
-
- <View
- android:layout_height="2dip"
- android:background="#FFFFFF" />
-
- <TableRow
- android:layout_width="wrap_content"
- android:layout_height="fill_parent"
- android:padding="10dip"
- >
- <TextView
- android:text="雨松MOMO"
- android:gravity="left"
- />
- <TextView
- android:text="男"
- android:gravity="right"/>
- </TableRow>
-
- <TableRow
- android:layout_width="wrap_content"
- android:layout_height="fill_parent"
- android:padding="10dip">
- <TextView
- android:text="小可爱"
- android:gravity="left"
- />
- <TextView
- android:text="女"
- android:gravity="right"/>
- </TableRow>
-
- <TableRow
- android:layout_width="wrap_content"
- android:layout_height="fill_parent"
- android:padding="10dip">
- <TextView
- android:text="好伙伴"
- android:gravity="left"
- />
- <TextView
- android:text="男"
- android:gravity="right"/>
- </TableRow>
-
- </TableLayout>


 8071
8071


 被折叠的 条评论
为什么被折叠?
被折叠的 条评论
为什么被折叠?
 到【灌水乐园】发言


