


大话设计模式
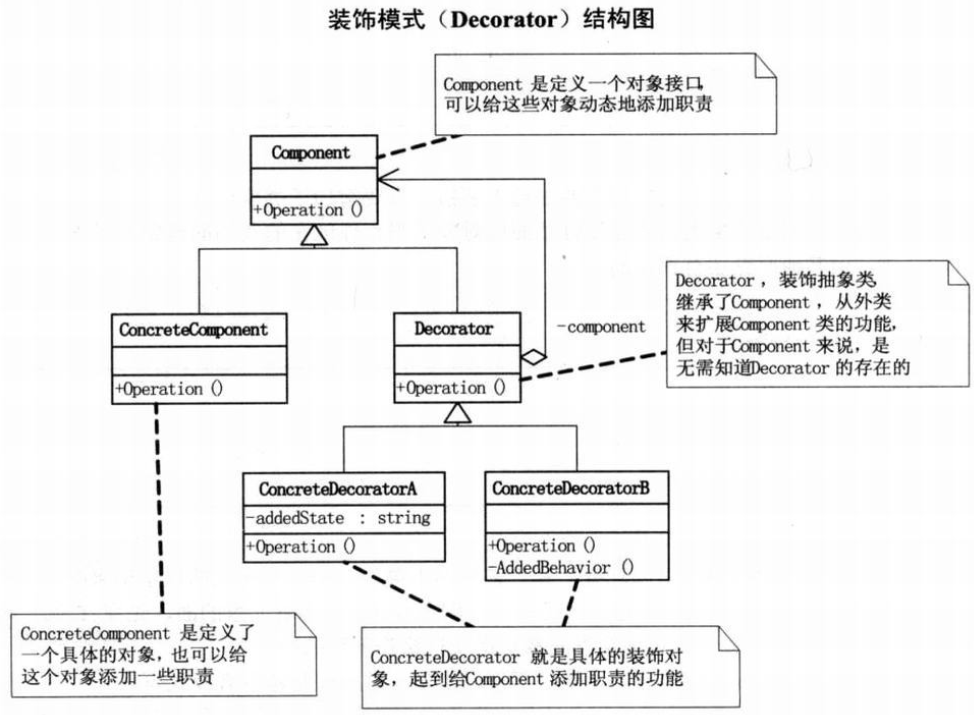
1 UML图
2 装饰模式C++代码实现
//Component类
class Component
{
public:
	virtual void Operation()
	{
		cout << "Component" << endl;
	}
};

//ConcreteComponent类
class ConcreteComponent:public Component
{
public:
	void Operation() override
	{
		cout << "具体对象的操作" << endl;
	}
};

//Decorator类
class Decorator :public Component
{
protected:
	Component component;

public:
	void SetComponent(Component com)//设置Component
	{
		component = com;
	}

	void Operation() override//重写Operation,实际执行的是Component的Operation
	{
		if (component != null)
		{
			component.Operation();
		}
	}
};

//ConcreteDecoratorA类
class ConcreteDecoratorA :public Decorator
{
private:
	string addedState;//本类独有的功能,以区别于ConcreteDecoratorB

public:
	//首先运行原Component的Operation,再执行本类的功能,如addedState,相当于对原有的Component进行了装饰
	void Operation() override
	{
		base.Operatiron();
		addedState = "New State";
		cout << "具体装饰对象A的操作" << endl;
	}

};

//ConcreteDecoratorB类
class ConcreteDecoratorB :public Decorator
{
public:
	//首先运行原Component的Operation,再执行本类的功能,如AddedBehavior,相当于对原有的Component进行了装饰
	void Operation() override
	{
		base.Operatiron();
		AddedBehavior();
		cout << "具体装饰对象B的操作" << endl;
	}

private:
	void AddedBehavior()//本类独有的方法,以区别于ConcreteDecoratorA
	{
		cout << "装饰B的操作" << endl;
	}
};

//客户端代码
int main()
{
	ConcreteComponent c = new ConcreteComponent();
	ConcreteDecoratorA d1 = new ConcreteDecoratorA();
	ConcreteDecoratorB d2 = new ConcreteDecoratorB();

	//装饰方法是:首先用ConcreteComponent实例化对象c,然后用ConcreteComponentA的实例化对象d1来包装c,
	//再用ConcreteComponentB的对象d2包装d1,最终执行d2的Operation
	d1.SetComponent(c);
	d2.SetComponent(d1);
	d2.Operation();

	return 0;
}
3 对于装饰模式的解释
概念:动态地给一个对象添加一些额外的职责,就增加功能来说,装饰模式比生成子类更为灵活。
建造模式和装饰着模式的区别:通过装饰模式可以让一个人的装饰有无数种方案,并非是固定的,而建造者模式要求建造的过程必须是稳定的。
装饰着模式的各个类扮演的角色:
- Component是定义一个对象,可以给这些对象动态地添加职责。
- ConcreteComponent是定义了一个具体的对象,也可以给这个对象增加一些职责。
- Decorator,装饰抽象类,继承了Component,从外类来扩展Component类的功能,但是对于Component来说,是无需知道Decorator的存在的。
- 至于ConcreteDecorator就是具体的装饰对象,起到给Component添加职责的作用。
装饰模式是利用SetComponent来对对象进行包装的。这样每个装饰对象的实现就和如何使用这个对象分开了,每个装饰对象只关心自己的功能,不需要关心何如被添加到对象链当中【DPE】。
如果只有一个ConcreteComponent类么没有抽象的Component类,那么Decorator类可以是ConcreteComponent的一个子类。同样道理,如果只有一个ConcreteDecorator类,那么就没有必要建立一个单独的Decorator类,而可以把Decorator和ConcreteComponent的责任合并成一个类。
装饰模式是为已有动能动态的添加更多功能的一种方式。
什么时候用:
优点:
- 需要在内部组装完成再显示出来的情况。
- 类似于建造者模式,但是建造者模式的要求见到的过程必须是稳定的,而装饰模式的建造过程是不稳定的。
- 我们需要把所需的功能按正确的顺序串联起来进行控制。
优点:
- 把类的装饰功能从类中搬移去除,这样可以简化原有的类。
- 有效地把类的核心职责和装饰功能区分开来,而且可以去除相关类中重复的装饰逻辑。
4 C++实现
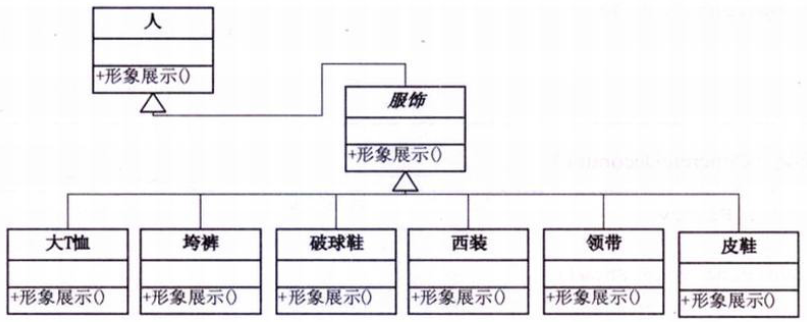
UML图:
C++源代码:
#include<iostream>
#include<string>

using namespace std;

//Person类(ConcreteComponent)
class Person
{
private:
	string name;

public:
	Person(){}

	Person(string na)
	{
		name = na;
	}

	virtual void show()
	{
		cout << "装扮的" << name << endl;
	}
};

//服饰类(Decorator)
class Finery :public Person
{
protected:
	Person *component;

public:
	void setComponent(Person *per)
	{
		component = per;
	}

	void show() override
	{
		if (component != nullptr)
			component->show();
	}
};

//具体服饰类
class TShirts :public Finery
{
public:
	void show() override
	{
		cout << "大T恤 ";
		Finery::show();
	}
};

class BigTrouser :public Finery
{
public:
	void show() override
	{
		std::cout << "垮裤  ";
		Finery::show();
	}

};

class Sneakers :public Finery
{
public:
	void show() override
	{
		std::cout << "破球鞋  ";
		Finery::show();
	}

};

class Suit :public Finery
{
public:
	void show() override
	{
		std::cout << "西装  ";
		Finery::show();
	}

};

class Tie :public Finery
{
public:
	void show() override
	{
		std::cout << "领带  ";
		Finery::show();
	}

};

class LeatherShoes :public Finery
{
public:
	void show()
	{
		std::cout << "皮鞋  ";
		Finery::show();
	}
};

//客户端代码
int main()
{
	Person *per = new Person("小菜");
	cout << "第一种装扮:" << endl;

	Sneakers *sneakers = new Sneakers();
	BigTrouser *bigTrouser = new BigTrouser();
	TShirts *tShirts = new TShirts();

	sneakers->setComponent(per);
	bigTrouser->setComponent(sneakers);
	tShirts->setComponent(bigTrouser);
	tShirts->show();

	cout << "\n第二种装扮:" << endl;

	LeatherShoes* px = new LeatherShoes();
	Tie* ld = new Tie();
	Suit* xz = new Suit();

	px->setComponent(per);
	ld->setComponent(px);
	xz->setComponent(ld);

	xz->show();

	if (per != NULL)
	{
		delete per;
		per = NULL;
	}
	if (sneakers != NULL)
	{
		delete sneakers;
		sneakers = NULL;
	}
	if (tShirts != NULL)
	{
		delete tShirts;
		tShirts = NULL;
	}
	if (bigTrouser != NULL)
	{
		delete bigTrouser;
		bigTrouser = NULL;
	}
	if (px != NULL)
	{
		delete px;
		px = NULL;
	}
	if (ld != NULL)
	{
		delete ld;
		ld = NULL;
	}
	if (xz != NULL)
	{
		delete xz;
		xz = NULL;
	}

	cout << endl;
	system("pause");
	return 0;
}
运行结果:
第一种装扮:
大T恤 垮裤  破球鞋  装扮的小菜

第二种装扮:
西装  领带  皮鞋  装扮的小菜

请按任意键继续. . .
注意:在这里我们没有必要有Component类,直接让服饰类Decorator继承人类ConcreteComponent就可以了!


 147
147


 被折叠的 条评论
为什么被折叠?
被折叠的 条评论
为什么被折叠?
 到【灌水乐园】发言


