


在使用easeui集成即时通讯的过程中,easeui提供的消息布局可能不能满足我们的需求,就想QQ分享那种布局,今天就这个问题写一下。
1、咱们来实现这种布局,首先如果我们要把这种消息和其他的消息区分开,那就需要使用环信提供的消息扩展。使用方法如下:
//发送一条扩展消息
String username=list.get(position).groupid;//对方的id
EMMessage message = EMMessage.createTxtSendMessage("分享的扩展消息",username);
message.setChatType(EMMessage.ChatType.GroupChat);
message.setAttribute("title", title);
message.setAttribute("icon", icon);
message.setAttribute("activityID", activityID);
message.setAttribute("senderid", SPUtils.getString(SPUtils.USER_ID));
EMClient.getInstance().chatManager().sendMessage(message);
T.shortToast(getApplicationContext(),"分享成功");
好了,这样就成功发送了一条和其他消息不一样的消息。
2、接下来,在easeui中做一些提前的准备,我们要去写两个布局,一般使用原有的布局文件去修改,为什么要写两个布局呢?因为要写一个接收消息的布局,写一个发送消息的布局。注意两个布局文件中的相对应的控件id要保持一致!接收方的ease_row_received_share.xml代码如下:
<?xml version="1.0" encoding="utf-8"?>
<LinearLayout xmlns:android="http://schemas.android.com/apk/res/android"
    android:layout_width="match_parent"
    android:layout_height="wrap_content"
    android:orientation="vertical"
    android:paddingTop="13dp" >

    <TextView
        android:id="@+id/timestamp"
        style="@style/chat_text_date_style"
        android:layout_width="wrap_content"
        android:layout_height="wrap_content"
        android:layout_gravity="center" />

    <RelativeLayout
        android:layout_width="match_parent"
        android:layout_height="wrap_content"
        android:layout_marginTop="5dp"
        android:paddingRight="20dp" >

        <ImageView
            android:id="@+id/iv_userhead"
            android:layout_width="@dimen/size_avatar"
            android:layout_height="@dimen/size_avatar"
            android:layout_alignParentLeft="true"
            android:layout_alignParentTop="true"
            android:layout_marginLeft="50dp"
            android:background="@drawable/ease_default_avatar"
            android:scaleType="fitXY" />

        <TextView
            android:id="@+id/tv_userid"
            style="@style/chat_text_name_style"
            android:layout_width="wrap_content"
            android:layout_height="wrap_content"
            android:layout_marginLeft="50dp"
            android:textSize="@dimen/chat_nick_text_size"
            android:layout_toRightOf="@id/iv_userhead"
            android:visibility="gone" />

        <LinearLayout
            android:id="@+id/bubble"
            android:layout_width="match_parent"
            android:layout_height="wrap_content"
            android:layout_marginLeft="50dp"
            android:layout_marginRight="60dp"
            android:layout_toLeftOf="@+id/progress_bar"
            android:layout_toRightOf="@id/iv_userhead"
            android:layout_below="@+id/tv_userid"
            android:background="@drawable/ease_chatfrom_bg" >

            <ImageView
                android:scaleType="fitXY"
                android:id="@+id/ease_chat_item_share_img"
                android:layout_width="50dp"
                android:layout_height="50dp"
                android:layout_margin="5dp"
                android:src="@drawable/ease_chat_item_file" />


            <!--图片右边的布局-->
            <LinearLayout
                android:layout_width="match_parent"
                android:layout_height="wrap_content"
                android:layout_gravity="center_vertical"
                android:layout_marginLeft="7dp"
                android:gravity="center_vertical"
                android:orientation="vertical" >

                <TextView
                    android:id="@+id/tv_title_name"
                    android:layout_width="wrap_content"
                    android:layout_height="wrap_content"
                    android:layout_gravity="center_vertical"
                    android:singleLine="true"
                    android:ellipsize="middle"
                    android:textColor="#000"
                    android:textSize="15sp" />
            </LinearLayout>
        </LinearLayout>
    </RelativeLayout>

</LinearLayout>
然后是发送方的布局代码ease_row_sent_share.xml
<?xml version="1.0" encoding="utf-8"?>
<LinearLayout xmlns:android="http://schemas.android.com/apk/res/android"
    xmlns:tools="http://schemas.android.com/tools"
    android:layout_width="match_parent"
    android:layout_height="wrap_content"
    android:gravity="center_horizontal"
    android:orientation="vertical"
    android:paddingTop="13dp" >

    <TextView
        android:id="@+id/timestamp"
        style="@style/chat_text_date_style"
        android:layout_width="wrap_content"
        android:layout_height="wrap_content" />

    <RelativeLayout
        android:layout_width="match_parent"
        android:layout_height="wrap_content"
        android:layout_marginTop="5dp"
        android:paddingLeft="20dp" >

        <ImageView
            android:id="@+id/iv_userhead"
            android:layout_width="@dimen/size_avatar"
            android:layout_height="@dimen/size_avatar"
            android:layout_alignParentRight="true"
            android:layout_alignParentTop="true"
            android:layout_marginRight="5dp"
            android:background="@drawable/ease_default_avatar"
            android:scaleType="fitXY" />

        <LinearLayout
            android:id="@+id/bubble"
            android:layout_marginLeft="60dp"
            android:layout_width="match_parent"
            android:layout_height="wrap_content"
            android:layout_marginRight="5dp"
            android:layout_toLeftOf="@id/iv_userhead"
            android:layout_toRightOf="@+id/ll_loading"
            android:background="@drawable/ease_chatto_bg" >

            <ImageView
                android:scaleType="fitXY"
                android:id="@+id/ease_chat_item_share_img"
                android:layout_width="50dp"
                android:layout_height="50dp"
                android:layout_margin="5dp"
                android:src="@drawable/ease_chat_item_file" />

            <LinearLayout
                android:layout_width="match_parent"
                android:layout_height="wrap_content"
                android:layout_gravity="center_vertical"
                android:layout_marginLeft="7dp"
                android:gravity="center_vertical"
                android:orientation="vertical" >

                <TextView
                    android:id="@+id/tv_title_name"
                    android:layout_width="wrap_content"
                    android:layout_height="wrap_content"
                    android:layout_gravity="center_vertical"
                    android:ellipsize="middle"
                    android:singleLine="true"
                    android:textColor="#000"
                    android:textSize="15sp" />
            </LinearLayout>
        </LinearLayout>

        <ImageView
            android:id="@+id/msg_status"
            android:layout_width="wrap_content"
            android:layout_height="wrap_content"
            android:layout_centerVertical="true"
            android:layout_toLeftOf="@id/bubble"
            android:clickable="true"
            android:src="@drawable/ease_msg_state_failed_resend"
            android:visibility="invisible" />

        <TextView
            android:id="@+id/tv_ack"
            style="@style/chat_text_name_style"
            android:layout_width="wrap_content"
            android:layout_height="wrap_content"
            android:layout_centerVertical="true"
            android:layout_toLeftOf="@id/tv_chatcontent"
            android:text="@string/text_ack_msg"
            android:textSize="12sp"
            android:visibility="invisible" />

        <TextView
            android:id="@+id/tv_delivered"
            style="@style/chat_text_name_style"
            android:layout_width="wrap_content"
            android:layout_height="wrap_content"
            android:layout_centerVertical="true"
            android:layout_toLeftOf="@id/tv_chatcontent"
            android:text="@string/text_delivered_msg"
            android:textSize="12sp"
            android:visibility="invisible" />
    </RelativeLayout>

</LinearLayout>
3、写好布局之后,咱们要写一个对应的类去控制这些控件。可能有人问上边的布局为啥控件要用相同的id,这里看到代码就知道为什么了。EaseChatRowShare.java具体代码如下:
package com.hyphenate.easeui.widget.chatrow;

import android.content.Context;
import android.widget.BaseAdapter;
import android.widget.ImageView;
import android.widget.TextView;

import com.hyphenate.chat.EMMessage;
import com.hyphenate.easeui.R;
import com.hyphenate.exceptions.HyphenateException;
import com.squareup.picasso.Picasso;

public class EaseChatRowShare extends  EaseChatRow {

    ImageView img;//图片
    TextView title;//title

    public EaseChatRowShare(Context context, EMMessage message, int position, BaseAdapter adapter) {
        super(context, message, position, adapter);
    }

    /**
     * 加载布局
     */
    @Override
    protected void onInflateView() {
        inflater.inflate(message.direct() == EMMessage.Direct.RECEIVE ?
                R.layout.ease_row_received_share : R.layout.ease_row_sent_share, this);
    }

    /**
     * 实例化控件
     */
    @Override
    protected void onFindViewById() {
        title = (TextView) findViewById(R.id.tv_title_name);
        img = (ImageView) findViewById(R.id.ease_chat_item_share_img);
    }


    /**
     * 更新适配器
     */
    @Override
    protected void onUpdateView() {
        adapter.notifyDataSetChanged();
    }

    /**
     * 设置内容
     */
    @Override
    protected void onSetUpView() {
        try {
            String titleString = message.getStringAttribute("title");
            String iconString = message.getStringAttribute("icon");
            String activityIDString = message.getStringAttribute("activityID");
            title.setText(titleString);
            Picasso.with(context).load(iconString).into(img);
        } catch (HyphenateException e) {
            e.printStackTrace();
        }
    }

    @Override
    protected void onBubbleClick() {
    }
}
看到这里,大家都能看清楚了,原因是在onInflateView()方法中,通过判断接收消息或者发送消息来加载不同的布局文件,所以在下边的控件要保持相同的id。
4、咱们怎么来使用这个EaseChatRowShare呢,大家在看这个消息的适配器EaseMessageAdapter的时候,发现定义了好多布局类型,然后在按不同的消息类型去加载不同的条目。easeui在这个地方给开发者留好了自定义布局的开发方式,大家看下边这个方法:
    /**
     * get number of message type, here 14 = (EMMessage.Type) * 2
     */
    public int getViewTypeCount() {
        if(customRowProvider != null && customRowProvider.getCustomChatRowTypeCount() > 0){
            return customRowProvider.getCustomChatRowTypeCount() + 14;
        }
        return 14;
    }
发现在customRowProvider 中写了一个customRowProvider.getCustomChatRowTypeCount() + 14; 这里的14是easeui内置的14种消息类型。然后我们去看这个 customRowProvider,是一个自定义消息的接口,好了,我们自己写一个类去实现EaseCustomChatRowProvider这个接口。CustomChatRowProvider代码如下:
package com.hyphenate.easeui.widget.chatrow;

import android.content.Context;
import android.widget.BaseAdapter;

import com.hyphenate.chat.EMMessage;
import com.hyphenate.exceptions.HyphenateException;

public class CustomChatRowProvider  implements EaseCustomChatRowProvider {

    private static final int MESSAGE_TYPE_SENDSHAREPIC = 1;//发送
    private static final int MESSAGE_TYPE_RECEIVEDSHAREPIC = 2;//接收

    private Context mContext;

    public CustomChatRowProvider(Context mContext) {
        this.mContext = mContext;
    }

    /**
     * 创建自定义的布局类型数量(返回值必须是类型的数量*2.包括接收布局和发送布局)
     * @return
     */
    @Override
    public int getCustomChatRowTypeCount() {
        return 2;
    }

    /**
     * 根据message的接收和发送  返回自定义的布局类型
     * @param message
     * @return
     */
    @Override
    public int getCustomChatRowType(EMMessage message) {
        //这里做个判断    如果能取到扩展字段    就返回消息类型
        try {
            message.getStringAttribute("title");
            return message.direct() == EMMessage.Direct.RECEIVE ?MESSAGE_TYPE_RECEIVEDSHAREPIC:MESSAGE_TYPE_SENDSHAREPIC;
        } catch (HyphenateException e) {
            e.printStackTrace();
        }
        return 0;
    }

    /**
     * 返回chatrow   每种文件的类型(图片、音频)  这里返回自定义的分享布局
     * @param message
     * @param position
     * @param adapter
     * @return
     */
    @Override
    public EaseChatRow getCustomChatRow(EMMessage message, int position, BaseAdapter adapter) {
        //同上    如果能取到扩展字段    就返回消息类型
        try {
            message.getStringAttribute("title");
            return new EaseChatRowShare(mContext, message, position, adapter);
        } catch (HyphenateException e) {
            e.printStackTrace();
        }
        return null;
    }
}
5、写好了这些,就让我们看看怎么用到CustomChatRowProvider 类,
在创建聊天的Fragment的时候,我们要设置Fragment的chatFragmentListener,然后去重写onSetCustomChatRowProvider()方法,具体代码如下:
chatFragment = new EaseChatFragment();
//设置聊天页面的自定义布局
chatFragment.setChatFragmentListener(new EaseChatFragment.EaseChatFragmentHelper() {
@Override
public void onSetMessageAttributes(EMMessage message) {
}
@Override
public void onEnterToChatDetails() {
}
@Override
public void onAvatarClick(String username) {
}
@Override
public void onAvatarLongClick(String username) {
}
@Override
public boolean onMessageBubbleClick(EMMessage message) {
return false;
}
@Override
public void onMessageBubbleLongClick(EMMessage message) {
}
@Override
public boolean onExtendMenuItemClick(int itemId, View view) {
return false;
}
@Override
public EaseCustomChatRowProvider onSetCustomChatRowProvider() {
return new CustomChatRowProvider(GroupChatActivity.this);
}
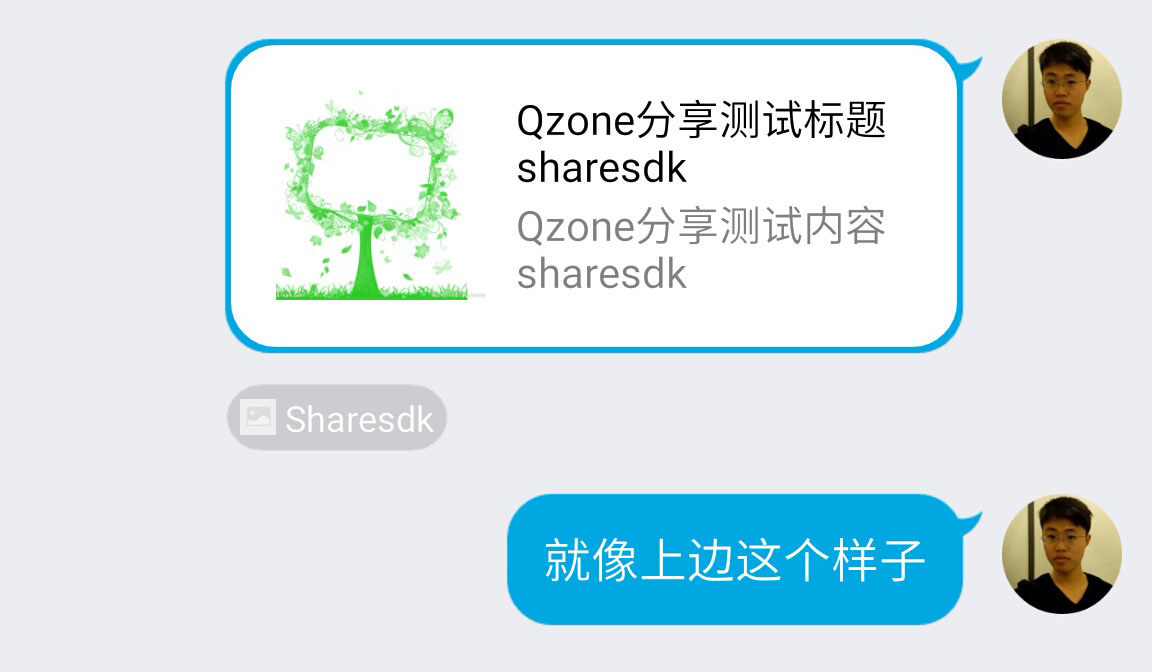
});6、到这里使用easeui实现自定义消息布局就实现了,咱们来看一下效果:
小伙伴们去使用吧!


 1325
1325

 被折叠的 条评论
为什么被折叠?
被折叠的 条评论
为什么被折叠?
 到【灌水乐园】发言


