


 本文介绍了如何自定义安卓控件LoadingView,详细讲解了从设计动画流程到实现各个步骤,包括颜色变化、方块抛出、圆球下落和眼睛、嘴巴的绘制动画。通过属性动画ValueAnimator和Interpolator实现动画效果,提供了项目下载链接和相关文章推荐。
项目下载地址:http://download.csdn.net/detail/qq_26331127/9418430
github地址 :https://github.com/LoveIsReal/LWang
先看效果:

题外话:写这个动画抚慰一下自己和可怜的广大单身狗们(不包括我 )希望看着能开心
写这个的想法来自于一篇Android开发中文站 的文章 地址:
他那个动画的最后是画了一个勾,但是觉得很普通 于是改成了现在这样 觉得很nice的自觉底下顶下
既然是做动画,不管什么工具或方式,首先是设计动画流程
我的动画流程:
1 ,圆弧加载成整环,随着进度值改变颜色 ,颜色区间是红色到蓝色。 这个并不是动画,是通过一个线程不断改变进度值从0 到 100 模拟了加载的过程
(所以当这个进度达到一百之后,程序后面的事就和加载无关了,纯属动画)
2 ,圆环两侧平行于圆环圆心位置同时抛出方块,运动到圆环正上方,此时距离圆环大小就是圆环半径
3,将上一个动画的两个方块 改为一个圆球,并且改为绿色,开始下落动画 ,终点是圆心
4,同时开始嘴 和 眼睛的绘制的动画。眼睛:圆心位置开始绘制两个圆球 逐渐运动到最终位置 。 嘴:从左向右绘制圆弧
分析结束。。。。。。
代码中最重要的知识点就是属性动画。
推荐看这篇文章 :http://blog.csdn.net/jdsjlzx/article/details/45558901
接下来的内容默认你看完上面那篇文章 知道什么是 ValueAnimator Interpolator TypeEvaluator
接下来开始装逼 ,额,错了,开始讲解代码。。。。。
并没有提供自定义属性 就不用什么attr了
继承View :
public class LoadingView extends View {
标准的三个参数构造方法 ,最后一个构造方法做各种Paint的初始化操作
onMeasure() 、onLayout 方法 不需要重写 因为内部没有子View xml 中设定的是固定宽高 。
看第一个流程 :
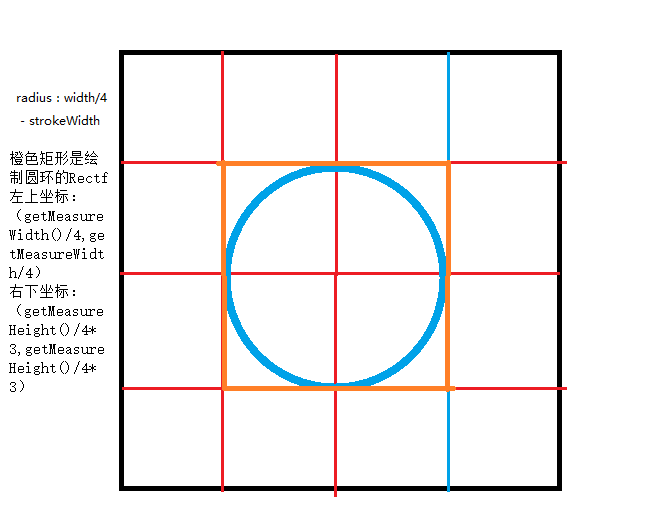
我们绘制圆环 绘制圆环用的是canvas.drawArc() 方法
里面需要一个Rectf 参数 就是一个矩形区域 我们设置成成员变量 ,在onSizeChanged (onMeasure 之后 onDraw之前调用的一个方法)方法中初始化它
看张图: 蓝色的圆环即为所需
然后就是进度值的设定:我在 Activity 中设置按钮的监听,启动一个 Thread 去模拟加载进度的过程 ,
Thread.sleep(20);
每隔20毫秒 加载1%
View 类中 定义了一个 setProgress()
 public void setProgress(int progress) {

        if (progress == 0) {
            //   由于ColorEvaluator 中的保存颜色值的静态变量   所有每次重置进度 也需要重置这些变量
            status = 0;  //                         每次重新运行  改变动画的运行标志位
            currentPosition = ballRadius;
            ColorEvaluator.resetColor();
        }
        float fraction = 1.0f * (progress) / 100;
        String color_str = ColorEvaluator.evaluate(fraction, "#0000ff", "#ff0000");
        int color = Color.parseColor(color_str);
        Log.e("wxy", "asdasdasd   " + fraction);
        circlePaint.setColor(color);
        this.progress = progress;
        postInvalidate();   //   之所有在这里使用postInvalidate  因为我是开了个线程去更新

        if (progress == 100) {   // 开始方块抛出动画
            status = drawFlyRect;    //  先改变运行状态  因为在下面的post线程会调用onDraw
            post(new Runnable() {     //    这里的post方法     其实就是View中专门设计的方法
                //  Causes the Runnable to be added to the message queue.
                //   The runnable will be run on the user interface thread   这两行英文是它的官方解释
                // 这个post产生的Runnable将运行在主线程中         这就解释了 为什么用了它  Mainactivity中就不用Looper.prepare()方法 ,
                //  而且也满足了  这个ValueAnimator必须用在主线程中
                // 从源码中看 View的 post  方法 开启了一个mHandler.post(runnable);
                @Override
                public void run() {
                    animation_fly.start();
                }
            });
        }
    }
看下drawArc方法的源码 :
     * @param oval       The bounds of oval used to define the shape and size
     *                   of the arc
     * @param startAngle Starting angle (in degrees) where the arc begins
     * @param sweepAngle Sweep angle (in degrees) measured clockwise
     * @param useCenter If true, include the center of the oval in the arc, and
                        close it if it is being stroked. This will draw a wedge
     * @param paint      The paint used to draw the arc
     */
    public void drawArc(@NonNull RectF oval, float startAngle, float sweepAngle, boolean useCenter,
            @NonNull Paint paint) {
        drawArc(oval.left, oval.top, oval.right, oval.bottom, startAngle, sweepAngle, useCenter,
                paint);
    }
startAngle 是起始的角度 ; canvas的角度的规定是 X正半轴 为0度 向下为正 ,即顺时针
sweepAngle 是圆弧扫过的角度 也有正负之分 正值表示顺时针 负值表示逆时针
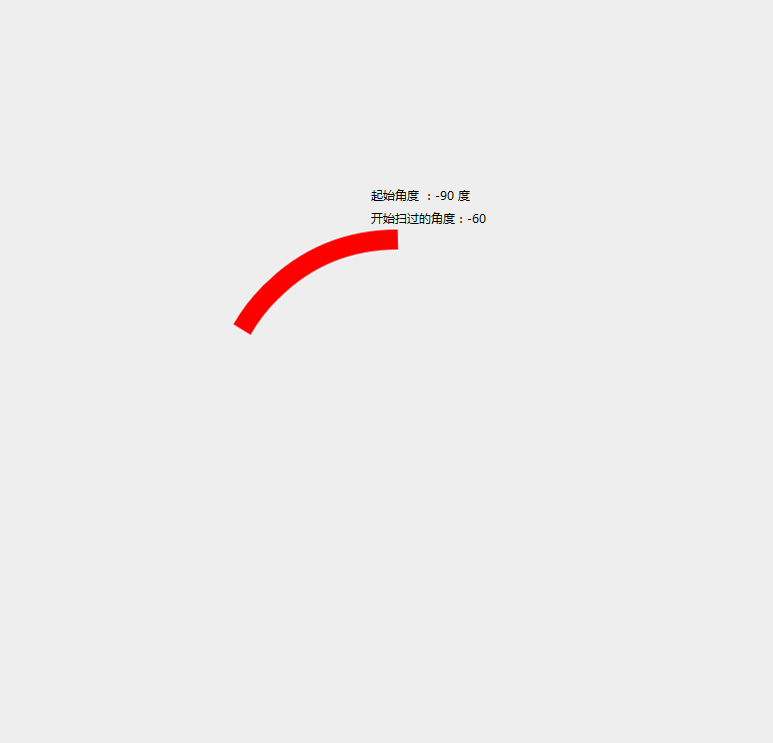
结束时是圆环重合 扫过的角度是 -360 , 起始角度是 -360 就是X轴正方向的角度
转的过程就是依据进度值更新圆环的起始角度和扫过的角度 :
canvas.drawArc(mRectf, startAngle - 270 * percent, -60 - (300 * percent), false, circlePaint);
false参数表示是否绘制半径 若为true 会从椭圆重心开始绘制两条半径 和起点终点围成一个封闭图形 , percent 表示进度值
大家都应该注意到了这个颜色的变化 ,是自定义的Evaluator ,根据我传入的进度值 返回相应的颜色 ,这个类不是我写的,感兴趣的看下:
public class ColorEvaluator {

    private static int mCurrentRed = -1;

    private static int mCurrentGreen = -1;

    private static int mCurrentBlue = -1;

    public static void resetColor() {
        mCurrentBlue = -1;
        mCurrentGreen = -1;
        mCurrentRed = -1;
    }

    public static String evaluate(float fraction, String startColor, String endColor) {
        int startRed = Integer.parseInt(startColor.substring(1, 3), 16);
        int startGreen = Integer.parseInt(startColor.substring(3, 5), 16);
        int startBlue = Integer.parseInt(startColor.substring(5, 7), 16);
        int endRed = Integer.parseInt(endColor.substring(1, 3), 16);
        int endGreen = Integer.parseInt(endColor.substring(3, 5), 16);
        int endBlue = Integer.parseInt(endColor.substring(5, 7), 16);
        // 初始化颜色的值
        if (mCurrentRed == -1) {
            mCurrentRed = startRed;
        }
        if (mCurrentGreen == -1) {
            mCurrentGreen = startGreen;
        }
        if (mCurrentBlue == -1) {
            mCurrentBlue = startBlue;
        }
        // 计算初始颜色和结束颜色之间的差值
        int redDiff = Math.abs(startRed - endRed);
        int greenDiff = Math.abs(startGreen - endGreen);
        int blueDiff = Math.abs(startBlue - endBlue);
        int colorDiff = redDiff + greenDiff + blueDiff;
        if (mCurrentRed != endRed) {
            mCurrentRed = getCurrentColor(startRed, endRed, colorDiff, 0,
                    fraction);
        } else if (mCurrentGreen != endGreen) {
            mCurrentGreen = getCurrentColor(startGreen, endGreen, colorDiff,
                    redDiff, fraction);
        } else if (mCurrentBlue != endBlue) {
            mCurrentBlue = getCurrentColor(startBlue, endBlue, colorDiff,
                    redDiff + greenDiff, fraction);
        }
        // 将计算出的当前颜色的值组装返回
        String currentColor = "#" + getHexString(mCurrentBlue)
                + getHexString(mCurrentGreen) + getHexString(mCurrentRed);             //  这里做了一些修改
        //    正确的颜色组装是  red  green  blue
        return currentColor;
    }

    /**
     * 根据fraction值来计算当前的颜色。
     */
    private static int getCurrentColor(int startColor, int endColor, int colorDiff,
                                       int offset, float fraction) {
        int currentColor;
        if (startColor > endColor) {
            currentColor = (int) (startColor - (fraction * colorDiff - offset));
            if (currentColor < endColor) {
                currentColor = endColor;
            }
        } else {
            currentColor = (int) (startColor + (fraction * colorDiff - offset));
            if (currentColor > endColor) {
                currentColor = endColor;
            }
        }
        return currentColor;
    }

    /**
     * 将10进制颜色值转换成16进制。
     */
    private static String getHexString(int value) {
        String hexString = Integer.toHexString(value);
        if (hexString.length() == 1) {
            hexString = "0" + hexString;
        }
        return hexString;
    }

}
看第二个流程:
需要注意的是 ,每次调用onDraw方法 之前在画布上已经绘制的内容将全部清空 然后进行绘制
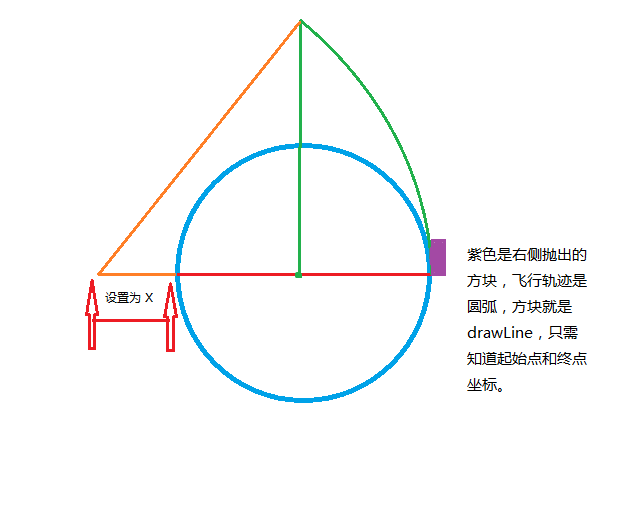
先看右侧的方块,因为我们只需要知道方块飞行时在圆弧上对应的扇形的角度 ,左侧的方块对应的角度是一样的 。
drawLine方法:
    /* @param startX The x-coordinate of the start point of the line
     * @param startY The y-coordinate of the start point of the line
     * @param paint  The paint used to draw the line
     */
    public void drawLine(float startX, float startY, float stopX, float stopY,
            @NonNull Paint paint) {
        native_drawLine(mNativeCanvasWrapper, startX, startY, stopX, stopY, paint.mNativePaint);
    }
---------------------------------------------------------------------------------------------------------------------------------------------
当然先得算出大圆弧的半径 :设置圆环半径为R勾股定理:( R + X) ^2 + (2*R)^ 2 = (2*R + X )^ 2
得出 :X = R / 2 .
然后把坐标系移到大圆弧圆心 以此为坐标原点 方便坐标计算
canvas.save();
canvas.translate(radius / 2 + strokeWidth, 2 * radius + strokeWidth);
然后就需要用到ValueAnimator 属性动画, 去计算从0 度到 最高位置的角度endAngle
endAngle = (float) Math.atan(4f / 3);然后用我定义一个方法去初始化这个 ValueAnimator
public void initAnimatorFlyRect() {
        animation_fly = ValueAnimator.ofFloat(0f, endAngle);
        animation_fly.setDuration(1000);
        animation_fly.setInterpolator(new DecelerateInterpolator());     //  定义了动画变化的速率
        // AccelerateDecelerateInterpolator表示  在开始和结束的时候减速   中间加速
        // DecelerateInterpolator 表示逐渐减速
        // AccelerateInterpolator  表示一直加速
        // LinearInterpolator    表示匀速

        animation_fly.addUpdateListener(new ValueAnimator.AnimatorUpdateListener() {  //  角度值断改变的监听
            @Override
            public void onAnimationUpdate(ValueAnimator animation) {
                currentAngle = (float) animation.getAnimatedValue();
                postInvalidate();
            }
        });
        animation_fly.addListener(new AnimatorListenerAdapter() {
            @Override
            public void onAnimationEnd(Animator animation) {            //  动画结束的监听
                super.onAnimationEnd(animation);
                currentAngle = 0f;
                status = drawBall;
                circlePaint.setColor(Color.argb(255, 0, 150, 136));    //   把画圆的Paint变成 绿色
                postInvalidate();
                post(new Runnable() {
                    @Override
                    public void run() {
                        initAnimationDown();
                        animation_down.start();
                    }
                });
            }
        });
    }
特别注意: ValueAnimator 必须在UI线程中 即主线程中启动 ,但是我们当前是开了个子线程去更新UI 所以不满足在UI线程中
那怎么办??
发现View类中 有个 post(Runnable action)方法 它API的解释是这样的
/**
 * Causes the Runnable to be added to the message queue.
 * The runnable will be run on the user interface thread.
 *
用post方法开的线程会运行在UI线程中 问题解决
post方法内部是 用mHandler.post 方法 ,具体实现没向下深究。。
if (progress == 100) {
    post(new Runnable() {
        @Override
        public void run() {
            animation_fly.start();
        }
    });
}
在进度值100 的 时候启动这个Animator --- animation_fly
具体的方块绘制代码:
public void drawFlyRect(Canvas canvas) {

        float bigX = getMeasuredWidth() / 2 - radius * 3 / 2 + strokeWidth;
        float bigY = getMeasuredHeight() / 2;
        canvas.save();
        canvas.translate(bigX, bigY);//将坐标移动到大圆圆心(方块轨迹所在的那个大圆)
        //  两个参数分别是平移的 X 轴距离  和  Y  轴距离
        float bigRadius = 5 * radius / 2;//大圆半径
        //方块起始端坐标     起始点坐标就是currentAngle 对应在圆弧上的点   注意这里我们规定纬度低的为起始端
        float x1 = (float) (bigRadius * Math.cos(currentAngle));        //  圆弧上的点在X轴上的投影长度
        float x11 = (float) (3 * radius - strokeWidth * 2 - (bigRadius * Math.cos(currentAngle)));
        float y1 = -(float) (bigRadius * Math.sin(currentAngle));       //  圆弧上的点在Y轴上的投影长度
        //方块末端坐标    末端点最难定   它也是圆弧上的一个点    和起始点相连成的直线就是方快
        //  所以起始点 和 末端点 构成的圆弧角度  我们不能用固定的值  毕竟希望这个方块上升时长度在减小
        float huAngle = (float) (0.15 * endAngle - 0.10 * endAngle * (currentAngle / endAngle));  // 确定方块的那段弧);
        float x2 = (float) (bigRadius * Math.cos(currentAngle + huAngle));
        float x22 = (float) (3 * radius - strokeWidth * 2 - (bigRadius * Math.cos(currentAngle + huAngle)));
        float y2 = -(float) (bigRadius * Math.sin(currentAngle + huAngle));
        canvas.drawLine(x1, y1, x2, y2, rectPaint);//小方块,其实是一条直线
        canvas.drawLine(x11, y1, x22, y2, rectPaint);
        canvas.restore();

    }
到顶点的时候,即Animator结束的时候 对应方法 onAnimationEnd() , 里面改变画笔的颜色为绿色 ,第二个过程结束。
看第三个流程:
俩方块消失,取而代之的是一个绿色圆球 接着开始下落动画 用ValueAnimator控制下落的纵坐标,即高度 ,相信大家应该很熟悉了 ,通过ValueAnimator的ofFloat() 方法计算高度值
Canvas 有绘制圆的方法:
/* @param cx     The x-coordinate of the center of the cirle to be drawn
 * @param  cy     The y-coordinate of the center of the cirle to be drawn
 * @param  radius The radius of the cirle to be drawn
 * @param  paint  The paint used to draw the circle
 */
public void drawCircle(float cx, float cy, float radius, @NonNull Paint paint) {
    native_drawCircle(mNativeCanvasWrapper, cx, cy, radius, paint.mNativePaint);
}
注意这个传入的画笔:
Paint ballPaint = new Paint();
ballPaint.setStyle(Paint.Style.FILL);
ballPaint.setColor(Color.argb(255, 0, 150, 136));    //  绿色
ballPaint.setAntiAlias(true);
它的Style是FILL 即实心圆球,如果是STROKE 就成了空心球
下落的球对应的Animator :
public void initAnimationDown() {
        animation_down = ValueAnimator.ofFloat(ballRadius, radius * 2 + strokeWidth);
        animation_down.setDuration(600);
        animation_down.setInterpolator(new AccelerateInterpolator());
        animation_down.addUpdateListener(new ValueAnimator.AnimatorUpdateListener() {
            @Override
            public void onAnimationUpdate(ValueAnimator animation) {
                currentPosition = (float) animation.getAnimatedValue();
                postInvalidate();
            }
        });

        animation_down.addListener(new AnimatorListenerAdapter() {
            @Override
            public void onAnimationEnd(Animator animation) {
                super.onAnimationEnd(animation);

                status = drawMouthAndEyes;

                currentPosition = radius * 2 + strokeWidth;
                initAnimatorTraslateBall();
                initAnimatorMouth();
                animation_traslate.start();
                animation_mouth.start();
            }
        });
}canvas.drawCircle(radius * 2 + strokeWidth, currentPosition, ballRadius, ballPaint);
看第四个流程:
嘴巴和眼睛同时绘制

上一个动画留在了圆心处 所以这个动画我的设计是 之前的坠落到圆心的小球变为两个同时向最终位置平移 并且画笔宽度逐渐变大
这需要一个ValueAnimator 计算其中一个点(另一个点的值都可以对称算出)X、Y轴坐标 和当前画笔宽度 三个值总不能用三次ofFloat方法吧
所以想到了ofObject 方法 把这些值存到一个对象中 就干脆定义一个类
public class PointAndSizeOfEyes {

    private float X;
    private float Y;
    private float eyeRadius;

    public PointAndSizeOfEyes(){
    }

    public PointAndSizeOfEyes(float x, float y, float eyeRadius) {
        X = x;
        Y = y;
        this.eyeRadius = eyeRadius;
    }

    ...........// get  set 方法省略
}
自定义一个 TypeEvaluator 去计算动画过程的值: 就是重写evaluate 方法就行 根据fraction进度值 , 去算出当前需要的值
public class PointAndSizeEvaluator implements TypeEvaluator {
    @Override
    public Object evaluate(float fraction, Object startValue, Object endValue) {
        PointAndSizeOfEyes point_start = (PointAndSizeOfEyes) startValue;
        PointAndSizeOfEyes point_end = (PointAndSizeOfEyes) endValue;

        //  需要注意的是    平移后的坐标X 还是 Y 都是变小的   所以  endValue < startValue
        return new PointAndSizeOfEyes()
                .setX(point_start.getX() - (point_start.getX() - point_end.getX()) * fraction)
                .setY(point_start.getY() - (point_start.getY() - point_end.getY()) * fraction)
                .setEyeRadius(point_start.getEyeRadius() + fraction * (point_end.getEyeRadius() - point_start.getEyeRadius()));
    }

}
绘制眼睛的属性动画 :
 public void initAnimatorTraslateBall() {
        //     Y轴眼睛的偏移量只有  1/4 radius ,   X轴  1/3 radius
        animation_traslate = ValueAnimator.ofObject(new PointAndSizeEvaluator(), new PointAndSizeOfEyes(currentPosition, currentPosition, ballRadius), new PointAndSizeOfEyes(currentPosition - radius / 3, currentPosition - radius / 4, bigBallRadius));
        animation_traslate.setDuration(1200);
        animation_traslate.setInterpolator(new AccelerateDecelerateInterpolator());
        animation_traslate.addUpdateListener(new ValueAnimator.AnimatorUpdateListener() {
            @Override
            public void onAnimationUpdate(ValueAnimator animation) {
                currentPoint = (PointAndSizeOfEyes) animation.getAnimatedValue();
                postInvalidate();
            }
        });

        animation_traslate.addListener(new AnimatorListenerAdapter() {
            @Override
            public void onAnimationEnd(Animator animation) {
                super.onAnimationEnd(animation);
            }
        });
    }
绘制嘴巴的属性动画:
public void initAnimatorMouth() {


        //  笑脸所在外切矩形的设定
        //!!!!!!!!!!!!!!!!!!!!!!!!!!!!!!!!!!!!!!!!!!!!!!!!!!!!!!!
        //
        //   8/3 = 2    整型相除等于2     必须用   8f/3f = 2.667
        //
        //  !!!!!!!!!!!!!!!!!!!!!!!!!!!!!!!!!!!!!!!!!!!!!!!!!!!!!!
        mRectf_mouth.set(new RectF((4f / 3f) * radius + strokeWidth * 2, (4f / 3f) * radius + strokeWidth, (8f / 3f) * radius + strokeWidth * 2, (8f / 3f) * radius + strokeWidth));

        animation_mouth = ValueAnimator.ofFloat(30 * 1.0f, 110 * 1.0f);    //   这里计算的是 嘴巴逆时针增长的角度   从小到大
        animation_mouth.setDuration(1200);
        animation_mouth.setInterpolator(new DecelerateInterpolator());
        animation_mouth.addUpdateListener(new ValueAnimator.AnimatorUpdateListener() {
            @Override
            public void onAnimationUpdate(ValueAnimator animation) {
                currentMouthAngle = (float) animation.getAnimatedValue();
                postInvalidate();
            }
        });
        animation_mouth.addListener(new AnimatorListenerAdapter() {
            @Override
            public void onAnimationEnd(Animator animation) {
                super.onAnimationEnd(animation);
            }
        });
    }
然后 onDraw 方法中 绘制:
canvas.drawCircle(currentPoint.getX() + strokeWidth, currentPoint.getY(), currentPoint.getEyeRadius(), ballPaint);  //   绘制左边的眼睛
canvas.drawCircle(2 * currentPosition - currentPoint.getX() + strokeWidth, currentPoint.getY(), currentPoint.getEyeRadius(), ballPaint);  //  绘制右边的眼睛
canvas.drawArc(mRectf_mouth, 145, -currentMouthAngle, false, mouthPaint);  // 绘制嘴巴
到此整个动画完成 , 有疑问的可以留言,撤。。。。。


 1734
1734

 被折叠的 条评论
为什么被折叠?
被折叠的 条评论
为什么被折叠?
 到【灌水乐园】发言


