一、简介
先看一下官网上的介绍:
testOnDemandRTSPServer creates a RTSP server that can stream, via RTP unicast, from various types of media file, on demand. (Supported media types include: MPEG-1 or 2 audio or video (elementary stream), including MP3 audio; MPEG-4 video (elementary stream); H.264 video (elementary stream); H.265 video (elementary stream); MPEG Program or Transport streams, including VOB files; DV video; AMR audio; WAV (PCM) audio.) The server can also stream from a Matroska or WebM file (by demultiplexing and streaming the tracks within the file). MPEG Transport Streams can also be streamed over raw UDP, if requested - e.g., by a set-top box.
- This server application also demonstrates how to deliver - via RTSP - a MPEG Transport Stream that arrived at the server as a UDP (raw-UDP or RTP/UDP) multicast or unicast stream. In particular, it is set up, by default, to accept input from the "testMPEG2TransportStreamer" demo application.
翻译一下:
testOnDemandRTSPServer 创建一个 RTSP 服务器,可以根据需要通过 RTP 单播从各种类型的媒体文件流式传输。 (支持的媒体类型包括:MPEG-1或2音频或视频(基本流),包括MP3音频; MPEG-4视频(基本流); H.264视频(基本流); H.265视频(基本流) MPEG程序或传输流,包括VOB文件; DV视频; AMR音频; WAV(PCM)音频。)服务器还可以从 Matroska 或 WebM 文件流(通过解复用和流式传输文件中的轨道)。 如果需要,MPEG传输流也可以通过原始UDP流传输,例如通过机顶盒。
该服务器应用程序还演示了如何通过 RTSP 传送作为 UDP(原始UDP或RTP / UDP)组播或单播流到达服务器的MPEG传输流。 特别地,默认情况下,它设置为接受来自“testMPEG2TransportStreamer”演示应用程序的输入。
二、源码分析
参看:live555 testOnDemandRTSPServer例程解析
此例程是关于构建live555 RTSP服务器的,可以点播很多类型的文件,这里只讲解H264的,本例程是点播,用的单播unicast的形式
#include "liveMedia.hh"
#include "BasicUsageEnvironment.hh"


//创建交互环境,用来打印相关信息的
UsageEnvironment* env;


// To make the second and subsequent client for each stream reuse the same
// input stream as the first client (rather than playing the file from the
// start for each client), change the following "False" to "True":
Boolean reuseFirstSource = False;


// To stream *only* MPEG-1 or 2 video "I" frames
// (e.g., to reduce network bandwidth),
// change the following "False" to "True":
Boolean iFramesOnly = False;


//打印相关信息的函数
static void announceStream(RTSPServer* rtspServer, ServerMediaSession* sms,
  char const* streamName, char const* inputFileName); // fwd


int main(int argc, char** argv) {
  // Begin by setting up our usage environment:
  // 1.创建任务调度器,createNew其实就是创建类的实例
  TaskScheduler* scheduler = BasicTaskScheduler::createNew();
// 2. 创建交互环境
  env = BasicUsageEnvironment::createNew(*scheduler);
  //以下为权限控制的代码,设置后没有权限的客户端无法进行连接
  UserAuthenticationDatabase* authDB = NULL;
#ifdef ACCESS_CONTROL
  // To implement client access control to the RTSP server, do the following:
  authDB = new UserAuthenticationDatabase;
  authDB->addUserRecord("username1", "password1"); // replace these with real strings
  // Repeat the above with each <username>, <password> that you wish to allow
  // access to the server.
#endif


  // 3. Create the RTSP server:此时就一直处于监听模客户端的连接
  RTSPServer* rtspServer = RTSPServer::createNew(*env, 8554, authDB);
  if (rtspServer == NULL) {
    *env << "Failed to create RTSP server: " << env->getResultMsg() << "\n";
    exit(1);
  }


  char const* descriptionString
    = "Session streamed by \"testOnDemandRTSPServer\"";


  // Set up each of the possible streams that can be served by the
  // RTSP server.  Each such stream is implemented using a
  // "ServerMediaSession" object, plus one or more
  // "ServerMediaSubsession" objects for each audio/video substream.


  // A H.264 video elementary stream:
  {
    char const* streamName = "H264unicast";//流名字,媒体名
    char const* inputFileName = "test.264";//文件名,当客户端输入的流名字为h264ESVideoTest时,实际上打开的是test.264文件
    // 4.创建媒体会话
    //当客户点播时,要输入流名字streamName,告诉RTSP服务器点播的是哪个流。
    //流名字和文件名的对应关系是通过增加子会话建立起来的(流名字streamName不是文件名inputFileName)。媒体会话对会话描述、会话持续时间、流名字等与会话有关的信息进行管理
    //第二个参数:媒体名、三:媒体信息、四:媒体描述
    ServerMediaSession* sms
      = ServerMediaSession::createNew(*env, streamName, streamName,
     descriptionString);
    //5.添加264子会话 这里的文件名才是真正打开文件的名字
    //reuseFirstSource:
    //这里的H264VideoFileS...类派生自FileServerMediaSubsession派生自OnDemandServerMediaSubsession
    //而OnDemandServerMediaSubsession和PassiveMediaSubsession共同派生自ServerMediaSubsession
    //关于读取文件之类都在这个类中实现的,如果要将点播改为直播就是要新建类继承此类然后添加新的方法
    sms->addSubsession(H264VideoFileServerMediaSubsession
      ::createNew(*env, inputFileName, reuseFirstSource));
     //6.为rtspserver添加session
    rtspServer->addServerMediaSession(sms);
     //打印信息到标准输出
    announceStream(rtspServer, sms, streamName, inputFileName);
  }


  // Also, attempt to create a HTTP server for RTSP-over-HTTP tunneling.
  // Try first with the default HTTP port (80), and then with the alternative HTTP
  // port numbers (8000 and 8080).


  if (rtspServer->setUpTunnelingOverHTTP(80) || rtspServer->setUpTunnelingOverHTTP(8000) || rtspServer->setUpTunnelingOverHTTP(8080)) {
    *env << "\n(We use port " << rtspServer->httpServerPortNum() << " for optional RTSP-over-HTTP tunneling.)\n";
  } else {
    *env << "\n(RTSP-over-HTTP tunneling is not available.)\n";
  }
  //执行循环方法,来执行循环方法,对套接字的读取事件和对媒体文件的延时发送操作都在这个循环中完成。
  env->taskScheduler().doEventLoop(); // does not return


  return 0; // only to prevent compiler warning
}


static void announceStream(RTSPServer* rtspServer, ServerMediaSession* sms,
  char const* streamName, char const* inputFileName) {
  char* url = rtspServer->rtspURL(sms);
  UsageEnvironment& env = rtspServer->envir();
  env << "\n\"" << streamName << "\" stream, from the file \""
      << inputFileName << "\"\n";
  env << "Play this stream using the URL \"" << url << "\"\n";
  delete[] url;
} 然后你可以跟 LIVE555再学习 -- testH264VideoStreamer 源码分析 里的代码做一下比较。
玛德 豁然开朗,单播原来也就是这么回事。
想了解更多,参看:Live555学习之(二)------- testOnDemandRTSPServer
这部分看来有点必要后面再认真的讲一下吧
其中的 doEventLoop 函数有点意思 详解参看:LIVE555再学习 -- live555实现RTSP直播服务器 分析
三、测试
在 testProgs 目录下放入 test.264,执行 ./testOnDemandRTSPServer
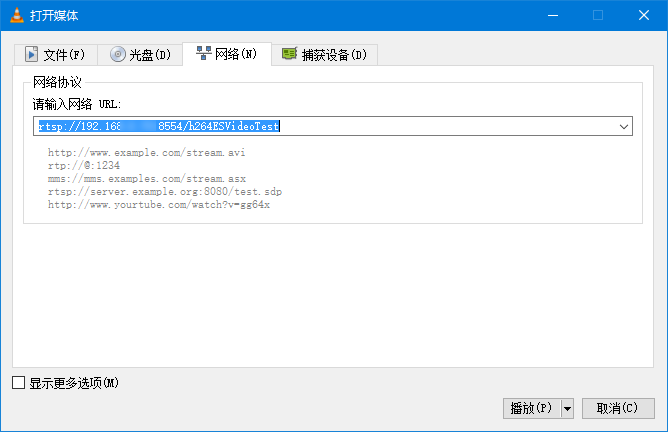
可以看到有提示嘛,在 VLC 上输入URL rtsp://192.168.2.xx:8554/h264ESVideoTest
OK,有视频显示。此时,我还没看单播和多播区别,也没看testOnDemandRTSPServer的源码,不过好奇怪为什么
上面测试,现在了解到 testOnDemandRTSPServer 是单播,传输现有的 test.264 有是点播。


 1834
1834

 被折叠的 条评论
为什么被折叠?


