


开源第六周:
这周使用了ethernet shield模块将数据传输到yeelink平台,通过yeelink平台服务器处理显示发送的数据。
一、ethernet shie:
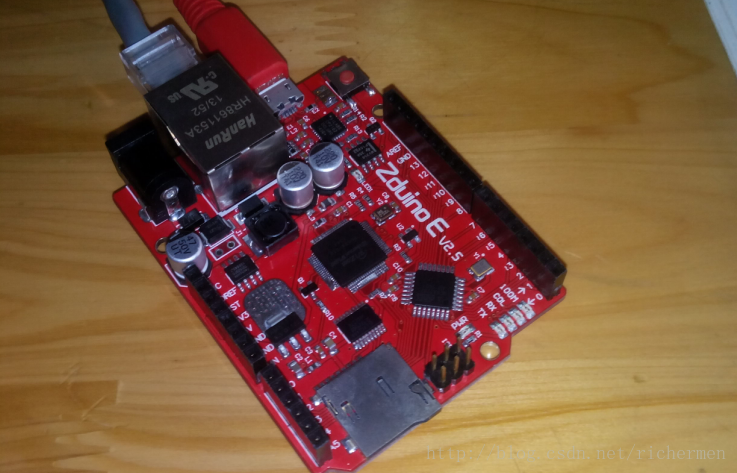
着款控制器是一款很奇特的控制器,它可以连接网线,通过程序设置本地mac地址和目标服务器地址实现数据的发送和接收功能。可以利用已经连接网络的电脑连接网络,也可以直接把程序烧入直接连接路由器连接网络。如果给模块加一个无线串口,也完全可以把这个传感器当作数据节点使用。
这个控制器是基于Arduino Ethernet的微控制器板,板载以W5500为核心的网络模块,可以使Arduino成为简单的Web服务器或者通过网络控制读写Arduino的数字和模拟接口等网络应用。可直接使用IDE中的Ethernet库文件便可实现一个简单Web服务器。
W5500是一款集TCP/IP协议、MAC和PHY(10/100M Base T)于一体的网络芯片,支持直接总线接口、间接总线接口和 SPI总线,Arduino IDE内置的Ethernet库仍兼容于W5500。直接把W5500当外部RAM使用,MCU初始化一下I/O,寄存器等就能使用了。是一种简易快速拓展Ethernet的方案,在稳定性及高效性方面表现也非常突出。 支持硬件 TCP/IP 协议:TCP, UDP, ICMP, IPv4, ARP, IGMP, PPPoE 。
名称 性能 说明
输入电压(推荐) 7~12V 最高可到40V
输入POE模块电压(推荐) 7~30V 需支持48V,参见“高级进阶”
数字I/O脚 14个 其中3、5、6、9、10、11号端口可用于PWM输出;10、11、12、13号端口用于SPI通信;4号端口用于TF卡片选;10号端口为W5500片选;2号端口可通过短接
模拟输入脚 6个
每个I/O直流输出能力 40 mA 整个处理器工作电流不得超过200mA
3.3V直流输出能力 50 mA
Flash Memory 32 KB 其中0.5 KB 用于 bootloader
其他 TCP/IP Ethernet控制器W5500支持Power Over Ethernet供电输入MicroSD卡(TF卡)座MicroUSB下载
说明 支持Micro SD卡读/写;Ethernet和MicroSD卡共用SPI口,通过4、10号端口分时复用。4、10号端口置高后,可继续接入其他的SPI设备。
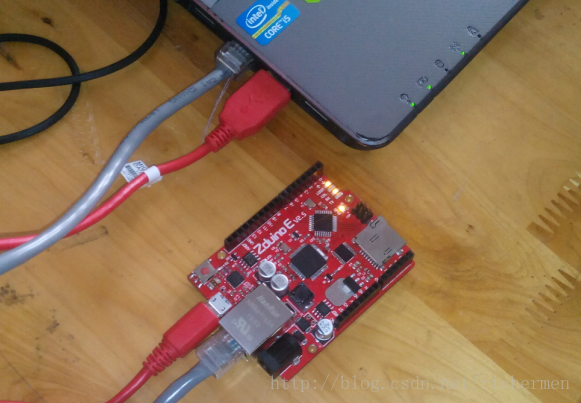
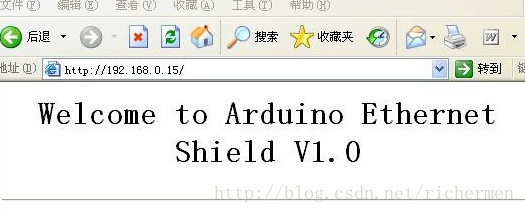
使用直通线将Ethernet扩展板和路由器连接好以后,Ethernet扩展板RJ45网络插座上的绿色灯会亮,库文件(Ethernet扩展板的库文件下载(Web Server),请下载后解压到arduino-0011\hardware\libraries)里面有个一个Web Server例程,打开编译后下载进Arduino,完成后Ethernet扩展板RJ45网络插座上的橙色灯会闪烁几下,表示网络芯片初始化完成。这时我们的Arduino就一个超小型的Web服务器了。打开IE浏览器,地址栏输入http://192.168.0.15/后回车,便进入Arduino内部的网页了
通过这个模块,给模块烧入连接程序就可以连接网络了。注意的是一定要设置好网络的参数(mac地址,目标IP地址,api key等),否则数据是在平台上显示不出来的。
二、连接yeelink,上传数据:
yeelink平台提供了两种方式,一种是arduino/单片机通过直接socket网络连接的办法,连入平台上,保持和服务器的长连接,这种方法控制的实时性相对较强;另外一种办法是arduino作为客户端,定期的向服务器查询传感器的当前值。
首先,照例我们要先申请到yeelink的API-KEY才可以进行:
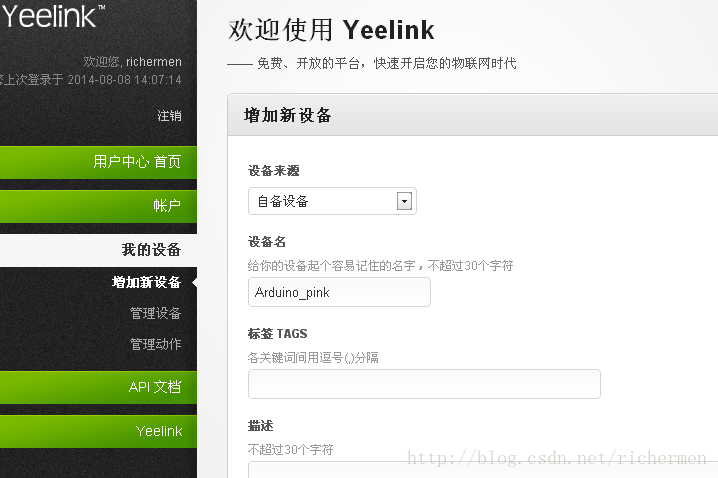
第一步: 注册之后,增加一个开关类的传感器。
第二步,获取这次插入的控制设备的设备号和传感器号。
第三步:连接网络,设置参数。
要注意这里的设置

1.APIKEY: 这个需要自己账号的APIKEY
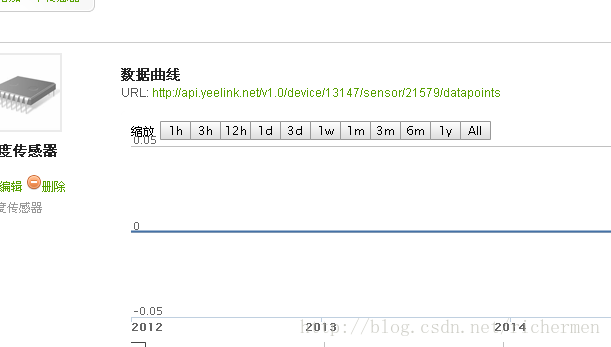
2.DEVICEID :这个需要设备号,获取这次插入的控制设备的设备号和传感器号:如下图来说,就是设备号=13147,传感器号=21579
3.SENSORID:这个需要传感器号
另外,需要注意一点,ethernet shield是需要你家中的路由器开启DHCP功能的,如果没有开启,可以参考将
1. 代码中添加 byte ip[] = { 192, 168, 1, 12 }; (根据网络环境更改)
2. 将Ethernet.begin(mac) 替换成Ethernet.begin(mac, ip);
1. 代码中添加 byte ip[] = { 192, 168, 1, 12 }; (根据网络环境更改)
2. 将Ethernet.begin(mac) 替换成Ethernet.begin(mac, ip);
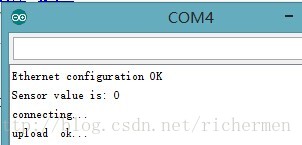
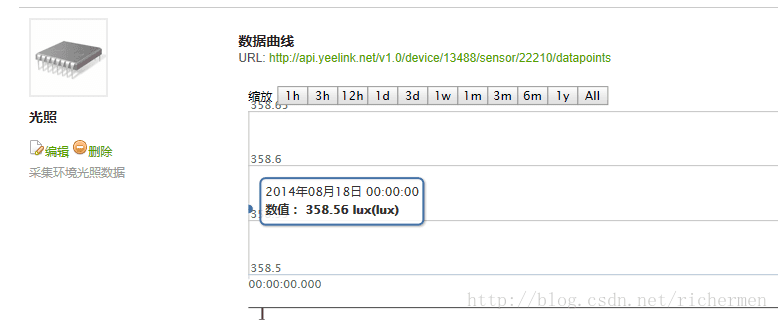
这里是通过ethernet shie上传yeelink的光照数据的展示图:
下面是上传光照数据到yeelink的源代码:
#include <SPI.h>
#include <Ethernet.h>
#include <Wire.h>
#include <math.h>
int BH1750address = 0x23;
byte buff[2];

// for yeelink api
#define APIKEY         "c10bce8bbb373f95f5a08c9fcc637a89" // replace your yeelink api key here
#define DEVICEID       13488 // replace your device ID
#define SENSORID       22210 // replace your sensor ID

// assign a MAC address for the ethernet controller.
byte mac[] = {0x6c,0x71,0xd9,0x64,0x6e,0xda};
// initialize the library instance:
EthernetClient client;
char server[] = "api.yeelink.net";   // name address for yeelink API

unsigned long lastConnectionTime = 0;          // last time you connected to the server, in milliseconds
boolean lastConnected = false;                 // state of the connection last time through the main loop
const unsigned long postingInterval = 30*1000; // delay between 2 datapoints, 30s

void setup() {
  Wire.begin();
  // start serial port:
  Serial.begin(57600);
  // start the Ethernet connection with DHCP:
  if (Ethernet.begin(mac) == 0) {
    Serial.println("Failed to configure Ethernet using DHCP");
    for(;;)
      ;
  }
  else {
    Serial.println("Ethernet configuration OK");
  }
}

void loop() {
  // if there's incoming data from the net connection.
  // send it out the serial port.  This is for debugging
  // purposes only:
  if (client.available()) {
    char c = client.read();
    Serial.print(c);
  }

  // if there's no net connection, but there was one last time
  // through the loop, then stop the client:
  if (!client.connected() && lastConnected) {
    Serial.println();
    Serial.println("disconnecting.");
    client.stop();
  }

  // if you're not connected, and ten seconds have passed since
  // your last connection, then connect again and send data:
  if(!client.connected() && (millis() - lastConnectionTime > postingInterval)) {
    // read sensor data, replace with your code
    int sensorReading = readLightSensor();
    //send data to server
    sendData(sensorReading);
  }
  // store the state of the connection for next time through
  // the loop:
  lastConnected = client.connected();
}

// this method makes a HTTP connection to the server:
void sendData(int thisData) {
  // if there's a successful connection:
  if (client.connect(server, 80)) {
    Serial.println("connecting...");
    // send the HTTP PUT request:
    client.print("POST /v1.0/device/");
    client.print(DEVICEID);
    client.print("/sensor/");
    client.print(SENSORID);
    client.print("/datapoints");
    client.println(" HTTP/1.1");
    client.println("Host: api.yeelink.net");
    client.print("Accept: *");
    client.print("/");
    client.println("*");
    client.print("U-ApiKey: ");
    client.println(APIKEY);
    client.print("Content-Length: ");
    Serial.println("upload  ok...");

    // calculate the length of the sensor reading in bytes:
    // 8 bytes for {"value":} + number of digits of the data:
    int thisLength = 10 + getLength(thisData);
    client.println(thisLength);

    client.println("Content-Type: application/x-www-form-urlencoded");
    client.println("Connection: close");
    client.println();

    // here's the actual content of the PUT request:
    client.print("{\"value\":");
    client.print(thisData);
    client.println("}");
  }
  else {
    // if you couldn't make a connection:
    Serial.println("connection failed");
    Serial.println();
    Serial.println("disconnecting.");
    client.stop();
  }
   // note the time that the connection was made or attempted:
  lastConnectionTime = millis();
}

// This method calculates the number of digits in the
// sensor reading.  Since each digit of the ASCII decimal
// representation is a byte, the number of digits equals
// the number of bytes:
int getLength(int someValue) {
  // there's at least one byte:
  int digits = 1;
  // continually divide the value by ten,
  // adding one to the digit count for each
  // time you divide, until you're at 0:
  int dividend = someValue /10;
  while (dividend > 0) {
    dividend = dividend /10;
    digits++;
  }
  // return the number of digits:
  return digits;
}

///
// get data from light sensor
// you can replace this code for your sensor
int readLightSensor()
{
  uint16_t val=0;
  BH1750_Init(BH1750address);
  delay(200);
  if(2==BH1750_Read(BH1750address))
  {
    val=((buff[0]<<8)|buff[1])/1.2;
  }

  Serial.print("Sensor value is: ");
  Serial.println((int)val);

  return val;
}

int BH1750_Read(int address) //
{
  int i=0;
  Wire.beginTransmission(address);
  Wire.requestFrom(address, 2);
  while(Wire.available()) //
  {
    buff[i] = Wire.read();  // receive one byte
    i++;
  }
  Wire.endTransmission();
  return i;
}

void BH1750_Init(int address)
{
  Wire.beginTransmission(address);
  Wire.write(0x10);//1lx reolution 120ms
  Wire.endTransmission();
}


 4858
4858


 被折叠的 条评论
为什么被折叠?
被折叠的 条评论
为什么被折叠?
 到【灌水乐园】发言


