


本系列导航:
linux驱动由浅入深系列:高通sensor架构实例分析之一(整体概览+AP侧代码分析)
linux驱动由浅入深系列:高通sensor架构实例分析之二(adsp驱动代码结构)
Linux驱动由浅入深系列:高通sensor架构实例分析之三(adsp上报数据详解、校准流程详解)
最初的时候芯片厂家对sensor的处理和对待其它外设一样都是直接挂在processor上,sensor的驱动也和其他linux或android的驱动一样,生成对应的设备节点给上层提供数据(关于此类linux基础驱动的知识,可以参考本博客其他博文)。但后来这一切发生了变化,最主要的原因就是功耗。Sensor希望自己能够一直处于工作状态下,如计步器等应用场景。这样如果sensor还挂在主processor上(这时候处理器就分多核啦)势必影响待机功耗。因此各个芯片厂推出了各自的方案,如sensor-hub等等。高通在MSM8960之后就将sensor的处理塞到了一个单独的音频dsp中了(MSM8953中这个dsp叫作aDSP),这样待机时主处理器休眠降低功耗,由这个aDSP在处理音频数据的间隙捎带着就能把sensor的数据处理了^^。下面以MSM8953为例分析一下其结构。
高通sensor软件架构
首先来看一下高通sensor处理的软件框图:
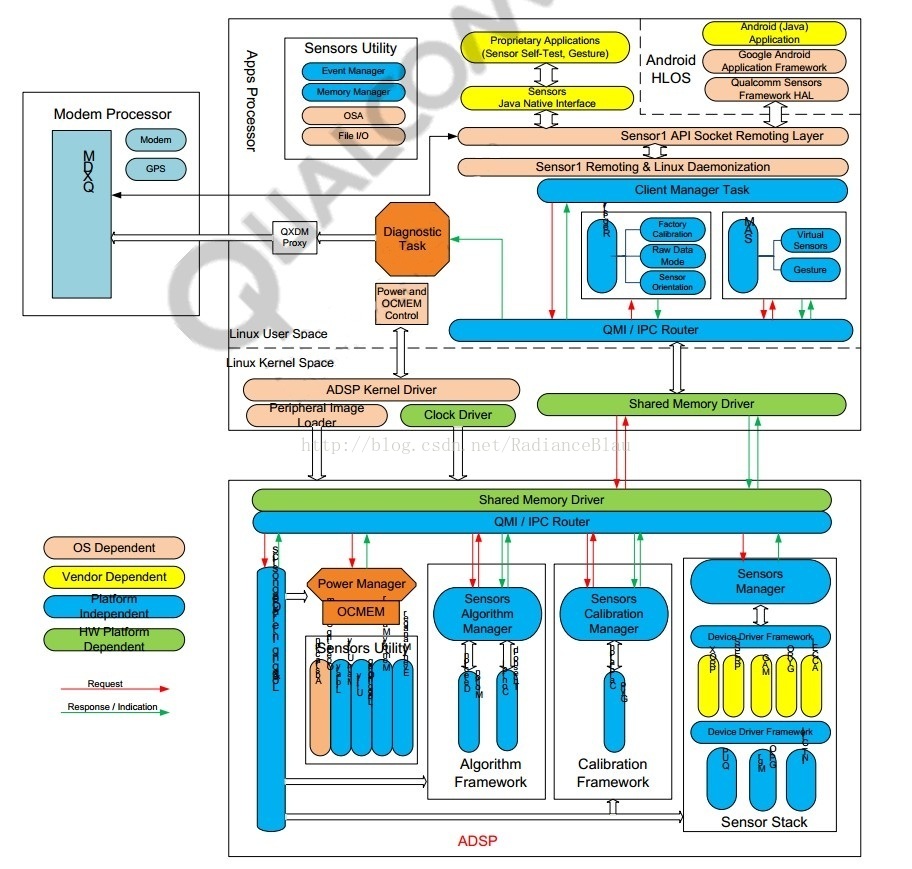
1, 框图上半部分是应用处理器,下半部分是aDSP。
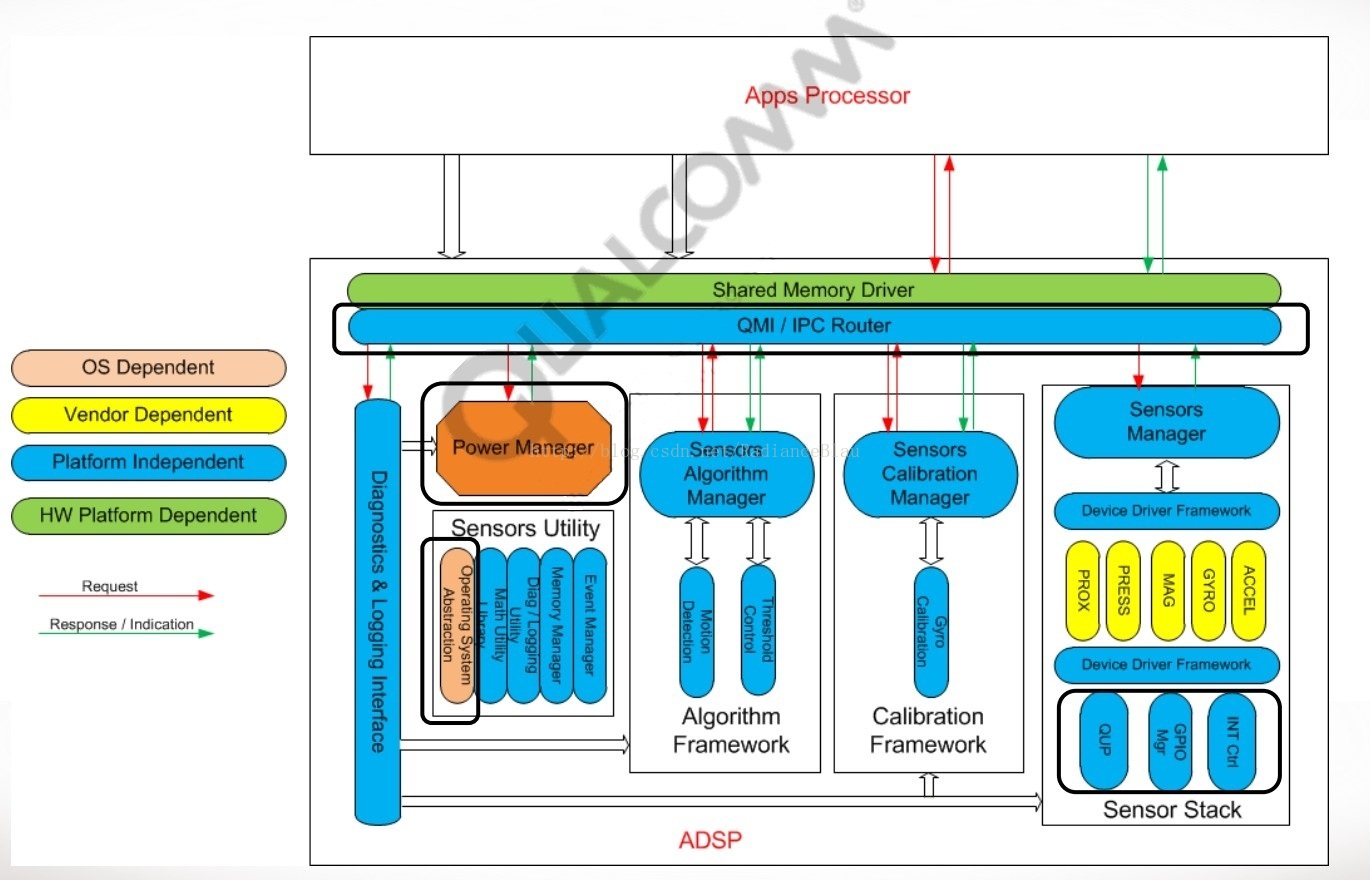
2, aDSP中包含了log接口,电源管理,sensor算法库,sensor校准,各个sensor的管理模块。最后一个是直接挂载各个传感器的(Prox、Press、Mag、Gyro、Acc),软件中的主要部分叫作SMGR。[上图文字怎么乱了,补充一张^-^]
3, 在应用处理器中,软件接口中不再有每个sensor的设备节点了。那有的是什么呢,只有Sensor1 API Socket Remoting Layer层对应的API接口。这个接口是本文的重点,下文详细解释。
4, 那么aDSP与应用处理器之间用什么机制进行通信呢?图中可以看到一个叫QMI的东西,就是它了,这个高通基于共享内存机制开发的多核间通信技术,在应用处理器侧和aDSP侧都有相应的库已经完成了底层实现。之后有机会分析一下这种号称最为有效的多核间通信技术。
5, 应用处理器侧还有些乱七八糟的蓝色框,这部分是运行在应用处理器侧的sensor算法、校准相关的东西。这是些只会在非待机模式运行的算法,就适合放在这个地方了。
android中sensor架构
在android中sensor的架构图如下:
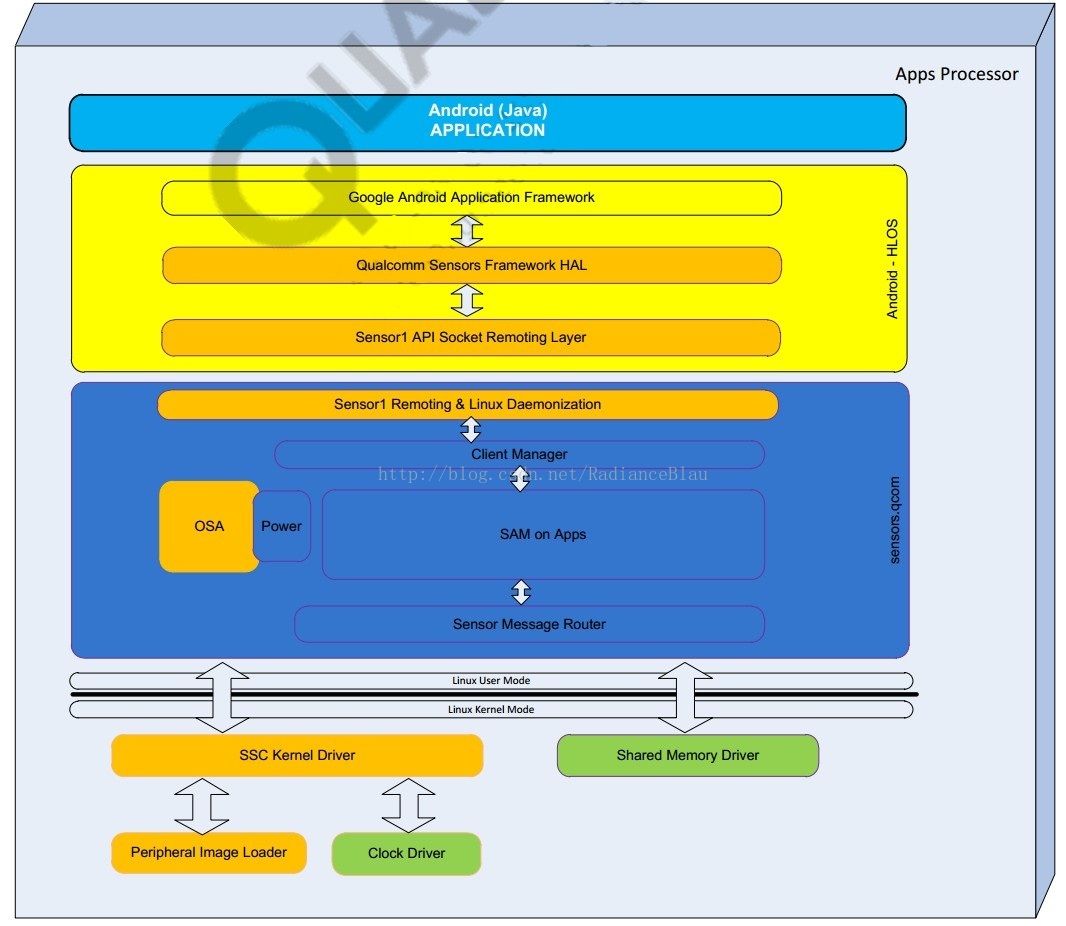
在Sensor1 API Socket Remoting Layer层的基础上转换成了android的Framwork层就可以被APP调用了,目前我们先以linux 应用程序的直接调用Sensor1 API Socket Remoting Layer层接口为例进行演示。
高通sensor测试工具
高通为sensor的测试提供了默认的工具,代码位于:
vendor\qcom\proprietary\sensors\dsps\test\src\sns_dsps_tc0001.c
vendor\qcom\proprietary\sensors\dsps\test\src\sns_cm_test.cpp
编译后生成对应的bin文件:
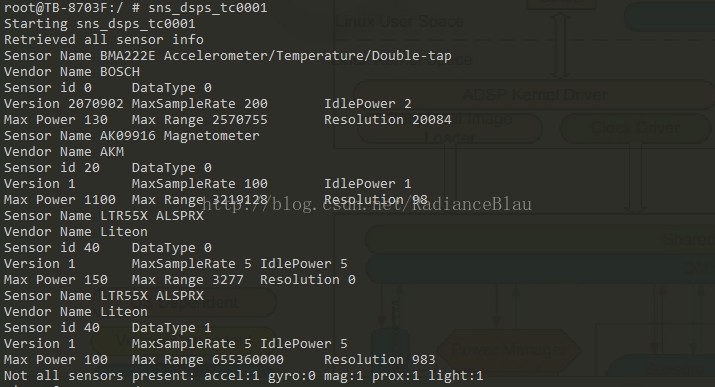
1,sns_dsps_tc0001用来查看当前系统挂载的sensor的相关信息:
2,sns_cm_test用来获取对应sensor_id的传感器数据:
Sensor的API接口:
1,
sensor1_error_e sensor1_open(sensor1_handle_s**hndl, sensor1_notify_data_cb_t data_cbf, intptr_t cb_data );
| ← | hndl | Opaque handle used to identify this client |
| → | data_cbf | Pointer to the client’s callback function to process received data |
| → | cb_data | This data is set by the client and will be passed unmodified as a |
2,
typedef void (*sensor1_notify_data_cb_t) (uint32 cb_data, sensor1_msg_header_s* msg_hdr, sensor1_msg_type_e msg_type, void *msg_ptr);
| → | cb_data | Unmodified value passed in when the callback was registered in |
| → | msg_hdr | Message header defining the message |
| → | msg_type | Type of message |
| → | msg_ptr | Pointer to the QMI-based message; these messages are defined in their |
3,
sensor1_error_e sensor1_close(sensor1_handle_s* hndl );
| → | hndl | Opaque handle used to identify this client |
4,
sensor1_error_e sensor1_write(sensor1_handle_s* hndl, sensor1_msg_header_s* msg_hdr, void *msg_ptr);
| → | hndl | Opaque handle to identify this client |
| → | msg_hdr | Message header defining the message |
| → | msg_ptr | Pointer to the QMI-based request message; these messages are defined |
5,
sensor1_error_e sensor1_writeable(sensor1_handle_s* hndl, sensor1_write_cb_t cbf, intptr_t cb_data, uint32_t service_number );
| → | hndl | Opaque handle to identify this client |
| → | cbf | Pointer to the client’s callback function |
| → | cb_data | This data is set by the client and will be passed unmodified as a |
| → | service_number | Client callback function will be called when it is possible that this |
6,
typedef void (*sensor1_write_cb_t) (intptr_t cb_data, uint32_t service_number);
| → | cb_data | Unmodified value passed in when the callback was registered in |
| → | service_number | Service ID to which this callback refers |
7,
sensor1_error_e sensor1_alloc_msg_buf(sensor1_handle_s* hndl, uint16_t size, void **buffer );
| → | hndl | Opaque handle to identify this client |
| → | size | Size of the message structure |
| ← | buffer | Address of a pointer to the memory address where the message should be |
8,
sensor1_error_e sensor1_free_msg_buf(sensor1_handle_s* hndl, void* msg_buf );
| → | hndl | Opaque handle to identify this client |
| → | msg_buf | Buffer to free |
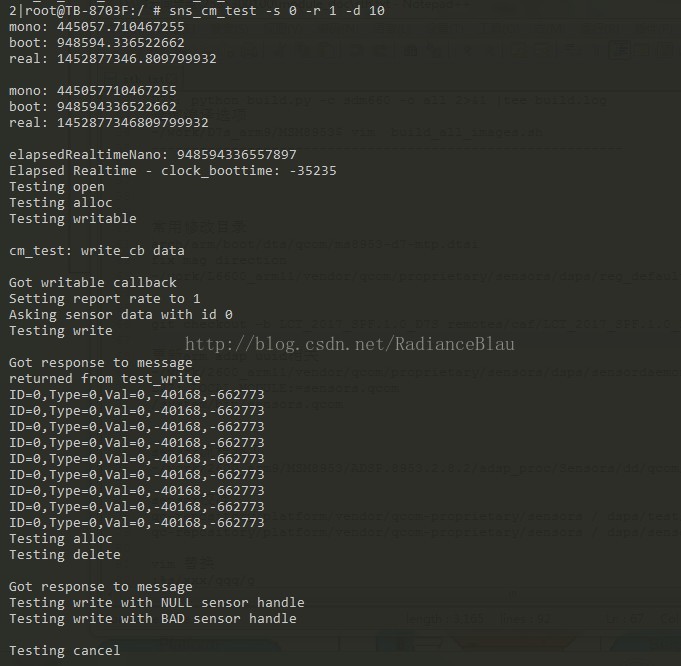
sns_cm_test.cpp代码实例
有了上面的api接口介绍,来看一下sns_cm_test.cpp中对其使用就比较清晰了:
- 好吧,为了避免麻烦,删除了高通私有代码演示,有代码的去上面指出的文件分析即可。相信没有代码的也不会看这篇文章^^ 本文仅做学习交流目的,如有侵权请联系博主。


 1万+
1万+


 被折叠的 条评论
为什么被折叠?
被折叠的 条评论
为什么被折叠?
 到【灌水乐园】发言


