


至于Service的概念,在此不作详解。先来看该程序的大体思路:在MainActivity中获得Testservice中的Timer的“加数”服务。

activity_main.xml(给出此文件是为了让演示方便)
<RelativeLayout xmlns:android="http://schemas.android.com/apk/res/android"
    xmlns:tools="http://schemas.android.com/tools"
    android:layout_width="match_parent"
    android:layout_height="match_parent"
    android:paddingBottom="@dimen/activity_vertical_margin"
    android:paddingLeft="@dimen/activity_horizontal_margin"
    android:paddingRight="@dimen/activity_horizontal_margin"
    android:paddingTop="@dimen/activity_vertical_margin"
    tools:context=".MainActivity" >

    <Button
        android:id="@+id/btnStartService"
        android:layout_width="wrap_content"
        android:layout_height="wrap_content"
        android:layout_alignParentLeft="true"
        android:layout_alignParentTop="true"
        android:text="启动Service" />

    <Button
        android:id="@+id/btnStopService"
        android:layout_width="wrap_content"
        android:layout_height="wrap_content"
        android:layout_alignLeft="@+id/btnStartService"
        android:layout_below="@+id/btnStartService"
        android:layout_marginTop="20dp"
        android:text="停止Service" />

    <Button
        android:id="@+id/bindService"
        android:layout_width="wrap_content"
        android:layout_height="wrap_content"
        android:layout_alignLeft="@+id/btnStopService"
        android:layout_below="@+id/btnStopService"
        android:layout_marginTop="20dp"
        android:text="绑定Service" />

    <Button
        android:id="@+id/unbindService"
        android:layout_width="wrap_content"
        android:layout_height="wrap_content"
        android:layout_alignLeft="@+id/bindService"
        android:layout_below="@+id/bindService"
        android:layout_marginTop="20dp"
        android:text="解除绑定 service" />

    <Button
        android:id="@+id/btmGetCurNum"
        android:layout_width="wrap_content"
        android:layout_height="wrap_content"
        android:layout_alignLeft="@+id/unbindService"
        android:layout_below="@+id/unbindService"
        android:layout_marginTop="20dp"
        android:text="获得当前Service中的数字" />

</RelativeLayout>package songshi.testservice2;
import java.util.Timer;
import java.util.TimerTask;
import android.app.Activity;
import android.content.ComponentName;
import android.content.Context;
import android.content.Intent;
import android.content.ServiceConnection;
import android.os.Bundle;
import android.os.IBinder;
import android.view.Menu;
import android.view.View;
import android.view.View.OnClickListener;
import android.widget.Button;
public class MainActivity extends Activity implements OnClickListener,
ServiceConnection {
private Button btnStart, btnStop, btnBind, btnUnbind, btnGetCurNum;
private Intent serviceIntent;
private Testservice testservice;
@Override
protected void onCreate(Bundle savedInstanceState) {
super.onCreate(savedInstanceState);
setContentView(R.layout.activity_main);
btnStart = (Button) findViewById(R.id.btnStartService);
btnStop = (Button) findViewById(R.id.btnStopService);
btnStart.setOnClickListener(this);
btnStop.setOnClickListener(this);
serviceIntent = new Intent(this, Testservice.class);
btnBind = (Button) findViewById(R.id.bindService);
btnUnbind = (Button) findViewById(R.id.unbindService);
btnBind.setOnClickListener(this);
btnUnbind.setOnClickListener(this);
btnGetCurNum = (Button) findViewById(R.id.btmGetCurNum);
btnGetCurNum.setOnClickListener(this);
}
@Override
public boolean onCreateOptionsMenu(Menu menu) {
// Inflate the menu; this adds items to the action bar if it is present.
getMenuInflater().inflate(R.menu.main, menu);
return true;
}
@Override
public void onClick(View v) {
// TODO Auto-generated method stub
switch (v.getId()) {
case R.id.btnStartService:
startService(serviceIntent);
break;
case R.id.btnStopService:
stopService(serviceIntent);
break;
case R.id.bindService:
bindService(serviceIntent, this, Context.BIND_AUTO_CREATE);
break;
case R.id.unbindService:
unbindService(this);
testservice = null;
break;
case R.id.btmGetCurNum:
if (testservice != null) {
System.out.println("当前Service中的数字是:"
+ testservice.getCurrentNum());
}
break;
}
}
@Override
public void onServiceConnected(ComponentName arg0, IBinder testBinder) {
// TODO Auto-generated method stub
System.out.println("service has been onServiceConnected");
testservice =((Testservice.TestServiceBinder)testBinder).getTSService();
}
@Override
public void onServiceDisconnected(ComponentName arg0) {
// TODO Auto-generated method stub
System.out.println("service has been onServiceDisconnected");
//只有在service因异常而断开连接的时候,这个方法才会用到。所以上面这句话是不会在下面的Logcat中打印出来的。
}
}
package songshi.testservice2;

import java.util.Timer;
import java.util.TimerTask;

import android.app.Service;
import android.content.Intent;
import android.os.Binder;
import android.os.IBinder;

public class Testservice extends Service {

	public class TestServiceBinder extends Binder{
		public Testservice getTSService(){
			return Testservice.this;
		}
	}

	private TestServiceBinder testServiceBinder=new TestServiceBinder();

	@Override
	public IBinder onBind(Intent intent) {
		// TODO Auto-generated method stub
		System.out.println("service onBind");
		return testServiceBinder;
	}

	@Override
	public void onCreate() {
		// TODO Auto-generated method stub
		System.out.println("service onCreate");
		startTimer();

		super.onCreate();

	}

	@Override
	public void onDestroy() {
		// TODO Auto-generated method stub
		System.out.println("service onDestroy");
		stopTimer();
		super.onDestroy();


	}

	private Timer timer = null;
	private TimerTask timerTask = null;

	private int i = 0;

	public void startTimer() {
		if (timer == null) {
			timer = new Timer();
			timerTask = new TimerTask() {

				@Override
				public void run() {
					// TODO Auto-generated method stub
					i++;
					System.out.println(i);
				}
			};

			timer.schedule(timerTask, 2000, 2000);
		}
	}

	public void stopTimer() {
		if (timer != null) {
			timer.cancel();
			timerTask.cancel();

			timer = null;
			timerTask = null;
		}
	}

	public int getCurrentNum() {
		return i;
	}
}
绑定Service——获取当前服务中的数字——解除绑定Service:
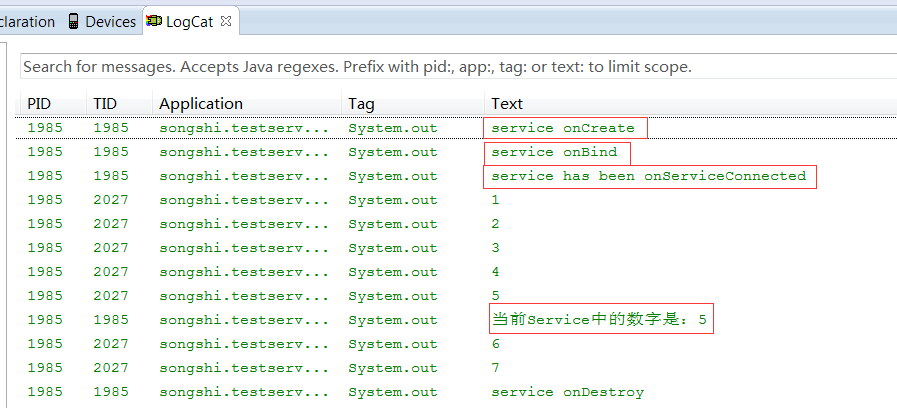
通过上图,我们可以看到,启动和绑定都能启动service!至于其中的详细过程,根据上图Logcat的输出,结合程序,可以跟踪一下整个流程。由于Service 的onStart()方法只有在startService()启动Service的情况下才调用,故使用onStart()的时候要注意这点。
与 Service 通信并且让它持续运行,如果我们想保持和 Service 的通信,又不想让 Service 随着 Activity 退出而退出呢?你可以先 startService() 然后再 bindService() 。当你不需要绑定的时候就执行 unbindService() 方法,执行这个方法只会触发 Service 的 onUnbind() 而不会把这个 Service 销毁。这样就可以既保持和 Service 的通信,也不会随着 Activity 销毁而销毁了。
服务不能自己运行,需要通过调用Context.startService()或Context.bindService()方法启动服务。这两个方法都 可以启动Service,但是它们的使用场合有所不同。使用startService()方法启用服务,调用者与服务之间没有关连,即使调用者退出了,服 务仍然运行。使用bindService()方法启用服务,调用者与服务绑定在了一起,调用者一旦退出,服务也就终止,大有“不求同时生,必须同时死”的 特点。
1.Context.startService()方式启动
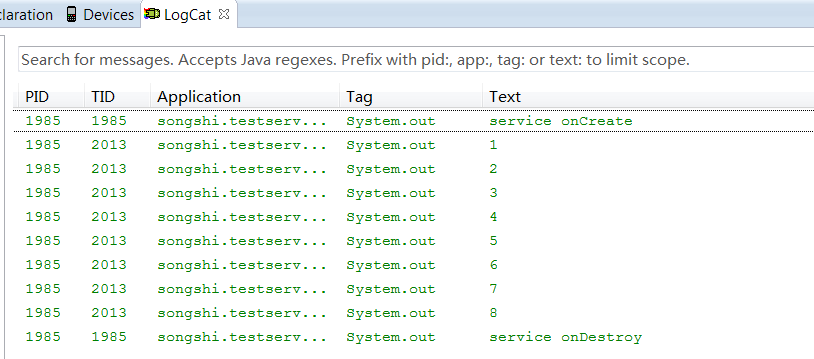
Context.startService()方式的生命周期: 启动时,startService –> onCreate() –> onStart()停止时,stopService –> onDestroy()如果调用者直接退出而没有停止Service,则Service 会一直在后台运行 Context.startService()方法启动服务,在服务未被创建时,系统会先调用服务的onCreate()方法,接着调用onStart()方法。如果调用startService()方法前服务已经被创建,多次调用startService()方法并不会导致多次创建服务,但会导致多次调用onStart()方法。采用startService()方法启动的服务,只能调用Context.stopService()方法结束服务,服务结束时会调用onDestroy()方法附代码
如果打算采用Context.startService()方法启动服务,在服务未被创建时,系统会先调用服务的onCreate()方法,接着调用onStart()方法。如果调用startService()方法前服务已经被创建,多次调用startService()方法并不会导致多次创建服务,但会导致多次调用onStart()方法。采用startService()方法启动的服务,只能调用Context.stopService()方法结束服务,服务结束时会调用onDestroy()方法。
2.Context.bindService()方式启动
Context.bindService()方式的生命周期: 绑定时,bindService -> onCreate() –> onBind()调用者退出了,即解绑定时,Srevice就会unbindService –>onUnbind() –> onDestory()Context.bindService()方式启动 Service的方法:绑定Service需要三个参数:bindService(intent, conn, Service.BIND_AUTO_CREATE);第一个:Intent对象第二个:ServiceConnection对象,创建该对象要实现它的onServiceConnected()和 onServiceDisconnected()来判断连接成功或者是断开连接第三个:如何创建Service,一般指定绑定的时候自动创建附代码
如果打算采用Context.bindService()方法启动服务,在服务未被创建时,系统会先调用服务的 onCreate()方法,接着调用onBind()方法。这个时候调用者和服务绑定在一起,调用者退出了,系统就会先调用服务的onUnbind()方 法,接着调用onDestroy()方法。如果调用bindService()方法前服务已经被绑定,多次调用bindService()方法并不会导致 多次创建服务及绑定(也就是说onCreate()和onBind()方法并不会被多次调用)。如果调用者希望与正在绑定的服务解除绑定,可以调用 unbindService()方法,调用该方法也会导致系统调用服务的onUnbind()-->onDestroy()方法。


 924
924

 被折叠的 条评论
为什么被折叠?
被折叠的 条评论
为什么被折叠?
 到【灌水乐园】发言


