


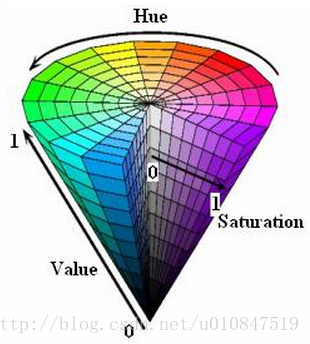
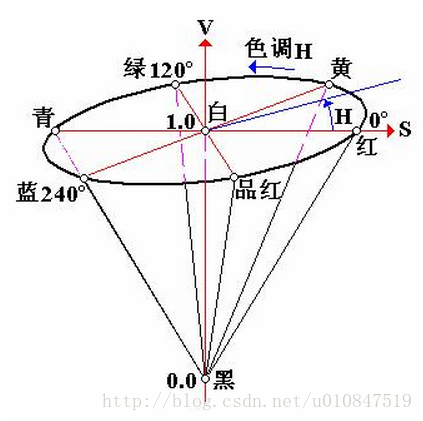
HSV颜色空间
HSV颜色空间与人眼所看色彩较接近, 故常用于颜色检测与识别。其中H(色调)、S(饱和度)、V(亮度)
- H—不同的颜色(红色/绿色/蓝色)—范围: 0~360
- S—颜色深浅(浅红/深红)—范围: 0.0~1.0
- V—颜色亮暗(暗红/亮红)—范围: 0.0~1.0
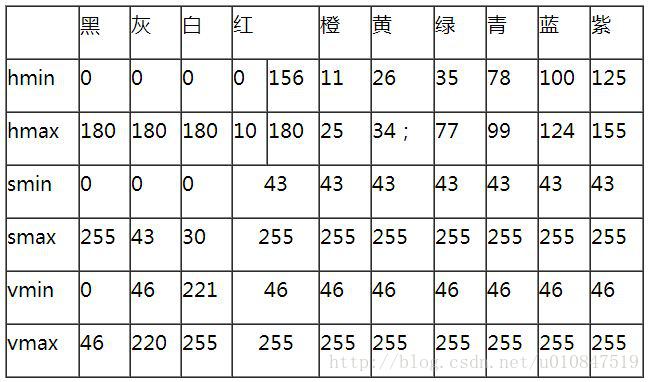
- OpenCV默认的HSV范围分别是:
H: 0~180, S: 0~255, V: 0~255
颜色空间转换—cvtColor()
转换颜色空间
void cvtColor( InputArray src, OutputArray dst, int code, int dstCn = 0 );将BGR颜色空间转换到HSV颜色空间
void cvtColor( InputArray srcImg, OutputArray hsv_img, BGR2HSV);颜色区间范围删选—inRange()
void inRange(InputArray src, InputArray lowerb,
InputArray upperb, OutputArray dst);- src: 输入原图或数组
- lowerb: 低边界或者颜色阈值
- upperb: 高边界或者颜色阈值
- dst: 输出目标图像, 需要和原图一样的size并且类型需为CV_8U
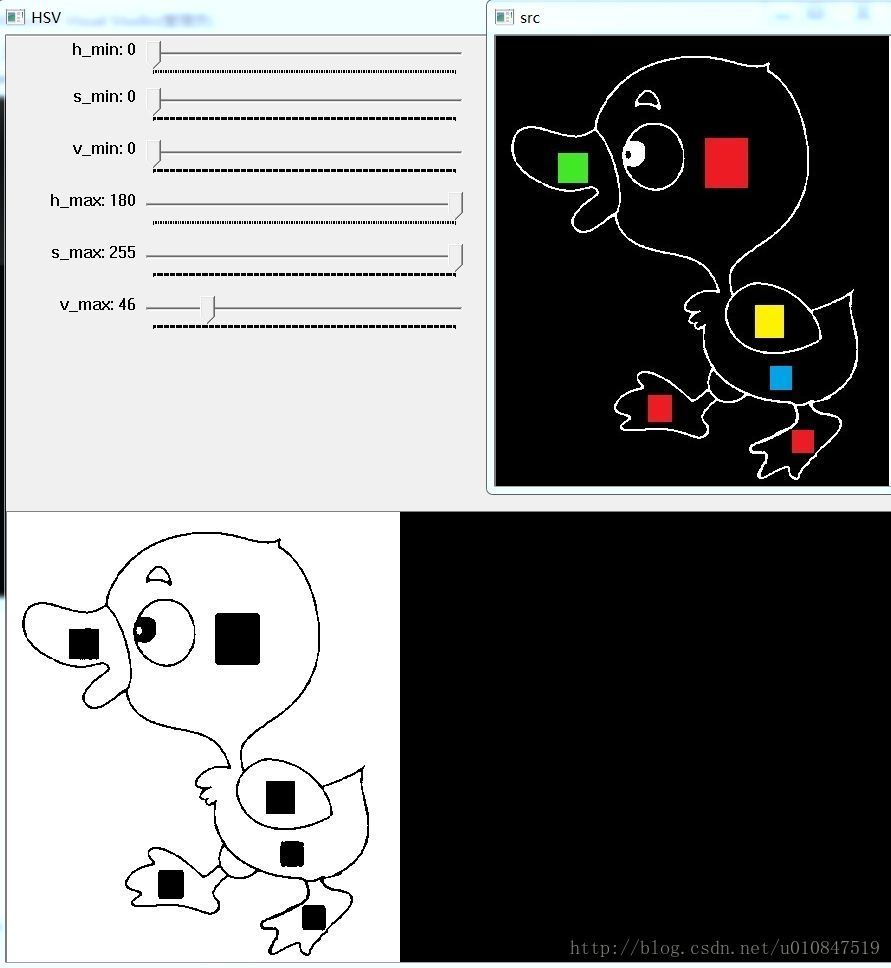
滑动条HSV参数debug工具
代码
#include "opencv2/opencv.hpp"
#include <iostream>
using namespace cv;
using namespace std;

Mat srcImg;
Mat hsv_img;

int h_min=0, s_min=0, v_min=0;
int h_max=180, s_max=255, v_max=46;

void OnChange(int, void* param)
{
Scalar hsv_min(h_min, s_min, v_min);
Scalar hsv_max(h_max, s_max, v_max);
Mat dstImg = Mat::zeros(srcImg.rows, srcImg.cols, CV_8UC3);
inRange(hsv_img, hsv_min, hsv_max, dstImg);

imshow("HSV", dstImg);
}

void main()
{
srcImg = imread("duck2.jpg");
imshow("src", srcImg);
cvtColor(srcImg, hsv_img, CV_BGR2HSV);  //转换到HSV颜色空间
namedWindow("HSV", CV_WINDOW_AUTOSIZE);
createTrackbar("h_min", "HSV", &h_min, 180, OnChange, 0);
createTrackbar("s_min", "HSV", &s_min, 255, OnChange, 0);
createTrackbar("v_min", "HSV", &v_min, 255, OnChange, 0);
createTrackbar("h_max", "HSV", &h_max, 180, OnChange, 0);
createTrackbar("s_max", "HSV", &s_max, 255, OnChange, 0);
createTrackbar("v_max", "HSV", &v_max, 255, OnChange, 0);

OnChange(h_min, 0);
OnChange(s_min, 0);
OnChange(v_min, 0);
OnChange(h_max, 0);
OnChange(s_max, 0);
OnChange(v_max, 0);

waitKey(0);
}
运行结果
识别图像中的绿色圆点
代码
#include "mainwindow.h"
#include<opencv2/opencv.hpp>
#include<opencv2/imgproc/imgproc.hpp>
#include<iomanip>
using namespace std;
using namespace cv;
///green hsv min value
int h_min = 35;
int s_min = 110;
int v_min = 106;
///green hsv max value
int h_max = 77;
int s_max = 255;
int v_max = 255;
MainWindow::MainWindow(QWidget *parent)
: QMainWindow(parent)
{
///识别图片中颜色物体
Mat srcImg = imread("D:\\1\\rgb.jpg");
imshow("src", srcImg);
Mat dstImg = srcImg.clone();
Mat hsv_img; //存储HSV图像
cvtColor(srcImg, hsv_img, CV_BGR2HSV); //BGR转到HSV颜色空间
Scalar hsv_min(h_min, s_min, v_min);
Scalar hsv_max(h_max, s_max, v_max);
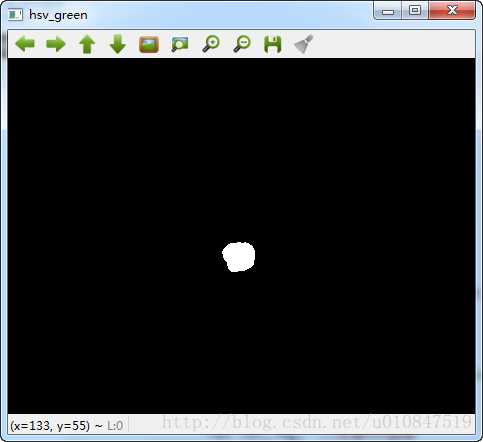
Mat hsv_green = Mat::zeros(srcImg.size(), CV_8U);
inRange(hsv_img, hsv_min, hsv_max, hsv_green);
medianBlur(hsv_green, hsv_green, 5);
imshow("hsv_green", hsv_green);
vector<vector<Point>> contours;
vector<Vec4i> hierarcy;
findContours(hsv_green, contours, hierarcy, CV_RETR_EXTERNAL, CV_CHAIN_APPROX_NONE);
vector<Rect> boundRect(contours.size());
for(int i=0; i<contours.size(); i++)
{
boundRect[i] = boundingRect(Mat(contours[i]));
rectangle(dstImg, boundRect[i].tl(), boundRect[i].br(), Scalar(0, 255, 255), 2, 8); //矩形标记
Point org = boundRect[i].tl();
putText( dstImg, "green", org, CV_FONT_HERSHEY_SIMPLEX, 1.2f, CV_RGB(0,255,0),2);
}
imshow("result", dstImg);
waitKey(0);
}
MainWindow::~MainWindow()
{
}
运行结果
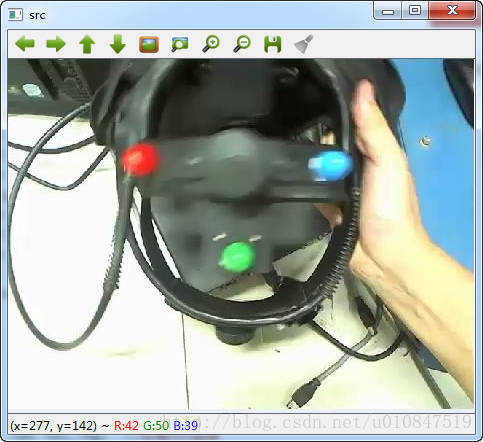
src
hsv_green
dst

知识点讲解
1.设置hsv空间范围
///green hsv min value
int h_min = 35;
int s_min = 110;
int v_min = 106;
///green hsv max value
int h_max = 77;
int s_max = 255;
int v_max = 255;
.........
Scalar hsv_min(h_min, s_min, v_min);
Scalar hsv_max(h_max, s_max, v_max);
......
inRange(hsv_img, hsv_min, hsv_max, hsv_green);
2.在原图上绘制轮廓
vector<vector<Point>> contours;
vector<Vec4i> hierarcy;

findContours(hsv_green, contours, hierarcy, CV_RETR_EXTERNAL, CV_CHAIN_APPROX_NONE);
vector<Rect> boundRect(contours.size());
for(int i=0; i<contours.size(); i++)
{
    boundRect[i] = boundingRect(Mat(contours[i]));
    rectangle(dstImg, boundRect[i].tl(), boundRect[i].br(), Scalar(0, 255, 255), 2, 8); //矩形标记
    Point org =  boundRect[i].tl();
    putText( dstImg, "green", org, CV_FONT_HERSHEY_SIMPLEX, 1.2f, CV_RGB(0,255,0),2);
}
识别视频中的红色,绿色和蓝色控制器,并进行标注
(1)颜色的识别,可以根据不同颜色的 H S V进行识别
(2)对于视频的处理,可以以帧为单位进行处理
代码
#include "mainwindow.h"
#include<opencv2/opencv.hpp>
#include<opencv2/imgproc/imgproc.hpp>
#include <QApplication>

using namespace cv;
using namespace std;
///--set HSV Range--///
int Red_min_h=0;
int Red_min_s=100;
int Red_min_v=100;

int Red_max_h=10;
int Red_max_s=255;
int Red_max_v=255;

int Green_min_h=60;
int Green_min_s=100;
int Green_min_v=100;

int Green_max_h=75;
int Green_max_s=255;
int Green_max_v=255;


int Blue_min_h=90;
int Blue_min_s=100;
int Blue_min_v=100;

int Blue_max_h=120;
int Blue_max_s=255;
int BLue_max_v=255;

int main(int argc, char *argv[])
{
QApplication a(argc, argv);
VideoCapture capture0;
capture0.open("D:\\1\\1.mp4");
Mat frame;
while(1){
capture0>>frame0;
if(frame.empty())
   return;
Mat img=frame0.clone();
Mat ROI=frame0(Rect(0,0,360,354));
Mat hsv_img;
GaussianBlur(ROI,ROI,Size(15,15),0);
cvtColor(ROI,hsv_img,CVBGR2HSV);

 Scalar Red_min(Red_min_h,Red_min_s,Red_min_v);
 Scalar Red_max(Red_max_h,Red_max_s,Red_max_v);

 Mat mask_red=Mat::zeros(ROI.rows,ROI.cols,CV_8UC3);
 inRange(hsv_img,Red_min,Red_max,mask_red);

 medianBlur(mask_red,mask_red,(7,7));
 vector<vector<Point>>contours_red;
 vector<Vec4i> hierarchy_red;
 findContours(mask_red,contours_red,hierarchy_red,PETR_EXTERNAL,CV_CHAIN_APPROX_SIMPLE,Point(0,0));
  vector<vector<Point>> contours_poly_red(contours_red.size());
  vector<Rect>boundRect_red(contours_red.size());
  int x0=0,y0=0,w0=0,h0=0;
  //多边形逼近
  for(unsigned int i=0;i<contours_red.size();i++){
      approxPolyDP(Mat(contours_red[i]),contours_poly_red[i],3,true);
      boundRect_red[i]=boundingRect(Mat(contours_poly_red[i]));
      if(boundRect_red[i].width>=15 && boundRect_red[i].width<=50 && boundRect_red[i].height>=15 && boundRect_red.height<=50){
          x0=boundRect_red[i].x;
          y0=boundRect_red[i].y;
          w0=boundRect_red[i].width;
          h0=boundRect_red[i].height;
          rectangle(frame0,boundRect[i].tl(),boundRect_red[i].br(),Scalar(0,0,255),2,8,0);
          putText(frame0,"red",CV_FONT_HERSHEY_SIMPLEX,1.2f,CV_RGB(255,0,0),2);
          break;
        }
      }
    }
 }
return a.exec();
}


 8955
8955


 被折叠的 条评论
为什么被折叠?
被折叠的 条评论
为什么被折叠?
 到【灌水乐园】发言


