浅谈Android系统进程间通信(IPC)机制Binder中的Server和Client获得Service Manager接口之路

在前面一篇文章 浅谈Service Manager成为Android进程间通信(IPC)机制Binder守护进程之路 中,介绍了Service Manager是如何成为Binder机制的守护进程的。既然作为守护进程,Service Manager的职责当然就是为Server和Client服务了。那么,Server和Client如何获得Service Manager接口,进而享受它提供的服务呢?本文将简要分析Server和Client获得Service Manager的过程。

《Android系统源代码情景分析》一书正在进击的程序员网(http://0xcc0xcd.com)中连载,点击进入!

        在阅读本文之前,希望读者先阅读Android进程间通信(IPC)机制Binder简要介绍和学习计划一文提到的参考资料Android深入浅出之Binder机制,这样可以加深对本文的理解。

        我们知道,Service Manager在Binder机制中既充当守护进程的角色,同时它也充当着Server角色,然而它又与一般的Server不一样。对于普通的Server来说,Client如果想要获得Server的远程接口,那么必须通过Service Manager远程接口提供的getService接口来获得,这本身就是一个使用Binder机制来进行进程间通信的过程。而对于Service Manager这个Server来说,Client如果想要获得Service Manager远程接口,却不必通过进程间通信机制来获得,因为Service Manager远程接口是一个特殊的Binder引用,它的引用句柄一定是0。

        获取Service Manager远程接口的函数是defaultServiceManager,这个函数声明在frameworks/base/include/binder/IServiceManager.h文件中:

[cpp]  view plain  copy
  1. sp<IServiceManager> defaultServiceManager();  

       实现在frameworks/base/libs/binder/IServiceManager.cpp文件中:

[cpp]  view plain  copy
  1. sp<IServiceManager> defaultServiceManager()  
  2. {  
  3.   
  4.     if (gDefaultServiceManager != NULL) return gDefaultServiceManager;  
  5.   
  6.     {  
  7.         AutoMutex _l(gDefaultServiceManagerLock);  
  8.         if (gDefaultServiceManager == NULL) {  
  9.             gDefaultServiceManager = interface_cast<IServiceManager>(  
  10.                 ProcessState::self()->getContextObject(NULL));  
  11.         }  
  12.     }  
  13.   
  14.     return gDefaultServiceManager;  
  15. }  
        gDefaultServiceManagerLock和gDefaultServiceManager是全局变量,定义在frameworks/base/libs/binder/Static.cpp文件中:

[cpp]  view plain  copy
  1. Mutex gDefaultServiceManagerLock;  
  2. sp<IServiceManager> gDefaultServiceManager;  
        从这个函数可以看出,gDefaultServiceManager是单例模式,调用defaultServiceManager函数时,如果gDefaultServiceManager已经创建,则直接返回,否则通过interface_cast<IServiceManager>(ProcessState::self()->getContextObject(NULL))来创建一个,并保存在gDefaultServiceManager全局变量中。

       在继续介绍interface_cast<IServiceManager>(ProcessState::self()->getContextObject(NULL))的实现之前,先来看一个类图,这能够帮助我们了解Service Manager远程接口的创建过程。


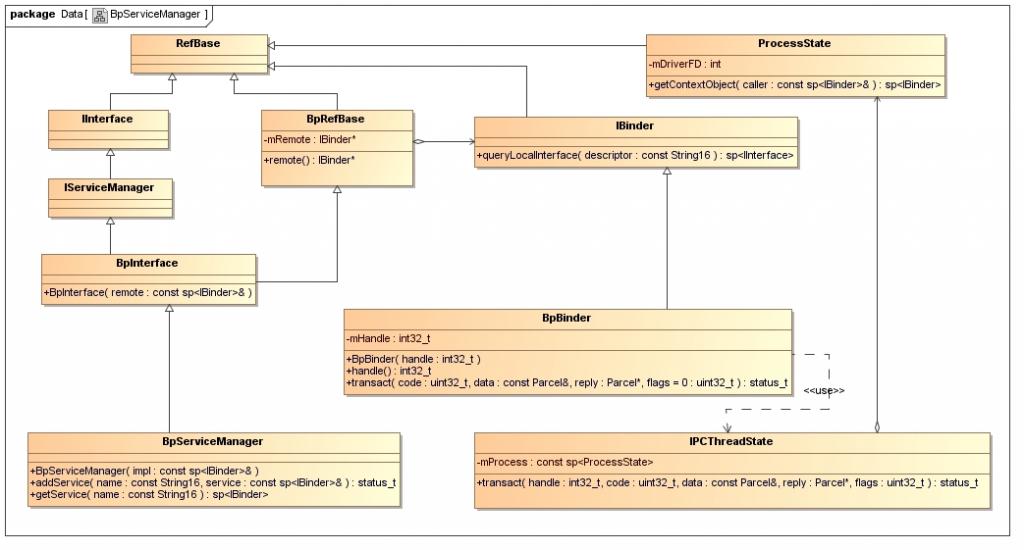
        参考资料Android深入浅出之Binder机制一文的读者,应该会比较容易理解这个图。这个图表明了,BpServiceManager类继承了BpInterface<IServiceManager>类,BpInterface是一个模板类,它定义在frameworks/base/include/binder/IInterface.h文件中:

[cpp]  view plain  copy
  1. template<typename INTERFACE>  
  2. class BpInterface : public INTERFACE, public BpRefBase  
  3. {  
  4. public:  
  5.     BpInterface(const sp<IBinder>& remote);  
  6.   
  7. protected:  
  8.     virtual IBinder* onAsBinder();  
  9. };  
        IServiceManager类继承了IInterface类,而IInterface类和BpRefBase类又分别继承了RefBase类。在BpRefBase类中,有一个成员变量mRemote,它的类型是IBinder*,实现类为BpBinder,它表示一个Binder引用,引用句柄值保存在BpBinder类的mHandle成员变量中。BpBinder类通过IPCThreadState类来和Binder驱动程序并互,而IPCThreadState又通过它的成员变量mProcess来打开/dev/binder设备文件,mProcess成员变量的类型为ProcessState。ProcessState类打开设备/dev/binder之后,将打开文件描述符保存在mDriverFD成员变量中,以供后续使用。

        理解了这些概念之后,就可以继续分析创建Service Manager远程接口的过程了,最终目的是要创建一个BpServiceManager实例,并且返回它的IServiceManager接口。创建Service Manager远程接口主要是下面语句:

[cpp]  view plain  copy
  1. gDefaultServiceManager = interface_cast<IServiceManager>(  
  2.     ProcessState::self()->getContextObject(NULL));  
        看起来简短,却暗藏玄机,具体可阅读 Android深入浅出之Binder机制 这篇参考资料,这里作简要描述。

        首先是调用ProcessState::self函数,self函数是ProcessState的静态成员函数,它的作用是返回一个全局唯一的ProcessState实例变量,就是单例模式了,这个变量名为gProcess。如果gProcess尚未创建,就会执行创建操作,在ProcessState的构造函数中,会通过open文件操作函数打开设备文件/dev/binder,并且返回来的设备文件描述符保存在成员变量mDriverFD中。

        接着调用gProcess->getContextObject函数来获得一个句柄值为0的Binder引用,即BpBinder了,于是创建Service Manager远程接口的语句可以简化为:

[cpp]  view plain  copy
  1. gDefaultServiceManager = interface_cast<IServiceManager>(new BpBinder(0));  
        再来看函数interface_cast<IServiceManager>的实现,它是一个模板函数,定义在framework/base/include/binder/IInterface.h文件中:

[cpp]  view plain  copy
  1. template<typename INTERFACE>  
  2. inline sp<INTERFACE> interface_cast(const sp<IBinder>& obj)  
  3. {  
  4.     return INTERFACE::asInterface(obj);  
  5. }  
        这里的INTERFACE是IServiceManager,于是调用了IServiceManager::asInterface函数。IServiceManager::asInterface是通过DECLARE_META_INTERFACE(ServiceManager)宏在IServiceManager类中声明的,它位于framework/base/include/binder/IServiceManager.h文件中:

[cpp]  view plain  copy
  1. DECLARE_META_INTERFACE(ServiceManager);  

        展开即为:

[cpp]  view plain  copy
  1. #define DECLARE_META_INTERFACE(ServiceManager)                              \  
  2.     static const android::String16 descriptor;                          \  
  3.     static android::sp<IServiceManager> asInterface(                    \  
  4.     const android::sp<android::IBinder>& obj);                          \  
  5.     virtual const android::String16& getInterfaceDescriptor() const;    \  
  6.     IServiceManager();                                                  \  
  7.     virtual ~IServiceManager();                                           

       IServiceManager::asInterface的实现是通过IMPLEMENT_META_INTERFACE(ServiceManager, "android.os.IServiceManager")宏定义的,它位于framework/base/libs/binder/IServiceManager.cpp文件中:

[cpp]  view plain  copy
  1. IMPLEMENT_META_INTERFACE(ServiceManager, "android.os.IServiceManager");  
       展开即为:

[cpp]  view plain  copy
  1. #define IMPLEMENT_META_INTERFACE(ServiceManager, "android.os.IServiceManager")                 \  
  2.     const android::String16 IServiceManager::descriptor("android.os.IServiceManager");     \  
  3.     const android::String16&                                   \  
  4.     IServiceManager::getInterfaceDescriptor() const {                                      \  
  5.     return IServiceManager::descriptor;                                                    \  
  6.     }                                                                                      \  
  7.     android::sp<IServiceManager> IServiceManager::asInterface(                             \  
  8.     const android::sp<android::IBinder>& obj)                                              \  
  9.     {                                                                                      \  
  10.     android::sp<IServiceManager> intr;                                                     \  
  11.     if (obj != NULL) {                                                                     \  
  12.     intr = static_cast<IServiceManager*>(                                                  \  
  13.     obj->queryLocalInterface(                                                              \  
  14.     IServiceManager::descriptor).get());                                                   \  
  15.     if (intr == NULL) {                                                                    \  
  16.     intr = new BpServiceManager(obj);                                                      \  
  17.     }                                                                                      \  
  18.     }                                                                                      \  
  19.     return intr;                                                                           \  
  20.     }                                                                                      \  
  21.     IServiceManager::IServiceManager() { }                                                 \  
  22.     IServiceManager::~IServiceManager() { }        
         估计写这段代码的员工是从Microsoft跳槽到Google的。这里我们关注IServiceManager::asInterface的实现:

[cpp]  view plain  copy
  1. android::sp<IServiceManager> IServiceManager::asInterface(const android::sp<android::IBinder>& obj)                                                
  2. {                                                                                       
  3.     android::sp<IServiceManager> intr;                                                      
  4.       
  5.     if (obj != NULL) {                                                                       
  6.         intr = static_cast<IServiceManager*>(                                                    
  7.                     obj->queryLocalInterface(IServiceManager::descriptor).get());  
  8.           
  9.         if (intr == NULL) {                  
  10.             intr = new BpServiceManager(obj);                                          
  11.         }                                            
  12.     }  
  13.     return intr;                                    
  14. }     
         这里传进来的参数obj就则刚才创建的new BpBinder(0)了,BpBinder类中的成员函数queryLocalInterface继承自基类IBinder,IBinder::queryLocalInterface函数位于framework/base/libs/binder/Binder.cpp文件中:

[cpp]  view plain  copy
  1. sp<IInterface>  IBinder::queryLocalInterface(const String16& descriptor)  
  2. {  
  3.     return NULL;  
  4. }  
         由此可见,在IServiceManager::asInterface函数中,最终会调用下面语句:

[cpp]  view plain  copy
  1. intr = new BpServiceManager(obj);   
         即为:

[cpp]  view plain  copy
  1. intr = new BpServiceManager(new BpBinder(0));   
        回到defaultServiceManager函数中,最终结果为:

[cpp]  view plain  copy
  1. gDefaultServiceManager = new BpServiceManager(new BpBinder(0));  
        这样,Service Manager远程接口就创建完成了,它本质上是一个BpServiceManager,包含了一个句柄值为0的Binder引用。

        在Android系统的Binder机制中,Server和Client拿到这个Service Manager远程接口之后怎么用呢?

        对Server来说,就是调用IServiceManager::addService这个接口来和Binder驱动程序交互了,即调用BpServiceManager::addService 。而BpServiceManager::addService又会调用通过其基类BpRefBase的成员函数remote获得原先创建的BpBinder实例,接着调用BpBinder::transact成员函数。在BpBinder::transact函数中,又会调用IPCThreadState::transact成员函数,这里就是最终与Binder驱动程序交互的地方了。回忆一下前面的类图,IPCThreadState有一个PorcessState类型的成中变量mProcess,而mProcess有一个成员变量mDriverFD,它是设备文件/dev/binder的打开文件描述符,因此,IPCThreadState就相当于间接在拥有了设备文件/dev/binder的打开文件描述符,于是,便可以与Binder驱动程序交互了。

       对Client来说,就是调用IServiceManager::getService这个接口来和Binder驱动程序交互了。具体过程上述Server使用Service Manager的方法是一样的,这里就不再累述了。

      IServiceManager::addService和IServiceManager::getService这两个函数的具体实现,在下面两篇文章中,会深入到Binder驱动程序这一层,进行详细的源代码分析,以便更好地理解Binder进程间通信机制,敬请关注。

  • 0
    点赞
  • 0
    收藏
    觉得还不错? 一键收藏
  • 0
    评论

“相关推荐”对你有帮助么?

  • 非常没帮助
  • 没帮助
  • 一般
  • 有帮助
  • 非常有帮助
提交
评论
添加红包

请填写红包祝福语或标题

红包个数最小为10个

红包金额最低5元

当前余额3.43前往充值 >
需支付:10.00
成就一亿技术人!
领取后你会自动成为博主和红包主的粉丝 规则
hope_wisdom
发出的红包
实付
使用余额支付
点击重新获取
扫码支付
钱包余额 0

抵扣说明:

1.余额是钱包充值的虚拟货币,按照1:1的比例进行支付金额的抵扣。
2.余额无法直接购买下载,可以购买VIP、付费专栏及课程。

余额充值