


 本文详细介绍如何使用Ubuntu SDK开发一个点评Scope,包括创建基本Scope、接口设计、数据获取与展示、定制化改进等方面。
在前面的文章中,我们已经创建了很多点评的Scope。在这个篇文章中,我们将使用现有的SDK来重新开发点评Scope。我们将有意识地使得我们的数据和Scope的框架进行分离,从而展示一个更好的开发框架。更多关于Scope的介绍可以在网址http://developer.ubuntu.com/scopes/或在http://cn.developer.ubuntu.com/scopes/找到。更多的Scop的例程在地址找到。我们最终的显示图片如下:


这个Scope的开发视频可以在地址“如何在Ubuntu OS上开发Scope (视频)”找到。
特别提醒:在模拟器中参阅文章”怎么在Ubuntu手机中打开开发者模式“打开开发者模式,这样才可以把应用部署到模拟器中。
1)创建一个最基本的Scope
我们打开我们的SDK。我们选择菜单“
File”==>“
New File or Project”。然后我们选择“
Unity Scope (cmake)”。输入“dianping”作为我们项目的名字。


我们选择适合自己的“Qt Scope using HTTP+JSON API”模版,并输入我们的Scope名字“dianping”。


请注意在填写“
Maintainer”时,应按照“your firstname, famulyname <x@y.com>”。注意中间的空格。在填写“
Domain”时,由于最新版本的变化,只能填写一个字符串。否则编译会会有一些问题。紧接着,我们选择我们需要支持的kits。这里我们选择同时支持Desktop,armhf(手机)及i386(模拟器)。这样,我们就基本上完成了我们的模版Scope。我们可以在manifest.json.in中修改我们所需要的。

我们可以修改我们Scope的描述及选择正确的Framework。在上面我们选择了“
ubuntu-sdk-14.10”。这个是在手机或在emulator里被支持的Framework。我们可以通过如下的方式来得到手机或emulator所支持的Framework。

我们可以运行一下我们刚创建的Scope。运行的情况如下。如果我们有问题的话,我们可能需要参照文章“
Ubuntu SDK 安装Qt SDK安装”。
 \
\
我们可以使用热键“
Ctrl + R”来在Desktop下运行我们的Scope。也可以点击SDK中做下角的绿色的按钮就可以直接运行我们的Scope了。如果在“
Application Output”显示的是“scope-unit-tests”,我们必须按照如下的方法进行修改以使得它能够在我们的Desktop下面能够正常运行:

我们也可以通过如下的方式选择emulator进行运行:

等我们选择完emulator后,我们就可以按上面的方法Ctrl+R或绿色的按钮来在emulator中运行我们的Scope了。我们可以参考文章“
怎么安装Ubuntu应用到Device中”
这个模版的Scope是一个完整的Scope,我们可以在“Search Query”中输入“Beijing”看看有什么变化。
2)点评接口
我们可以在dianping的网站申请自己的开发者账号,并可以试一下它的接口的功能。点评的接口文档可以在
点评地址找到。等你注册完好后,我们可以在
地址进行测试。我已经注册好了。大家可以在自己的浏览器地址栏中输入如下的内容,我们可以看到JSON格式的输出:
http://api.dianping.com/v1/business/find_businesses?appkey=3562917596&sign=1EAF11F443AE46F87D7D4F2F55903A1D8719455F&category=美食&city=北京&limit=20&platform=2&sort=2
我们可以看到正确的JSON输出。
在今天的练习中,我们不必要去点评网站申请自己的账号。在下面的练习中,直接使用我已经创建好的点评key及secret。
3)设计Client数据接口
在整个template的设计中,Client的作用是用来向Web Service申请数据,并把数据存入内存中以便在Query的类中调用,并用Scope UI toolkit进行展示。最初的设计和我们的是不一样的。为了方便我们的设计,我们把Client类的接口进行修改,如下:
#ifndef API_CLIENT_H_
#define API_CLIENT_H_

#include <api/config.h>

#include <atomic>
#include <deque>
#include <map>
#include <string>
#include <core/net/http/request.h>
#include <core/net/uri.h>

#include <QJsonDocument>

namespace api {

/**
 * Provide a nice way to access the HTTP API.
 *
 * We don't want our scope's code to be mixed together with HTTP and JSON handling.
 */
class Client {
public:

    /**
     * Data structure for the quried data
     */
    struct Data {
        std::string name;
        std::string business_url;
        std::string s_photo_url;
        std::string photo_url;
        std::string rating_s_img_url;
        std::string address;
        std::string telephone;
    };

    /**
     * A list of weather information
     */
    typedef std::deque<Data> DataList;


    Client(Config::Ptr config);

    virtual ~Client() = default;

    /**
     * Get the query data
     */
    virtual DataList getData(const std::string &query);

    /**
     * Cancel any pending queries (this method can be called from a different thread)
     */
    virtual void cancel();

    virtual Config::Ptr config();

protected:
    void get(QString uri, QJsonDocument &root);

    /**
     * Progress callback that allows the query to cancel pending HTTP requests.
     */
    core::net::http::Request::Progress::Next progress_report(
            const core::net::http::Request::Progress& progress);

private:
    QString getQueryString(QString query);
    QString removeTestInfo(QString name);

    /**
     * Hang onto the configuration information
     */
    Config::Ptr config_;

    /**
     * Thread-safe cancelled flag
     */
    std::atomic<bool> cancelled_;
};

}

#endif // API_CLIENT_H_
在这里我们简化了以前的设计。我们设计了一个Data数据结构来装我们所得到的数据,我们使用如下的方法来获取我们query所需要的数据:
virtual DataList getData(const std::string &query);
这个函数返回一个数组。这个数组将被我们的Query类所利用,并显示所获得的数据。Client类的实现如下:
#include <api/client.h>

#include <core/net/error.h>
#include <core/net/http/client.h>
#include <core/net/http/content_type.h>
#include <core/net/http/response.h>
#include <QVariantMap>

#include <QString>
#include <QCryptographicHash>
#include <QDebug>
#include <QTextCodec>
#include <QUrl>

#include <iostream>

namespace http = core::net::http;
namespace net = core::net;

using namespace api;
using namespace std;
using namespace std;

const QString appkey = "3562917596";
const QString secret = "091bf584e9d24edbbf48971d65307be3";
const QString BASE_URI = "http://api.dianping.com/v1/business/find_businesses?";

Client::Client(Config::Ptr config) :
    config_(config), cancelled_(false) {
}

void Client::get( QString uri, QJsonDocument &root) {
    // Create a new HTTP client
    auto client = http::make_client();

    // Start building the request configuration
    http::Request::Configuration configuration;

    // Build the URI from its components
    configuration.uri = uri.toStdString();

    // Give out a user agent string
    configuration.header.add("User-Agent", config_->user_agent);

    // Build a HTTP request object from our configuration
    auto request = client->head(configuration);

    try {
        // Synchronously make the HTTP request
        // We bind the cancellable callback to #progress_report
        auto response = request->execute(
                    bind(&Client::progress_report, this, placeholders::_1));

        // Check that we got a sensible HTTP status code
        if (response.status != http::Status::ok) {
            throw domain_error(response.body);
        }
        // Parse the JSON from the response
        root = QJsonDocument::fromJson(response.body.c_str());

        // qDebug() << "response: " << response.body.c_str();
    } catch (net::Error &) {
    }
}

Client::DataList Client::getData(const string& query) {
    QJsonDocument root;

    QString temp = QString::fromStdString(query);
    QByteArray bytearray = query.c_str();
    QString query_string = QString::fromUtf8(bytearray.data(), bytearray.size());

    qDebug() << "query_string: " << query_string;

    QString uri = getQueryString(query_string);
    qDebug() << "uri: "  << uri;
    get(uri, root);

    DataList result;

    QVariantMap variant = root.toVariant().toMap();

    // Iterate through the weather data
    for (const QVariant &i : variant["businesses"].toList()) {
        QVariantMap item = i.toMap();

        QString name = removeTestInfo(item["name"].toString());
        qDebug() << "name: " << name;

        QString business_url = item["business_url"].toString();
        qDebug() << "business_url: " << business_url;

        QString s_photo_url = item["s_photo_url"].toString();
        qDebug() << "s_photo_url: " << s_photo_url;

        QString photo_url = item["photo_url"].toString();
        qDebug() << "photo_url: " << photo_url;

        QString rating_s_img_url = item["rating_s_img_url"].toString();
        qDebug() << "rating_s_img_url: " << rating_s_img_url;

        QString address = item["address"].toString();
        qDebug() << "address: " << address;

        QString telephone = item["telephone"].toString();
        qDebug() << "telephone: " << telephone;

        // Add a result to the weather list
        result.emplace_back(
            Data { name.toStdString(), business_url.toStdString(), s_photo_url.toStdString(),
                   photo_url.toStdString(), rating_s_img_url.toStdString(),
                   address.toStdString(), telephone.toStdString() });
    }

    return result;
}

http::Request::Progress::Next Client::progress_report(
        const http::Request::Progress&) {

    return cancelled_ ?
                http::Request::Progress::Next::abort_operation :
                http::Request::Progress::Next::continue_operation;
}

void Client::cancel() {
    cancelled_ = true;
}

Config::Ptr Client::config() {
    return config_;
}

QString Client::getQueryString(QString query) {
    QMap<QString, QString> map;

    map["category"] = "美食";
    map["city"] = query;
    map["sort"] = "2";
    map["limit"] = "20";
    map["platform"] = "2";

    QCryptographicHash generator(QCryptographicHash::Sha1);

    QString temp;
    temp.append(appkey);
    QMapIterator<QString, QString> i(map);
    while (i.hasNext()) {
        i.next();
        qDebug() << i.key() << ": " << i.value();
        temp.append(i.key()).append(i.value());
    }

    temp.append(secret);

    qDebug() << temp;

    qDebug() << "UTF-8: " << temp.toUtf8();

    generator.addData(temp.toUtf8());
    QString sign = generator.result().toHex().toUpper();

//    qDebug() << sign;

    QString url;
    url.append(BASE_URI);
    url.append("appkey=");
    url.append(appkey);

    url.append("&");
    url.append("sign=");
    url.append(sign);

    i.toFront();
    while (i.hasNext()) {
        i.next();
        qDebug() << i.key() << ": " << i.value();
        url.append("&").append(i.key()).append("=").append(i.value());
    }

    qDebug() << "Final url: " << url;

    QUrl url1(url);

    qDebug() << url1.url();
    QByteArray bytearray = url1.toEncoded();
    QString string = QString::fromUtf8(bytearray.data(), bytearray.size());
    qDebug() << "url new: " << string;

    return string;
}

// The following method is used to remove the
// "这是一条测试商户数据,仅用于测试开发,开发完成后请申请正式数据..." string
const QString TEST_STRING = "(这是一条测试商户数据,仅用于测试开发,开发完成后请申请正式数据...)";
QString Client::removeTestInfo(QString name)
{
    if ( name.contains(TEST_STRING) ) {
        int index = name.indexOf(TEST_STRING);
        QString newName = name.left(index);
        // qDebug() << "newName: " << newName;
        return newName;
    } else {
        qDebug() << "it does not contain the string";
        return name;
    }
}
首先,我们可以看一下这里的helper方法“getQueryString”。这个方法的作用是用来得到我们的申请的url的。我们可以参考“ 点评开发入门示例”是怎么生成申请的url的。“removeTestInfo”是用来删除我们得到的数据的部分内容以更好地呈现。如果我们需要正式的数据,需要和dianping进行注册。我们通过使用能够net-cpp的API来进行HTTP请求,并使用Qt API QJsonDocument来进行JSON的解析。我们可以通过qDebug来打印并输出我们想要看到的内容。
为了能对我们修改的Client类进行测试,我们对Query.cpp中的“run”进行了如下的修改:
void Query::run(sc::SearchReplyProxy const& reply) {
    try {
        // Start by getting information about the query
        const sc::CannedQuery &query(sc::SearchQueryBase::query());
        QString queryString = QString::fromStdString(query.query_string());

        // Trim the query string of whitespace
        string query_string = alg::trim_copy(query.query_string());

        Client::DataList datalist;
        if (query_string.empty()) {
            queryString = QString("北京");
            datalist = client_.getData("北京");
        } else {
            // otherwise, get the forecast for the search string
            datalist = client_.getData(query_string);
        }
    } catch (domain_error &e) {
        // Handle exceptions being thrown by the client API
        cerr << e.what() << endl;
        reply->error(current_exception());
    }
}
这样我们的Client类的实现基本已经完成。它可以帮我们向点评的web service发送请求,并得到我们想要的数据。这个数据被放在一个叫做Client::DataList的数组中。我们在下面的章节中具体描述怎么利用这个数据进行显示。通过Client类的实现,我们完成了数据(Client)和展示(Query)之间的分离。这也是一个比较推荐的设计。
整个部分的源代码可以在地址下载:
bzr branch
lp:~liu-xiao-guo/debiantrial/dianpianclient1
4)代码讲解
src/scope/scope.cpp
这个文件定义了一个
unity::scopes::ScopeBase的类。它提供了客户端用来和Scope交互的起始接口。
- 这个类定义了“start", "stop"及"run"来运行scope。绝大多数开发者并不需要修改这个类的大部分实现。在我们的例程中,我们将不做任何的修改
- 它也同时实现了另外的两个方法:search 和 preview。我们一般来说不需要修改这俩个方法的实现。但是他们所调用的函数在具体的文件中必须实现
在我们本次的实现中,我们不需要做任何的修改。
src/scope/query.cpp
这个文件定义了一个
unity::scopes::SearchQueryBase类。这个类用来产生由用户提供的查询字符串而生产的查询结果。这个结果可能是基于json或是xml的。这个类可以用来进行对返回的结果处理并显示。
- 得到由用户输入的查询字符串
- 向web services发送请求
- 生成搜索的结果(根据每个不同而不同)
- 创建搜索结果category(比如不同的layout-- grid/carousel)
- 根据不同的搜寻结果来绑定不同的category以显示我们所需要的UI
- 推送不同的category来显示给最终用户
创建并注册CategoryRenderers
在本例中,我们创建了两个JSON objects. 它们是最原始的字符串,如下所示,它有两个field:template及components。template是用来定义是用什么layout来显示我们所搜索到的结果。这里我们选择的是”grid"和carousel布局。用的是小的card-size。components项可以用来让我们选择预先定义好的field来显示我们所需要的结果。这里我们添加了"title"及“art"。同时我们可以显示一个title及一个图片(art)。更多详细的介绍可以参阅文章“
Customization & branding”。如果大家对Scope的模版不是很熟悉的好,可以参阅我的文章“
细细品味Ubuntu Scope中的category renderer模版”做更深一步的了解。
//Create a JSON string to be used tro create a category renderer - uses grid layout
std::string CR_GRID = R"(
{
        "schema-version" : 1,
        "template" : {
        "category-layout" : "grid",
        "card-size": "small"
        },
        "components" : {
        "title" : "title",
        "art" : {
        "field": "art",
        "aspect-ratio": 1.6,
        "fill-mode": "fit"
        }
        }
        }
        )";

//Create a JSON string to be used tro create a category renderer - uses carousel layout
std::string CR_CAROUSEL = R"(
{
        "schema-version" : 1,
        "template" : {
        "category-layout" : "carousel",
        "card-size": "small",
        "overlay" : true
        },
        "components" : {
        "title" : "title",
        "art" : {
        "field": "art",
        "aspect-ratio": 1.6,
        "fill-mode": "fit"
        }
        }
        }
        )";
我们为每个JSON Object创建了一个CategoryRenderer,并同时向reply object注册。我们修改我们的run方法来实现显示:
void Query::run(sc::SearchReplyProxy const& reply) {
    try {
        // Start by getting information about the query
        const sc::CannedQuery &query(sc::SearchQueryBase::query());
        QString queryString = QString::fromStdString(query.query_string());

        // Trim the query string of whitespace
        string query_string = alg::trim_copy(query.query_string());

        Client::DataList datalist;
        if (query_string.empty()) {
            queryString = QString("北京");
            datalist = client_.getData("北京");
        } else {
            // otherwise, get the forecast for the search string
            datalist = client_.getData(query_string);
        }

        CategoryRenderer rdrGrid(CR_GRID);
        CategoryRenderer rdrCarousel(CR_CAROUSEL);

        QString title = queryString + "美味";

        // Register two categories
        auto carousel = reply->register_category("dianpingcarousel", title.toStdString(), "", rdrCarousel);
        auto grid = reply->register_category("dianpinggrid", "", "", rdrGrid);

        bool isgrid = false;

        // For each of the entry in the datalist
        for (const Client::Data &data : datalist) {

            // for each result
            const std::shared_ptr<const Category> * category;

            if ( isgrid ) {
                category = &grid;
                isgrid = false;
            } else {
                isgrid = true;
                category = &carousel;
            }

            //create our categorized result using our pointer, which is either to out
            //grid or our carousel Category
            CategorisedResult catres((*category));

            // We must have a URI
            catres.set_uri(data.business_url);
            catres.set_dnd_uri(data.business_url);
            catres.set_title(data.name);
            catres.set_art(data.photo_url);

            catres["address"] = Variant(data.address);
            catres["telephone"] = Variant(data.telephone);

            // Push the result
            if (!reply->push(catres)) {
                // If we fail to push, it means the query has been cancelled.
                // So don't continue;
                return;
            }
        }
    } catch (domain_error &e) {
        // Handle exceptions being thrown by the client API
        cerr << e.what() << endl;
        reply->error(current_exception());
    }
}
using namespace unity::scopes;
我们可以在“
Search Query”中输入“上海”,我们可以看到不同的结果。
我们也可以尝试点击我们的画面,在另外一个画面中可以看到一个图片。
到这里,我们基本上已经看到了Scope工作的了。我们下面来更进一步来在Preview中显示更多的内容。这样我们基本上完成了Query.cpp的代码。整个源码可以在如下的地址找到:
bzr branch
lp:~liu-xiao-guo/debiantrial/dianpianclient2
src/scope/preview.cpp
这个文件定义了一个unity::scopes::PreviewQueryBase类。
这个类定义了一个widget及一个layout来展示我们搜索到的结果。这是一个preview结i果,就像它的名字所描述的那样。
- 定义在preview时所需要的widget
- 让widget和搜索到的数据field一一对应起来
- 定义不同数量的layout列(由屏幕的尺寸来定)
- 把不同的widget分配到layout中的不同列中
- 把reply实例显示到layout的widget中
Preview
Preview Widgets
这是一组预先定义好的widgets。每个都有一个类型。更据这个类型我们可以生成它们。你可以在这里找到Preview Widget列表及它们提供的的field类型。
这个例子使用了如下的widgets
- header:它有title及subtitle field
- image:它有source field有来显示从哪里得到这个art
- text:它有text field
- action:用来展示一个有"Open"的按钮。当用户点击时,所包含的URI将被打开
PreviewWidget w_header("headerId", "header");
最终的程序如下:
void Preview::run(sc::PreviewReplyProxy const& reply) {
    // Support three different column layouts
    // Client can display Previews differently depending on the context
    // By creates two layouts (one with one column, one with two) and then
    // adding widgets to them differently, Unity can pick the layout the
    // scope developer thinks is best for the mode
    ColumnLayout layout1col(1), layout2col(2);

    // add columns and widgets (by id) to layouts.
    // The single column layout gets one column and all widets
    layout1col.add_column({"headerId", "artId", "infoId", "telId", "actionsId"});
    // The two column layout gets two columns.
    // The first column gets the art and header widgets (by id)
    layout2col.add_column({"artId", "headerId"});
    // The second column gets the info and actions widgets
    layout2col.add_column({"infoId", "telId", "actionsId"});

    // Push the layouts into the PreviewReplyProxy intance, thus making them
    // available for use in Preview diplay
    reply->register_layout({layout1col, layout2col});

    //Create some widgets
    // header type first. note 'headerId' used in layouts
    // second field ('header) is a standard preview widget type
    PreviewWidget w_header("headerId", "header");
    // This maps the title field of the header widget (first param)  to the
    // title field in the result to be displayed in this preview, thus providing
    // the result-specific data to the preview for display
    w_header.add_attribute_mapping("title", "title");

    // Standard subtitle field here gets our 'artist' key value
    // w_header.add_attribute_mapping("subtitle", "artist");

    PreviewWidget w_art("artId", "image");
    w_art.add_attribute_mapping("source", "art");

    PreviewWidget w_info("infoId", "text");
    w_info.add_attribute_mapping("text", "address");

    PreviewWidget w_tel("telId", "text");
    w_tel.add_attribute_mapping("text", "telephone");

    Result result = PreviewQueryBase::result();
    QString urlString(result["uri"].get_string().c_str());
    // qDebug() << "[Details] GET " << urlString;
   // QUrl url = QUrl(urlString);

    // Create an Open button and provide the URI to open for this preview result
    PreviewWidget w_actions("actionsId", "actions");
    VariantBuilder builder;
    builder.add_tuple({
            {"id", Variant("open")},
            {"label", Variant("Open")},
            {"uri", Variant(urlString.toStdString())} // uri set, this action will be handled by the Dash
        });
    w_actions.add_attribute_value("actions", builder.end());

    // Bundle out widgets as required into a PreviewWidgetList
    PreviewWidgetList widgets({w_header, w_art, w_info, w_tel, w_actions});
    // And push them to the PreviewReplyProxy as needed for use in the preview
    reply->push(widgets);
}
为了能够编译我们的代码,我们必须在Preview.cpp文件的开始部分加入如下的代码:
using namespace unity::scopes;
#include <QDebug>
重新编译我们的Scope。并运行它,我们可以看到如下的画面:


在手机的上的运行情况。选择手机为当前的kit(armhf):

我们使用热键Ctrl + R或按下绿色的按钮:


这样我们基本上初步完成了我们的Scope。同样,我们可以在搜索的框中输入其它任何一个城市的名字,这样我们就可以搜到不同的结果。整个Scope的源代码可以在如下的地址找到:
bzr branch
lp:~liu-xiao-guo/debiantrial/dianpianclient3
我们将在以下的章节中对我们的Scope做进一步的定制。
5)定制Scope
定制Scope图标
我们虽然可以在我们的手机上或者是在emulator上运行我们的Scope,但是它的icon不是我们需要的。我们可以打开data文件夹,并修改里面的“icon.png”及“logo.png”。这样我们就可以得到我们定制的应用图标了。

定制Scope颜色
打开我们Scope在data目录下的文件“com.ubuntu.developer.liu-xiao-guo.dianping_dianping.ini”。并做如下的修改:
[ScopeConfig]
DisplayName = Dianping Scope
Description = This is a Dianping scope
Art = screenshot.png
Author = Firstname Lastname
Icon = icon.png

[Appearance]
PageHeader.Logo = logo.png
PageHeader.Background = color:///#FFFFFF
PageHeader.ForegroundColor = #F8500F
PageHeader.DividerColor = #F8500F
BackgroundColor = #FFFFFF
PreviewButtonColor = #F8500F
这里我们对PageHeader的颜色做了些改变。我们会看到在手机上的不同的颜色的变化。


更多关于个性化的设置,可以参阅文章“Customization & branding”。到目前位置的所有源代码在如下的地址可以下载:
bzr branch lp:~liu-xiao-guo/debiantrial/dianpianclient5
定制Category template
我们到目前下面显示的是一个grid的布局,我们想显示更多的信息。先前的template是:
//Create a JSON string to be used tro create a category renderer - uses grid layout
std::string CR_GRID = R"(
{
        "schema-version" : 1,
        "template" : {
        "category-layout" : "grid",
        "card-size": "small"
        },
        "components" : {
        "title" : "title",
        "art" : {
        "field": "art",
        "aspect-ratio": 1.6,
        "fill-mode": "fit"
        }
        }
        }
        )";
由于默认的是水平方向的,我们希望是垂直布局的,这样我们把template修改为:
std::string CR_GRID = R"(
{
        "schema-version" : 1,
        "template" : {
            "category-layout" : "vertical-journal",
            "card-layout": "horizontal",
            "card-size": "small",
            "collapsed-rows": 0
        },
        "components" : {
            "title" : "title",
            "subtitle":"subtitle",
            "summary":"summary",
            "art":{
                "field": "art2",
                "aspect-ratio": 1
            }
        }
})";
同时,为了显示更多的信息,我们加入了“subtitle”及“summary”的项目到“Components”中。我们可以参考文章“ Customization & branding”进行对比:


为了得到我们所需要的“summary”数据,我们修改我们的Data数据结构为:
    struct Data {
        std::string name;
        std::string business_url;
        std::string s_photo_url;
        std::string photo_url;
        std::string rating_s_img_url;
        std::string address;
        std::string telephone;
        std::string summary;
}; QVariantList deals = item["deals"].toList();
QString summary;
if ( deals.count() > 0 ) {
QVariantMap temp = deals.first().toMap();
summary = temp["description"].toString();
}
qDebug() << "summary: " << summary; catres["subtitle"] = data.address;
catres["summary"] = data.summary;
catres["fulldesc"] = data.summary;
catres["art2"] = data.s_photo_url;
重新运行我们的Scope,我们可以看到如下的显示:


显然通过上面的改变,我们已经达到了修改我们的Scope的目的。虽然是同样的数据,我们可以通过修改我们的template来得到不同的显示。所有的源代码在如下的地址可以找到:
bzr branch lp:~liu-xiao-guo/debiantrial/dianpianclient6
加入设置
我们在这里想对dianping Scope做一个设置。比如我想有更多的搜寻的结果,而不是每次只有最多20个。我们可以通过文章“如何在Ubuntu Scope中定义设置变量并读取”来多我们的limit进行设置。首先,在Query类中加入函数。我们也需要在query.h文件中加入相应的定义:
query.h

private:
    void initScope();
// The followoing function is used to retrieve the settings for the scope
void Query::initScope()
{
unity::scopes::VariantMap config = settings(); // The settings method is provided by the base class
// if (config.empty())
// qDebug() << "CONFIG EMPTY!";
int limit = config["limit"].get_double();
cerr << "limit: " << limit << endl;
client_.setLimit(limit);
}
我们在Client.cpp中定义一个方法:
void Client::setLimit(int limit)
{
    m_limit = limit;
}
这里“m_limit”是一个成员变量。我们同时修改:
QString Client::getQueryString(QString query) {
    QMap<QString, QString> map;

    map["category"] = "美食";
    map["city"] = query;
    map["sort"] = "2";
    map["limit"] = QString::number(m_limit);  // 修改这个
    map["platform"] = "2";
 ...
}
并在“
run”的开始部分调用它:
void Query::run(sc::SearchReplyProxy const& reply) {

    // Initialize the scopes
    initScope();

 ....
}
同时不要忘记在“data”目录下生产相应的.ini文件(/dianping/data/com.ubuntu.developer.liu-xiao-guo.dianping_dianping-settings.ini)。注意这里的格式必须是 “包名”-settings.ini。其内容如下:
[limit]
type = number
defaultValue = 20
displayName = 搜寻条数
我们也同时需要对“data”目录下的CMakeLists.txt文件进行修改。添加如下的部分到其中:
configure_file(
  "com.ubuntu.developer.liu-xiao-guo.dianping_dianping-settings.ini"
  "${CMAKE_BINARY_DIR}/src/com.ubuntu.developer.liu-xiao-guo.dianping_dianping-settings.ini"
)

INSTALL(
  FILES "${CMAKE_BINARY_DIR}/src/com.ubuntu.developer.liu-xiao-guo.dianping_dianping-settings.ini"
  DESTINATION "${SCOPE_INSTALL_DIR}"
)
这个部分的改动是为了能够把设置文件也安装到手机的文件系统中去。我们可以在项目中点击右键,并选择运行“Run CMake”,这样,我们在Project中可以看到新添加的.ini文件。重新运行我们的Scope,并在Scope的右上角的设置图标(像有锯齿的 )去尝试改变limit的值,看看效果是什么样的。


这样通过改变搜寻的数目,我们可以看到搜寻的结果的条数的变化。整个源码在如下的地址可以找到:
bzr branch
lp:~liu-xiao-guo/debiantrial/dianpianclient7
6)利用Scope位置信息搜索附近位置的信息
目前我们的点评Scope已经能够完成绝大部分的工作了。我们可以通过它来搜索不同城市的美食佳肴。比如我们可以输入“北京",“上海”,“广州”等城市的美食。美中不足的是我们大多数情况下是希望能够搜索到我们附近的美食等。许多外地的美食可能对我们来讲并不感兴趣。为了能够多位置进行搜索,我们可以利用Scope架构中所提供的位置信息进行对位置进行搜索。我们可以重新对点评API来进行研究,我们发现点评的API中有如下的描述:

在这里我们可以看到,在点评的API中,可以对地理位置经纬度进行搜索。如果我们可以利用当前的经纬度进行搜索,我们就可以找到当前位置的有兴趣的东西了。如果这样,我们搜索的关键词又会是什么呢?我们可以发现API这里有一个关键词category。我想我们可以对category进行搜索。也即对分类进行搜索。通过我们对category的分析,目前category的分类有如下:
美食,休闲娱乐,购物,丽人,结婚,亲子,运动健身,酒店,汽车服务,生活服务
在我们的Scope中,我们可以通过输入上面的关键词,这样就可以找到当前位置我们喜欢的美食,酒店等信息。这个信息对于我们来说是非常有用的。
为了实现这个功能,我们在我们的Query类中加入位置信息成员变量:
class Query: public unity::scopes::SearchQueryBase {
public:
    Query(const unity::scopes::CannedQuery &query,
          const unity::scopes::SearchMetadata &metadata, api::Config::Ptr config);
    ~Query() = default;
    void cancelled() override;
    void run(const unity::scopes::SearchReplyProxy &reply) override;

private:
    void initScope();

private:
    api::Client client_;

    QString m_longitude;    // added
    QString m_latitude;  // added
};
同时在query.cpp的开始部分,我们加入两个经纬度常量。这样当我们没有获得位置时,我们将使用这个常量的位置信息来显示当前位置的信息:
const QString DEFAULT_LATITUDE = "39.9698";
const QString DEFAULT_LONGITUDE = "116.446";
在Query::run的方法中加入如下的代码:
void Query::run(sc::SearchReplyProxy const& reply) {
    try {
        initScope();

        // Get the current location of the search
        auto metadata = search_metadata();
        if ( metadata.has_location() ) {
            qDebug() << "Location is supported!";
            auto location = metadata.location();

            if ( location.has_altitude()) {
                cerr << "altitude: " << location.altitude() << endl;
                cerr << "longitude: " << location.longitude() << endl;
                cerr << "latitude: " << location.latitude() << endl;
                auto latitude = std::to_string(location.latitude());
                auto longitude = std::to_string(location.longitude());
                m_longitude = QString::fromStdString(longitude);
                m_latitude = QString::fromStdString(latitude);
            }

            if ( m_longitude.isEmpty() ) {
                m_longitude = DEFAULT_LONGITUDE;
            }
            if ( m_latitude.isEmpty() ) {
                m_latitude = DEFAULT_LATITUDE;
            }

            qDebug() << "m_longitude1: " << m_longitude;
            qDebug() << "m_latitude1: " << m_latitude;
        } else {
            qDebug() << "Location is not supported!";
            m_longitude = DEFAULT_LONGITUDE;
            m_latitude = DEFAULT_LATITUDE;
        }

        client_.setCoordinate(m_longitude, m_latitude);

        // Start by getting information about the query
        const sc::CannedQuery &query(sc::SearchQueryBase::query());
        QString queryString = QString::fromStdString(query.query_string());

        // Trim the query string of whitespace
        string query_string = alg::trim_copy(query.query_string());

        Client::DataList datalist;
        if (query_string.empty()) {
            queryString = QString("美食");  // changed
            datalist = client_.getData(queryString.toStdString());
        } else {
            // otherwise, get the forecast for the search string
            datalist = client_.getData(query_string);
        }

 ...
}
注意这里,我们加入了代码对位置信息的获取,并同时修改了对搜索的关键词的改动。我们默认的是“美食”而不是先前的“北京”城市。
为了能够进行编译,在Query.cpp的开始部分加入如下的头文件:
#include <unity/scopes/SearchMetadata.h>
#include <QDebug>
我们必须同时在Client类中加入成员变量:
    QString m_longitude;
QString m_latitude;void Client::setCoordinate(QString longitude, QString latitude)
{
m_longitude = longitude;
m_latitude = latitude;
}当然,最后,我们也不要忘记修改我们的API请求的部分,把经纬度的信息加入进去:
QString Client::getQueryString(QString query) {
    QMap<QString, QString> map;

    map["category"] = query; //This is the new search item
    // map["city"] = query;
    map["sort"] = "2";
    map["limit"] = QString::number(m_limit);
    map["platform"] = "2";

    map["latitude"] = m_latitude;
    map["longitude"] = m_longitude;

    ...
}
这里我们对“category”进行搜索而不是上面的对“城市”进行搜索。经过这样的改造,我们基本上完成了我们对位置的搜索的Scope了。由于在Desktop上显示对位置不支持,所要对这个对位置的搜索进行测试,我们必须在真实的手机上进行测试。重新编译我们的Scope,并部署到一个真实的手机上。当我们重新运行我们的Scope在手机上时,在“Application Output”窗口显示的是如下的信息“

它显示我们并没有对位置进行支持虽然我们的GPS已经被打开了,这是什么原因呢?这是由于Ubuntu平台的安全性所造成的。我们必须修改我们的相关设置。我们可以参照文章“
怎么在Ubuntu Scope中获取location地址信息”对我们的Scope进行配置。打开我们Scope的“com.ubuntu.developer.liu-xiao-guo.dianping_dianping.ini”,并加入如下的句子:
[ScopeConfig]
DisplayName = Dianping Scope
Description = This is a Dianping scope
Art = screenshot.png
Author = Firstname Lastname
Icon = icon.png

LocationDataNeeded=true // added

[Appearance]
PageHeader.Logo = logo.png
PageHeader.Background = color:///#FFFFFF
PageHeader.ForegroundColor = #F8500F
PageHeader.DividerColor = #F8500F
BackgroundColor = #FFFFFF
PreviewButtonColor = #F8500F
重新运行我们的Scope:


注意通过这样的改变,我们可以只能对如下的关键词进行搜索:
美食, 休闲娱乐, 购物, 丽人, 结婚, 亲子, 运动健身, 酒店, 汽车服务, 生活服务
一个更为完整的department的Scope可以在“在Ubuntu OS上创建一个department 点评Scope (Qt XML)”找到。到目前位置的所有的源码在如下的地址找到:
bzr branch lp:~liu-xiao-guo/debiantrial/dianpianclient8
7)生成click包及部署到手机中
如果开发者想生成自己的click包或把Scope安装到自己的手机中,我们可以按如下所示的步骤操作:
选择手机target并成功编译

选择“Publish”生成click安装包或直接安装到手机中

如果是生产click安装包的话,文件可以在和项目名称(dianping)处于同一级的下面的一个目录中可以找到,比如对我们的情况:

最终的安装名称是一个以“click”为扩展名的文件。对于我们的情况是“com.ubuntu.developer.liu-xiao-guo.dianping_0.1_armhf.click。”如果我们得到click安装包的话,我们就可以在其它的任何一个手机上进行安装了。我们可以按照文章“
怎么安装Ubuntu应用到Device”把我们的click文件安装到手机中了。
对于安装到手机的中Scope,我们可以通过如下的方式打开我们的Scope:

7)给自己的Scope加入关键词
我们可以参阅文章“
Scopes 关键词 (keyword)及departments探讨”对自己的Scope加入合适的关键词:
-用户可以通过设定的关键词来搜索自己的Scope来提高曝光率
-自己的Scope可以成为Aggregator Scope的一部分,无缝集成到分类好的Aggregator Scope中
9)调试Scope
当我们在开发应用时,我们可以通过上面的“cerr”/"qDebug"在“Application Output”输出结果来查看结果。当在手机运行时,我们也可以通过查看如下的文件来看Scope的运行情况:
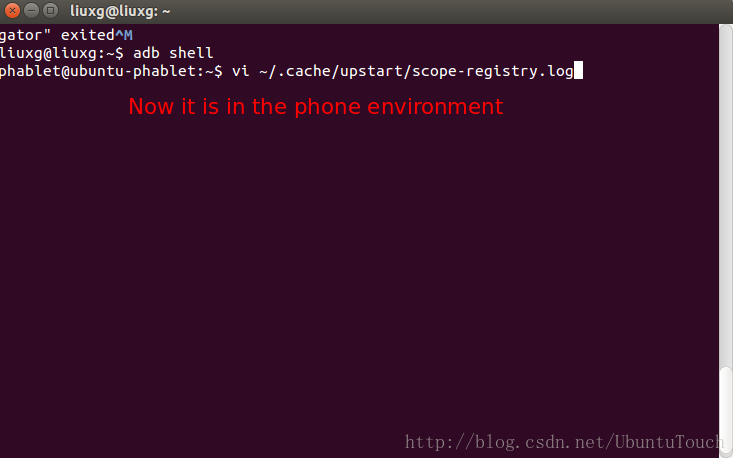
如果你同时有两个装置(或模拟器)连接在你的电脑上,你可以通过如下的命令来进入到你的手机中:

我们可以通过查看在手机中的文件“~/.cache/upstart/scope-registry.log”来看最新的Scope的运行情况。
开发者也可以在地址:~/.local/share/unity-scopes/unconfined/Registry/logs/<log_with_highest_number>下找到更多的调试信息.
我们也可以参照文章“如何在
Qt Creator中调试Ubuntu Scope”在手机中调试我们的Scope。同样的方法也适用于Desktop及模拟器虽然现在还有一点问题。
10)如何卸载已经安装好的Scope
我们可以通过如下的方法来卸载已经在手机上安装好的Scope


11)使Scope做好发布准备
等我们已经开发好我们自己的Scope后,我们可以通过参阅文章“
使Scope做好发布准备”来完成最后的发布工作了。真心希望能够在Ubuntu商店中看到越来越多的开发者开发出更多的Scope!


 2114
2114

 被折叠的 条评论
为什么被折叠?
被折叠的 条评论
为什么被折叠?
 到【灌水乐园】发言


