


本文主要用于帮助理解View的scrollTo()方法,并穿叉了View的一些知识点。
一、自定义ViewGroup
自定义的ViewGroup有3个LinearLayout组成,在滑动时屏幕上一次只会显示一个LinearLayout,在构造函数中完成了布局的初始化,如下:
public class MultiViewGroup extends ViewGroup {
	private static final String TAG = "yxf";
	private Context mContext;

	public MultiViewGroup(Context context) {
		super(context);
		mContext = context;
		init();
	}

	public MultiViewGroup(Context context, AttributeSet attrs) {
		super(context, attrs);
		mContext = context;
		init();
	}

	private void init() {
		// 初始化3个 LinearLayout控件
		LinearLayout oneLL = new LinearLayout(mContext);
		oneLL.setBackgroundColor(Color.RED);
        addView(oneLL);

		LinearLayout twoLL = new LinearLayout(mContext);
		twoLL.setBackgroundColor(Color.YELLOW);
		addView(twoLL);

		LinearLayout threeLL = new LinearLayout(mContext);
		threeLL.setBackgroundColor(Color.BLUE);
		addView(threeLL);
	}
另外,重载了onMeasure()和onLayout()方法。
@Override
protected void onMeasure(int widthMeasureSpec, int heightMeasureSpec) {
	Log.i(TAG, "--- start onMeasure() --");
	// 设置该ViewGroup的大小
	int width = MeasureSpec.getSize(widthMeasureSpec);
	int height = MeasureSpec.getSize(heightMeasureSpec);
	setMeasuredDimension(width, height);
	int childCount = getChildCount();
	Log.i(TAG, "--- onMeasure childCount is -->" + childCount);
	for (int i = 0; i < childCount; i++) {
		View child = getChildAt(i);
		// 设置每个子视图的大小 , 即全屏
		child.measure(MultiScreenActivity.screenWidth, MultiScreenActivity.scrrenHeight);
	}
}

@Override
protected void onLayout(boolean changed, int l, int t, int r, int b) {
	// TODO Auto-generated method stub
	Log.i(TAG, "--- start onLayout() --");
	int startLeft = 0; // 每个子视图的起始布局坐标
	int startTop = 50; // 间距设置为10px 相当于 android:layout_marginTop= "10px"
	int childCount = getChildCount();
	Log.i(TAG, "--- onLayout childCount is -->" + childCount);
	for (int i = 0; i < childCount; i++) {
		View child = getChildAt(i);
		child.layout(startLeft, startTop,
				startLeft + MultiScreenActivity.screenWidth,
				startTop + MultiScreenActivity.scrrenHeight);
		startLeft = startLeft + MultiScreenActivity.screenWidth;
	}
}child.measure(MultiScreenActivity.screenWidth, MultiScreenActivity.scrrenHeight);
child.layout(startLeft, startTop, startLeft + MultiScreenActivity.screenWidth,startTop + MultiScreenActivity.scrrenHeight);
二、在Activity中使用自定义的ViewGroup
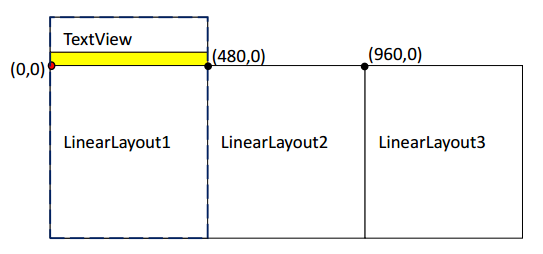
整个Activity的布局如下图:
package com.example.scrollerviewdemos;

import android.app.Activity;
import android.os.Bundle;
import android.util.DisplayMetrics;
import android.util.Log;
import android.view.View;
import android.view.View.OnClickListener;
import android.widget.Button;
import android.widget.Toast;


public class MultiScreenActivity extends Activity implements OnClickListener {

	private static final String TAG = "yxf";
	private Button mScrollLeft;
	private Button mScrollRight;
	private MultiViewGroup mulTiViewGroup  ;

	public static int screenWidth; // 屏幕宽度
	public static int scrrenHeight;//屏幕高度

	private int curscreen = 0;

	protected void onCreate(Bundle savedInstanceState) {
		super.onCreate(savedInstanceState);
        //获得屏幕分辨率大小
		DisplayMetrics metric = new DisplayMetrics();
		getWindowManager().getDefaultDisplay().getMetrics(metric);
		screenWidth = metric.widthPixels ;
		scrrenHeight = metric.heightPixels;
		Log.d(TAG,"screenWidth * scrrenHeight --->" + screenWidth + " * " +scrrenHeight);

		setContentView(R.layout.activity_multiview);

        //获取自定义视图的空间引用
		mulTiViewGroup = (MultiViewGroup)findViewById(R.id.mymultiViewGroup);

		mScrollLeft = (Button) findViewById(R.id.bt_scrollLeft);
		mScrollRight = (Button) findViewById(R.id.bt_scrollRight);

		mScrollLeft.setOnClickListener(this);
		mScrollRight.setOnClickListener(this);
	}

	@Override
	public void onClick(View v) {
		// TODO Auto-generated method stub
		switch (v.getId()) {
		case R.id.bt_scrollLeft:
			if(curscreen > 0) {
			    curscreen -- ;
			    Toast.makeText(MultiScreenActivity.this, "第" +(curscreen+1) + "屏", Toast.LENGTH_SHORT).show();
			} else {
                Toast.makeText(MultiScreenActivity.this, "当前已是第一屏",Toast.LENGTH_SHORT).show();
			}
			mulTiViewGroup.scrollTo(curscreen * screenWidth , 0);
			break;
		case R.id.bt_scrollRight:
			if (curscreen < 2 ){
				curscreen ++ ;
				Toast.makeText(MultiScreenActivity.this, "第" + (curscreen+1) + "屏", Toast.LENGTH_SHORT).show();
			} else {
				Toast.makeText(MultiScreenActivity.this, "当前已是最后一屏",Toast.LENGTH_SHORT).show();
			}
			mulTiViewGroup.scrollTo(curscreen * screenWidth, 0);
			break;
		}
	}
}<?xml version="1.0" encoding="utf-8"?>
<RelativeLayout xmlns:android="http://schemas.android.com/apk/res/android"
android:orientation="vertical"
android:layout_width="fill_parent"
android:layout_height="fill_parent">
<TextView
android:id="@+id/tv_hello"
android:layout_width="fill_parent"
android:layout_height="wrap_content"
android:text="@string/hello" />
<com.example.scrollerviewdemos.MultiViewGroup
android:id="@+id/mymultiViewGroup"
android:layout_below="@id/tv_hello"
android:layout_height="wrap_content"
android:layout_width="wrap_content">
</com.example.scrollerviewdemos.MultiViewGroup>
<Button android:id="@+id/bt_scrollLeft"
android:layout_alignParentBottom="true"
android:layout_width="200dip"
android:layout_height="wrap_content"
android:text="Prev" />
<Button android:id="@+id/bt_scrollRight"
android:layout_width="200dip"
android:layout_toRightOf="@id/bt_scrollLeft"
android:layout_alignParentBottom="true"
android:layout_height="wrap_content"
android:text="Next" />
</RelativeLayout>


 5384
5384


 被折叠的 条评论
为什么被折叠?
被折叠的 条评论
为什么被折叠?
 到【灌水乐园】发言


