


 本文详细剖析了Android系统中服务注册的过程,包括客户端如何通过ServiceManager注册服务,以及注册过程中的关键步骤。服务注册分为Java层和服务层两种,文章重点介绍了这两种注册方式的具体实现。
在ServiceManager 进程启动源码分析中详细介绍了ServiceManager进程是如何启动,如何成为Android系统的服务大管家。客户端在请求服务前,必须将服务注册到ServiceManger中,这样客户端在请求服务的时候,才能够查找到指定的服务。本文开始将以CameraService服务的注册为例来介绍服务注册的整个过程。
CameraService服务的注册过程包括五个步骤:
1)客户进程向ServiceManager进程发送IPC服务注册信息;
2)ServiceManager进程接收客户进程发送过来的IPC数据;
3)ServiceManager进程登记注册服务;
4)ServiceManager向客户进程发送IPC返回信息;
5)客户进程接收ServiceManager进程发送过来的IPC数据;
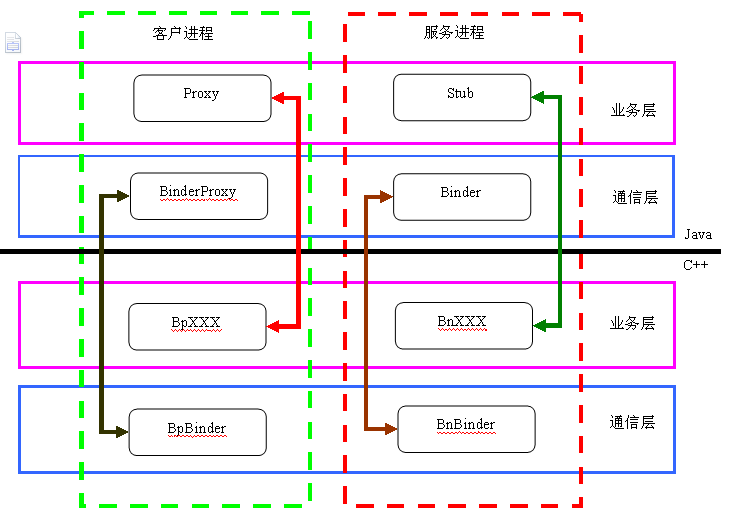
本文主要分析客户端进程是如何向ServiceManager进程发送IPC服务注册信息的。服务分为Java服务和本地服务两种,因此服务注册也存在两种方式:Java层服务注册和C++层服务注册。
Java层服务注册过程
例如注册电源管理服务:ServiceManager.addService(Context.POWER_SERVICE, power);
通过ServiceManager类的addService()函数来注册某个服务,addService函数的实现如下:
public static void addService(String name, IBinder service) {
	try {
		getIServiceManager().addService(name, service, false);
	} catch (RemoteException e) {
		Log.e(TAG, "error in addService", e);
	}
}
通过getIServiceManager()获取ServiceManager的代理对ServiceManagerProxy,并调用代理对象的addService函数来注册服务。
获取代理对象ServiceManagerProxy
private static IServiceManager getIServiceManager() {
	if (sServiceManager != null) {
		return sServiceManager;
	}
	// 获取ServiceManagerProxy对象实例
	sServiceManager = ServiceManagerNative.asInterface(BinderInternal.getContextObject());
	return sServiceManager;
}
Java层通过以下两个步骤来获取ServiceManager的代理对象的引用:
1) BinderInternal.getContextObject() 创建一个Java层的BinderProxy对象,该对象与C++层的BpBinder一一对应;
2) ServiceManagerNative.asInterface(obj) 创建一个Java层面的ServiceManagerProxy代理对象,作用与C++层的BpServiceManager相同。

函数首先创建BpBinder,然后使用BpBinder对象来创建一个Java层的BinderProxy对象,最后通过BinderProxy对象来构造ServiceManagerProxy实例对象。
BpBinder ---> BinderProxy ---> ServiceManagerProxy
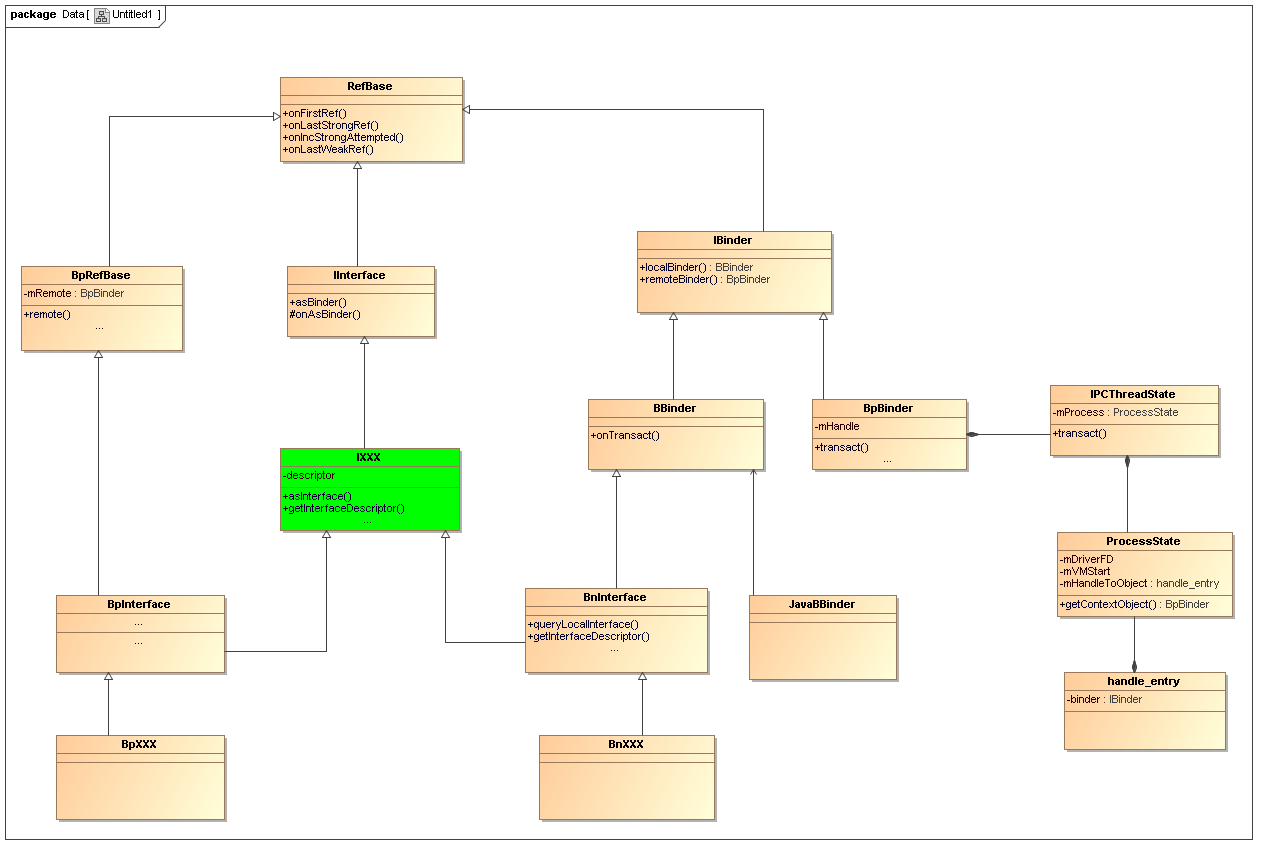
BpBinder创建过程
BinderInternal类的静态函数getContextObject()是一个本地函数
public static final native IBinder getContextObject()其对应的JNI函数为:
static jobject android_os_BinderInternal_getContextObject(JNIEnv* env, jobject clazz)
{
    sp<IBinder> b = ProcessState::self()->getContextObject(NULL); -->new BpBinder(0)
	//new BpBinder(0) ----->new BinderProxy()
    return javaObjectForIBinder(env, b);
}
函数首先使用单例模式获取ProcessState对象,并调用其函数getContextObject()来创建BpBinder对象,最后使用javaObjectForIBinder函数创建BinderProxy对象。整个过程包括以下几个步骤:
1.构造ProcessState对象实例;
2.创建BpBinder对象;
3.创建BinderProxy对象;
构造ProcessState对象实例
frameworks\base\libs\binder\ProcessState.cpp
采用单例模式为客户端进程创建ProcessState对象:
sp<ProcessState> ProcessState::self()
{
    if (gProcess != NULL) return gProcess;
    AutoMutex _l(gProcessMutex);
    if (gProcess == NULL) gProcess = new ProcessState;
    return gProcess;
}
构造ProcessState对象
ProcessState::ProcessState()
    : mDriverFD(open_driver()) //打开Binder设备驱动
    , mVMStart(MAP_FAILED)
    , mManagesContexts(false)
    , mBinderContextCheckFunc(NULL)
    , mBinderContextUserData(NULL)
    , mThreadPoolStarted(false)
    , mThreadPoolSeq(1)
{
    if (mDriverFD >= 0) {
#if !defined(HAVE_WIN32_IPC)
        // mmap the binder, providing a chunk of virtual address space to receive transactions.
        mVMStart = mmap(0, BINDER_VM_SIZE, PROT_READ, MAP_PRIVATE | MAP_NORESERVE, mDriverFD, 0);
        if (mVMStart == MAP_FAILED) {
            LOGE("Using /dev/binder failed: unable to mmap transaction memory.\n");
            close(mDriverFD);
            mDriverFD = -1;
        }
#else
        mDriverFD = -1;
#endif
    }
    if (mDriverFD < 0) {
        // Need to run without the driver, starting our own thread pool.
    }
}
在构造ProcessState对象时,将打开Binder驱动,并将Binder驱动设备文件句柄保存在成员变量mDriverFD 中。同时将Binder设备文件句柄映射到客户端进程的地址空间中,映射的起始地址保存在mVMStart变量中,映射的空间大小为(1024*1024) - (2* 4096)
创建BpBinder对象
sp<IBinder> ProcessState::getContextObject(const sp<IBinder>& caller)
{
    return getStrongProxyForHandle(0); //ServiceManager的handle = 0
}
函数直接调用getStrongProxyForHandle函数来创建ServiceManager的Binder代理对象BpBinder,由于ServiceManager服务对应的Handle值为0,因此这里的参数设置为0.
sp<IBinder> ProcessState::getStrongProxyForHandle(int32_t handle)
{
    sp<IBinder> result;
  AutoMutex _l(mLock);
  //根据句柄值查询
    handle_entry* e = lookupHandleLocked(handle);
	//如果从表中查找到了对应的handle
    if (e != NULL) {
        // We need to create a new BpBinder if there isn't currently one, OR we
        // are unable to acquire a weak reference on this current one.  See comment
        // in getWeakProxyForHandle() for more info about this.
		// 取handle_entry 中的binder成员
        IBinder* b = e->binder;
        if (b == NULL || !e->refs->attemptIncWeak(this)) {
            b = new BpBinder(handle); //根据句柄值创建一个BpBinder
            e->binder = b;
            if (b) e->refs = b->getWeakRefs();
            result = b;
        } else {
            // This little bit of nastyness is to allow us to add a primary
            // reference to the remote proxy when this team doesn't have one
            // but another team is sending the handle to us.
            result.force_set(b);
            e->refs->decWeak(this);
        }
    }
    return result;
}
根据句柄获取相应的Binder代理,返回BpBinder对象,该函数主要是根据handle值从表中查找对应的handle_entry,并返回该结构的成员binder的值。查找过程如下:
ProcessState::handle_entry* ProcessState::lookupHandleLocked(int32_t handle)
{
    const size_t N=mHandleToObject.size();
    if (N <= (size_t)handle) {
        handle_entry e;
        e.binder = NULL;
        e.refs = NULL;
        status_t err = mHandleToObject.insertAt(e, N, handle+1-N);
        if (err < NO_ERROR) return NULL;
    }
    return &mHandleToObject.editItemAt(handle);
}
为了理解整个查找过程,必须先了解各个数据结构直接的关系,下面通过一个图了描述数据存储结构:

在ProcessState的成员变量mHandleToObject中存储了进程所使用的BpBinder,Handle值是BpBinder所对应的handle_entry在表mHandleToObject中的索引。
查找过程实质上就是从mHandleToObject向量中查找相应句柄的Binder代理对象。
创建BinderProxy对象
使用函数javaObjectForIBinder来创建一个BinderProxy对象,并在保存BpBinder的持久对象,同样为了能更深入地理解整个创建过程,我们需要先理解BinderProxy数据结构与BpBinder数据结构直接的关系,它们之间的关系如下图所示:

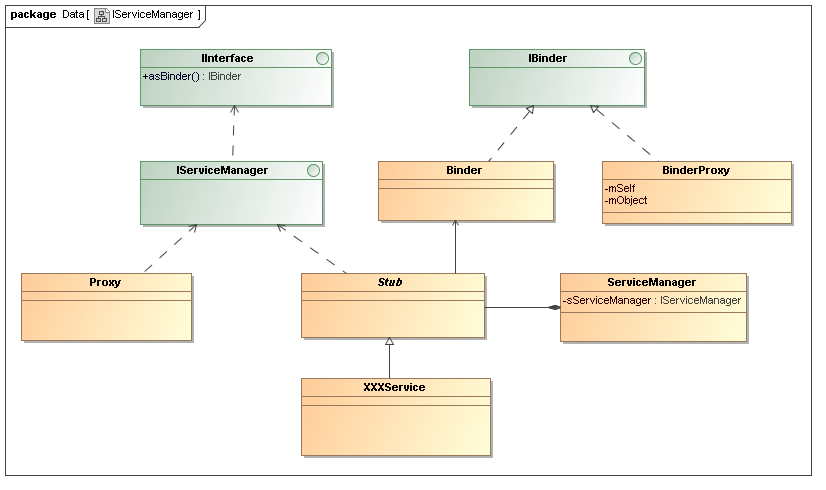
Java类在JNI层的数据对应关系:

jobject javaObjectForIBinder(JNIEnv* env, const sp<IBinder>& val)
{
    //val == new BpBinder(0)
  if (val == NULL) return NULL;
  //BpBinder 中返回false
    if (val->checkSubclass(&gBinderOffsets)) {  //false
        jobject object = static_cast<JavaBBinder*>(val.get())->object();
        LOGDEATH("objectForBinder %p: it's our own %p!\n", val.get(), object);
        return object;
    }
    AutoMutex _l(mProxyLock);
  //BpBinder的findObject函数实际在ObjectManager中查找JNI层的BinderProxy,即gBinderProxyOffsets
  jobject object = (jobject)val->findObject(&gBinderProxyOffsets);
    //如果已经保存,则删除原来的gBinderProxyOffsets
  if (object != NULL) {
        //调用WeakReference类的get方法
        jobject res = env->CallObjectMethod(object, gWeakReferenceOffsets.mGet);
        if (res != NULL) {
            LOGV("objectForBinder %p: found existing %p!\n", val.get(), res);
            return res;
        }
        LOGDEATH("Proxy object %p of IBinder %p no longer in working set!!!", object, val.get());
        android_atomic_dec(&gNumProxyRefs);
        //从BpBinder的ObjectManager中删除JNI层的gBinderProxyOffsets
        val->detachObject(&gBinderProxyOffsets);
        env->DeleteGlobalRef(object);
    }
  //在JNI层构造一个Java层的BinderProxy
  object = env->NewObject(gBinderProxyOffsets.mClass, gBinderProxyOffsets.mConstructor);
    if (object != NULL) {
        LOGDEATH("objectForBinder %p: created new proxy %p !\n", val.get(), object);
        // 将本地BpBinder对象保存在BinderProxy的成员变量mObject中
        env->SetIntField(object, gBinderProxyOffsets.mObject, (int)val.get());
        val->incStrong(object);
        // 创建一个类型为WeakReference的对象,BinderProxy的成员变量mSelf就是WeakReference类实例对象
      jobject refObject = env->NewGlobalRef(env->GetObjectField(object, gBinderProxyOffsets.mSelf));
        //将新创建的BinderProxy对象注册到BpBinder的ObjectManager中,同时注册一个回收函数proxy_cleanup,当BinderProxy对象撤销时,释放资源
      val->attachObject(&gBinderProxyOffsets, refObject,jnienv_to_javavm(env), proxy_cleanup);
        // Also remember the death recipients registered on this proxy
        sp<DeathRecipientList> drl = new DeathRecipientList;
        drl->incStrong((void*)javaObjectForIBinder);
        env->SetIntField(object, gBinderProxyOffsets.mOrgue, reinterpret_cast<jint>(drl.get()));
        // 增加Proxy对象的引用计数
        android_atomic_inc(&gNumProxyRefs);
        //当创建的Proxy对象超过200个时,调用BinderIntenal的ForceGc进行垃圾回收
        incRefsCreated(env);
    }
    return object;
}gBinderProxyOffsets是JNI层中存储Java层的BinderProxy类信息的结构,refObject是JNI层创建的WeakReference对象的全局引用
void BpBinder::attachObject(const void* objectID, void* object, void* cleanupCookie,
    object_cleanup_func func)
{
    AutoMutex _l(mLock);
  LOGV("Attaching object %p to binder %p (manager=%p)", object, this, &mObjects);
  //调用ObjectManager的attach函数来完成存储
    mObjects.attach(objectID, object, cleanupCookie, func);
}
void BpBinder::ObjectManager::attach(const void* objectID, void* object, void* cleanupCookie,IBinder::object_cleanup_func func)
{
entry_t e;
e.object = object;
e.cleanupCookie = cleanupCookie;
e.func = func;
if (mObjects.indexOfKey(objectID) >= 0) {//如果列表中已经存在该gBinderProxyOffsets
LOGE("Trying to attach object ID %p to binder ObjectManager %p with object %p, but object ID already in use",objectID, this, object);
return;
}
mObjects.add(objectID, e); //不存在,则添加gBinderProxyOffsets和refObject的键值对
}将Java层的BinderProxy对象对应的JNI层的gBinderProxyOffsets以键值对的形式存储在BpBinder的ObjectManager中。
ServiceManagerProxy对象的创建过程

使用BinderProxy对象来构造ServiceManagerProxy对象:
static public IServiceManager asInterface(IBinder obj)
{
	if (obj == null) {
		return null;
	}
	IServiceManager in =(IServiceManager)obj.queryLocalInterface(descriptor);
	if (in != null) {
		return in;
	}
	return new ServiceManagerProxy(obj);
}
采用单例模式来构造ServiceManagerProxy对象
public ServiceManagerProxy(IBinder remote) {
	mRemote = remote;
}
构造过程比较简单,就是将创建的BinderProxy对象赋值给ServiceManagerProxy的成员变量mRemote。
使用ServiceManagerProxy注册服务
public void addService(String name, IBinder service, boolean allowIsolated)
		throws RemoteException {
	Parcel data = Parcel.obtain(); //发送的数据包
	Parcel reply = Parcel.obtain(); //接收的数据包
	//写入需要发送的数据
	data.writeInterfaceToken(IServiceManager.descriptor);
	data.writeString(name);
	data.writeStrongBinder(service);
	data.writeInt(allowIsolated ? 1 : 0);
	//数据传输过程
	mRemote.transact(ADD_SERVICE_TRANSACTION, data, reply, 0);
	reply.recycle();
	data.recycle();
}
ServiceManagerProxy实现的代理作用就是将数据的处理与数据的传输分开,在代理层仅仅实现数据的打包与解包工作,而真正的数据发送完全交个BinderProxy来完成。
在ServiceManagerProxy对象构造过程中,将BinderProxy对象直接赋给了ServiceManagerProxy的成员变量mRemote了,因此上面调用的transact函数调用的是BinderProxy类的transact函数:
public native boolean transact(int code, Parcel data, Parcel reply,
		int flags) throws RemoteException;
这是一个本地函数,其对于的JNI实现函数为:
static jboolean android_os_BinderProxy_transact(JNIEnv* env, jobject obj,
        jint code, jobject dataObj, jobject replyObj, jint flags) // throws RemoteException
{
	//数据检查
    if (dataObj == NULL) {
        jniThrowNullPointerException(env, NULL);
        return JNI_FALSE;
    }
    //将Java中的Parcel转换为C++中的Parcel对象
    Parcel* data = parcelForJavaObject(env, dataObj);
    if (data == NULL) {
        return JNI_FALSE;
    }
	//将Java中的Parcel转换为C++中的Parcel对象
    Parcel* reply = parcelForJavaObject(env, replyObj);
    if (reply == NULL && replyObj != NULL) {
        return JNI_FALSE;
    }
    //从BinderProxy的成员变量mObject中取得对应的BpBinder对象
    IBinder* target = (IBinder*)env->GetIntField(obj, gBinderProxyOffsets.mObject);
    if (target == NULL) {
        jniThrowException(env, "java/lang/IllegalStateException", "Binder has been finalized!");
        return JNI_FALSE;
    }

    ALOGV("Java code calling transact on %p in Java object %p with code %d\n",
            target, obj, code);

    // Only log the binder call duration for things on the Java-level main thread.
    // But if we don't
    const bool time_binder_calls = should_time_binder_calls();

    int64_t start_millis;
    if (time_binder_calls) {
        start_millis = uptimeMillis();
    }
	//调用BpBinder对象的transact函数来发送数据
    status_t err = target->transact(code, *data, reply, flags);
    //if (reply) printf("Transact from Java code to %p received: ", target); reply->print();
    if (time_binder_calls) {
        conditionally_log_binder_call(start_millis, target, code);
    }

    if (err == NO_ERROR) {
        return JNI_TRUE;
    } else if (err == UNKNOWN_TRANSACTION) {
        return JNI_FALSE;
    }
    signalExceptionForError(env, obj, err, true /*canThrowRemoteException*/);
    return JNI_FALSE;
}
在创建BinderProxy对象一节中,BinderProxy对象创建后,会将其对应的BpBinder对象保存在BinderProxy的成员变量mObject中,在这里就直接从mObject中取出BpBinder对象来发送数据。
status_t BpBinder::transact(uint32_t code, const Parcel& data, Parcel* reply, uint32_t flags)
{
    // Once a binder has died, it will never come back to life.
    if (mAlive) {
		//间接调用IPCThreadState的transact函数来发送数据
        status_t status = IPCThreadState::self()->transact(mHandle, code, data, reply, flags);
        if (status == DEAD_OBJECT) mAlive = 0;
        return status;
    }
    return DEAD_OBJECT;
}
本地服务注册过程
C++层注册服务:SurfaceFlinger::instantiate();
各个C++本地服务继承BinderService,BinderService类是一个模板类,其instantiate函数定义如下:
static void instantiate() { publish(); }static status_t publish(bool allowIsolated = false) {
//取得ServiceManager的代理对象
sp<IServiceManager> sm(defaultServiceManager());
//注册服务
return sm->addService(String16(SERVICE::getServiceName()), new SERVICE(), allowIsolated);
}BpServiceManager对象获取过程
sp<IServiceManager> defaultServiceManager(){
    if (gDefaultServiceManager != NULL) return gDefaultServiceManager;
    {
        AutoMutex _l(gDefaultServiceManagerLock);
        if (gDefaultServiceManager == NULL) {
            gDefaultServiceManager = interface_cast<IServiceManager>(
                ProcessState::self()->getContextObject(NULL));
        }
    }
    return gDefaultServiceManager;
}
通过interface_cast<IServiceManager>(ProcessState::self()->getContextObject(NULL))获取servicemanager代理对象的引用,通过以下三个步骤来实现:
1) ProcessState::self() 得到ProcessState实例对象;
2) ProcessState->getContextObject(NULL) 得到BpBinder对象;
3) interface_cast<IServiceManager>(const sp<IBinder>& obj) 使用BpBinder对象来创建服务代理对象BpXXX;
前面两个步骤ProcessState::self()->getContextObject(NULL)已经在前面详细介绍了,它返回一个BpBinder(0)对象实例。因此:
gDefaultServiceManager = interface_cast<IServiceManager>(BpBinder(0));interface_cast是一个模版函数
frameworks\base\include\binder\IInterface.h
template<typename INTERFACE>
inline sp<INTERFACE> interface_cast(const sp<IBinder>& obj)
{
  return INTERFACE::asInterface(obj);
  //return IServiceManager::asInterface(obj);
}因此interface_cast函数的实现实际上是调用相应接口的asInterface函数来完成的,对于IServiceManager接口即调用IServiceManager::asInterface(obj)
通过宏DECLARE_META_INTERFACE声明了ServiceManager的接口函数
DECLARE_META_INTERFACE(ServiceManager);DECLARE_META_INTERFACE 的定义:
#define DECLARE_META_INTERFACE(INTERFACE)               \
    static const android::String16 descriptor;                         \
    static android::sp<I##INTERFACE> asInterface(                  \
            const android::sp<android::IBinder>& obj);              \
    virtual const android::String16& getInterfaceDescriptor() const;      \
    I##INTERFACE();                                          \
  virtual ~I##INTERFACE();                                   \
因此对于ServiceManager的接口函数声明如下:
static const android::String16 descriptor;
static android::sp<IServiceManager> asInterface(const android::sp<android::IBinder>& obj);
virtual const android::String16& getInterfaceDescriptor() const;
IServiceManager();
virtual ~IServiceManager();
通过宏IMPLEMENT_META_INTERFACE定义ServiceManager的接口函数实现
IMPLEMENT_META_INTERFACE(ServiceManager, "android.os.IServiceManager");IMPLEMENT_META_INTERFACE的定义:
#define IMPLEMENT_META_INTERFACE(INTERFACE, NAME)      \
    const android::String16 I##INTERFACE::descriptor(NAME);        \
    const android::String16&                                      \
            I##INTERFACE::getInterfaceDescriptor() const {          \
        return I##INTERFACE::descriptor;                          \
    }                                                          \
    android::sp<I##INTERFACE> I##INTERFACE::asInterface(         \
            const android::sp<android::IBinder>& obj)                \
    {                                                          \
        android::sp<I##INTERFACE> intr;                          \
        if (obj != NULL) {                                       \
            intr = static_cast<I##INTERFACE*>(                   \
                obj->queryLocalInterface(                         \
                        I##INTERFACE::descriptor).get());         \
            if (intr == NULL) {                                  \
                intr = new Bp##INTERFACE(obj);                 \
            }                                                 \
        }                                                     \
        return intr;                                             \
    }                                                         \
    I##INTERFACE::I##INTERFACE() { }                         \
    I##INTERFACE::~I##INTERFACE() { }                        \
对于ServiceManager的接口函数实现如下:
const android::String16 IServiceManager::descriptor(NAME);
const android::String16&
		IServiceManager::getInterfaceDescriptor() const {
	return IServiceManager::descriptor;
}
android::sp<IServiceManager> IServiceManager::asInterface(
		const android::sp<android::IBinder>& obj)
{
	android::sp<IServiceManager> intr;
	if (obj != NULL) {
		intr = static_cast<IServiceManager*>(obj->queryLocalInterface(IServiceManager::descriptor).get());
		if (intr == NULL) {
			intr = new BpServiceManager(obj);
		}
	}
	return intr;
}
IServiceManager::IServiceManager() { }
IServiceManager::~IServiceManager() { }
Obj是BpBinder对象,BpBinder继承IBinder类,在子类BpBinder中并未重写父类的queryLocalInterface接口函数,因此obj->queryLocalInterface() 实际上是调用父类IBinder的queryLocalInterface()函数,在IBinder类中:
sp<IInterface>  IBinder::queryLocalInterface(const String16& descriptor)
{
    return NULL;
}
因此通过调用 IServiceManager::asInterface()函数即可创建ServiceManager的代理对象BpServiceManager = new BpServiceManager(new BpBinder(0)),BpServiceManager的构造实际上是对通信层的封装,为上层屏蔽进程间通信的细节。
BpServiceManager的构造过程:
BpServiceManager(const sp<IBinder>& impl): BpInterface<IServiceManager>(impl)
{
}BpServiceManager的构造过程中并未做任何实现,在构造BpServiceManager对象之前,必须先构造父类对象BpInterface,BpInterface的构造函数采用了模板函数实现:
template<typename INTERFACE>
inline BpInterface<INTERFACE>::BpInterface(const sp<IBinder>& remote): BpRefBase(remote)
{
}由于BpInterface 同时继承于BpRefBase及相应的接口,如IServiceManager,因此在构造BpInterface 的过程中必先构造其父类对象:
对于父类BpRefBase的构造过程如下:
BpRefBase::BpRefBase(const sp<IBinder>& o): mRemote(o.get()), mRefs(NULL), mState(0)
{
    extendObjectLifetime(OBJECT_LIFETIME_WEAK);
    if (mRemote) {
        mRemote->incStrong(this);           // Removed on first IncStrong().
        mRefs = mRemote->createWeak(this);  // Held for our entire lifetime.
    }
}
最终把ServiceManger对应的BpBinder(0)赋给了mRemote,在客户端向ServiceManager发送请求过程中,首先通过ServiceManager的代理对象BpServiceManager来包装数据,接着调用BpBinder将数据发送给服务端ServiceManager。

BpServiceManager服务注册过程
virtual status_t addService(const String16& name, const sp<IBinder>& service,
		bool allowIsolated)
{
	//数据打包过程
	Parcel data, reply;
	data.writeInterfaceToken(IServiceManager::getInterfaceDescriptor());
	data.writeString16(name);
	data.writeStrongBinder(service);
	data.writeInt32(allowIsolated ? 1 : 0);
	//使用BpBinder来发送数据
	status_t err = remote()->transact(ADD_SERVICE_TRANSACTION, data, &reply);
	return err == NO_ERROR ? reply.readExceptionCode() : err;
}
函数首先将要发送的数据打包在parcel对象中,然后调用BpBinder对象来发送数据。
status_t BpBinder::transact(uint32_t code, const Parcel& data, Parcel* reply, uint32_t flags)
{
    // Once a binder has died, it will never come back to life.
    if (mAlive) {
		//间接调用IPCThreadState的transact函数来发送数据
        status_t status = IPCThreadState::self()->transact(mHandle, code, data, reply, flags);
        if (status == DEAD_OBJECT) mAlive = 0;
        return status;
    }
    return DEAD_OBJECT;
}

在这里和Java层的服务注册过程殊途同归了,都是通过IPCThreadState类来和Binder驱动交换,将IPC数据发送给ServiceManger进程。本文分析了用户空间中Binder通信架构设计及IPC数据的封装过程,在接下来的Android IPC数据在内核空间中的发送过程分析将进入Binder驱动分析IPC数据的传输过程。


 167
167

 被折叠的 条评论
为什么被折叠?
被折叠的 条评论
为什么被折叠?
 到【灌水乐园】发言


