


1. 使用 PuTTY 从 Windows 连接到 Linux 实例
转自 http://docs.aws.amazon.com/zh_cn/AWSEC2/latest/UserGuide/putty.html
先决条件
使用 PuTTY 连接到您的 Linux 实例之前,请先完成以下先决条件:
安装 PuTTY
从 PuTTY 下载页面下载并安装 PuTTY。如果您安装的是旧版本的 PuTTY,建议您下载最新版本。确保安装整个套件。
获得实例的 ID
您可以通过使用 Amazon EC2 控制台(位于 Instance ID (实例 ID) 列中)获得您的实例的 ID。如果您愿意,您可以使用 describe-instances (AWS CLI) 或 Get-EC2Instance (适用于 Windows PowerShell 的 AWS 工具) 命令。
获得实例的公有 DNS 名称
您可以使用 Amazon EC2 控制台获取实例的公有 DNS(勾选 Public DNS (公有 DNS) 列;如果此列处于隐藏状态,请单击 Show/Hide (显示/隐藏) 图标并选择 Public DNS (公有 DNS))。如果您愿意,您可以使用 describe-instances (AWS CLI) 或 Get-EC2Instance (适用于 Windows PowerShell 的 AWS 工具) 命令。查找私有密钥
您需要使用您在启动实例时指定的密钥对的 .pem 文件的完全限定路径。允许从您的 IP 地址到您的实例的入站 SSH 流量
确保与您的实例关联的安全组允许来自您的 IP 地址的传入 SSH 流量。有关更多信息,请参阅授权网络访问您的实例。
Important
默认情况下,您的默认安全组不允许传入 SSH 流量。
使用 PuTTYgen 转换您的私有密钥
PuTTY 本身不支持 Amazon EC2 生成的私有密钥格式 (.pem)。PuTTY 有一个名为 PuTTYgen 的工具,可将密钥转换成所需的 PuTTY 格式 (.ppk)。您必须将私有密钥转换为此格式 (.ppk),然后才能尝试使用 PuTTY 连接到您的实例。
转换您的私有密钥
启动 PuTTYgen(例如,在“Start”菜单中,依次单击“All Programs > PuTTY > PuTTYgen ”)。
在 Type of key to generate (要生成的密钥类型) 下,选择 SSH-2 RSA。
单击“Load”。在默认情况下,PuTTYgen 仅显示扩展名为 .ppk 的文件。要找到您的 .pem 文件,请选择显示所有类型的文件的选项。


4. 为启动实例时指定的密钥对选择 .pem 文件,然后单击 Open。单击 OK (确定) 关闭确认对话框。
5. 单击 Save private key (保存私有密钥),以 PuTTY 可用的格式保存密钥。PuTTYgen 显示一条关于在没有口令的情况下保存密钥的警告。单击 Yes (是)。
Note
私有密钥的口令是一层额外保护,因此,即使您的私有密钥被泄露,在没有口令的情况下,该密钥仍不可用。使用口令的缺点是让自动化变得更难,因为登录到实例或复制文件到实例需要进行人为干预。
6. 为该密钥指定与密钥对相同的名称(如,my-key-pair)。PuTTY 自动添加 .ppk 文件扩展名。
您的私有密钥格式现在是正确的 PuTTY 使用格式了。您现在可以使用 PuTTY 的 SSH 客户端连接到实例。
启动 PuTTY 会话
- (可选)您可以在本地系统(而不是实例)上使用以下命令之一验证实例上的 RSA 密钥指纹。如果您从第三方的公用 AMI 启动了实例,则可能需要这样做。找到 SSH HOST KEY FINGERPRINTS 部分,记下 RSA 指纹(例如 1f:51:ae:28:bf:89:e9:d8:1f:25:5d:37:2d:7d:b8:ca:9f:f5:f1:6f)并将它与实例的指纹进行比较。
- 启动 PuTTY(在“Start”菜单中,单击“All Programs > PuTTY > PuTTY”)。
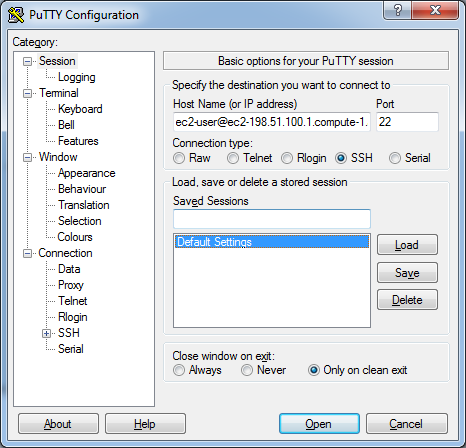
- 在“Category (类别)”窗格中,选择 Session (会话) 并填写以下字段:
a. 在 Host Name (主机名) 框中,输入 user_name@public_dns_name。确保为您的 AMI 指定相应的用户名。例如:
- 对于 Amazon Linux AMI,用户名称是 ec2-user。
- 对于 RHEL5 AMI,用户名称为 root 或 ec2-user。
- 对于 Ubuntu AMI,用户名称是 ubuntu。
- 对于 Fedora AMI,用户名称为 fedora 或 ec2-user。
- 对于 SUSE Linux,用户名称是 root 或 ec2-user。
- 另外,如果 ec2-user 和 root 无法使用,请与 AMI 供应商核实。
b. 在 Connection type (连接类型) 下,选择 SSH。
c. 确保 Port (端口) 为 22。
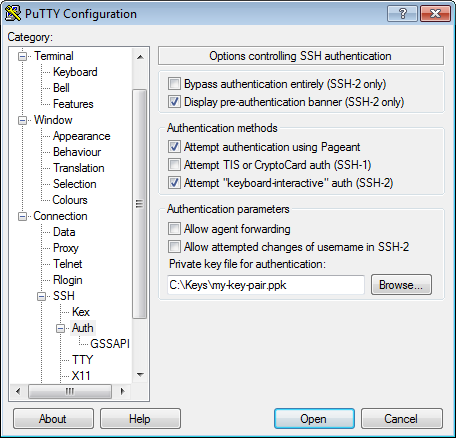
4. 在 Category (类别) 窗格中,展开 Connection (连接),再展开 SSH,然后选择 Auth (身份验证)。完成以下操作:
a. 单击 Browse (浏览)。
b. 选择您为密钥对生成的 .ppk 文件,然后单击 Open (打开)。
c. (可选)如果打算稍后重新启动此会话,则可以保存此会话信息以便日后使用。在 Category (类别) 树中选择 Session (会话),为 Saved Sessions (已存会话) 中的会话输入一个名称,然后单击 Save (保存)。
d. 单击 Open (打开) 开始 PuTTY 会话。
5. 如果这是您第一次连接到此实例,PuTTY 会显示安全警告对话框,询问您是否信任您要连接到的主机。
6. (可选)验证安全警报中的指纹是否与在步骤 1 中获取的指纹匹配。如果这些指纹不匹配,则表示有人可能在试图实施“中间人”攻击。如果匹配,请继续到下一步。
7. 单击 Yes (是)。此时会打开一个窗口并且您连接到了您的实例。
Note
如果您在将私有密钥转换成 PuTTY 格式时指定了口令,当您登录到实例时,您必须提供该口令。
如果您在尝试连接到您的实例时收到错误消息,请参阅排查实例的连接问题。
2. Connect to Amazon EC2 file directory using FileZilla and SFTP
- Edit (Preferences) > Settings > Connection > SFTP, Click “Add key file”
- Browse to the location of your .pem file and select it.
- A message box will appear asking your permission to convert the file into ppk format. Click Yes, then give the file a name and store it somewhere.
- If the new file is shown in the list of Keyfiles, then continue to the next step. If not, then click “Add keyfile…” and select the converted file.
Note: Above is to add .ppk file, if added, click “Yes(确定)“. - File > Site Manager Add a new site with the following parameters:
Host: Your public dns name of ec2 instance, or the public ip address of the server
Protocol: SFTP
Logon Type: Normal
User: From the docs: “For Amazon Linux, the default user name is ec2-user. For RHEL5, the user name is often root but might be ec2-user. For Ubuntu, the user name is ubuntu. For SUSE Linux, the user name is root. For Debian, the user name is admin. Otherwise, check with your AMI provider.”
Note: let password to be empty, if there is no password.
Press Connect Button - If saving of passwords has been disabled, you will be prompted that the logon type will be changed to ‘Ask for password’. Say ‘OK’ and when connecting, at the password prompt push ‘OK’ without entering a password to proceed past the dialog.
Note: FileZilla automatically figures out which key to use. You do not need to specify the key after importing it as described above.


 2443
2443

 被折叠的 条评论
为什么被折叠?
被折叠的 条评论
为什么被折叠?
 到【灌水乐园】发言


