


 本文深入解析Android中ViewGroup的布局过程,从ViewRoot类的performTraversals方法入手,逐步剖析layout方法的工作原理。详细解释了LinearLayout如何通过layoutVertical方法为子View分配位置。
到目前为止,measure过程已经讲解完了,今天开始我们就来学习layout过程,不过在学习layout过程之前,大家有没有发现我换了编辑器,哈哈,终于下定决心从Html编辑器切换为markdown编辑器,这里之所以使用“下定决心”这个词,是因为毕竟Html编辑器使用好几年了,很多习惯都已经养成了,要改变多年的习惯确实不易,相信这也是还有很多人坚持使用Html编辑器的原因。这也反应了一个现象,当人对某一事物非常熟悉时,一旦出现了新的事物想取代老的事物时,人们都有一种抵触的情绪,做技术的人也一样,当他对某一技术非常熟悉时,当新的同类技术出来时,都有抵触情绪,这也就是网上总有人讨论各种编程语言的好坏的原因,同时你会发现一个问题,当你对某种技术非常熟悉时,如果完成某项任务使用你熟悉的技术完成工作量非常大,而使用另外一种新的技术却非常容易实现,相信大部分都会选择熟悉的技术实现,即使他的工作量非常大。正如html编辑器和markdown编辑器一样,markdown在排版方面明显比html编辑器强大,但是还有很多人不愿意切换过来。但是我今天想说的其实是作为程序员,我们的领域如果出现了新的技术,在我们有精力的前提下我们还是应该花时间去研究,至少不应该有种抵触的情绪,好吧,今天扯淡就到这里吧….
现在就开始学习ViewGroup的layout过程吧,如果你还没有学习过我前面的文章,建议先去阅读前面两篇相关文章
Android 中View的绘制机制源码分析一
Android 中View的绘制机制源码分析二
如同measure方法一样,layout方法也是从ViewRoot类的performTraversals方法调用,代码如下:
 final boolean didLayout = mLayoutRequested;
        boolean triggerGlobalLayoutListener = didLayout
                || attachInfo.mRecomputeGlobalAttributes;
        if (didLayout) {
            mLayoutRequested = false;
            mScrollMayChange = true;
            if (DEBUG_ORIENTATION || DEBUG_LAYOUT) Log.v(
                "ViewRoot", "Laying out " + host + " to (" +
                host.mMeasuredWidth + ", " + host.mMeasuredHeight + ")");
            long startTime = 0L;
            if (Config.DEBUG && ViewDebug.profileLayout) {
                startTime = SystemClock.elapsedRealtime();
            }
            host.layout(0, 0, host.mMeasuredWidth, host.mMeasuredHeight);
            if (Config.DEBUG && ViewDebug.consistencyCheckEnabled) {
                if (!host.dispatchConsistencyCheck(ViewDebug.CONSISTENCY_LAYOUT)) {
                    throw new IllegalStateException("The view hierarchy is an inconsistent state,"
                            + "please refer to the logs with the tag "
                            + ViewDebug.CONSISTENCY_LOG_TAG + " for more infomation.");
                }
            }
我们发现调用的就是host.layout(0,0,host.mMeasureWidth,host.mMeasureHeight),在前面的文章中已经说过host就是DecorView,host.mMeasuredWidth和host.mMeasureHeight经过了measure过程后分别就是host的宽度和高度,其实也就是屏幕的宽度和高度。layout方法是View中的一个方法,我们先看看layout的代码吧
    /**
     *
     * @param l Left position, relative to parent
     * @param t Top position, relative to parent
     * @param r Right position, relative to parent
     * @param b Bottom position, relative to parent
     */
    public final void layout(int l, int t, int r, int b) {
        boolean changed = setFrame(l, t, r, b);
        if (changed || (mPrivateFlags & LAYOUT_REQUIRED) == LAYOUT_REQUIRED) {
            if (ViewDebug.TRACE_HIERARCHY) {
                ViewDebug.trace(this, ViewDebug.HierarchyTraceType.ON_LAYOUT);
            }
            onLayout(changed, l, t, r, b);
            mPrivateFlags &= ~LAYOUT_REQUIRED;
        }
        mPrivateFlags &= ~FORCE_LAYOUT;
    }
layout和measure一样,是一个final方法,所以子类无法改变它的行为,在layout中主要调用onLayout方法完成实际的逻辑,但是并不是每次laout方法都会调用onLayout方法的,首先会调用setFrame方法将上下左右的位置分别保存起来,并且在setFrame方法中会判断和上次的上下左右的位置是否一样,如果不一样保存起来并返回true,否则直接返还false.只有返还true或者有LAYOUT_REQUIRED标记才会调用onLayout方法,而onLayout方法需要子类(ViewGroup)自己去根据自己的情况实现,所以在自定义ViewGroup时,经常需要改写onLayout。在onLayout里面我们可以根据自己的需求在布局View在ViewGroup的摆放位置。至于layout的四个参数注释里面已经写清楚了,分别代表View 左边,顶部,右边,底部在父视图中的位置,通过上面传入的参数,可以知道host在屏幕中是满屏的。为了对layout有更深入的理解,我这里使用LinearLayout讲解如何利用layout进行子View的位置分配。
    @Override
    protected void onLayout(boolean changed, int l, int t, int r, int b) {
        if (mOrientation == VERTICAL) {
            layoutVertical();
        } else {
            layoutHorizontal();
        }
    }
在LinearLayout的onLayout方法中,和onMeasure方法一样,根据当前LinearLayout的排列方式分别调用layoutVertical和LayoutHorizontal,这里我们还是看看竖排的 layoutVertical吧
    /**
     * Position the children during a layout pass if the orientation of this
     * LinearLayout is set to {@link #VERTICAL}.
     *
     * @see #getOrientation()
     * @see #setOrientation(int)
     * @see #onLayout(boolean, int, int, int, int)
     */
    void layoutVertical() {
        //距离左边的距离
        final int paddingLeft = mPaddingLeft;
        //child的顶部,默认情况等于顶部pading
        int childTop = mPaddingTop;
        int childLeft;

        // LinearLayout可用宽度
        final int width = mRight - mLeft;
        int childRight = width - mPaddingRight;

        // Space available for child
        int childSpace = width - paddingLeft - mPaddingRight;
        //子View的个数
        final int count = getVirtualChildCount();

        final int majorGravity = mGravity & Gravity.VERTICAL_GRAVITY_MASK;
        final int minorGravity = mGravity & Gravity.HORIZONTAL_GRAVITY_MASK;
        //根据LinearLayotu的gravity的值计算childTop的位置
        if (majorGravity != Gravity.TOP) {
           switch (majorGravity) {
               case Gravity.BOTTOM:
                   // mTotalLength contains the padding already, we add the top
                   // padding to compensate
                   childTop = mBottom - mTop + mPaddingTop - mTotalLength;
                   break;
               case Gravity.CENTER_VERTICAL:
                   childTop += ((mBottom - mTop)  - mTotalLength) / 2;
                   break;
           }

        }

        for (int i = 0; i < count; i++) {
            final View child = getVirtualChildAt(i);
            if (child == null) {
                childTop += measureNullChild(i);
            } else if (child.getVisibility() != GONE) {
                final int childWidth = child.getMeasuredWidth();
                final int childHeight = child.getMeasuredHeight();
                //拿到子View的LayoutParams
                final LinearLayout.LayoutParams lp =
                        (LinearLayout.LayoutParams) child.getLayoutParams();

                int gravity = lp.gravity;
                if (gravity < 0) {
                    gravity = minorGravity;
                }
                //计算子View在水平方向的childLeft
                switch (gravity & Gravity.HORIZONTAL_GRAVITY_MASK) {
                    case Gravity.LEFT:
                        childLeft = paddingLeft + lp.leftMargin;
                        break;
                    case Gravity.CENTER_HORIZONTAL:
                        childLeft = paddingLeft + ((childSpace - childWidth) / 2)
                                + lp.leftMargin - lp.rightMargin;
                        break;
                    case Gravity.RIGHT:
                        childLeft = childRight - childWidth - lp.rightMargin;
                        break;
                    default:
                        childLeft = paddingLeft;
                        break;
                }


                childTop += lp.topMargin;

                setChildFrame(child, childLeft, childTop + getLocationOffset(child),
                        childWidth, childHeight);
                childTop += childHeight + lp.bottomMargin + getNextLocationOffset(child);
                i += getChildrenSkipCount(child, i);
            }
        }
    }
其实LinearyLayout的layoutVertical方法的逻辑很简单:首先计算子View在LinearLayout中的起始位置,也就是上面的childTop,就算时首先判断当前LinearLayout在垂直方向上的 对齐方式:
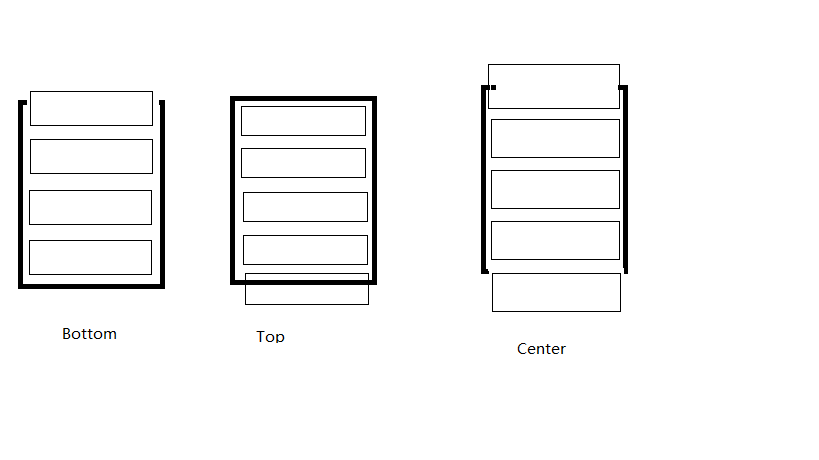
1. 如果是Gravity.Bottom,那么childTop = mBottom - mTop + mPaddingTop - mTotalLength; 这个很好理解,所以如果mTotalLenght比屏幕的高度大时,childTop很有可能是负值,从而顶部看不见
2. 如果是Gravity.CENTER_VERTICAL,那么childTop += ((mBottom - mTop) - mTotalLength) / 2;
3.如果是Gravity.Top 那么childTop = mPaddingTop; 这种是默认值 三种对齐方式对应的效果图如下:
childTop计算完毕后开始遍历各个子View,根据LinearLayout的水平方向的布局计算childLeft,这里可能有些人就犯糊涂了,这里是垂直布局,为什么要看水平方向,因为即使垂直方向,子视图也可以水平居中,所以不同的水平布局算childLeft是不一样的。
如果是Gravity.LEFT 那么childLeft = paddingLeft + lp.leftMargin;
如果是Gravity.CENTER_HORIZONTAL 那么childLeft = paddingLeft + ((childSpace - childWidth) / 2) + lp.leftMargin - lp.rightMargin; childLeft = childRight - childWidth - lp.rightMargin;`
如果是Gravity.RIGHT 那么是
现在childTop和childLeft都计算好了,由于已经measure过,所以childBottom和childRight很容易算出,这里调用了setChildFrame方法,该方法实际就是调用child.layout方法设置child的布局位置。至此,LinearLayout的布局过程已经讲解完毕。


 1065
1065

 被折叠的 条评论
为什么被折叠?
被折叠的 条评论
为什么被折叠?
 到【灌水乐园】发言


