


前言
由于公司环境恶劣,小菜鸟我本来想画UML图来显示类与类之间的关系,可惜这个念头无法达成,也只好用Word文档来完成。待菜鸟我辞职了,再自己画上UML图和Gif动态图,来显示类于类之间的关系。所以如果有看客请谅解谅解本人的情况。
正文
之前复习了实现桌面小部件的时候,知道了其中运用到了RemoteView这个特殊的类。这个类,顾名思义就是远程视图。可以跨越进程的显示View。
这也就诞生了一些特殊应用,比如说,我们完成远程的显示视图。之前复习的AIDL也可以办到这一点,但是相比于直接使用RemoteView来说的确是复杂了那么一点。
不过RemoteView的缺点也是很明显的,为了提高RemoteView的进程间通讯的速度,RemoteView只支持一下几种View以及 ViewGroup:
- Layout:
FrameLayout,LinearLayout,RelativeLayout,GridLayout - View:
AnalogClock,Button,Chronometer,ImageButton,ImageView,ProgressBar
,TextView,ViewFlipper,ListView,GridView,StackView,AdapterViewFilter,
ViewStub。
RemoteView在系统中主要运用的场景有:通知和桌面部件。之前对通知有了一定的研究了,这一次我们来分析桌面部件中RemoteView的应用。
首先,上一章我们提到了,在传输RemoteView之前,需要现在RemoteView中设置好相关的资源:
RemoteViews remoteView = new RemoteViews(context.getPackageName(),R.layout.appwidget);

remoteView.setImageViewBitmap(R.id.imageView1,rotateBitmap(context,srcBitmap,degree));
那么我们就从方法setImageViewBitmap作为研究入口开始探索。
 public void setImageViewBitmap(int viewId, Bitmap bitmap) {
        setBitmap(viewId, "setImageBitmap", bitmap);
    }
这里很简单又调用了setBitmap
public void setBitmap(int viewId, String methodName, Bitmap value) {
        addAction(new BitmapReflectionAction(viewId, methodName, value));
    }
接着这里又调用了addAction的方法。在这里我先提一提RemoteView的工作原理,这样才好继续理解。
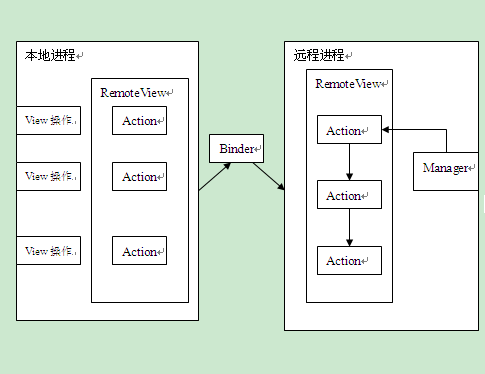
前文提到了,RemoteView同样可以向AIDL实现那样用View去访问远程进程,但是原理却完全不一样。AIDL是通过另一端实现.Stub内部类,在其中调用远程View数据来实现。
然而在RemoteView中,使用的策略是将实现了Parcelable接口的内部类Action传送到远程进程。
private abstract static class Action implements Parcelable我们将操作的对象操作封装到Action中,接着在远程端依次操作Action,最后再一次跨进程回到RemoteView中让RemoteView去修改View。这么做的高明之处在于,省去了每一种View定义一个Binder接口,提高了程序的性能。
RemoteView中的set工作
了解RemoteView的原理之后,让我们看看addAction是如何实现的。
 private void addAction(Action a) {
        if (hasLandscapeAndPortraitLayouts()) {
            throw new RuntimeException("RemoteViews specifying separate landscape and portrait" +
                    " layouts cannot be modified. Instead, fully configure the landscape and" +
                    " portrait layouts individually before constructing the combined layout.");
        }
        if (mActions == null) {
            mActions = new ArrayList<Action>();
        }
        mActions.add(a);

        // update the memory usage stats
        a.updateMemoryUsageEstimate(mMemoryUsageCounter);
    }
从上面的源码,可以清晰的知道,addAction是将一系列Action封装到List中,这里就完成了Action的存储。
我们什么时候调用这里面的Action的list呢?我们之前写AppWidget接下来是这么写:
AppWidgetManager appWidgetManager = AppWidgetManager.getInstance(context);
appWidgetManager.updateAppWidget(new ComponentName(context, AppProvider.class),remoteView);
这么写其实就是AppWidgetManager调用AppWidgetProvider中的我们自己覆写的onUpdate()方法。
比如说,我们研究的setBitmap方法中,传入了方法名setImageBitmap,接着在addAction中通过反射调用这个方法。
且看在BitmapReflectionAction这个内部类中的构造类。
BitmapReflectionAction(int viewId, String methodName, Bitmap bitmap) {
            this.bitmap = bitmap;
            this.viewId = viewId;
            this.methodName = methodName;
            bitmapId = mBitmapCache.getBitmapId(bitmap);
        }
可以知道的,这里将相关的数据全部存入到这个继承了Action类的BitmapReflectionAction。
AppWidgetManager工作
下面是AppWidgetManager的updateAppWidget方法。
public void updateAppWidget(int[] appWidgetIds, RemoteViews views) {
        if (mService == null) {
            return;
        }
        try {
            mService.updateAppWidgetIds(mPackageName, appWidgetIds, views);
        }
        catch (RemoteException e) {
            throw new RuntimeException("system server dead?", e);
        }
    }
这里的AppWidgetManager将会在SystemServer中运行起来,这里并不讨论,先放出一点证据:
private static final String APPWIDGET_SERVICE_CLASS ="com.android.server.appwidget.AppWidgetService";
if (mPackageManager.hasSystemFeature(PackageManager.FEATURE_APP_WIDGETS)) {
mSystemServiceManager.startService(APPWIDGET_SERVICE_CLASS);
}
上面那个SystemServer究竟如何启动这里暂不做讨论,我们继续。
在上面一段函数中mService同样调用了 updateAppWidget,但是在这里指的是IAppWidgetService这个Binder接口。而AppWidgetServiceImpl就是实现这个接口。
class AppWidgetServiceImpl extends IAppWidgetService.Stub implements WidgetBackupProvider,OnCrossProfileWidgetProvidersChangeListener
AppWidgetServiceImpl中工作
我们看看这个类中updateAppWidget中调用了updateAppWidgetIds:
private void updateAppWidgetIds(String callingPackage, int[] appWidgetIds,
            RemoteViews views, boolean partially) {
        final int userId = UserHandle.getCallingUserId();

        if (appWidgetIds == null || appWidgetIds.length == 0) {
            return;
        }

        // Make sure the package runs under the caller uid.
        mSecurityPolicy.enforceCallFromPackage(callingPackage);

        final int bitmapMemoryUsage = (views != null) ? views.estimateMemoryUsage() : 0;
        if (bitmapMemoryUsage > mMaxWidgetBitmapMemory) {
            throw new IllegalArgumentException("RemoteViews for widget update exceeds"
                    + " maximum bitmap memory usage (used: " + bitmapMemoryUsage
                    + ", max: " + mMaxWidgetBitmapMemory + ")");
        }

        synchronized (mLock) {
            ensureGroupStateLoadedLocked(userId);

            final int N = appWidgetIds.length;
            for (int i = 0; i < N; i++) {
                final int appWidgetId = appWidgetIds[i];

                // NOTE: The lookup is enforcing security across users by making
                // sure the caller can only access widgets it hosts or provides.
                Widget widget = lookupWidgetLocked(appWidgetId,
                        Binder.getCallingUid(), callingPackage);

                if (widget != null) {
                    updateAppWidgetInstanceLocked(widget, views, partially);
                }
            }
        }
    }
上一段代码就是整个AppWidget的核心逻辑,上面做的事情有以下几件:
1.final int userId = UserHandle.getCallingUserId();获取uid(用来识别程序的ID)
2.mSecurityPolicy.enforceCallFromPackage(callingPackage);保证package中运行的是我们的程序
ensureGroupStateLoadedLocked(userId);做的事情有点多,简单说就是从uid获取到程序的路径以及相关文件的路径的,获取到Widget的实例,并且将Widget实例添加到ArrayList中。
updateAppWidgetInstanceLocked(widget, views, partially);widget的实例不为空的时候,则更新或者载入View。
我们先看看ensureGroupStateLoadedLocked(userId)做了什么:
private void ensureGroupStateLoadedLocked(int userId) {
        final int[] profileIds = mSecurityPolicy.getEnabledGroupProfileIds(userId);

        // Careful lad, we may have already loaded the state for some
        // group members, so check before loading and read only the
        // state for the new member(s).
        int newMemberCount = 0;
        final int profileIdCount = profileIds.length;
        for (int i = 0; i < profileIdCount; i++) {
            final int profileId = profileIds[i];
            if (mLoadedUserIds.indexOfKey(profileId) >= 0) {
                profileIds[i] = LOADED_PROFILE_ID;
            } else {
                newMemberCount++;
            }
        }

        if (newMemberCount <= 0) {
            return;
        }

        int newMemberIndex = 0;
        final int[] newProfileIds = new int[newMemberCount];
        for (int i = 0; i < profileIdCount; i++) {
            final int profileId = profileIds[i];
            if (profileId != LOADED_PROFILE_ID) {
                mLoadedUserIds.put(profileId, profileId);
                newProfileIds[newMemberIndex] = profileId;
                newMemberIndex++;
            }
        }

        clearProvidersAndHostsTagsLocked();

        loadGroupWidgetProvidersLocked(newProfileIds);
        loadGroupStateLocked(newProfileIds);
    }
在这里面工作的事情主要有两个:
1.loadGroupWidgetProvidersLocked(newProfileIds):将从xml中通过标签读取Provider到list中
2.loadGroupStateLocked(newProfileIds):通过读取之前定义的appwidget_info中的信息后,实例化widget加入到widget的list中。
检查完组件的状态之后,我们就应该做出更新的相应update动作,updateAppWidgetIds里面调用了updateAppWidgetInstanceLocked:
    private void updateAppWidgetInstanceLocked(Widget widget, RemoteViews views,
            boolean isPartialUpdate) {
        if (widget != null && widget.provider != null
                && !widget.provider.zombie && !widget.host.zombie) {

            if (isPartialUpdate && widget.views != null) {
                // For a partial update, we merge the new RemoteViews with the old.
                widget.views.mergeRemoteViews(views);
            } else {
                // For a full update we replace the RemoteViews completely.
                widget.views = views;
            }

            scheduleNotifyUpdateAppWidgetLocked(widget, views);
        }
    }
判断是否是部分widget的刷新,假如是部分刷新以及widget中实例为空,则操作其中RemoteView中的Action的list,接着交给scheduleNotifyUpdateAppWidgetLocked做核心工作。
private void scheduleNotifyUpdateAppWidgetLocked(Widget widget, RemoteViews updateViews) {
        if (widget == null || widget.provider == null || widget.provider.zombie
                || widget.host.callbacks == null || widget.host.zombie) {
            return;
        }

        SomeArgs args = SomeArgs.obtain();
        args.arg1 = widget.host;
        args.arg2 = widget.host.callbacks;
        args.arg3 = updateViews;
        args.argi1 = widget.appWidgetId;

        mCallbackHandler.obtainMessage(
                CallbackHandler.MSG_NOTIFY_UPDATE_APP_WIDGET,
                args).sendToTarget();
    }
接下来就发送信息CallbackHandler.MSG_NOTIFY_UPDATE_APP_WIDGET,将工作交给mCallbackHandler这个Handler对象工作。
让我们看看这个Handler中handleMessage究竟完成了什么:
case MSG_NOTIFY_UPDATE_APP_WIDGET: {
                    SomeArgs args = (SomeArgs) message.obj;
                    Host host = (Host) args.arg1;
                    IAppWidgetHost callbacks = (IAppWidgetHost) args.arg2;
                    RemoteViews views = (RemoteViews) args.arg3;
                    final int appWidgetId = args.argi1;
                    args.recycle();

                    handleNotifyUpdateAppWidget(host, callbacks, appWidgetId, views);
                } break;
可以知道我们最后将工作交给handleNotifyUpdateAppWidget()方法。
private void handleNotifyUpdateAppWidget(Host host, IAppWidgetHost callbacks,
            int appWidgetId, RemoteViews views) {
        try {
            callbacks.updateAppWidget(appWidgetId, views);
        } catch (RemoteException re) {
            synchronized (mLock) {
                Slog.e(TAG, "Widget host dead: " + host.id, re);
                host.callbacks = null;
            }
        }
    }
最后还是调用callbacks.updateAppWidget,而callbacks就是IAppWidgetHost这个Binder接口。
AppWidgetHost中的工作
而IAppWidgetHost的具体实现是AppWidgetHost中的Callback内部类,这个时候我们已经从SystemServer的进程中回到了我们的自己的进程,接着再通过消息机制,调用函数:
void updateAppWidgetView(int appWidgetId, RemoteViews views) {
        AppWidgetHostView v;
        synchronized (mViews) {
            v = mViews.get(appWidgetId);
        }
        if (v != null) {
            v.updateAppWidget(views);
        }
    }
可以看见这里就调用AppWidgetHostView里面的update方法。
AppWidgetHostView中的流程
可以说,接下来这个类就是真正执行更新的类。我们先去看看这个类中的update方法。
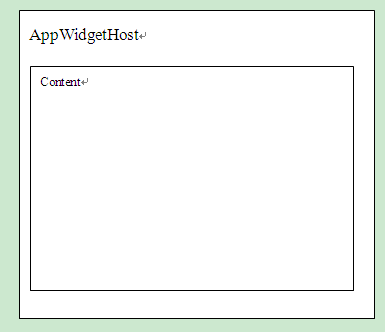
先声明AppWidgetHostView就是remoteView父容器,它是继承于FrameLayout,也就是说,它拥有FrameLayout中的特性,这样我们其实可以做很多事情了。
public class AppWidgetHostView extends FrameLayout我们继续看看updateAppWidget中的方法:
public void updateAppWidget(RemoteViews remoteViews) {

        if (LOGD) Log.d(TAG, "updateAppWidget called mOld=" + mOld);

        boolean recycled = false;
        View content = null;
        Exception exception = null;

        // 插入以前的view到bitmap让我们可以办到淡入淡出效果
        if (CROSSFADE) {
            if (mFadeStartTime < 0) {
                if (mView != null) {
                    final int width = mView.getWidth();
                    final int height = mView.getHeight();
                    try {
                        mOld = Bitmap.createBitmap(width, height, Bitmap.Config.ARGB_8888);
                    } catch (OutOfMemoryError e) {
                        // we just won't do the fade
                        mOld = null;
                    }
                    if (mOld != null) {
                        //mView.drawIntoBitmap(mOld);
                    }
                }
            }
        }

        if (remoteViews == null) {
            if (mViewMode == VIEW_MODE_DEFAULT) {
                // We've already done this -- nothing to do.
                return;
            }
            content = getDefaultView();
            mLayoutId = -1;
            mViewMode = VIEW_MODE_DEFAULT;
        } else {
            // Prepare a local reference to the remote Context so we're ready to准备一个本地的应用给远程Context
            // inflate any requested LayoutParams.
            mRemoteContext = getRemoteContext();
            int layoutId = remoteViews.getLayoutId();

            // 大概是如果旧的布局和新的布局相匹配,则重新用回原来的remoteView
            //
            if (content == null && layoutId == mLayoutId) {
                try {
                    remoteViews.reapply(mContext, mView, mOnClickHandler);
                    content = mView;
                    recycled = true;
                    if (LOGD) Log.d(TAG, "was able to recycled existing layout");
                } catch (RuntimeException e) {
                    exception = e;
                }
            }

            // Try normal RemoteView inflation尝试着加载远程视图remoteview
            if (content == null) {
                try {
                    content = remoteViews.apply(mContext, this, mOnClickHandler);
                    if (LOGD) Log.d(TAG, "had to inflate new layout");
                } catch (RuntimeException e) {
                    exception = e;
                }
            }

            mLayoutId = layoutId;
            mViewMode = VIEW_MODE_CONTENT;
        }

        if (content == null) {
            if (mViewMode == VIEW_MODE_ERROR) {
                // We've already done this -- nothing to do.
                return ;
            }
            Log.w(TAG, "updateAppWidget couldn't find any view, using error view", exception);
            content = getErrorView();
            mViewMode = VIEW_MODE_ERROR;
        }

        if (!recycled) {
            prepareView(content);
            addView(content);
        }

        if (mView != content) {
            removeView(mView);
            mView = content;
        }

        if (CROSSFADE) {
            if (mFadeStartTime < 0) {
                // if there is already an animation in progress, don't do anything --
                // the new view will pop in on top of the old one during the cross fade,
                // and that looks okay.
                mFadeStartTime = SystemClock.uptimeMillis();
                invalidate();
            }
        }
    }
上面的做的事情主要有两个:
1.如果过去的布局(layout)和新载入的布局(layout)相匹配则旧的重用,调用remoteView.reapply
2.如果过去的布局(layout)和新的不匹配,则调用remoteView.apply
我们这里只讨论第一次加载的情况,因此继续看apply方法。感兴趣的,可以起自行去看看reapply方法的内容。
回到RemoteView工作
在remoteViews.apply(mContext, this, mOnClickHandler)函数中调用了apply:
public View apply(Context context, ViewGroup parent, OnClickHandler handler) {
        RemoteViews rvToApply = getRemoteViewsToApply(context);

        View result;
        // RemoteViews may be built by an application installed in another
        // user. So build a context that loads resources from that user but
        // still returns the current users userId so settings like data / time formats
        // are loaded without requiring cross user persmissions.
        final Context contextForResources = getContextForResources(context);
        Context inflationContext = new ContextWrapper(context) {
            @Override
            public Resources getResources() {
                return contextForResources.getResources();
            }
            @Override
            public Resources.Theme getTheme() {
                return contextForResources.getTheme();
            }
        };

        LayoutInflater inflater = (LayoutInflater)
                context.getSystemService(Context.LAYOUT_INFLATER_SERVICE);

        // Clone inflater so we load resources from correct context and
        // we don't add a filter to the static version returned by getSystemService.
        inflater = inflater.cloneInContext(inflationContext);
        inflater.setFilter(this);
        result = inflater.inflate(rvToApply.getLayoutId(), parent, false);

        rvToApply.performApply(result, parent, handler);

        return result;
    }
上面的代码可以看出我们是通过LayoutInfater动态加载RemoteView,加载布局文件可以动过rvToApply.getLayoutId()获得的。加载好文件之后,调用rvToApply.performApply(result, parent, handler)去执行具体的更新操作。
private void performApply(View v, ViewGroup parent, OnClickHandler handler) {
        if (mActions != null) {
            handler = handler == null ? DEFAULT_ON_CLICK_HANDLER : handler;
            final int count = mActions.size();
            for (int i = 0; i < count; i++) {
                Action a = mActions.get(i);
                a.apply(v, parent, handler);
            }
        }
    }
可以看到的是这个时候,我们获取list中的Action,在这里执行具体的对象对应具体的Action操作。这就完成了,我们不需要将View数据跨越进程的修改操作,而是在本线程进行真正的修改。
此时,存在队列中的ReflectionAction将会调用自身的apply,再通过反射去调用存在其中的方法名。
public void apply(View root, ViewGroup rootParent, OnClickHandler handler) {
            final View view = root.findViewById(viewId);
            if (view == null) return;

            Class<?> param = getParameterType();
            if (param == null) {
                throw new ActionException("bad type: " + this.type);
            }

            try {
                getMethod(view, this.methodName, param).invoke(view, wrapArg(this.value));
            } catch (ActionException e) {
                throw e;
            } catch (Exception ex) {
                throw new ActionException(ex);
            }
        }
这个时候我们发现将会调用ImageView中的setImageBitmap方法。
大致上,RemoteView的工作流程就完成了。同理在Notification中也是类似的思路,有兴趣的读者可以自己去看看。
RemoteView的使用以及意义
RemoteView可以作为一种简化后的可以跨进程UI更新的方案。下面是一个模拟通知框的远程修改UI的简单Demo,这一次我就借花献佛,借用任玉刚大神的Demo:
我们首先建立两个Activity,一个远程,一个本地,只需要在< activity >标签下添加属性“:remote”即可。
我们先看发送端:
DemoActivity_2.java:
public class DemoActivity_2 extends Activity {
    private static final String TAG = "DemoActivity_2";

    @Override
    protected void onCreate(Bundle savedInstanceState) {
        super.onCreate(savedInstanceState);
        setContentView(R.layout.demo_2);
        Log.d(TAG, "onCreate");
        Toast.makeText(this, getIntent().getStringExtra("sid"),
                Toast.LENGTH_SHORT).show();
        initView();
    }

    private void initView() {
    }

    public void onButtonClick(View v) {
        //加载RemoteView布局文件
        RemoteViews remoteViews = new RemoteViews(getPackageName(), R.layout.layout_simulated_notification);
        //加载资源文件
        remoteViews.setTextViewText(R.id.msg, "msg from process:" + Process.myPid());
        remoteViews.setImageViewResource(R.id.icon, R.drawable.icon1);
        //声明pendingintent是启动activity
        PendingIntent pendingIntent = PendingIntent.getActivity(this,
                0, new Intent(this, DemoActivity_1.class), PendingIntent.FLAG_UPDATE_CURRENT);
        PendingIntent openActivity2PendingIntent = PendingIntent.getActivity(
                this, 0, new Intent(this, DemoActivity_2.class), PendingIntent.FLAG_UPDATE_CURRENT);
        //给控件绑定pendingIntent
        remoteViews.setOnClickPendingIntent(R.id.item_holder, pendingIntent);
        remoteViews.setOnClickPendingIntent(R.id.open_activity2, openActivity2PendingIntent);
        Intent intent = new Intent(MyConstants.REMOTE_ACTION);
        intent.putExtra(MyConstants.EXTRA_REMOTE_VIEWS, remoteViews);
        //发送广播
        sendBroadcast(intent);
    }

}
接下来是接收端MainActivity:
public class MainActivity extends Activity {
    private static final String TAG = "MainActivity";

    private LinearLayout mRemoteViewsContent;

    //类似像桌面小部件一样,做一个receiver来接受广播
    private BroadcastReceiver mRemoteViewsReceiver = new BroadcastReceiver() {
        @Override
        public void onReceive(Context context, Intent intent) {
            RemoteViews remoteViews = intent
                    .getParcelableExtra(MyConstants.EXTRA_REMOTE_VIEWS);
            if (remoteViews != null) {
                //发送来的remoteview不为空时更新
                updateUI(remoteViews);
            }
        }
    };

    @Override
    protected void onCreate(Bundle savedInstanceState) {
        super.onCreate(savedInstanceState);
        setContentView(R.layout.activity_main);
        initView();
    }

    private void initView() {
        mRemoteViewsContent = (LinearLayout) findViewById(R.id.remote_views_content);
        IntentFilter filter = new IntentFilter(MyConstants.REMOTE_ACTION);
        registerReceiver(mRemoteViewsReceiver, filter);
    }

    private void updateUI(RemoteViews remoteViews) {
//        View view = remoteViews.apply(this, mRemoteViewsContent);
        //通过方法getIdentifier来加载相应名字的layout布局
        int layoutId = getResources().getIdentifier("layout_simulated_notification", "layout", getPackageName());
        View view = getLayoutInflater().inflate(layoutId, mRemoteViewsContent, false);
        //调用reapply更新remoteView
        remoteViews.reapply(this, view);
        mRemoteViewsContent.addView(view);
    }

    @Override
    protected void onDestroy() {
        unregisterReceiver(mRemoteViewsReceiver);
        super.onDestroy();
    }

    public void onButtonClick(View v) {
        if (v.getId() == R.id.button1) {
            Intent intent = new Intent(this, TestActivity.class);
            startActivity(intent);
        } else if (v.getId() == R.id.button2) {
            Intent intent = new Intent(this, DemoActivity_2.class);
            startActivity(intent);
        }
    }

}
这样就完成一次跨进程的UI更新,是不是觉得比使用AIDL简单多了呢?注意这里要更新的话,必须使用remoteView支持的view和viewgroup
代码下载:Github
RemoteView流程图与机制
RemoteView机制:
RemoteView的View结构:
RemoteView工作流程图:

这样RemoteView的工作流程大致分析完了。当然里面不仅仅只有这么多,里面涉及到的Service不仅仅只有一个AppManagerService还有PackageService,UserService等等,更加详细的,读者感兴趣的可以去自行查看源码,这里只给出了大致脉络,以及主要流程。
感谢任玉刚大神的android开发探索艺术,帮助了我看代码。


 845
845

 被折叠的 条评论
为什么被折叠?
被折叠的 条评论
为什么被折叠?
 到【灌水乐园】发言


