


在写BinderPool之前还记得,AIDL中也可以接受AIDL对象的吧。其实设计者应该也是为此而考虑的。
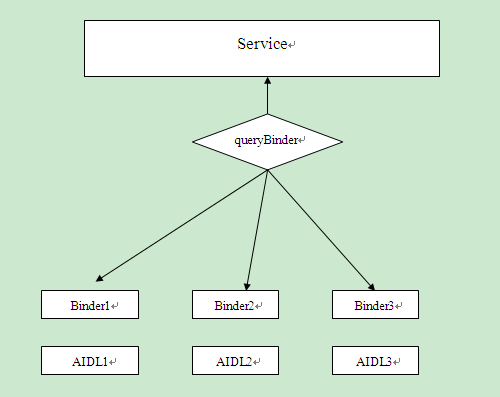
面对着许多的AIDL需要去完成远程通信,难道我们每一个去实现,每一个去调用吗?不不不,这样代码写起来不简洁。所以,我们的策略就是通过自己写一个AIDL文件去管理众多AIDL文件。再用Service去管理这个管理AIDL实现的BinderPool。
这就是BinderPool连接池的思想。
这是不是很想我们在设计模式中见到过的一种的思路呢?
没错,就是我们工厂模式,BinderPool在这里充当工厂。
下面让我们解析解析源码:
首先是三个AIDL文件
ISecurityCenter.aidl
package com.example.mybinderpool.aidl;

interface ISecurityCenter{
    String encrypt(String content);
    String decrypt(String password);
}
ICompute.aidl
package com.example.mybinderpool.aidl;

interface ICompute{
    int add(int a,int b);
}
IBinderPool.aidl
package com.example.mybinderpool.aidl;

interface IBinderPool{
    IBinder queryBinder(int bindercode);
}
我准备做的事情有两件,跨进程的计算加法以及跨进程的加密字符串,接着用IBinderPool这个AIDL去管理它们。
接下来是,头两个AIDL的实现:
文件 ISecurityImpl.java
public class ISecurityImpl extends ISecurityCenter.Stub{
    private static char SECRET_CODE= '^';

    @Override
    public String encrypt(String content) throws RemoteException {
        // TODO Auto-generated method stub
        char[] chars = content.toCharArray();
        for(int i = 0;i < chars.length;i++){
            chars[i] ^= SECRET_CODE;
        }
        return new String(chars);
    }

    @Override
    public String decrypt(String password) throws RemoteException {
        // TODO Auto-generated method stub
        return password;
    }

}
文件IComputeImpl.java
public class IComputeImpl extends ICompute.Stub{

    @Override
    public int add(int a, int b) throws RemoteException {
        // TODO Auto-generated method stub
        return a + b;
    }

}
接下来是BinderPoolService.java的实现
public class BinderPoolService extends Service{

    private static final String TAG = "BinderPoolService";

    private Binder mBinderPool = new BinderPool.BinderPoolImpl();

    @Override
    public void onCreate(){
        super.onCreate();
    }

    @Override
    public void onDestroy(){
        super.onDestroy();
    }


    @Override
    public IBinder onBind(Intent arg0) {
        // TODO Auto-generated method stub
        return mBinderPool;
    }

}
上面三段源码需要解释并不多,十分简单,要注意的是我们在Service中调用的Binder是指BinderPool中BinderPoolImpl,这个内部类实际上就是返回查询之后的Binder。
接下来才是重点,BinderPool的实现:
public class BinderPool {
    private static final String TAG = "BinderPool";
    public static final int BINDER_NONE = -1;
    public static final int BINDER_COMPUTE = 0;
    public static final int BINDER_SECURITY = 1;

    private Context context;
    private IBinderPool mBinderPool;
    private static volatile BinderPool sInstance;
    private CountDownLatch mConnectBinderPoolCountDownLatch;

    private BinderPool(Context context){
        this.context = context.getApplicationContext();
        connectBinderPoolService();
    }
    //这里是单例模式,保证只有一个BinderPool
    public static BinderPool getInstance(Context context){
        if(sInstance == null){
            synchronized (BinderPool.class) {
                if(sInstance == null){
                    sInstance = new BinderPool(context);
                }
            }
        }
        return sInstance;
    }

    //这里synchronized的关键字是因为,这个行为可能是并发,进程,防止共享资源出现冲突。
    private synchronized void connectBinderPoolService(){
        mConnectBinderPoolCountDownLatch = new CountDownLatch(1);
        Intent service = new Intent(context,BinderPoolService.class);
        context.bindService(service, mBinderConnection, Context.BIND_AUTO_CREATE);
        try {
            mConnectBinderPoolCountDownLatch.await();
        } catch (InterruptedException e) {
            // TODO: handle exception
            e.printStackTrace();
        }
    }

    //调用内部类里面查询Binder的方法
    public IBinder queryBinder(int binderCode){
        IBinder binder = null;
        try {
            if(mBinderPool == null){
                binder = mBinderPool.queryBinder(binderCode);
            }
        } catch (RemoteException e) {
            // TODO: handle exception
            e.printStackTrace();
        }
        return binder;
    }

    //实现ServiceConnection来绑定Service
    private ServiceConnection mBinderConnection = new ServiceConnection() {

        @Override
        public void onServiceDisconnected(ComponentName arg0) {
            // TODO Auto-generated method stub

        }

        @Override
        public void onServiceConnected(ComponentName classname, IBinder service) {
            // TODO Auto-generated method stub
            mBinderPool = IBinderPool.Stub.asInterface(service);
            try{
                //回调BinderDied方法,为的是给BinderPool设置死亡代理
                mBinderPool.asBinder().linkToDeath(mBinderPoolDeath, 0);
            }catch(RemoteException e){
                e.printStackTrace();
            }
            mConnectBinderPoolCountDownLatch.countDown();

        }
    };

    private IBinder.DeathRecipient mBinderPoolDeath = new IBinder.DeathRecipient() {

        @Override
        public void binderDied() {
            // TODO Auto-generated method stub
            //BinderPool断开后重新连接并且重新绑定
            mBinderPool.asBinder().unlinkToDeath(mBinderPoolDeath, 0);
            mBinderPool = null;
            connectBinderPoolService();
        }
    };

    public static class BinderPoolImpl extends IBinderPool.Stub{

        public BinderPoolImpl(){
            super();
        }


        //实现了IBinderPool.Stub中查询功能
        @Override
        public IBinder queryBinder(int bindercode) throws RemoteException {
            // TODO Auto-generated method stub
            IBinder binder = null;
            switch (bindercode) {
            case BINDER_SECURITY:
                binder = new ISecurityImpl();
                break;

            case BINDER_COMPUTE:
                binder = new IComputeImpl();
                break;
            default:
                break;
            }

            return binder;
        }

    }


}
Binder连接池的核心代码就在这里。
让我稍微的解析一下:
首先,我们必须保证BinderPool必须是单例,由于远程通信可能是并发的,如果声明两个BinderPool去同时访问同一个资源,这样整个过程不可控。为此我们使用了单例模式。
private synchronized void connectBinderPoolService(){
        mConnectBinderPoolCountDownLatch = new CountDownLatch(1);
        Intent service = new Intent(context,BinderPoolService.class);
        context.bindService(service, mBinderConnection, Context.BIND_AUTO_CREATE);
        try {
            mConnectBinderPoolCountDownLatch.await();
        } catch (InterruptedException e) {
            // TODO: handle exception
            e.printStackTrace();
        }
    }

    private ServiceConnection mBinderConnection = new ServiceConnection() {

        @Override
        public void onServiceDisconnected(ComponentName arg0) {
            // TODO Auto-generated method stub

        }

        @Override
        public void onServiceConnected(ComponentName classname, IBinder service) {
            // TODO Auto-generated method stub
            mBinderPool = IBinderPool.Stub.asInterface(service);
            try{
                //回调BinderDied方法,为的是给BinderPool设置死亡代理
                mBinderPool.asBinder().linkToDeath(mBinderPoolDeath, 0);
            }catch(RemoteException e){
                e.printStackTrace();
            }
            mConnectBinderPoolCountDownLatch.countDown();

        }
    };

    private IBinder.DeathRecipient mBinderPoolDeath = new IBinder.DeathRecipient() {

        @Override
        public void binderDied() {
            // TODO Auto-generated method stub
            //BinderPool断开后重新连接并且重新绑定
            mBinderPool.asBinder().unlinkToDeath(mBinderPoolDeath, 0);
            mBinderPool = null;
            connectBinderPoolService();
        }
    };
上面这一段,是为了防止访问共享资源冲突做出的方案。首先使用synchronized将这个方法上锁,这个时候这个对象的其他synchronized方法只能等到前一个方法调用完毕并释放锁之后才能被调用。
而CountDownLatch这个构建是Java同步多个或一个任务,强制他们等待由其他任务执行的一组操作执行。
countdown的方法是每一次调用,声明在构造器里的计数减一,到0之后释放所有等待任务。
await方法则是,当调用counDown()的任务在产生这个调用时没有被阻塞,只有await的调用会被调用,直到计数变为0。
清楚这两个方法是怎么回事之后,就能明白其实就是为了每执行一个任务的时候,另一个任务暂停,当执行完当前任务,才继续执行。
接下来是MainActivity.java
public class MainActivity extends Activity {
    private static final String TAG = "BinderPoolActivity";

    private ISecurityCenter mSecurityCenter;
    private ICompute mCompute;

    @Override
    protected void onCreate(Bundle savedInstanceState) {
        super.onCreate(savedInstanceState);
        setContentView(R.layout.activity_main);
        new Thread(new Runnable() {

            @Override
            public void run() {
                // TODO Auto-generated method stub
                dowork();
            }
        }).start();

    }

    private void dowork(){
        BinderPool binderPool = BinderPool.getInstance(MainActivity.this);
        IBinder securityBinder = binderPool.queryBinder(BinderPool.BINDER_SECURITY_CENTER);
        mSecurityCenter = (ISecurityCenter) ISecurityCenterImpl.asInterface(securityBinder);
        Log.e(TAG, "VISIT SECURITY");
        String msg = "helloworld";
        Log.e(TAG, msg);

        try{
            String password = mSecurityCenter.encrypt(msg);
            Log.e("encrypt",password);
            Log.e("decrypt", mSecurityCenter.decrypt(password));
        }catch(RemoteException e){
            e.printStackTrace();
        }

        IBinder computeBinder = binderPool.queryBinder(BinderPool.BINDER_COMPUTE);
        mCompute = IComputeImpl.asInterface(computeBinder);
        try{

            Log.e("3+5=", Integer.toString(mCompute.add(3, 5)));
        }catch(RemoteException e){
            e.printStackTrace();
        }
    }


}
想这种耗时的工作最好放在子线程中完成更好。
到这里Binder连接池就分析完成。
附上源码:
Github


 636
636

 被折叠的 条评论
为什么被折叠?
被折叠的 条评论
为什么被折叠?
 到【灌水乐园】发言


