


注意:一下所有配置,均为林多的电脑配置路径。如果,要在自己的电脑上run,请仔细改为自己电脑上相应的路径。
1、准备训练数据
首先为训练数据和测试数据,新建两个文件夹,名称任意,存放数据:
trian(存放训练数据)
val(存放测试数据)
在tiran和val中,放入统一尺寸的图片,如320x320。保证这些图像的名称,不包含奇怪的字符。最好是数字或字母组成的名称。
2、新建train.txt和val.txt两个文本。
在train.txt中,输入train文件下的图片名+分类。
trian.txt内容如(更正:标签建议从0开始):
1.jpg 0
2.jpg 0
3.jpg 1
注意:1.jpg和1(类别)之间,只能有1个空格。
成千,上万的文件名,如何一下子输入到.txt中?
命令“dir/s/on/b>d:/train.txt”,可以将当前所在文件夹内的文件名(含路径,输入到tran.txt中),之后,只要利用记事本里的“查找—替换”功能,将路径名替换为空,将.jpg替换成(.jpg 1)。如存在多个分类,建立多个文件夹,将不同分类放入,重复上面步骤,最后将多个.txt内容整合到一个.txt中即可。
最后,将train.txt和val.txt放在与train和val文件夹同级的目录下。如D:/my文件夹内
注:在linux或windows下,跑caffe,其实差别不是很大,训练数据几乎是一样的,只是windows下多用leveldb格式,而linux下为默认的lmdb格式。至于配置文件,无非是指定路径的差别。
3、利用caffe自带例子中的imagenet来训练我们的数据。
windows下,将caffe安装目录下的examples\imagenet中的 create_imagenet.sh、make_ imagenet.sh、train_caffenet.sh。和models\bvlc_reference_caffenet中的solver.prototxt和train_val.prototxt。一共5个文件,拷入到D:/my文件夹中.
在windows下,安装Git,即可运行sh,十分方便。
4、生成leveldb和图像均值
修改create_imagenet.sh,内容如下:
#!/usr/bin/env sh
# Create the imagenet lmdb inputs
# N.B. set the path to the imagenet train + val data dirs
set -e
#对应自己的路径
DATA=D:/my
TOOLS=D:/caffe-master/Build/x64/Release
#对应自己的路径
TRAIN_DATA_ROOT=D:/my/train/
VAL_DATA_ROOT=D:/my/val/

# Set RESIZE=true to resize the images to 256x256. Leave as false if images have
# already been resized using another tool.
#改为true,让caffe为我们resize图片
RESIZE=true
if $RESIZE; then
  RESIZE_HEIGHT=256
  RESIZE_WIDTH=256
else
  RESIZE_HEIGHT=0
  RESIZE_WIDTH=0
fi

if [ ! -d "$TRAIN_DATA_ROOT" ]; then
  echo "Error: TRAIN_DATA_ROOT is not a path to a directory: $TRAIN_DATA_ROOT"
  echo "Set the TRAIN_DATA_ROOT variable in create_imagenet.sh to the path" \
       "where the ImageNet training data is stored."
  exit 1
fi

if [ ! -d "$VAL_DATA_ROOT" ]; then
  echo "Error: VAL_DATA_ROOT is not a path to a directory: $VAL_DATA_ROOT"
  echo "Set the VAL_DATA_ROOT variable in create_imagenet.sh to the path" \
       "where the ImageNet validation data is stored."
  exit 1
fi

echo "Creating train leveldb..."

GLOG_logtostderr=1 $TOOLS/convert_imageset \
    --resize_height=$RESIZE_HEIGHT \
    --resize_width=$RESIZE_WIDTH \
    #指定数据格式
	--backend=leveldb \
    --shuffle \
    $TRAIN_DATA_ROOT \
    #对应自己的路径
    $DATA/train.txt \
    $DATA/imagenet_train_leveldb

echo "Creating val leveldb..."

GLOG_logtostderr=1 $TOOLS/convert_imageset \
    --resize_height=$RESIZE_HEIGHT \
    --resize_width=$RESIZE_WIDTH \
    #指定数据格式
	--backend=leveldb \
    --shuffle \
    $VAL_DATA_ROOT \
    #对应自己的路径
    $DATA/val.txt \
    $DATA/imagenet_val_leveldb

echo "Done."
[图片]
运行后,生成imagenet_train_leveldb和imagenet_val_leveldb两个文件夹。
生成图像均值
修改make_imagenet_mean.sh,内容如下:
#!/usr/bin/env sh
# Compute the mean image from the imagenet training lmdb
# N.B. this is available in data/ilsvrc12
#对应自己的路径
DATA=D:/my
TOOLS=D:/caffe-master/Build/x64/Release
#对应自己的路径
$TOOLS/compute_image_mean.exe $DATA/imagenet_train_leveldb $DATA/imagenet_mean.binaryproto --backend=leveldb

echo "Done."
运行后,会生成imagenet_mean.binaryproto文件。
到此,数据阶段的所有内容,都已经准备好
5、配置,训练阶段需要的内容。
solver.prototxt内容:
#指定路径
net: "D:/my/train_val.prototxt"
test_iter: 1000
test_interval: 1000
base_lr: 0.01
lr_policy: "step"
gamma: 0.1
stepsize: 100000
display: 20
max_iter: 450000
momentum: 0.9
weight_decay: 0.0005
snapshot: 10000
#指定路径
snapshot_prefix: "D:/my/result"
#指定CPU训练
solver_mode: CPU
train_val.prototxt文件内容:
name: "CaffeNet"
layer {
  name: "data"
  type: "Data"
  top: "data"
  top: "label"
  include {
    phase: TRAIN
  }
  transform_param {
    mirror: true
    crop_size: 227
    #指定路径
    mean_file: "D:/my/imagenet_mean.binaryproto"
  }
# mean pixel / channel-wise mean instead of mean image
#  transform_param {
#    crop_size: 227
#    mean_value: 104
#    mean_value: 117
#    mean_value: 123
#    mirror: true
#  }
  data_param {
  #指定路径
    source: "D:/my/imagenet_train_leveldb"
    batch_size: 256
    #指定格式
	backend: LEVELDB
  }
}
layer {
  name: "data"
  type: "Data"
  top: "data"
  top: "label"
  include {
    phase: TEST
  }
  transform_param {
    mirror: false
    crop_size: 227
    #指定路径
    mean_file: "D:/my/imagenet_mean.binaryproto"
  }
# mean pixel / channel-wise mean instead of mean image
#  transform_param {
#    crop_size: 227
#    mean_value: 104
#    mean_value: 117
#    mean_value: 123
#    mirror: false
#  }
  data_param {
  #指定路径
    source: "D:/my/imagene_val_leveldb"
    batch_size: 50
    #指定格式
    backend: LEVELDB
  }
}
layer {
  name: "conv1"
  type: "Convolution"
  bottom: "data"
  top: "conv1"
  param {
    lr_mult: 1
    decay_mult: 1
  }
  param {
    lr_mult: 2
    decay_mult: 0
  }
  convolution_param {
    num_output: 96
    kernel_size: 11
    stride: 4
    weight_filler {
      type: "gaussian"
      std: 0.01
    }
    bias_filler {
      type: "constant"
      value: 0
    }
  }
}
layer {
  name: "relu1"
  type: "ReLU"
  bottom: "conv1"
  top: "conv1"
}
layer {
  name: "pool1"
  type: "Pooling"
  bottom: "conv1"
  top: "pool1"
  pooling_param {
    pool: MAX
    kernel_size: 3
    stride: 2
  }
}
layer {
  name: "norm1"
  type: "LRN"
  bottom: "pool1"
  top: "norm1"
  lrn_param {
    local_size: 5
    alpha: 0.0001
    beta: 0.75
  }
}
layer {
  name: "conv2"
  type: "Convolution"
  bottom: "norm1"
  top: "conv2"
  param {
    lr_mult: 1
    decay_mult: 1
  }
  param {
    lr_mult: 2
    decay_mult: 0
  }
  convolution_param {
    num_output: 256
    pad: 2
    kernel_size: 5
    group: 2
    weight_filler {
      type: "gaussian"
      std: 0.01
    }
    bias_filler {
      type: "constant"
      value: 1
    }
  }
}
layer {
  name: "relu2"
  type: "ReLU"
  bottom: "conv2"
  top: "conv2"
}
layer {
  name: "pool2"
  type: "Pooling"
  bottom: "conv2"
  top: "pool2"
  pooling_param {
    pool: MAX
    kernel_size: 3
    stride: 2
  }
}
layer {
  name: "norm2"
  type: "LRN"
  bottom: "pool2"
  top: "norm2"
  lrn_param {
    local_size: 5
    alpha: 0.0001
    beta: 0.75
  }
}
layer {
  name: "conv3"
  type: "Convolution"
  bottom: "norm2"
  top: "conv3"
  param {
    lr_mult: 1
    decay_mult: 1
  }
  param {
    lr_mult: 2
    decay_mult: 0
  }
  convolution_param {
    num_output: 384
    pad: 1
    kernel_size: 3
    weight_filler {
      type: "gaussian"
      std: 0.01
    }
    bias_filler {
      type: "constant"
      value: 0
    }
  }
}
layer {
  name: "relu3"
  type: "ReLU"
  bottom: "conv3"
  top: "conv3"
}
layer {
  name: "conv4"
  type: "Convolution"
  bottom: "conv3"
  top: "conv4"
  param {
    lr_mult: 1
    decay_mult: 1
  }
  param {
    lr_mult: 2
    decay_mult: 0
  }
  convolution_param {
    num_output: 384
    pad: 1
    kernel_size: 3
    group: 2
    weight_filler {
      type: "gaussian"
      std: 0.01
    }
    bias_filler {
      type: "constant"
      value: 1
    }
  }
}
layer {
  name: "relu4"
  type: "ReLU"
  bottom: "conv4"
  top: "conv4"
}
layer {
  name: "conv5"
  type: "Convolution"
  bottom: "conv4"
  top: "conv5"
  param {
    lr_mult: 1
    decay_mult: 1
  }
  param {
    lr_mult: 2
    decay_mult: 0
  }
  convolution_param {
    num_output: 256
    pad: 1
    kernel_size: 3
    group: 2
    weight_filler {
      type: "gaussian"
      std: 0.01
    }
    bias_filler {
      type: "constant"
      value: 1
    }
  }
}
layer {
  name: "relu5"
  type: "ReLU"
  bottom: "conv5"
  top: "conv5"
}
layer {
  name: "pool5"
  type: "Pooling"
  bottom: "conv5"
  top: "pool5"
  pooling_param {
    pool: MAX
    kernel_size: 3
    stride: 2
  }
}
layer {
  name: "fc6"
  type: "InnerProduct"
  bottom: "pool5"
  top: "fc6"
  param {
    lr_mult: 1
    decay_mult: 1
  }
  param {
    lr_mult: 2
    decay_mult: 0
  }
  inner_product_param {
    num_output: 4096
    weight_filler {
      type: "gaussian"
      std: 0.005
    }
    bias_filler {
      type: "constant"
      value: 1
    }
  }
}
layer {
  name: "relu6"
  type: "ReLU"
  bottom: "fc6"
  top: "fc6"
}
layer {
  name: "drop6"
  type: "Dropout"
  bottom: "fc6"
  top: "fc6"
  dropout_param {
    dropout_ratio: 0.5
  }
}
layer {
  name: "fc7"
  type: "InnerProduct"
  bottom: "fc6"
  top: "fc7"
  param {
    lr_mult: 1
    decay_mult: 1
  }
  param {
    lr_mult: 2
    decay_mult: 0
  }
  inner_product_param {
    num_output: 4096
    weight_filler {
      type: "gaussian"
      std: 0.005
    }
    bias_filler {
      type: "constant"
      value: 1
    }
  }
}
layer {
  name: "relu7"
  type: "ReLU"
  bottom: "fc7"
  top: "fc7"
}
layer {
  name: "drop7"
  type: "Dropout"
  bottom: "fc7"
  top: "fc7"
  dropout_param {
    dropout_ratio: 0.5
  }
}
layer {
  name: "fc8"
  type: "InnerProduct"
  bottom: "fc7"
  top: "fc8"
  param {
    lr_mult: 1
    decay_mult: 1
  }
  param {
    lr_mult: 2
    decay_mult: 0
  }
  inner_product_param {
    num_output: “类别数”#注意,此处对应训练数据的标签数(如100个类别:100)
    weight_filler {
      type: "gaussian"
      std: 0.01
    }
    bias_filler {
      type: "constant"
      value: 0
    }
  }
}
layer {
  name: "accuracy"
  type: "Accuracy"
  bottom: "fc8"
  bottom: "label"
  top: "accuracy"
  include {
    phase: TEST
  }
}
layer {
  name: "loss"
  type: "SoftmaxWithLoss"
  bottom: "fc8"
  bottom: "label"
  top: "loss"
}
将train_caffenet.sh,改为train_caffenet.bat,内容如下:
#!/usr/bin/env sh
set -e
#指定路径
D:/caffe-master/Build/x64/Release/caffe.exe train --solver=D:/my/solver.prototxt
到此,运行train_caffenet.bat,训练网络即可。。当然,你可以不把train_caffenet.sh改为.bat文件,只需要修改里面的路径后,在Git中,运行即可。
5、linux下
PS:博主某天重新看了下这段,有些乱。于是这段的仅供参考(-_-)
首选保证,你以及配置好caffe了。
在windows下,你也可以在linux下这么做。。将数据重新生成lmdb格式。。。就是在上面的步骤中,去掉 --backend=leveldb \,再将 $DATA/imagenet_train_leveldb 改为 $DATA/imagenet_train_lmdb (val的也要改)
这样会生成imagenet_train_lmdb和imagenet_val_lmdb两个文件夹。将生成的imagenet_train_lmdb和imagenet_val_lmdb两个文件夹中的内容,上传到linux服务器中。
首先,在~/caffe/examples/imagenet(以我安装caffe路径为例)文件夹下,利用mkdir命令新建两个文件夹
ilsvrc12_val_lmdb和ilsvrc12_train_lmdb。。将imagenet_train_leveldb和imagenet_val_leveldb中的内容,在SecureCRT中利用rz命令上传文件(将train文件夹中的图片,传入imagenet_train_leveldb。将val中的图片,传入imagenet_val_leveldb)
make_imagenet_mean.sh (无需修改)
create_imagenet.sh(无需修改)
train_caffenet.sh内容(无需修改)
solver.prototxt内容(无需修改默认)
train_val.prototxt内容:(无需修改,默认)
之后,切换到~/caffe目录下
按照windows下的流程,运行 make_imagenet_mean.sh,然后train_caffen.sh。
如果,出现如法运行的情况,请切换到caffe安装根目录(~/caffe),在该目录下运行sh。
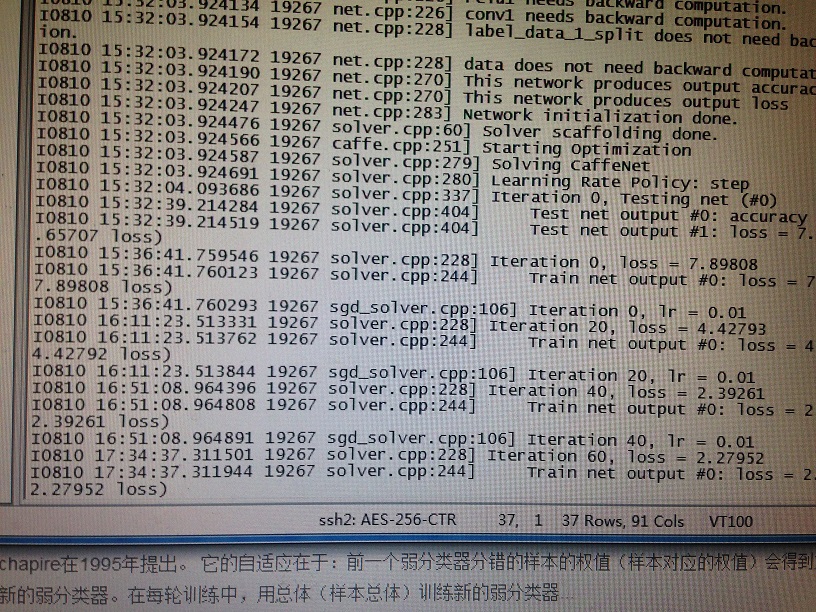
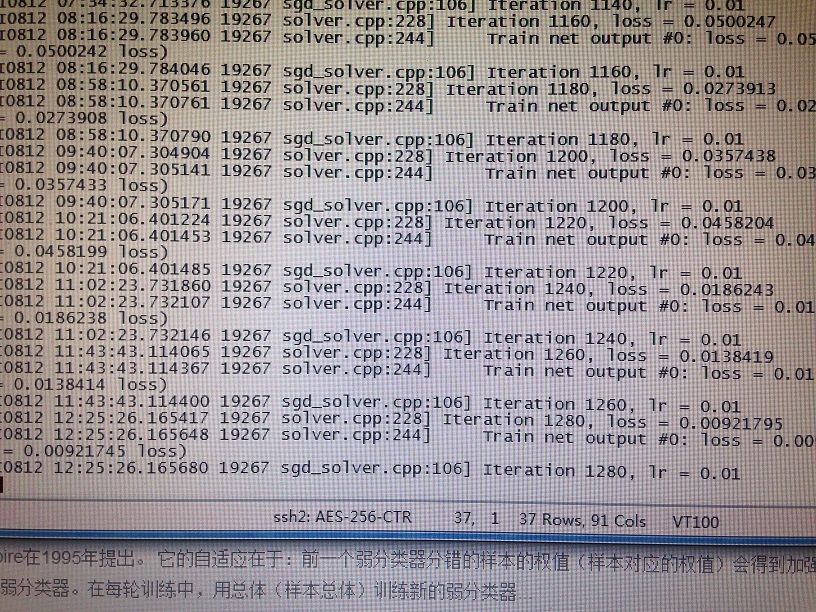
实际训练效果非常慢,大约1小时才回蹦出下一条提示。估计是Net的结构配置的不对,毕竟用了自己的数据,Net结构肯定要修改。但训练效果还是很好的。
下面是在linux服务器上跑的结果。
跑了大概两天,loss从最开始的7.65707,迭代到1280次时,降到0.000921745。训练出来的模型完全可以利用caffe+opencv做分类了~
这里提供了图片数据、标签分类文本、还是网络配置数据。在运行前,要生成自己的leveldb嗷~
Windows下caffe训练实例


 1万+
1万+


 被折叠的 条评论
为什么被折叠?
被折叠的 条评论
为什么被折叠?
 到【灌水乐园】发言


