


pytorch study 1-2 week
- 学习地址
- 配置环境变量
- p3 函数学习两大法宝
- p5 pytorch加载数据
- p6 Dataset实战
- p7 tensorboard add_scalar()使用
- p8 tensorboard add_img()的使用
- p9 trasforms的使用
- p12 常见的transforms
- p14 torchvision中常见数据集的使用
- p15 Dataloader的使用
- p16 神经网络的基本骨架-nn.Module的使用
- p17 卷积神经网络nn.function.conv2d
- p18 卷积层 nn.conv2d
- p19 池化层 nn.MaxPool2d
- p20 非线性激活 nn.Relu, nn.Sigmoid
- p21 线性层 linear
- p22 搭建一个简单的神经网络
- 查看padding,stride不同应用的地址
- p23 & p24 反向传播与优化器
- p25 train module
- p26 用自己的测试集测试
学习地址
链接: B站 小土堆
配置环境变量
- jupyte可以以任意代码块运行
p3 函数学习两大法宝
- dir() 函数: 能让我们知道 工具箱以及工具箱中的分隔区有什么东西。
- help() 函数: 能让我们知道每个工具是如何使用的,工具的使用方法
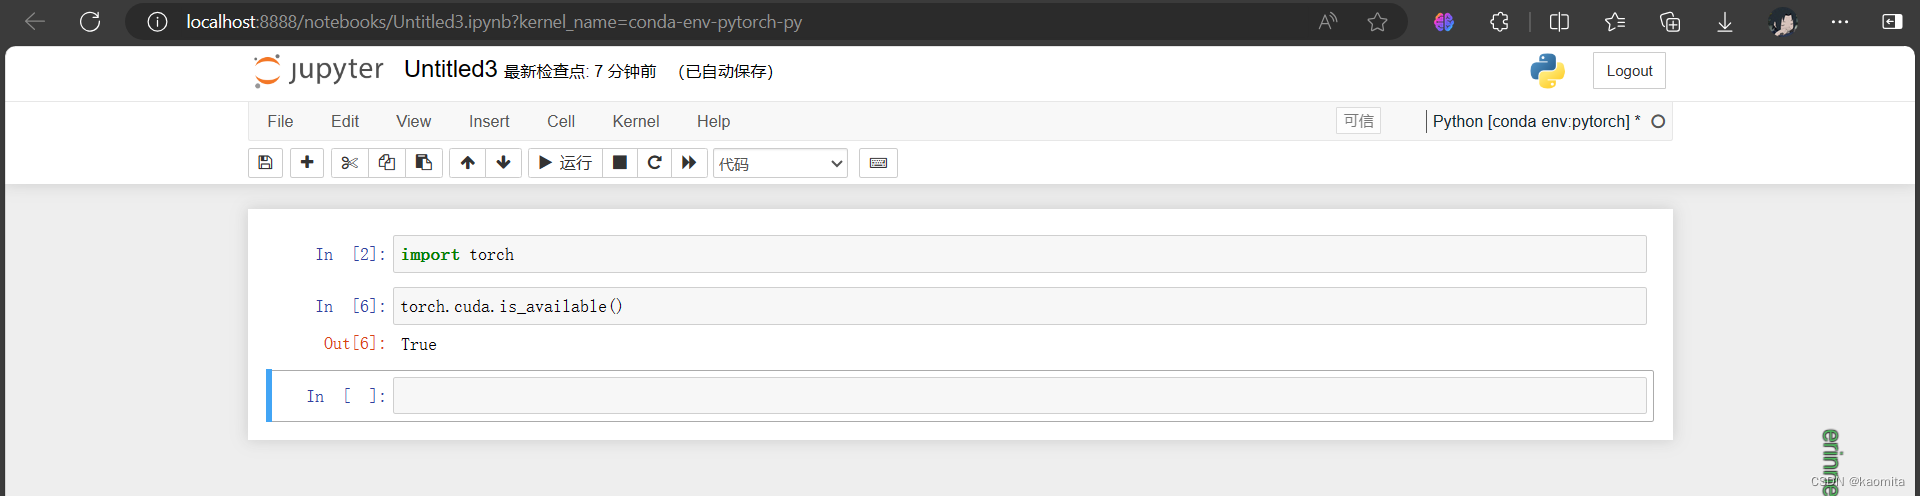
help的使用(在jupyter中使用torch.cuda.available?? 可以获取更详细信息)

p5 pytorch加载数据
- Dataset: 如何获取每一个数据及其lable;告诉我们有多少个数据
- Dataload: 为后面的网络提供不同的数据形式
p6 Dataset实战
创建Dataset类,并尝试调用它.
getitem 和 len 是class中内置的函数,可以用datatest[i]调用 getitem 函数,print(datatest)则直接调用 len 打印datatest的长度
from PIL import Image
from torch.utils.data import Dataset
import os  # for file handling


class MyDataset(Dataset):
    """Create a custom dataset"""

    def __init__(self, root_dir, label_dir):
        """a root direction include many label directories"""
        self.root_dir = root_dir
        self.label_dir = label_dir
        self.path = os.path.join(self.root_dir, self.label_dir)  # combine the root and label directory
        self.img_path = os.listdir(self.path)  # list all the images in the label directory

    def __getitem__(self, idx):
        """return the specific image and its label by index"""
        img_name = self.img_path[idx]
        img_item = os.path.join(self.root_dir, self.label_dir, img_name)
        img = Image.open(img_item)
        label = self.label_dir
        return img, label

    def __len__(self):
        """return the number of images in the label directory"""
        return len(self.img_path)


# test the dataset
root_dir = "D:/image"
label_dir = "Animation"
dataset = MyDataset(root_dir, label_dir)

print(dataset[0])
img, label = dataset[0]
img.show()
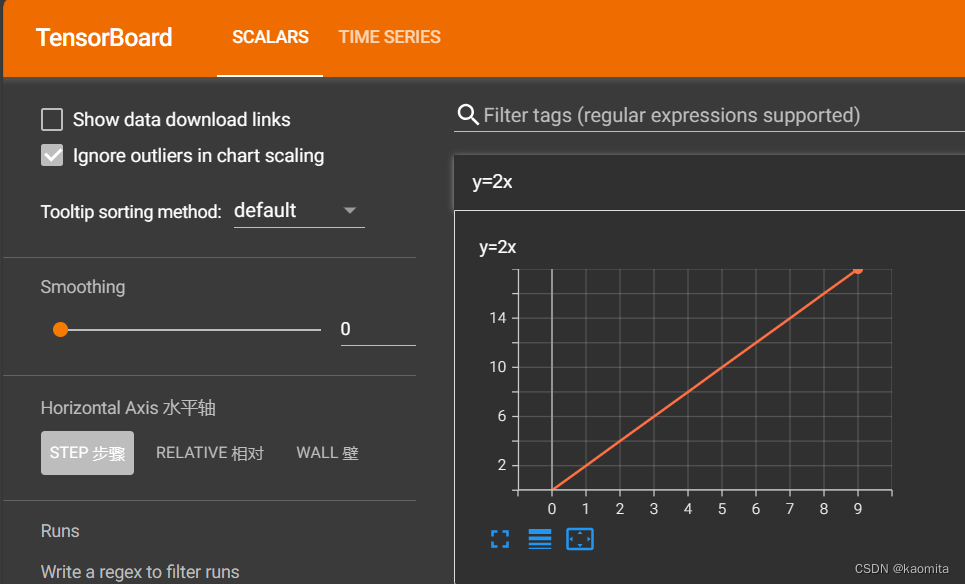
p7 tensorboard add_scalar()使用
- 使用 add_scalar() 的函数绘画功能
from torch.utils.tensorboard import SummaryWriter

writer = SummaryWriter("logs")  # write the logs to the logs directory
for i in range(10):
    writer.add_scalar("y=2x", i * 2, i)

writer.close()
'''open the terminal and run the following command to start the
tensorboard server: tensorboard --logdir=week1-2/tensorboard_learn/logs (--port=6006)'''
p8 tensorboard add_img()的使用
- add_img() 常用来观察训练结果
需要注意的是,把图片(用 Image() 处理过的jpg格式为 PIL.JpegImagePlugin.JpegImageFile ,可以用 type() 查看图片类型)喂给 add_image() 前,需要将其转换为tensor或者array形式
import numpy as np
from PIL import Image
from torch.utils.tensorboard import SummaryWriter

writer = SummaryWriter("logs")  # write the logs to the logs directory
img_path = "D:/image/Animation/659327.jpg"
img_path2 = "D:/image/Animation/1301131.png"
img = Image.open(img_path2)
img_array = np.array(img)  # convert the image to an array

writer.add_image("Animation", img_array, 3, dataformats='HWC')

p9 trasforms的使用
- transforms相当于一个工具箱,通过不同的工具处理图片得到结果
使用 totensor() 将图片转换为tensor格式
from PIL import Image
from torchvision import transforms

img_path = "D:/image/Animation/659327.jpg"
img = Image.open(img_path)
print(type(img))

tensor_img = transforms.ToTensor()(img)
print(type(tensor_img))

'''
<class 'PIL.JpegImagePlugin.JpegImageFile'>
<class 'torch.Tensor'>
'''
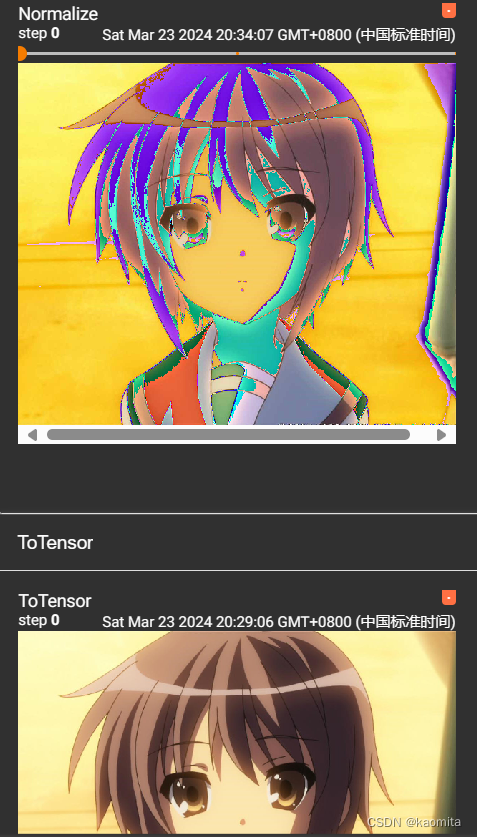
p12 常见的transforms
- ToTensor() : 转化成tensor
- Nomalize() : 归一化
# ToTensor
tensor_img = transforms.ToTensor()(img)
writer.add_image("ToTensor", tensor_img)

# Normalize
# output[channel] = (input[channel] - mean[channel]) / std[channel]
normalize = transforms.Normalize(mean=[0.5, 0.5, 0.5], std=[2, 0.5, 1])  # mean and std for 3 channels
img_norm = normalize(tensor_img)  # normalize the tensor image
writer.add_image("Normalize", img_norm, 1)
归一化后的对比
- Random(): 随机取值
# RandomCrop
trans_random = transforms.RandomCrop(512)
trans_totensor = transforms.ToTensor()
trans_compose = transforms.Compose([trans_random, trans_totensor])
# first run trans_random(img) to get a value, then run trans_totensor(value)
for i in range(10):
    img_crop = trans_compose(img)
    writer.add_image("Random", img_crop, i)
效果

p14 torchvision中常见数据集的使用
- 在pytorch官网->Docs中可以查看和下载相关的数据集
CIFAR100的使用
import torchvision

dataset_transform = torchvision.transforms.Compose([
    torchvision.transforms.ToTensor()
])

# create dataset in current directory and convert the image to tensor
train_set = torchvision.datasets.CIFAR10(root="./dataset", train=True, transform=dataset_transform, download=True)
test_set = torchvision.datasets.CIFAR10(root="./dataset", train=False, transform=dataset_transform, download=True)

img, target = test_set[0]
print(target)  # output 3
print(test_set.classes[target])  # output cat
print(test_set[0])  # output tensor format
# img.show()
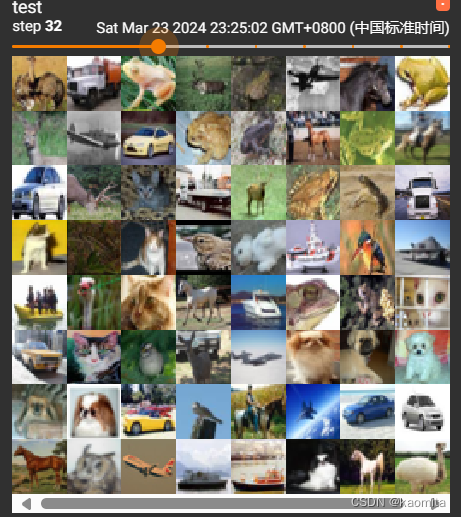
p15 Dataloader的使用
使用 DataLoader() 读取数据集test_data
参数介绍
- batch_size:每次读取多少个data
- shuffle: true->每一个epoch 中取图片的随机取值方式相同; false->每一个epoch 中取图片的随机取值方式不同
- num_works: 类似于线程
- drop_last: Ture->最后取的一组data数量如果少于batch_size,则舍去
from torch.utils.tensorboard import SummaryWriter
import torchvision
from torch.utils.data import DataLoader

test_data = torchvision.datasets.CIFAR10(root="../dataset_use/dataset", train=False, transform=torchvision.transforms.ToTensor(), download=True)

test_loader = DataLoader(test_data, batch_size=64, shuffle=True, num_workers=0, drop_last=False)

writer = SummaryWriter("dataloader")
step = 0
for data in test_loader:
    imgs, targets = data
    writer.add_images("test", imgs, step)
    step += 1
writer.close()
效果
p16 神经网络的基本骨架-nn.Module的使用
nn.Module 是所有神经网络的基础框架,我们的神经网络必须继承它,同时必须重写forward函数
创建一个简单的神经网络
from torch import nn


class NeuralNetwork(nn.Module):
    """Create a custom neural network
       nn.Module is the base class for all neural network modules in PyTorch, so must inherit from it
       and also must override the forward method, which defines the computation performed at every call.
    """
    def __init__(self) -> None:
        super().__init__()

    def forward(self, input):
        output = input + 1
        return output


my_nn = NeuralNetwork()
x = 1
output = my_nn(x)
print(output)  # output 2
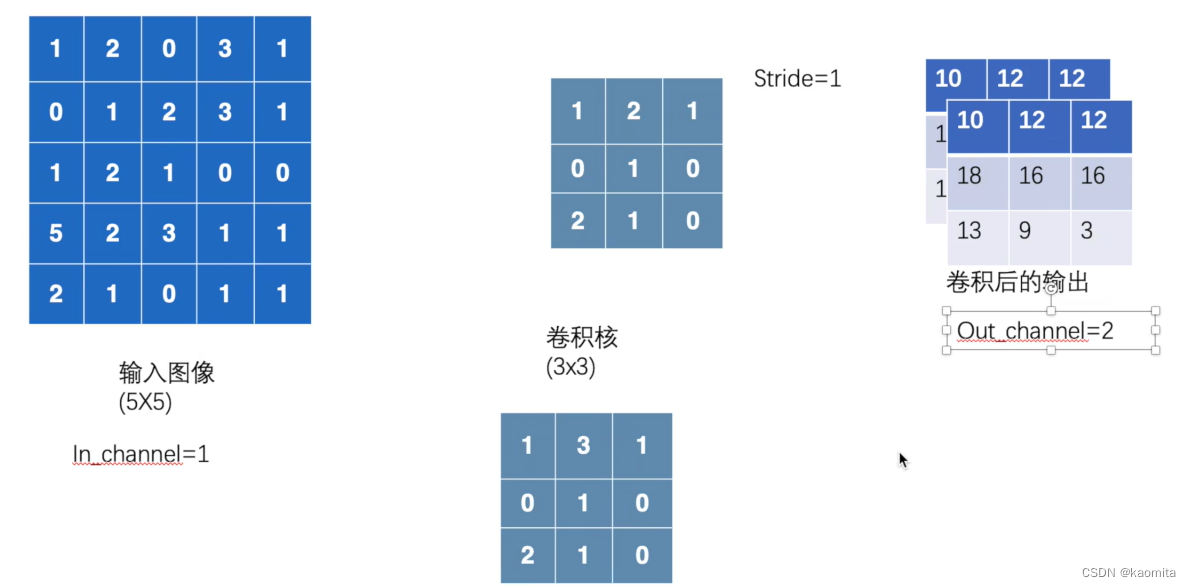
p17 卷积神经网络nn.function.conv2d
利用conv2d处理二维图像进行卷积操作,在将数据喂给conv2d前,需要保证我们的输入数据符合 (batch_size, channel, height, width) 的sahpe,其 batch_size 是一个 batch 中样本的数量, channels 是图像的通道数,表示图像的颜色信息。对于 RGB 彩色图像,通常是 3;对于灰度图像,通道数为 1
参数介绍
- input: 输入的二维图像数据
- kernel: 卷积核
- stride: 控制卷积核每次横向或者纵向的移动距离
- padding=n: 将图像向四周拓展n

# Convolution Layers in PyTorch
import torch
import torch.nn.functional as F

# input image size: 5x5
input = torch.tensor([[1, 2, 0, 3, 1],
                      [0, 1, 2, 3, 1],
                      [1, 2, 1, 0, 0],
                      [5, 2, 3, 1, 1],
                      [2, 1, 0, 1, 1]], dtype=torch.float32)

# kernel size: 3x3
kernel = torch.tensor([[1, 2, 1],
                       [0, 1, 0],
                       [2, 1, 0]], dtype=torch.float32)

# reshape the input and kernel to 4D tensor(batch_size, channel, height, width)
input = torch.reshape(input, (1, 1, 5, 5))
kernel = torch.reshape(kernel, (1, 1, 3, 3))

# convolution operation
output = F.conv2d(input, kernel, stride=1, padding=0)
print(output)

'''tensor([[[[10., 12., 12.],
          [18., 16., 16.],
          [13.,  9.,  3.]]]])'''
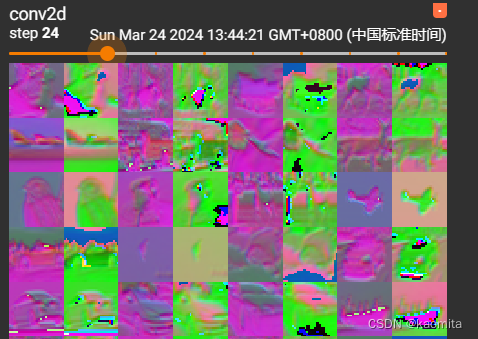
p18 卷积层 nn.conv2d
用nn.conv2d对数据集进行卷积
需要注意的是,tensorboard不能对channel为6的图片展示,需要将其reshape
out_channel是in_channel二倍时,如下所示
dataset = torchvision.datasets.CIFAR10(root="../dataset_use/dataset", train=False,
                                       transform=torchvision.transforms.ToTensor(), download=True)
dataloader = DataLoader(dataset, batch_size=64, shuffle=True, num_workers=0, drop_last=False)


class Net(nn.Module):
    def __init__(self):
        super(Net, self).__init__()
        self.conv1 = Conv2d(3, 6, 3, 1, 0)

    def forward(self, x):
        x = self.conv1(x)
        return x


my_nn = Net()
writer = SummaryWriter("nn_conv2d")
step = 0

for data in dataloader:
    imgs, targets = data
    output = my_nn(imgs)
    print(imgs.shape)  # torch.Size([64, 3, 32, 32]) 64 images, 3 channels, 32x32 pixels
    print(output.shape)  # torch.Size([64, 6, 30, 30]) because kernel size is 3x3, so the output size is 30x30
    writer.add_images("input", imgs, step)
    output = output.reshape(-1, 3, 30, 30)
    writer.add_images("conv2d", output, step)
    step += 1

writer.close()
效果如下
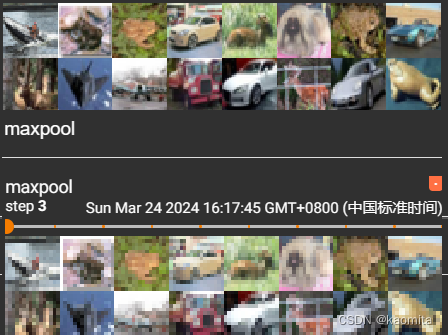
p19 池化层 nn.MaxPool2d
最大池化量可以最大限度保留输入量特征,同时减小数据量
dataset = torchvision.datasets.CIFAR10(root="../dataset_use/dataset", train=False, transform=torchvision.transforms.ToTensor(), download=True)
dataloader = DataLoader(dataset, batch_size=64, shuffle=True, num_workers=0, drop_last=False)


class Network(nn.Module):
    """MaxPool2d Layers in PyTorch.
    it can keep the important information and reduce the size of the image"""
    def __init__(self):
        super(Network, self).__init__()
        self.maxpool = nn.MaxPool2d(kernel_size=2, ceil_mode=False)

    def forward(self, x):
        y = self.maxpool(x)
        return y


my_nn = Network()
writer = SummaryWriter("../logs")
step = 0
for data in dataloader:
    imgs, targets = data
    output = my_nn(imgs)
    writer.add_images("input", imgs, step)
    writer.add_images("maxpool", output, step)
    step += 1

writer.close()
效果如下
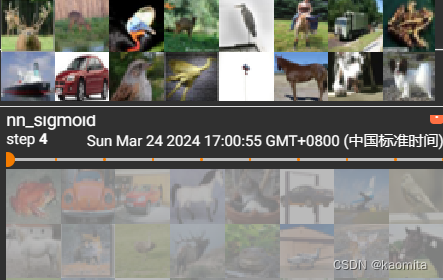
p20 非线性激活 nn.Relu, nn.Sigmoid
将原始数据非线性变换来训练出非线性的特征
ReLU可以将负值变为0
sigmoid不仅可以将负值变为0,还能将大于0的值压低
RelU 参数介绍
- inplace: True->当输入值小于0时,在原位置将负值用0替换,False->当输入值小于0时,保留原始数据,用一个output将原来的input替换并用0代替负值
# ReLU activation function, convert the negative value to 0
data = tensor([[1, -1, 0, 3, 1],
               [0, 1, 2, -1, 1]])
print(ReLU()(data))  # tensor([[1, 0, 0, 3, 1], [0, 1, 2, 0, 1]])

# Signmoid activation function, convert the value to 0~1
dataset = torchvision.datasets.CIFAR10(root="../dataset_use/dataset", train=False,
                                       transform=torchvision.transforms.ToTensor(), download=True)
data_loader = DataLoader(dataset, batch_size=64, shuffle=True, num_workers=0, drop_last=False)


class Network(nn.Module):
    def __init__(self):
        super(Network, self).__init__()
        self.sigmoid = nn.Sigmoid()

    def forward(self, x):
        y = self.sigmoid(x)
        return y
sigmoid非线性后对比
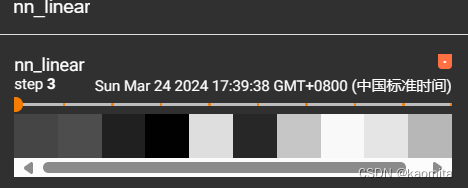
p21 线性层 linear
linear将数据改变形状成线性
如,将torch.Size([1, 1, 1, 196608])变成torch.Size([1, 1, 1, 10])
class Network(nn.Module):
    def __init__(self):
        super(Network, self).__init__()
        self.linear = nn.Linear(196608, 10)

    def forward(self, x):
        y = self.linear(x)
        return y


writer = SummaryWriter("../logs")
step = 0
my_nn = Network()
for data in dataloader:
    imgs, targets = data
    print(imgs.shape)  # torch.Size([64, 3, 32, 32]) 64 images, 3 channels, 32x32 pixels
    output = torch.reshape(imgs, (1, 1, 1, -1))  # Equivalent to output = torch.flatten(imgs, 1)
    print(output.shape)  # torch.Size([1, 1, 1, 196608]) 1 image, 1 channel, 1 pixel, 196608 features
    output = my_nn(output)
    print(output.shape)  # torch.Size([1, 1, 1, 10])
    writer.add_images("nn_linear", output, step)
    step += 1

writer.close()
由于channel为1,图像变成了黑白方块
p22 搭建一个简单的神经网络
将下面的的图像变化过程作为目标,搭建简单的神经网络
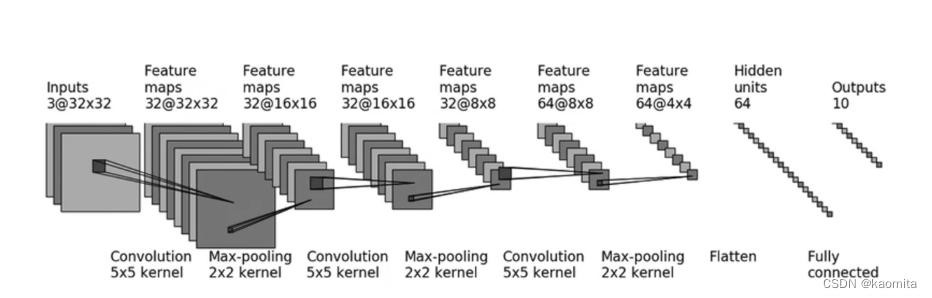
这段程序的最终目的是得到10个classes的概率值
import torch
import torchvision
from torch import nn
from torch.nn import Conv2d, MaxPool2d, Flatten
from torch.utils.tensorboard import SummaryWriter
class Network(nn.Module):
"""Conv2d -> MaxPool2d -> Flatten -> Linear
Sequential: A sequential container. Modules will be added to it in the order they are passed in the constructor."""
def __init__(self):
super(Network, self).__init__()
self.module1 = nn.Sequential(
Conv2d(in_channels=3, out_channels=32, kernel_size=5, padding=2), # padding need Compute
MaxPool2d(kernel_size=2, stride=2), # stride = kernel_size by default
Conv2d(in_channels=32, out_channels=32, kernel_size=5, padding=2),
MaxPool2d(kernel_size=2, stride=2),
Conv2d(in_channels=32, out_channels=64, kernel_size=5, padding=2), # 64 channels 4x4 pixels
MaxPool2d(kernel_size=2, stride=2),
Flatten(), # 64 * 4 * 4 = 1024 展平成 1 维-> 1 * 1024
nn.Linear(in_features=1024, out_features=64),
nn.Linear(in_features=64, out_features=10) # 10 classes, per class has a probability value
)
def forward(self, x):
return self.module1(x)
my_nn = Network()
print(my_nn)
input = torch.ones((64, 3, 32, 32)) # 64 images, 3 channels, 32x32 pixels to test the network
output = my_nn(input)
print(output.shape) # torch.Size([64, 10])
writer = SummaryWriter("../logs")
dataset = torchvision.datasets.CIFAR10(root="../dataset_use/dataset", train=False, transform=torchvision.transforms.ToTensor(), download=True)
dataloader = torch.utils.data.DataLoader(dataset, batch_size=64, shuffle=True, num_workers=0, drop_last=True)
imgs, targets = next(iter(dataloader))
print(imgs.shape) # torch.Size([64, 3, 32, 32]) 64 images, 3 channels, 32x32 pixels
output = my_nn(imgs)
print(output.shape) # torch.Size([64, 10])
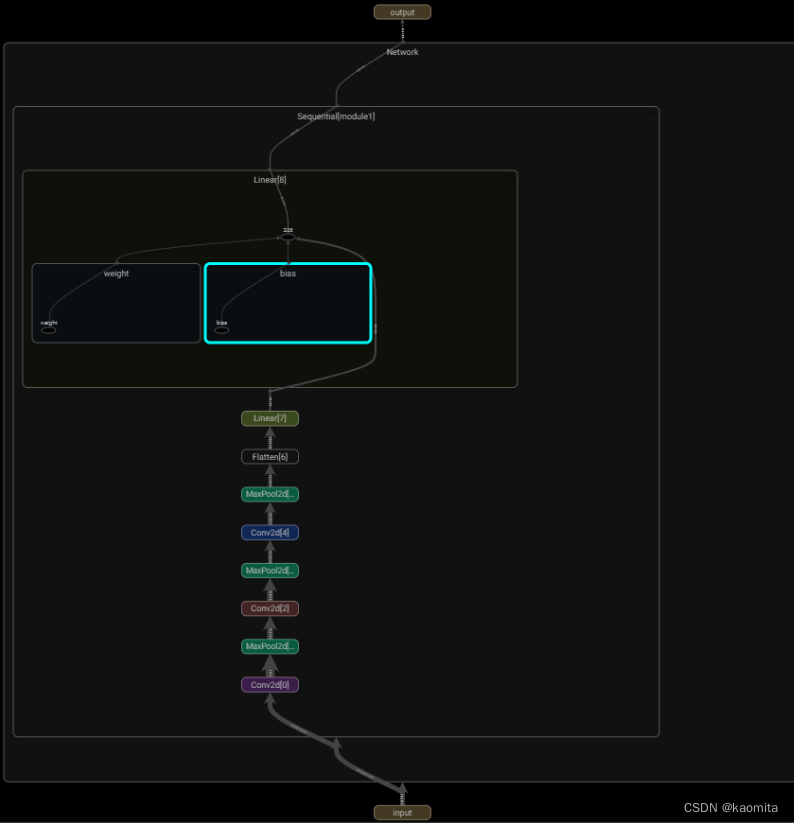
writer.add_graph(my_nn, input)
writer.close()
最后在TensorBoard中查看结果
查看padding,stride不同应用的地址
https://github.com/vdumoulin/conv_arithmetic/blob/master/README.md
p23 & p24 反向传播与优化器
反转函数 backward() 自动计算所有模型参数相对于损失函数的梯度。这些梯度可以用于后续的优化步骤,比如使用梯度下降算法来更新模型参数
在使用反转函数之前,我们需要定义损失函数 loss = nn.CrossEntropyLoss() ,它表示的是目标值与得到的结果值之间的差距优化器 optim 通常使用的是梯度下降或其变体的方法,通过计算损失函数关于模型参数的梯度,然后沿着梯度的反方向更新参数

loss = nn.CrossEntropyLoss()  # CrossEntropyLoss: combines nn.LogSoftmax() and nn.NLLLoss() in one single class
optim = torch.optim.SGD(my_nn.parameters(), lr=0.01)

for epoch in range(10):
    loss_all = 0
    for data in dataloader:
        imgs, targets = data
        output = my_nn(imgs)
        result_loss = loss(output, targets)
        loss_all = result_loss + loss_all
        optim.zero_grad()  # clear the gradient
        result_loss.backward()  # back propagation
        optim.step()  # update the parameters
    print("epoch: {}, loss: {}".format(epoch, loss_all))
"""epoch: 0, loss: 358.20758056640625
    epoch: 1, loss: 353.9226379394531
    epoch: 2, loss: 338.0143737792969
    epoch: 3, loss: 318.69183349609375
    epoch: 4, loss: 312.21600341796875
	...
"""
可以看到loss_all在逐渐减小
p25 train module
我们可以以p22中搭建的神经网络为基础,以CIFAR10为数据集来训练我们识别图像的模型了
训练模型的步骤:
- 获取数据集(用dataloader)
- 创建自己的神经网络
- 将数据集喂给神经网络并得到损失函数
- 用反向传播更新神经网络参数
- 此外还可以设置训练模型采用cpu还是gpu
from my_first_nn import Network

# train using gpu -> 1.module.to(device)   2.loss.to(device)   3.data.to(device)
devise = torch.device("cuda" if torch.cuda.is_available() else "cpu")
print("use devise:", devise)

# dataset
train_data = torchvision.datasets.CIFAR10(root="../dataset_use/dataset", train=True, transform=torchvision.transforms.ToTensor(), download=True)
test_data = torchvision.datasets.CIFAR10(root="../dataset_use/dataset", train=False, transform=torchvision.transforms.ToTensor(), download=True)
print("train_data size:", len(train_data))
print("test_data size:", len(test_data))

# dataloader
train_loader = DataLoader(train_data, batch_size=64, shuffle=True, num_workers=0, drop_last=True)
test_loader = DataLoader(test_data, batch_size=64, shuffle=True, num_workers=0, drop_last=True)

# create a network
my_nn = Network()
my_nn = my_nn.to(devise)  # move the network to gpu

# loss function
loss = nn.CrossEntropyLoss()
loss = loss.to(devise)  # move the loss function to gpu

# optimizer
learn_rate = 1e-2
optim = torch.optim.SGD(my_nn.parameters(), lr=learn_rate)

# parameters
epoch = 30
total_train_step = 0

# add the network to tensorboard
writer = SummaryWriter("../logs")


# train and test
for i in range(epoch):
    start_time = time.time()
    print("------start {} round training------".format(i + 1))

    # train
    my_nn.train()
    for data in train_loader:
        imgs, targets = data
        imgs, targets = imgs.to(devise), targets.to(devise)
        output = my_nn(imgs)
        result_loss = loss(output, targets)

        # optimize the network
        optim.zero_grad()
        result_loss.backward()
        optim.step()

        total_train_step += 1
        if total_train_step % 100 == 0:
            end_time = time.time()
            print("time: ", end_time - start_time)
            print("train_step: {}, loss: {}".format(total_train_step, result_loss))
            writer.add_scalar("train_loss", result_loss, total_train_step)

    # test
    total_test_loss = 0
    total_accuracy = 0
    my_nn.eval()
    with torch.no_grad():  # test don't calculate the gradient but only the loss
        for data in test_loader:
            imgs, targets = data
            imgs, targets = imgs.to(devise), targets.to(devise)
            output = my_nn(imgs)
            result_loss = loss(output, targets)
            total_test_loss += result_loss

            # calculate the accuracy
            accuracy = (torch.argmax(output, dim=1) == targets).sum()
            total_accuracy += accuracy

    print("整体测试集上的损失值为:", total_test_loss)
    print("整体测试集上的准确率为:", total_accuracy / len(test_data))
    writer.add_scalar("test_loss", total_test_loss, total_train_step)
    writer.add_scalar("test_accuracy", total_accuracy / len(test_data), total_train_step)

    torch.save(my_nn, "./train_module/nn_{}.pth".format(i))
    print("模型已保存在./train_module/nn_{}.pth".format(i))

writer.close()
经过30轮的训练,可以得到结果如下
train_step: 23400, loss: 0.5869374871253967
整体测试集上的损失值为: tensor(155.8699, device='cuda:0')
整体测试集上的准确率为: tensor(0.6689, device='cuda:0')
模型已保存在./train_module/nn_29.pth
准确率为0.66,可以在tensorboarder上看到它的变化

p26 用自己的测试集测试
p25中我们用CIFAR10中的测试机测得模型正确率为0.66,现在来用自己的图片测试一下
from module.readData import MyDataset

train_set = torchvision.datasets.CIFAR10(root="../dataset_use/dataset", train=True, transform=torchvision.transforms.ToTensor(), download=True)
device = torch.device("cuda" if torch.cuda.is_available() else "cpu")

# take out test images
root_dir = "../imgs"
label_dir = "ships"

img_test = MyDataset(root_dir, label_dir)
imgs = img_test.open_images_in_folder()
test_nums = len(imgs)

transform = torchvision.transforms.Compose([torchvision.transforms.Resize((32, 32)),
                                             torchvision.transforms.ToTensor()])

# 对 img_test 中的每个图像应用转换操作
img = [transform(img) for img in imgs]
# 将转换后的图像列表转换为张量并移到设备上
img = torch.stack(img).to(device)
print(img.shape)  # output torch.Size([3, 32, 32])

module = torch.load("./train_module/nn_29.pth", map_location=device)
print(module)

img = torch.reshape(img, (test_nums, 3, 32, 32))
module.eval()
print("------start test------")
with torch.no_grad():
    output = module(img)
    print("test module output:".format(output))
    for i in range(test_nums):
        value = torch.argmax(output[i], 0)
        print("{}: {}-{}".format(img_test.img_total[i], value.item(), train_set.classes[value.item()]))
测试了几张"ship"的图片,结果如下
------start test------
test module output:
ship.png: 8-ship
Snipaste_2024-03-29_17-47-43.png: 8-ship
Snipaste_2024-03-29_17-47-54.png: 8-ship
Snipaste_2024-03-29_17-48-10.png: 8-ship
Snipaste_2024-03-29_17-48-38.png: 8-ship
Snipaste_2024-03-29_17-48-46.png: 8-ship
Snipaste_2024-03-29_17-49-02.png: 8-ship
Snipaste_2024-03-29_17-49-15.png: 8-ship
Snipaste_2024-03-29_17-49-44.png: 3-cat
只有最后一张图片识别错误


 1069
1069


 被折叠的 条评论
为什么被折叠?
被折叠的 条评论
为什么被折叠?
 到【灌水乐园】发言


