


目录
2.Hadoop在大数据技术体系中的地位和作用(来自文心一言)
第一章 简答
1.简述Hadoop各个组件及其功能
hadoop是一个统称,目前hadoop主要包含三大组件
-
hdfs:是一个分布式存储框架,适合海量数据存储
-
mapreduce:是一个分布式计算框架,适合海量数据计算
-
yarn:是一个资源调度平台,负责给计算框架分配计算资源
2.Hadoop在大数据技术体系中的地位和作用(来自文心一言)
Hadoop在大数据技术体系中占据着重要的地位,并发挥着关键的作用。 首先,Hadoop是一个由Apache基金会所开发的分布式系统基础架构,主要用于大数据的存储和处理。它解决了传统数据处理方式在面临海量数据时遇到的瓶颈,为大数据技术的发展提供了强大的支持。 其次,Hadoop具有高可靠性、高扩展性、高效性、高容错性等特点,这使得它成为处理大数据的理想选择。通过采用冗余数据存储方式和分布式处理技术,Hadoop能够确保数据的可靠性和安全性,同时实现线性扩展,支持处理PB级数据。 在大数据技术体系中,Hadoop发挥着核心的作用。它作为大数据存储和计算的底层平台,为上层应用提供了稳定、高效的数据处理能力。基于Hadoop,可以构建各种大数据应用,如数据挖掘、数据分析、机器学习等,为各行业提供有价值的数据洞察。 此外,Hadoop还是大数据生态圈的重要组成部分。Hadoop生态圈包括了许多与大数据相关的开源项目,如HBase、Hive、Spark等,这些项目与Hadoop相互配合,共同构成了一个完整的大数据技术体系。通过Hadoop生态圈,用户可以更加便捷地构建和管理大数据应用,实现数据的快速处理和价值挖掘。 总的来说,Hadoop在大数据技术体系中扮演着不可或缺的角色。它不仅为大数据处理提供了强大的底层支持,还推动了大数据技术的快速发展和应用普及。随着大数据技术的不断发展和完善,Hadoop的地位和作用也将进一步得到巩固和提升。
3.Hadoop 启动命令,停止命令
启动Hadoop集群
start-all.sh停止Hadoop集群所有服务:
stop-all.sh4.pig 加载HDFS 数据
-- 加载数据
data = LOAD 'hdfs://<namenode>:<port>/user/hadoop/input/data.txt' USING PigStorage('\t'); 5.数据采集的方法(来自ppt)
-
系统日志采集
-
分布式消息订阅分发
-
ETL
-
网络数据采集
6.数据分析过程(来自ppt)
-
数据采集与预处理
-
数据存储与管理
-
数据处理与分析
-
数据可视化
*7.数据清洗的基本流程**
-
数据分析
-
定义数据清洗的策略和规则
-
搜寻并确定错误实例
-
纠正发现的错误
-
干净数据回流
8.什么是大数据(来自文心一言)
大数据(big data)是指那些无法在一定时间范围内用常规软件工具进行捕捉、管理和处理的数据集合。这些数据集合具有海量的数据规模、快速的数据流转、多样的数据类型和价值密度低的特征,需要新的处理模式才能具有更强的决策力、洞察发现力和流程优化能力。简而言之,大数据是一种海量的、高增长率和多样化的信息资产。 大数据的五大特征通常包括:大量、高速、多样、低价值密度和真实性。这些特征使得大数据在各行各业中具有广泛的应用前景,包括但不限于商业分析、医疗研究、政府决策等。通过大数据技术,人们可以从中发现新知识、创造新价值、提升新能力,进而推动社会的进步和发展。
第二章-爬虫
2.1 requests模块 重点
1 urllib3模块
通过POST请求获取网页内容的实例
import urllib3
http = urllib3.PoolManager()
response = http.request('POST','https://fanyi.baidu.com/sug',fields={'kw':'苹果',})
print(response.data, response.status)
2 requests模块
以GET请求方式为例,打印多种请求信息的代码如下:
import requests
response = requests.get('http://www.baidu.com')  # 对需要爬取的网页发送请求
print('状态码:', response.status_code)  # 打印状态码
print('url:', response.url)  # 打印请求url•
print('header:', response.headers)  # 打印头部信息•
print('cookie:', response.cookies)  # 打印cookie信息•
print('text:', response.text)  # 以文本形式打印网页源码•
print('content:', response.content)  # 以字节流形式打印网页源码•
以POST请求方式发送HTTP网页请求的示例代码如下
# 导入模块•
import requests••# 表单参数•
data = {'kw': '苹果', }•# 对需要爬取的网页发送请求•
response = requests.post('https://fanyi.baidu.com/sug', data=data)•
# 以字节流形式打印网页源码•
print(response.content, "\n", response.status_code)•
3.传递URK参数
为了请求特定的数据,我们需要在URL(Uniform Resource Locator)的查询字符串中加入一些特定数据。这些数据一般会跟在一个问号后面,并且以键值对的形式放在URL中。在requests中,我们可以直接把这些参数保存在字典中,用params构建到URL中。具体实例如下:
import requests
base_url = 'http://httpbin.org'
param_data = {'user':'xmu','password':'123456'}
response =requests.get(base_url+'/get',params=param_data)
print(response.url)
print(response.status_code)
4.定制请求头
在爬取网页的时候,输出的信息中有时候会出现“抱歉,无法访问”等字眼,这就是禁止爬取,需要通过定制请求头Headers来解决这个问题。定制Headers是解决requests请求被拒绝的方法之一,相当于我们进入这个网页服务器,假装自己本身在爬取数据。请求头Headers提供了关于请求、响应或其他发送实体的消息,如果没有定制请求头或请求的请求头和实际网页不一致,就可能无法返回正确结果。
获取一个网页的Headers的方法如下:使用360、火狐或谷歌浏览器打开一个网址(比如“httpbin.org”),在网页上单击鼠标右键,在弹出的菜单中选择“查看元素”,然后刷新网页,再按照如图3-4所示的步骤,先点击“Network”选项卡,再点击“Doc”,接下来点击“Name”下方的网址,就会出现类似如下的Headers信息:
User-Agent:Mozilla/5.0 (Windows NT 6.1; WOW64) AppleWebKit/537.36 (KHTML, like Gecko) Chrome/46.0.2490.86 Safari/537.36

Headers中有很多内容,主要常用的就是“User-Agent”和“Host”,它们是以键对的形式呈现的,如果把“User-Agent”以字典键值对形式作为Headers的内容,往往就可以顺利爬取网页内容。
下面是添加了Headers信息的网页请求过程:
import requests
url='http://httpbin.org'# 创建头部信息
headers={'User-Agent':'Mozilla/5.0 (Windows NT 6.1; WOW64) AppleWebKit/537.36 (KHTML, like Gecko) Chrome/46.0.2490.86 Safari/537.36'}
response = requests.get(url,headers=headers)
print(response.content)
print(response.status_code)
4.XPath语言
1.基本术语
XML文档通常可以被看作一棵节点树。在XML中,有元素、属性、文本、命名空间、处理指令、注释以及文档节点等七种类型的节点,其中,元素节点是最常用的节点。下面是一个HTML文档中的代码:
<html>
    <head><title>BigData Software</title></head>
    <p class="title"><b>BigData Software</b></p>
    <p class="bigdata">There are three famous bigdata software;and their names are
        <a href="http://example.com/hadoop" class="hadoop" id="link1">Hadoop</a>,
        <a href="http://example.com/spark" class="spark" id="link2">Spark</a>and
        <a href="http://example.com/flink" class="flink" id="link3"><!--Flink--></a>;
        and they are widely used in real application.</p>
    <p class="bigdata">...</p>
</html>
2.基本语法
XML/HTML文档是由标签构成的,所有的标签都有很强的层级关系。基于这种层级关系,XPath语法能够准确定位我们所需要的信息。XPath使用路径表达式来选取XML/HTML文档中的节点,这个路径表达式和普通计算机文件系统中见到的路径表达式非常相似。在XPath语法中,我们直接使用路径来选取,再加上适当的谓语或函数进行指定,就可以准确定位到指定的节点。
(1)节点选取
XPath选取节点时,是沿着路径到达目标,表3-3列出了常用的表达式。

“/”可以理解为绝对路径,需要从根节点开始;“./”则是相对路径,可以从当前节点开始;“../”则是先返回上一节点,从上一节点开始。这与普通计算机的文件系统类似。下面给出测试这些表达式的简单实例,这里需要用到lxml中的etree库,在使用之前需要执行如下命令安装lxml库:
pip install lxml
from lxml import etree
etree.HTML( )
调用HTML类对HTML文本进行初始化,成功构造XPath解析对象,同时可以自动修正HMTL文本(标签缺少闭合自动添加上)
etree.tostring**()**
tostring( )方法可以输出修正之后的HTML代码,也可以直接读取文本进行解析,但是结果为bytes类型,因此需要利用decode()方法将其转成str类型
“//”表示全局搜索,比如,“//p”可以将所有的<p>标签搜索出来。“/”表示在某标签下进行搜索,只能搜索子节点,不能搜索子节点的子节点。简单来说,“//”可以进行跳级搜索,“/”只能在本级上进行搜索,不能跳跃。下面是具体实例:
(1)逐级搜索
\>>> html_data = html.xpath('/html/body/p/a')

\>>> for element in html_data:

   print(etree.tostring(element))
(2)跳级搜索
\>>> html_data = html.xpath('//a')

\>>> for element in html_data:

   print(etree.tostring(element))
可以在方括号内添加“@”,将标签属性填进去,这样就可以准确地将含有该标签属性的部分提取出来,示例代码如下:
\>>> html_data = html.xpath('//p/a[@class="bigdata Spark"]')

\>>> for element in html_data:

   print(etree.tostring(element))
上面代码的执行结果如下:
b'<a href="http://example.com/spark" class="bigdata Spark" id="link2">Spark</a>and\n '(2)谓语
直接使用前面介绍的方法可以定位到多数我们需要的节点,但是有时候我们需要查找某个特定的节点或者包含某个指定值的节点,就要用到谓语。谓语是被嵌在方括号中的。表3-4列出了一些带有谓语的路径表达式及其描述的内容。
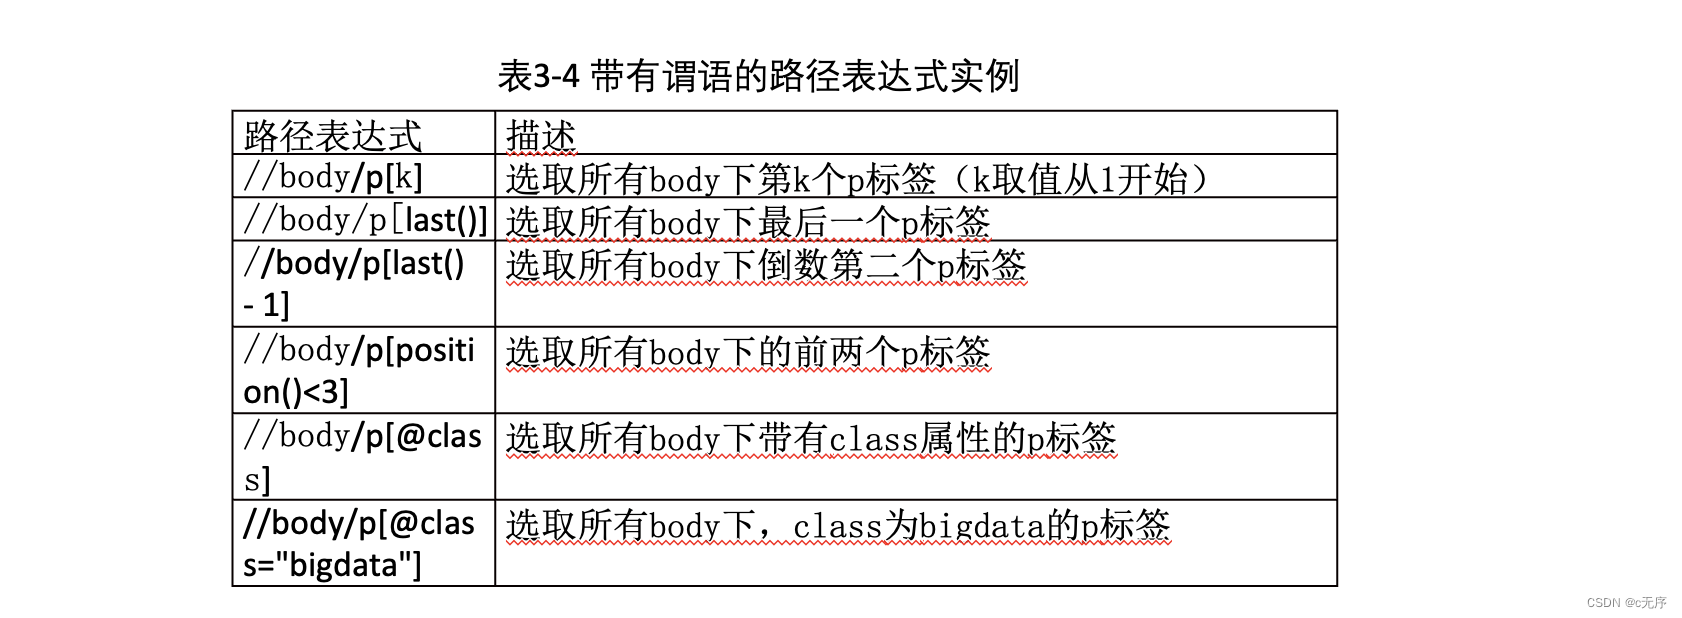
下面演示表3-4中的最后一个例子,选取所有body下,class为bigdata的p标签,代码如下:
\>>> html_data = html.xpath('//body/p[@class="bigdata"]')

\>>> for element in html_data:

  print(etree.tostring(element))
上面代码执行结果如下:
b'<p class="bigdata">There are three famous bigdata software;and their names are\n

<a href="http://example.com/hadoop" class="bigdata Hadoop" id="link1">Hadoop</a>,\n

<a href="http://example.com/spark" class="bigdata Spark" id="link2">Spark</a>and\n

<a href="http://example.com/flink" class="bigdata Flink" id="link3"><!--Flink--></a>;\n

and they are widely used in real application.</p>\n '

b'<p class="bigdata">...</p>\n '
(3)函数
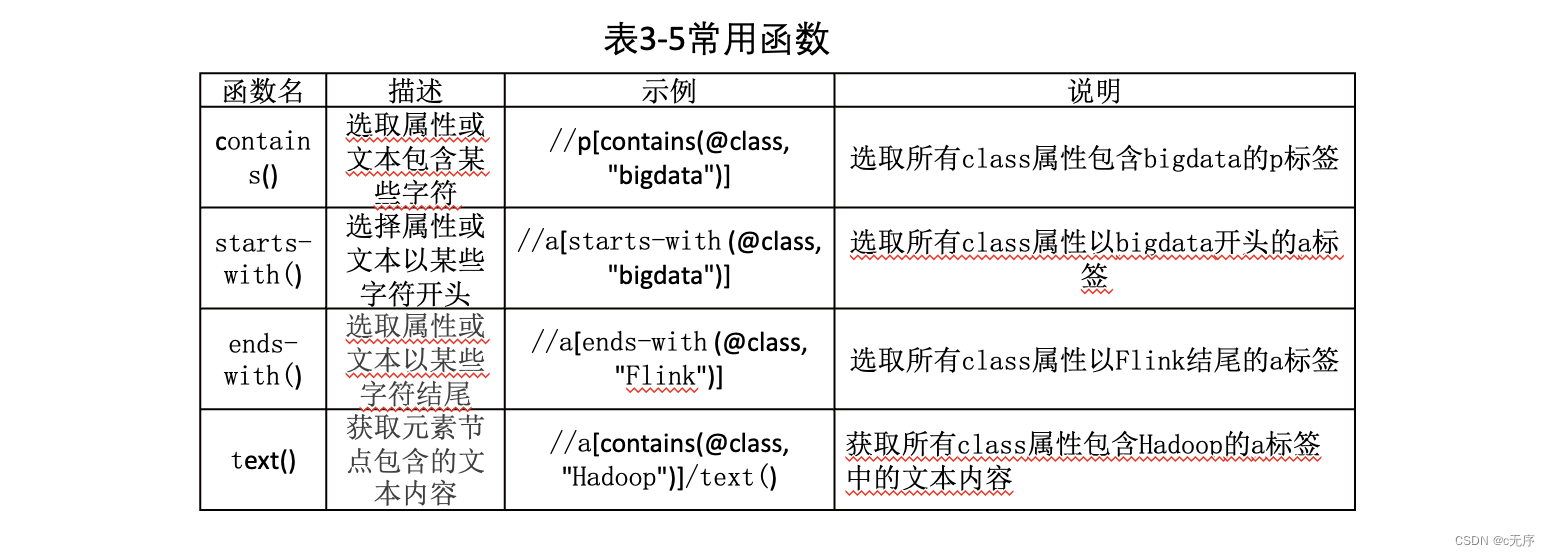
XPath中提供超过100个内建函数用于字符串值、数值、日期和时间比较序列处理等操作,极大地方便了我们定位获取所需要的信息。表3-5列出了几个常用的函数。
2.2 selenium
selenium主要是用来做自动化测试,支持多种浏览器,爬虫中主要用来解决JavaScript渲染问题。模拟浏览器进行网页加载,当urllib,requests无法正常获取网页内容的时候,就可以尝试使用selenium来爬取信息。
① 声明浏览器对象
#Python文件名或者包名不要命名为selenium,会导致无法导入
from selenium import webdriver

\#webdriver可理解为浏览器的驱动器,支持多种浏览器,这里以Chrome为例

browser = webdriver.Chrome()
② 访问页面并获取网页**Html**
from selenium import webdriver

browser = webdriver.Chrome()

\#browser.page_source是获取网页的全部html

browser.get(‘https://www.taobao.com’)

print(browser.page_source)

browser.close()
2.3 爬取王者荣耀实例
from selenium import webdriver
from selenium.webdriver.common.by import By
from selenium.webdriver.support.ui import WebDriverWait
from selenium.webdriver.support import expected_conditions as EC
from selenium.webdriver.chrome.options import Options
import time

opt = Options()
# 无头模式
opt.add_argument("--headless")

#fp = open("./hero_info.txt", "w", encoding="utf-8")

fp = open("./hero_wangzherongyao1.txt", mode="w", encoding="utf8")
driver = webdriver.Chrome(options=opt)
#
url = "https://pvp.qq.com/web201605/herolist.shtml"
driver.get(url)
time.sleep(7)

# 定位元素
url_element = driver.find_elements(By.XPATH, "//ul[@class='herolist clearfix']/li/a")
# 用于记录所有深层页面url
hero_list = []
for a in url_element:
    hero_url = a.get_attribute("href")
    hero_list.append(hero_url)

for new_url in hero_list:
    driver.get(new_url)
    # 获取英雄的名称和代号
    title = driver.find_element(By.XPATH, "//h3[@class='cover-title']").text
    name = driver.find_element(By.XPATH, "//h2[@class='cover-name']").text

    skill1_name = driver.find_element(By.XPATH, "//div[@class='skill-show']/div[1]/p[1]/b").text
    skill1_content = driver.find_element(By.XPATH, "//div[@class='skill-show']/div[1]/p[2]").text
    driver.execute_script("document.getElementsByClassName('show-list')[1].style.display='block'")
    skill2_name = driver.find_element(By.XPATH, "//div[@class='skill-show']/div[2]/p[1]/b").text
    skill2_content = driver.find_element(By.XPATH, "//div[@class='skill-show']/div[2]/p[2]").text
    driver.execute_script("document.getElementsByClassName('show-list')[2].style.display='block'")
    skill3_name = driver.find_element(By.XPATH, "//div[@class='skill-show']/div[3]/p[1]/b").text
    skill3_content = driver.find_element(By.XPATH, "//div[@class='skill-show']/div[3]/p[2]").text
    driver.execute_script("document.getElementsByClassName('show-list')[3].style.display='block'")
    skill4_name = driver.find_element(By.XPATH, "//div[@class='skill-show']/div[4]/p[1]/b").text
    skill4_content = driver.find_element(By.XPATH, "//div[@class='skill-show']/div[4]/p[2]").text
    driver.execute_script("document.getElementsByClassName('show-list')[4].style.display='block'")
    skill5_name = driver.find_element(By.XPATH, "//div[@class='skill-show']/div[5]/p[1]/b").text
    skill5_content = driver.find_element(By.XPATH, "//div[@class='skill-show']/div[5]/p[2]").text
    fp.write(title + "\n" + name + "\n" + skill1_name+"\n"+skill1_content+"\n"+skill2_name+"\n"+ skill2_content+ "\n"+skill3_name+ "\n"+
          skill3_content+"\n"+skill4_name+"\n"+ skill4_content+"\n"+skill5_name+ "\n"+skill5_content)

    print(title + "\n" + name + "\n" + skill1_name+"\n"+skill1_content+"\n"+skill2_name+"\n"+ skill2_content+ "\n"+skill3_name+ "\n"+
          skill3_content+"\n"+skill4_name+"\n"+ skill4_content+"\n"+skill5_name+ "\n"+skill5_content)

driver.close()
fp.close()
books_selenium.py实例
import time
from selenium import webdriver
import csv

url = "https://item.jd.com"
# 创建谷歌浏览器驱动参数对象,可以指定Chrome浏览器路径,指定调试路径,无界面模式等
chrome_options = webdriver.ChromeOptions()
# 加载谷歌浏览器驱动
driver = webdriver.Chrome(options=chrome_options)
# 请求地址
driver.get(url)
#等待 5 秒
time.sleep(5)
# 找到搜索框,传送入关键词
driver.find_element_by_id("key").send_keys("数据采集与预处理")
time.sleep(2)

# 找到搜索按钮,搜索
driver.find_element_by_xpath('//*[@id="search"]/div/div[2]/button').click()
# 挂起(等待)当前线程的执行
time.sleep(10)
# 向下滚动500个像素
driver.execute_script('window.scrollBy(0,500)')
time.sleep(5)
driver.execute_script('window.scrollBy(0,500)')
time.sleep(2)

# 保存数据到本地,生成一个books_jingdong.csv文件,以追加的方式存储信息,编码为"utf-8"
f = open('D:\\PythonCode\\books_jingdong.csv', mode='a', encoding='utf_8_sig', newline='')
# 生成一个DictWriter 文件
csv_writer = csv.DictWriter(f, fieldnames=["商品标题:", "商品链接:", "商品价格:"])
# 把列名称写入books_jingdong.csv文件
csv_writer.writeheader()
for i in range(1,30):
    book_xpath = '//*[@id="J_goodsList"]/ul/li[{}]'.format(i)
    book_url = driver.find_element_by_xpath(book_xpath + '/div/div[1]/a').get_attribute('href')
    #driver.implicitly_wait(1)
    print(book_url)
    name_book = driver.find_element_by_xpath(book_xpath + '/div/div[3]/a/em/font').text
    price_book = driver.find_element_by_xpath(book_xpath + '/div/div[2]/strong/i').text
    # 数据存入字典
    dic = {'商品标题:': name_book, '商品价格:': price_book, '商品链接:': book_url}
    # 逐条写入数据
    csv_writer.writerow(dic)
    print(dic, "已保存!!!")


 # 退出浏览器驱动
driver.quit()
第三章
Pig学习
# 上传数据到 HDFS data 目录下
hdfs dfs -put students.txt /data# 查看 data 目录下的文件
hdfs dfs -ls /data(1)启动
# 启动 pig
本地模式:pig -x local
以便访问本地文件系统,测试或处理小规模数据集#加载数据
grunt> student1 = LOAD 'file:///root/data/students.txt' USING PigStorage(',') as (
id:int, name:chararray, age:int, gender:chararray, class:chararray);# 输出数据
grunt> dump student1
mapreduce模式:pig -x mapreduce
或 pig
进入mapreduce模式,在mapreduce下,pig可以访问整个hadoop集群,处理大规模数据集
可以打开web yarn 页面查看(2)加载
任何一种数据流的第一步都是要指定输入。
在Pig Latin中是通过LOAD语句来完成的。默认情况下,load使用默认加载函数PigStorage加载存放在HDFS中并且以“tab”键进行分割的文件。用户也可以指定一个完整的URL路径这可以从HDFS中读取文件。
实际上,用户的大部分数据并非是使用“tab”键做分割符的文本文件,也有可能需要从其它非HDFS的存储系统中加载数据。
Pig允许用户在加载数据时通过using句式指定其它加载函数。如果没有指定加载函数,那么会使用内置的加载函数PigStorage。用户同样可以通过using句式为使用的加载函数指定参数。例如:如果想读取以逗号分割的文本文件数据,那么PigStorage会接收一个指定分割符的参数:
load语句也可以有as句式,这个句式可以为用户加载的数据指定模式,模式相当于列名。
当从HDFS访问指定“文件”的时候,用户也可以指定文件夹。在这种情况下,Pig会遍历用户指定的文件夹下的所有文件并将它们作为load语句的输入。#从HDFS中,载入数据
grunt> student = LOAD 'hdfs://master:9000/data/students.txt' USING PigStorage(',') as (id:int, name:chararray, age:int, gender:chararray, class:chararray);(3)输出
将结果数据输出到屏幕,对于调试阶段和原型研究阶段是特别有用的。dump语句可以将用户的脚本输出打印到屏幕上。
# 输出数据
grunt> DUMP student# 报错,没有启动 history server
# 进入 hadoop sbin 目录
# 启动 history server
mr-jobhistory-daemon.sh start historyserver
## 关闭 history server 使用
## mr-jobhistory-daemon.sh stop historyserver
# jps 查看进程, 出现 JobHistoryServer
# 重新启动 pig,载入数据,输出数据,成功输出(4)存储
当用户处理完数据之后,需要把结果写到某个地方。Pig提供了store语句来进行写数据
# 存储数据至 HDFS abc 目录下
grunt> STORE student INTO 'hdfs://master:9000/abc/' USING PigStorage(',');# Linux 查看
hdfs dfs -ls /abc
(5)查询
# 使用 FILTER 运算符获取 理科二班 详细信息
grunt> filter_data = FILTER student BY class == '理科二班';
grunt> DUMP filter_data;# 载入重复数据
grunt> student_repeat = LOAD 'hdfs://master:9000/data/student_repeat.txt' USING PigStorage(',') as (id:int, name:chararray, age:int, gender:chararray, class:chararray);
grunt> DUMP student_repeat;(6)去重
# 使用 DISTINCT 去重
grunt> student_dedup = DISTINCT student_repeat;
grunt> DUMP student_dedup;# 使用 FOREACH 运算符进行数据转换
grunt> stu = FOREACH student_dedup GENERATE id, age, class;
grunt> DUMP stu;# 载入数据
grunt> score = LOAD 'hdfs://master:9000/data/score.txt' USING PigStorage(',') as (sid:int, num:int, score:int);
grunt> DUMP score;(7)连接
# student 和 score 内部连接(inner-join):也称等值连接。当两个表中都存在匹配时,内部连接将返回行。基于连接谓词,通过组合两个关系(如 A 和 B)的列值来创建新关系。对 A 的每一行与 B 的每一行进行比较,以查找满足连接谓词的所有行对。当连接谓词被满足时,A 和 B 的每个匹配的行对的列值被组合成结果行。
grunt> student_score = JOIN student BY id, score BY sid;
grunt> DUMP student_score;# 左外连接:返回左表中所有行,即使右边的关系中没有匹配项
grunt> out_left = JOIN student BY id LEFT OUTER, score BY sid;
grunt> DUMP out_left;(8)分组
# 按照班级进行分组
grunt> group_data = GROUP student by class;
grunt> DUMP group_data;# 使用 DESCRIBE 查看分组关系
grunt> DESCRIBE group_datagroup_data: {group: chararray,student: {(id: int,name: chararray,age: int,gender: chararray,class: chararray)}}
(9)排序
# 排序 ORDER BY 运算符
# 升序
grunt> order_by_data = ORDER student BY age;
grunt> DUMP order_by_data;# 降序
grunt> order_by_data = ORDER student BY age DESC;
grunt> DUMP order_by_data;(10)LIMIT
# LIMIT 运算符获取固定数量的数据
grunt> limit_data = LIMIT student 10;
grunt> DUMP limit_data;(11)合并
# UNION 运算符用于合并两个关系的内容。要对两个关系执行 UNION 操作,它们的列和域必须相同
grunt> st = UNION student, student_repeat;
grunt> DUMP st;(12)拆分
# 使用 SPLIT 运算符将 student 拆分为 年龄小于 22 的表 s1, 和年龄等于 24 的表 s2
grunt> SPLIT student into s1 if age<22, s2 if age == 24;
grunt> DUMP s1;
grunt> DUMP s2;
Hadoop 的作用
Hadoop 的作用非常简单,就是在多计算机集群环境中营造一个统一而稳定的存储和计算环境,并能为其他分布式应用服务提供平台支持。
也就是说, Hadoop 在某种程度上将多台计算机组织成了一台计算机(做同一件事),那么 HDFS 就相当于这台计算机的硬盘,而 MapReduce 就是这台计算机的 CPU 控制器。
HDFS 使用
HDFS Shell命令
hadoop fs = hdfs dfs
# 显示根目录 / 下的文件和子目录,绝对路径
hadoop fs -ls /
# 新建文件夹,绝对路径
hadoop fs -mkdir /hello
# 上传文件
hadoop fs -put hello.txt /hello/
# 下载文件
hadoop fs -get /hello/hello.txt
# 输出文件内容
hadoop fs -cat /hello/hello.txt
# -help + 命令:输出这个命令参数
hdfs dfs -help
# -moveFromLocal :从本地剪切粘贴到hdfs
hadoop fs - moveFromLocal /home/hadoop/a.txt /aaa/bbb/cc/dd
# –appendToFile :追加⼀个⽂件到已经存在的⽂件末尾
hadoop fs -appendToFile ./hello.txt /hello.txt
# -tail:显示⼀个⽂件的末尾
hadoop fs -tail /weblog/access_log.1
# 查看hdfs某个⽬录下的所有⽂件结构
hdfs dfs -ls -R /
hdfs dfs -lsr /
# -copyFromLocal:从本地⽂件系统中拷⻉⽂件到hdfs路径去
hadoop fs -copyFromLocal ./jdk.tar.gz /aaa/
# -copyToLocal:从hdfs拷⻉到本地
hadoop fs -copyToLocal /user/hello.txt ./hello.txt
# -cp :从hdfs的⼀个路径拷⻉到hdfs的另⼀个路径
hadoop fs -cp /aaa/jdk.tar.gz /bbb/jdk.tar.gz.2
# -mv:在hdfs⽬录中移动⽂件
hadoop fs -mv /aaa/jdk.tar.gz /
# -get:等同于copyToLocal,就是从hdfs下载⽂件到本地
hadoop fs -get /user/hello.txt ./
# -getmerge :合并下载多个⽂件
⽐如hdfs的⽬录 /aaa/下有多个⽂件:log.1, log.2,log.3,… 可以⼀次性下载并合并
hadoop fs -getmerge /aaa/log.* ./log.sum
# -rm:删除⽂件或⽂件夹
hadoop fs -rm -r /aaa/bbb/
# -rmdir:删除空⽬录
hadoop fs -rmdir /aaa/bbb/ccc
# -df :统计⽂件系统的可⽤空间信息
hadoop fs -df -h /
# -du:统计⽂件夹的⼤⼩信息
hadoop fs -du -s -h /input
# -count:统计⼀个指定⽬录下的⽂件节点数量
hadoop fs -count /input
#hdfs fsck / :查看集群的状态
hdfs fsck /
flume
测试flume*
(1) 监控一个文件,将数据打印出来 *
配置文件# a1表示给agent命名为a1
# 给source组件命名为r1
a1.sources = r1
# 给sink组件命名为k1
a1.sinks = k1
# 给channel组件命名为c1
a1.channels = c1
#指定exec的属性
a1.sources.r1.type = exec
a1.sources.r1.command = tail -f /root/data/execToLogger.text
# 配置sink
# 使用logger作为sink组件,可以将收集到数据直接打印到控制台
a1.sinks.k1.type = logger
# 配置channel
# 将channel的类型设置为memory,表示将event缓存在内存中
a1.channels.c1.type = memory
# 组装
# 将sources的channels属性指定为c1
a1.sources.r1.channels = c1# 将sinks的channel属性指定为c1
a1.sinks.k1.channel = c1启动运行代码
flume-ng agent -n a1 -f ./execToLogger.conf -Dflume.root.logger=DEBUG,console
#####################################################################
#####################################################################(2) 监控一个目录,将数据打印出来
新建/root/data目录
在/root/data/目录下新建文件 a.txt,输入内容,观察flume进程打印的日志
# 随意在a.txt中加入一些内容 vim /root/data/a.txt# 首先先给agent起一个名字 叫a1
# 分别给source channel sink取名字
a1.sources = r1
a1.channels = c1
a1.sinks = k1
#配置source
a1.sources.r1.type = spooldir
a1.sources.r1.spoolDir = /root/data/
# 配置sink
# 使用logger作为sink组件,可以将收集到数据直接打印到控制台
a1.sinks.k1.type = logger
# 配置channel
# 将channel的类型设置为memory,表示将event缓存在内存中
a1.channels.c1.type = memory
# 组装
# 将sources的channels属性指定为c1
a1.sources.r1.channels = c1# 将sinks的channel属性指定为c1
a1.sinks.k1.channel = c1启动agent
flume-ng agent -n a1 -f ./spoolingtest.conf -Dflume.root.logger=DEBUG,console
#####################################################################
#####################################################################(3) 监听telnet端口
在任一node节点上安装 telnet
安装telnet
yum install telnet
# a表示给agent命名为a
# 给source组件命名为r1
a.sources = r1
# 给sink组件命名为k1
a.sinks = k1
# 给channel组件命名为c1
a.channels = c1
#指定netcat的属性
a.sources.r1.type = netcat
a.sources.r1.bind = 0.0.0.0
a.sources.r1.port = 8888#指定sink的类型
a.sinks.k1.type = logger
#指定channel
a.channels.c1.type = memory
# 组装
a.sources.r1.channels = c1
a.sinks.k1.channel = c1先启动agent
flume-ng agent -n a -f ./netcatToLogger.conf -Dflume.root.logger=DEBUG,console
在启动telnet
telnet master 8888#####################################################################
#####################################################################
(4) 采集目录下数据上传到 HDFS
spoolingToHDFS.conf
配置文件
# a表示给agent命名为a
# 给source组件命名为r1
a.sources = r1
# 给sink组件命名为k1
a.sinks = k1
# 给channel组件命名为c1
a.channels = c1
#指定spooldir的属性
a.sources.r1.type = spooldir
a.sources.r1.spoolDir = /root/data
a.sources.r1.fileHeader = true
a.sources.r1.interceptors = i1
a.sources.r1.interceptors.i1.type = timestamp
#指定sink的类型
a.sinks.k1.type = hdfs
a.sinks.k1.hdfs.path = /flume/data/dir1
# 指定文件名前缀
a.sinks.k1.hdfs.filePrefix = student
# 指定达到多少数据量写一次文件 单位:bytes
a.sinks.k1.hdfs.rollSize = 102400
# 指定多少条写一次文件
a.sinks.k1.hdfs.rollCount = 1000
# 指定文件类型为 流 来什么输出什么
a.sinks.k1.hdfs.fileType = DataStream
# 指定文件输出格式 为text
a.sinks.k1.hdfs.writeFormat = text
# 指定文件名后缀
a.sinks.k1.hdfs.fileSuffix = .txt
#指定channel
a.channels.c1.type = memory
a.channels.c1.capacity = 1000
# 表示sink每次会从channel里取多少数据
a.channels.c1.transactionCapacity = 100
# 组装
a.sources.r1.channels = c1
a.sinks.k1.channel = c1在 /root/data/目录下准备数据
启动agent
flume-ng agent -n a -f ./spoolingToHDFS.conf -Dflume.root.logger=DEBUG,console########################################################################
########################################################################
########################################################################
配置拦截器监控一个文件,将数据打印出来 *
配置文件# a1表示给agent命名为a1
# 给source组件命名为r1
a1.sources = r1
# 给sink组件命名为k1
a1.sinks = k1
# 给channel组件命名为c1
a1.channels = c1
#指定exec的属性
a1.sources.r1.type = exec
a1.sources.r1.command = tail -f /root/data/execToLogger.text#配置拦截器
# 给r1这个souces配置一个拦截器并取名为 i1
a1.sources.r1.interceptors = i1
# 将拦截器i1的类型设置为timestamp 会将处理数据的时间以毫秒的格式插入event的header中
# a1.sources.r1.interceptors.i1.type = timestamp
# 将拦截器i1的类型设置为regex_filter 会根据正则表达式过滤数据
a1.sources.r1.interceptors.i1.type = regex_filter
# 配置正则表达式
a1.sources.r1.interceptors.i1.regex = ^[0-9]
# excludeEvents = true 表示将匹配到的过滤,未匹配到的放行
a1.sources.r1.interceptors.i1.excludeEvents = true# 配置sink
# 使用logger作为sink组件,可以将收集到数据直接打印到控制台
a1.sinks.k1.type = logger
# 配置channel
# 将channel的类型设置为memory,表示将event缓存在内存中
a1.channels.c1.type = memory
# 组装
# 将sources的channels属性指定为c1
a1.sources.r1.channels = c1# 将sinks的channel属性指定为c1
a1.sinks.k1.channel = c1启动运行代码
flume-ng agent -n a1 -f ./inte1.conf -Dflume.root.logger=DEBUG,console
课件内容:
创建execToLogger.conf 文件,添加内容见 txt 文本
监控一个文件,将数据打印出来
启动运行代码
flume-ng agent -n a1 -f ./execToLogger.conf -Dflume.root.logger=DEBUG,console
创建spoolingtest.conf 文件,内容见 txt
监控一个目录,将数据打印出来
启动agent
flume-ng agent -n a1 -f ./spoolingtest.conf -Dflume.root.logger=DEBUG,console
新建netcatToLogger.conf 文件,内容见 txt
监听telnet端口
在任一node节点上安装 telnet
安装telnet

yum install telnet

先启动agent

flume-ng agent -n a -f ./netcatToLogger.conf -Dflume.root.logger=DEBUG,console

在启动telnet

telnet master 8888
创建spoolingToHDFS.conf 文件,内容见 txt
采集目录数据存于HDFS
在 /root/data/目录下准备数据
启动agent

flume-ng agent -n a -f ./spoolingToHDFS.conf -Dflume.root.logger=DEBUG,console
配置flume拦截器
\# 给r1这个souces配置一个拦截器并取名为 i1
 a1.sources.r1.interceptors = i1

 \# 将拦截器i1的类型设置为timestamp 会将处理数据的时间以毫秒的格式插入event的header中

 \# a1.sources.r1.interceptors.i1.type = timestamp

 \# 将拦截器i1的类型设置为regex_filter 会根据正则表达式过滤数据

 a1.sources.r1.interceptors.i1.type = regex_filter

 \# 配置正则表达式,取非数字的内容

 a1.sources.r1.interceptors.i1.regex = ^[0-9]

 \# excludeEvents = true 表示将匹配到的过滤,未匹配到的放行

 a1.sources.r1.interceptors.i1.excludeEvents = true
创建 inte1.conf 文件
启动命令
flume-ng agent -n a1 -f ./inte1.conf -Dflume.root.logger=DEBUG
,console
第四章
Kettle
Kettle的基本功能包括转换管理和作业管理。转换管理主要包括输入、输出、转换、应用、流程、脚本、查询、检验、作业、映射和批量加载等功能。作业管理主要包括通用、邮件、文件管理、条件、脚本、批量加载等功能。
pandas
下载 jupyter notebook
pip install jupyter notebook

启动
jupyter notebook

# 导入 pandas 模块
import pandas as pd
# 导入数据
data = pd.read_csv('C:\\Users\\guojl\\Desktop\\example\\data\\score.txt')
# 或者
dt = pd.read_csv('C:/Users/guojl/Desktop/example/data/score.txt')
print(dt)
# 读取 txt 文件
txt_dt = pd.read_table('C:\\Users\\guojl\\Desktop\\example\\data\\score.txt', sep=',')
# 读取 excel 文件
excel_dt = pd.read_excel('C:\\Users\\guojl\\Desktop\\123.xlsx')
# 读取 html 文件
# html_dt = pd.read_html('C:\\Users\\guojl\\Desktop\\test.html')
# 字典转换为 DataFrame
dic1 = {'class':[211, 212, 213,214, 215], 'num':[34, 33, 35, 36, 37]}
dic_dt = pd.DataFrame(dic1)
print(dic_dt)


dic = [{'class':211, 'num':34},
       {'class':212, 'num':33},
       {'class':213, 'num':35},
       {'class':214, 'num':36},
       {'class':215, 'num':37}]
dic_dt = pd.DataFrame(dic)

# 存为 .csv 文件
dic_dt.to_csv('C:\\Users\\guojl\\Desktop\\example\\data_save\\csv_dt.csv')
# 存为 .xlsx 文件
dic_dt.to_excel('C:\\Users\\guojl\\Desktop\\example\\data_save\\excel_dt.xlsx')
# 存为 .json 文件
dic_dt.to_json('C:\\Users\\guojl\\Desktop\\example\\data_save\\json_dt.json')


# 导入 numpy 模块
import numpy as np
# 创建 20 行 5 列,由随机数组成的 DataFrame 对象
df = pd.DataFrame(np.random.rand(20, 5))
print(df)

# 元组
tup = (1, 2, 3)
# 创建一个 Series 对象
df = pd.Series(tup)
print(df)

# 列表
lst = [1, 2, 3]
# 创建一个 Series 对象
df = pd.Series(lst)
print(df)

# 一维数组
arr = np.array([1, 2, 3])
# 创建一个 Series 对象
df = pd.Series(arr)
print(df)

# 字典
dic = {'index0':1, 'index1':2, 'index2':3, 'index3':4}
# 创建一个 Series 对象
df = pd.Series(dic)
print(df)

# 由标量创建一个 Series 对象
df = pd.Series(10)
print(df)

# 指定index 创建一个 Series 对象
df = pd.Series("大数据", index=range(10, 20))
print(df)

# 指定index
lst = [1, 2, 3]
df = pd.Series(data=lst,index=["index1","index2","index3"])
print(df)

# 字典
dic = {'index0':1, 'index1':2, 'index2':3, 'index3':4}
df = pd.Series(dic,index=["index1","没有的"])
print(df)

# 索引重复,不建议
lst = [1,2,3]
df = pd.Series(lst, index=["索引相同"]*3)
print(df)

# 给 Series 命名
lst = [1,2,3]
df = pd.Series(lst, name='BigData')
print(df)

# 指定数据类型
lst = [1,2,3]
df = pd.Series(lst, dtype=np.float64)
print(df)

# date_range()是pandas中常用的函数,用于生成一个固定频率的DatetimeIndex时间索引。原型:
# date_range(start=None, end=None, periods=None, freq=None, tz=None, normalize=False, name=None, closed=None, **kwargs)

# 常用参数为start、end、periods、freq。
# start:指定生成时间序列的开始时间
# end:指定生成时间序列的结束时间
# periods:指定生成时间序列的数量
# freq:生成频率,默认‘D’,可以是’H’、‘D’、‘M’、‘5H’、‘10D’、…
# 还可以根据closed参数选择是否包含开始和结束时间,left包含开始时间,不包含结束时间,right与之相反。默认同时包含开始时间和结束时间。

# 函数调用时至少要指定参数start、end、periods中的两个。
df = pd.date_range('2023/4/10', '2023/5/10')
print(df)

# 指定开始时间和时间序列数量
df = pd.date_range('2023/4/10', periods=10)
print(df)

# 指定结束时间和时间序列数量
df = pd.date_range(end='2023/4/10', periods=10)
print(df)

# 指定开始时间、时间序列数量和频率
df = pd.date_range(start='2023/4/10', periods=10, freq='2D')
print(df)

# 指定结束时间、时间序列数量和频率
df = pd.date_range(end='2023/4/10', periods=10, freq='2D')
print(df)

# 指定起止时间和 closed 参数
df = pd.date_range(start='2023/4/10', end='2023/5/10', closed='left')
print(df)

# 时间序列做为索引,生成 Series 一维数组
dates = pd.date_range(start='2023/4/10', periods=10, freq='2D')
df = pd.Series(range(10), index=dates)
print(df)

# 时间序列做行索引,生成DateFrame二维数组
dates = pd.date_range(start='2023/4/10', periods=10, freq='2D')
df = pd.DataFrame(np.random.randn(10,5), index=dates, columns=list('ABCDE'))
print(df)

# 导入数据
df = pd.read_csv('C:/Users/guojl/Desktop/example/data/score.txt')
# 查看数据前10行
print(df.head(10))

# 导入数据
df = pd.read_csv('C:/Users/guojl/Desktop/example/data/score.txt')
# 查看数据最后10行
print(df.tail(10))

# 导入数据
df = pd.read_csv('C:/Users/guojl/Desktop/example/data/score.txt')
# 查看数据行数和列数
print(df.shape)

# 导入数据
df = pd.read_csv('C:/Users/guojl/Desktop/example/data/score.txt')
# 查看数据索引、类型和内存信息
http:df.info()

# 查看数据列的汇总统计
print(df.describe())

# 导入数据
df = pd.read_csv('C:/Users/guojl/Desktop/example/data/score.txt')
# 查看数据 score 列计数结果, 默认降序排列
print(df['score'].value_counts())

# 导入数据
df = pd.read_csv('C:/Users/guojl/Desktop/example/data/score.txt')
# 查看数据 score 列计数结果, 升序排列
print(df['score'].value_counts(ascending=True))

# 导入数据
df = pd.read_csv('C:/Users/guojl/Desktop/example/data/score.txt')
# 使用标准化 normalize=True 的方法,查看数据 score 计数占比
print(df['score'].value_counts(ascending=True, normalize=True))

# df.apply 用法,按列对数据进行操作
print(df.apply(pd.value_counts))

# 导入数据
df = pd.read_csv('C:/Users/guojl/Desktop/example/data/score.txt')
# 数据选取 一列
print(df['score'])

# 数据选取 多列
print(df[['num', 'score']])

# 按位置选取数据 第一行
print(df.iloc[0])

# 按索引选取数据 第一行
print(df.loc[0])

# 按位置选取数据 第一行
print(df.iloc[0,:])

# 按位置选取数据 第一行前三列
print(df.iloc[0,:3])

# 按位置选取数据 第一行第一列
print(df.iloc[0,0])

# 输出列名
print(df.columns)

# 导入数据
df = pd.read_csv('C:/Users/guojl/Desktop/example/data/score.txt')
# 修改列名
df.columns = ['a', 'b', 'c']
print(df.columns)

# 查看数据空值,返回 bool 逻辑值, True or False
print(df.isnull())

# 查看数据非空值,返回 bool 逻辑值, True or False
print(df.notnull())

# 删除所有包含空值的行
df.dropna()
print(df)

# 删除所有包含空值的列
df.dropna(axis=1)
print(df)

# axis 参数:0为行 1为列

# 保留至少有 3 个非空值的行
df.dropna(thresh=3)

# 用 x 替换数据中的所有空值
df.fillna('x')

# 数据类型更改为 float 类型
df.astype(float)

# replace 替换数据
df_str = '小明是一名学生,成绩优异'
df = df_str.replace('明', '雷')
print(df)

# replace 替换多个数据
df_str = '小明是一名学生,成绩优异'
df = df_str.replace('明', '雷').replace('成绩', '表现')
print(df)

# rename 更改列名
dic = [{'a':1, 'b':2},
       {'c':3, 'd':4},
       {'e':5, 'f':6}]
df = pd.DataFrame(dic)
df1 = df.rename(columns={'a':'one', 'b':'two', 'c':'three', 'd':'four', 'e':'five', 'f':'six'})
print(df1.columns)

# 选择性更改
df1 = df.rename(columns={'a':'one', 'b':'two'})

# 更改索引列
dic1 = {'class':[211, 212, 213,214, 215], 'num':[34, 33, 35, 36, 37],
        'name':['小张', '小李', '小王', '小赵', '小郑']}
dic_dt = pd.DataFrame(dic1)
df = dic_dt.set_index('name')
print(df)

# 批量重命名索引
dic1 = {'class':[211, 212, 213,214, 215], 'num':[34, 33, 35, 36, 37],
        'name':['小张', '小李', '小王', '小赵', '小郑']}
dic_dt = pd.DataFrame(dic1)
df = dic_dt.rename(index=lambda x: x+3)
print(df)

# 批量更改列名
dic1 = {1:[211, 212, 213,214, 215], 2:[34, 33, 35, 36, 37],
        3:['小张', '小李', '小王', '小赵', '小郑']}
dic_dt = pd.DataFrame(dic1)
df = dic_dt.rename(columns=lambda x: x+3)
print(df)

# 选择 num 列大于 35 的行
dic1 = {'class':[211, 212, 213,214, 215], 'num':[34, 33, 35, 36, 37],
        'name':['小张', '小李', '小王', '小赵', '小郑']}
dic_dt = pd.DataFrame(dic1)
df = dic_dt[dic_dt['num'] > 35]
print(df)

# 排序,按照 num 列排序, 默认升序
dic1 = {'class':[211, 212, 213,214, 215], 'num':[34, 33, 35, 36, 37],
        'name':['小张', '小李', '小王', '小赵', '小郑']}
dic_dt = pd.DataFrame(dic1)
df = dic_dt.sort_values('num')
print(df)

# 降序
df = dic_dt.sort_values('num', ascending=False)

# 先按 num 降序, 再按 class 升序
df = dic_dt.sort_values(['num', 'class'], ascending=[False, True])
print(df)

# 返回一个按 num 列进行分组的 GroupBy 对象
dic1 = {'class':[211, 212, 211,214, 214], 'num':[34, 33, 33, 34, 37],
        'name':['小张', '小李', '小王', '小赵', '小郑']}
dic_dt = pd.DataFrame(dic1)
df = dic_dt.groupby('num')
print(df)

# 返回一个按 class、num 列进行分组的 GroupBy 对象
dic1 = {'class':[211, 212, 211,214, 214], 'num':[34, 33, 33, 34, 37],
        'name':['小张', '小李', '小王', '小赵', '小郑']}
dic_dt = pd.DataFrame(dic1)
df = dic_dt.groupby(['class','num'])
print(df)

# 返回一个按 class 分组后、num 列均值
dic1 = {'class':[211, 212, 211,214, 214], 'num':[34, 33, 33, 34, 37],
        'name':['小张', '小李', '小王', '小赵', '小郑']}
dic_dt = pd.DataFrame(dic1)
df = dic_dt.groupby('class')['num']
print(df)
# 输出 df 中值
for key, value in df:
        print(key)
        print(value)

# 返回一个按 class 分组后,计算num, score 的最大值的数据透视表
dic1 = {'class':[211, 212, 211,214, 214], 'num':[34, 33, 33, 34, 37],
        'name':['小张', '小李', '小王', '小赵', '小郑'], 'score':[100, 99, 99, 80, 89]}
dic_dt = pd.DataFrame(dic1)
df = dic_dt.pivot_table(index='class', values=['num','score'], aggfunc=max)
print(df)

# 返回按 class 列分组的所有列均值
dic1 = {'class':[211, 212, 211,214, 214], 'num':[34, 33, 33, 34, 37],
        'name':['小张', '小李', '小王', '小赵', '小郑'], 'score':[100, 99, 99, 80, 89]}
dic_dt = pd.DataFrame(dic1)
df = dic_dt.groupby('class').agg(np.mean)
print(df)

# 对每一列求均值
dic1 = {'class':[211, 212, 211,214, 214], 'num':[34, 33, 33, 34, 37],
         'score':[100, 99, 99, 80, 89]}
dic_dt = pd.DataFrame(dic1)
df = dic_dt.apply(np.mean)
print(df)

# 对每一行求均值
dic1 = {'class':[211, 212, 211,214, 214], 'num':[34, 33, 33, 34, 37],
         'score':[100, 99, 99, 80, 89]}
dic_dt = pd.DataFrame(dic1)
df = dic_dt.apply(np.mean, axis=1)
print(df)

# 对每一列求最大值
dic1 = {'class':[211, 212, 211,214, 214], 'num':[34, 33, 33, 34, 37],
         'score':[100, 99, 99, 80, 89]}
dic_dt = pd.DataFrame(dic1)
df = dic_dt.apply(np.max, axis=0)
print(df)

# 将 dic2 的行加入 dic_dt 尾部
dic1 = {'class':[211, 212, 211,214, 214], 'num':[34, 33, 33, 34, 37],
         'score':[100, 99, 99, 80, 89]}
dic_dt = pd.DataFrame(dic1)
dic2 = dic_dt
df = dic_dt.append(dic2)
print(df)

# 将 dic2 的列加到 dic_dt 的尾部
dic1 = {'class':[211, 212, 211,214, 214], 'num':[34, 33, 33, 34, 37],
         'score':[100, 99, 99, 80, 89]}
dic_dt = pd.DataFrame(dic1)
dic2 = dic_dt
df = pd.concat([dic_dt, dic2], axis= 1)
print(df)

# join 用法
lis = ['abc', 'xiaozhang', '大数据', '123']
df = '-'.join(lis)
print(df)

# 汇总统计
dic1 = {'class':[211, 212, 211,214, 214], 'num':[34, 33, 33, 34, 37],
         'score':[100, 99, 99, 80, 89]}
dic_dt = pd.DataFrame(dic1)
df = dic_dt.describe()
print(df)

# 所有列的均值
df = dic_dt.mean()

# 列之间的相关系数
df = dic_dt.corr()

# 每一列的非空值个数
df = dic_dt.count()

# 每一列的最大值
df = dic_dt.max()

# 每一列的最小值
df = dic_dt.min()

# 每一列的中位数
df = dic_dt.median()

# 每一列的标准差
df = dic_dt.std()
pandas实验
Jupyter Notebook是什么
Jupyter Notebook是一个开源的web应用程序,一个交互式笔记本,支持运行 40 多种编程语言。
它允许您创建和共享文档,包含代码,方程,可视化和叙事文本。
用途包括:数据清洗和转换,数值模拟,统计建模、数据可视化、机器学习等等。
支持以网页的形式分享,GitHub 中天然支持 Notebook 展示,也可以通过 nbviewer 分享你的文档。当然也支持导出成 HTML、Markdown 、PDF 等多种格式的文档。
不仅可以输出图片、视频、数学公式,甚至可以呈现一些互动的可视化内容,比如可以缩放的地图或者是可以旋转的三维模型。
通过 pip 安装:pip install jupyter
安装成功提示有:jupyter、jupyter-client、jupyter-console、jupyter-core。
打开打开cmd命令提示符窗口输入jupyter notebook 回车,然后浏览器就会打开Jupyter notebook。
import pandas as pd
student = pd.read_table('C:\\Users\\guojl\\Desktop\\students.txt', sep = ',')
print(student)
student[student['age']>23]
student[student['age']>22]
student.groupby('class')['id'].count().reset_index().rename(columns={'id':'count'})
student.groupby('class')['age'].min().reset_index().rename(columns = {'age':'min_age'})
score = pd.read_table('C:\\Users\\guojl\\Desktop\\score.txt', sep = ',')
print(score)
score.columns
score.groupby("id")["score"].sum().reset_index().rename(columns={'score':'sum_score'}).sort_values('sum_score', ascending = False).head()
student.merge(score, on = 'id')
merge(left, right, how=‘inner’, on=None, left_on=None, right_on=None, left_index=False, right_index=False, sort=False, suffixes=(’_x’, ‘_y’), copy=True, indicator=False, validate=None)
left 参与合并的左侧DataFrame
right 参与合并的右侧DataFrame
how 连接方式:‘inner’(默认)、‘outer’、‘left’、‘right’,分别对应内连接、外连接、左连接、右连接;外连接其实左连接和右连接的并集。左连接是左侧DataFrame取全部数据,右侧DataFrame匹配左侧DataFrame。(右连接right和左连接类似)
on 用于连接的列名,必须同时存在于左右两个DataFrame对象中,如果未指定,则以left和right列名的交集作为连接键
left_on 左侧DataFarme中用作连接键的列
right_on 右侧DataFarme中用作连接键的列
left_index 将左侧的行索引用作其连接键
right_index 将右侧的行索引用作其连接键
sort 根据连接键对合并后的数据进行排序,默认为True。有时在处理大数据集时,禁用该选项可获得更好的性能
suffixes 字符串值元组,用于追加到重叠列名的末尾,默认为(‘_x’,‘_y’).例如,左右两个DataFrame对象都有‘data’,则结果中就会出现‘data_x’,‘data_y’
copy 设置为False,可以在某些特殊情况下避免将数据复制到结果数据结构中。默认总是赋值作用:
连接两个DataFrame并返回连接之后的DataFrameimport matplotlib.pyplot as plt
df = student.groupby('class')['id'].count().reset_index().rename(columns={'id':'count'})
plt.rcParams['font.family']=['SimHei']
fig,ax = plt.subplots()
ax.plot(df['class'], df['count'])
ax.set_xticklabels(labels=df['class'], rotation=90) # 旋转90度
plt.show()


 1716
1716


 被折叠的 条评论
为什么被折叠?
被折叠的 条评论
为什么被折叠?
 到【灌水乐园】发言


