


nginx
简介:
nginx(发音同engine x)是一款轻量级的Web服务器(如:apahce、tomcat)/反向代理服务器及电子邮件(IMAP/POP3)代理服务器,并在一个BSD-like协议下发行。是由俄罗斯的程序设计师Igor Sysoev所开发,第一个公开版本0.1.0发布于2004年10月4日。其将源代码以类BSD许可证的形式发布,因它的稳定性、丰富的功能集、示例配置文件和低系统资源的消耗而闻名。2011年6月1日,nginx 1.0.4发布。其稳定性很强
nginx的特点
是占有内存少,并发能力强,事实上nginx的并发能力确实在同类型的网页服务器中表现较好,中国大陆使用nginx网站用户有:百度、京东、新浪、网易、腾讯、淘宝等。
nginx擅长静态网站、负载均衡
apache擅长动态网站
特性:
nginx是一个很牛的高性能Web和反向代理服务器,它具有很多非常优越的特性:
- 在高连接并发的情况下,nginx是Apache服务器不错的替代品,能够支持高达50000个并发连接数的响应
- 使用epoll and kqueue作为开发模型
- nginx作为负载均衡服务器:nginx既可在内部直接支持和PHP程序对外进行服务,也可支持作为HTTP代理服务器对外进行服务
- nginx采用C进行编写,不论系统资源开销还是CPU使用效率都比Perlbal要好很多
优点:
- 高并发连接:官方测试能够支撑5万并发连接,在实际生产环境中跑到2-3万并发连接数
- 内存消耗少:在3万并发连接下,开启的10个nginx进程才消耗150M内存(15M*10=150M)
- 配置文件非常简单:风格跟程序一样通俗易懂
- 成本低廉:nginx为开源软件,可以免费使用。而购买F5 BIG-IP、NetScaler等硬件负载均衡交换机则需要十多万至几十万人民币
- 支持Rewrite重写规则:能够根据域名、URL的不同,将HTTP请求分到不同的后端服务器群组
- 内置的健康检查功能:如果Nginx Proxy后端的某台Web服务器宕机了,不会影响前端访问
- 节省带宽:支持GZIP压缩,可以添加浏览器本地缓存的Header头
- 稳定性高:用于反向代理,宕机的概率微乎其微
- 模块化设计:模块可以动态编译
- 外围支持好:文档全,二次开发和模块较多
- 支持热部署:可以不停机重载配置文件
- 支持事件驱动、AIO(AsyncIO,异步IO)、mmap(Memory Map,内存映射)等性能优化
nginx的基本功能
- 静态资源的web服务器,能缓存打开的文件描述符
- http、smtp、pop3协议的反向代理服务器
- 缓存加速、负载均衡
- 支持FastCGI(fpm,LNMP),uWSGI(Python)等
- 模块化(非DSO机制),过滤器zip、SSI及图像的大小调整
- 支持SSL
nginx的扩展功能
- 基于名称和IP的虚拟主机
- 支持keepalive
- 支持平滑升级
- 定制访问日志、支持使用日志缓冲区提高日志存储性能
- 支持URL重写
- 支持路径别名
- 支持基于IP及用户的访问控制
- 支持速率限制,支持并发数限制
nginx的应用类别
- 使用nginx结合FastCGI运行PHP、JSP、Perl等程序
- 使用nginx作反向代理、负载均衡、规则过滤
- 使用nginx运行静态HTML网页、图片
- nginx与其他新技术的结合应用
nginx的模块与工作原理
nginx由内核和模块组成。其中,内核的设计非常微小和简洁,完成的工作也非常简单,仅仅通过查找配置文件将客户端请求映射到一个location block(location是nginx配置中的一个指令,用于URL匹配),而在这个location中所配置的每个指令将会启动不同的模块去完成相应的工作。
nginx的模块分类
nginx的模块从结构上分为核心模块、基础模块和第三方模块
- HTTP模块、EVENT模块和MAIL模块等属于核心模块
- HTTP Access模块、HTTP FastCGI模块、HTTP Proxy模块和HTTP Rewrite模块属于基本模块
- HTTP Upstream模块、Request Hash模块、Notice模块和HTTP Access Key模块属于第三方模块
用户根据自己的需要开发的模块都属于第三方模块。正是有了如此多模块的支撑,nginx的功能才会如此强大
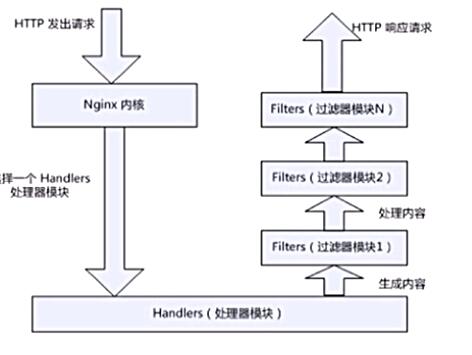
nginx模块从功能上分为三类,分别是:
- Handlers(处理器模块)。此类模块直接处理请求,并进行输出内容和修改headers信息等操作。handlers处理器模块一般只能有一个
- Filters(过滤器模块)。此类模块主要对其他处理器模块输出的内容进行修改操作,最后由nginx输出
- Proxies(代理器模块)。就是nginx的HTTP Upstream之类的模块,这些模块主要与后端一些服务比如fastcgi等操作交互,实现服务代理和负载均衡等功能
nginx模块分为:核心模块、事件模块、标准Http模块、可选Http模块、邮件模块、第三方模块和补丁等
- nginx基本模块:所谓基本模块,指的是nginx默认的功能模块,它们提供的指令,允许你使用定义nginx基本功能的变量,在编译时不能被禁用,包括:
- 核心模块:基本功能和指令,如进程管理和安全。常见的核心模块指令,大部分是放置在配置文件的顶部
- 事件模块:在Nginx内配置网络使用的能力。常见的events(事件)模块指令,大部分是放置在配置文件的顶部
- 配置模块:提供包含机制
具体的指令,请参考nginx的官方文档
nginx的工作原理
nginx的模块直接被编译进nginx,因此属于静态编译方式。
启动nginx后,nginx的模块被自动加载,与Apache不一样,首先将模块编译为一个so文件,然后在配置文件中指定是否进行加载。
在解析配置文件时,nginx的每个模块都有可能去处理某个请求,但是同一个处理请求只能由一个模块来完成。
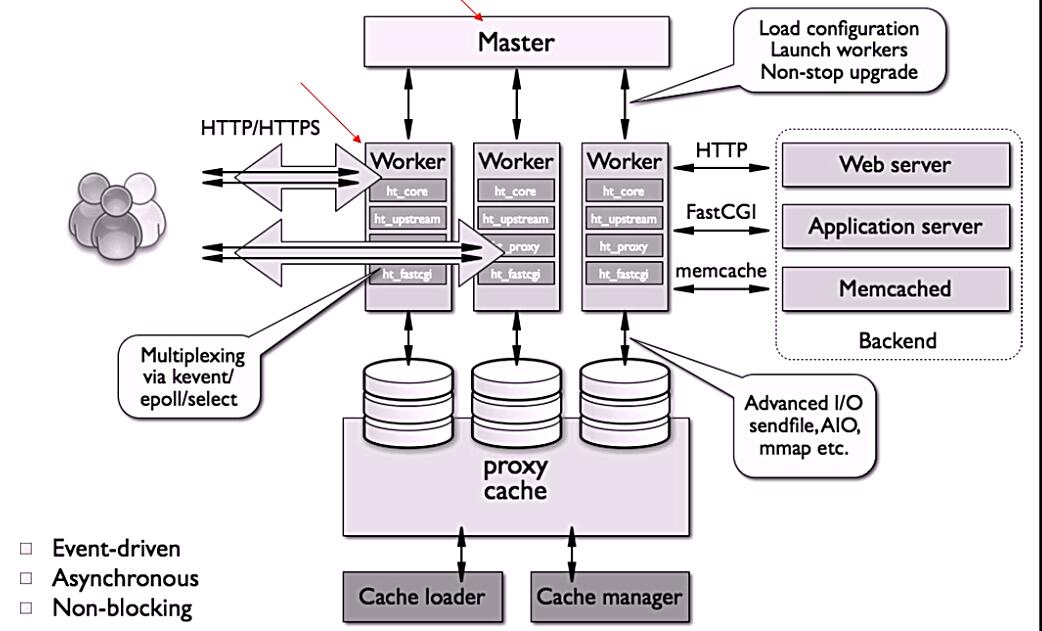
nginx的进程架构:
启动nginx时,会启动一个Master进程,这个进程不处理任何客户端的请求,主要用来产生worker线程,一个worker线程用来处理n个request。
下图展示了模块一次常规的HTTP请求和响应的过程
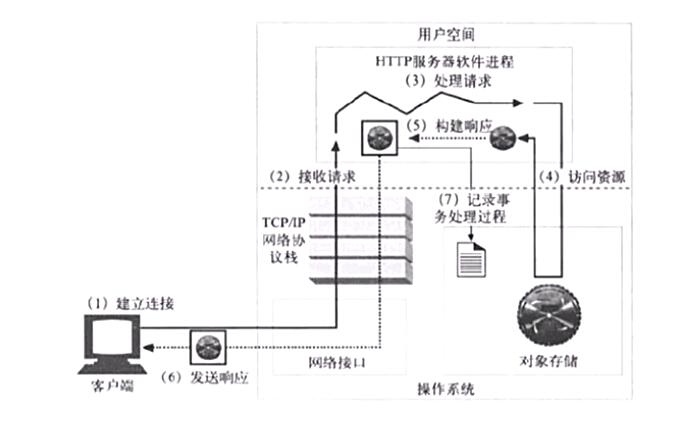
下图展示了基本的WEB服务请求步骤
nginx的安装与配置
nginx的安装
//准备工作
//永久关闭防火墙和selinux
[root@centos ~]# systemctl disable --now firewalld.service
[root@centos ~]# setenforce 0
[root@centos ~]# sed -i 's/^SELINUX=enforcing/SELINUX=disabled/g' /etc/selinux/config
//重启主机
[root@centos ~]# reboot

//配置yum源(推荐使用阿里云源)和epel源。
[root@centos ~]# rm -rf /etc/yum.repos.d/*
[root@centos ~]# curl -o /etc/yum.repos.d/CentOS-Base.repo https://mirrors.aliyun.com/repo/Centos-vault-8.5.2111.repo
[root@centos ~]# sed -i -e '/mirrors.cloud.aliyuncs.com/d' -e '/mirrors.aliyuncs.com/d' /etc/yum.repos.d/CentOS-Base.repo
[root@centos ~]# yum clean all
[root@centos ~]# yum makecache
[root@centos ~]# yum install -y https://mirrors.aliyun.com/epel/epel-release-latest-8.noarch.rpm
[root@centos ~]# sed -i 's|^#baseurl=https://download.example/pub|baseurl=https://mirrors.aliyun.com|' /etc/yum.repos.d/epel*
[root@centos ~]# sed -i 's|^metalink|#metalink|' /etc/yum.repos.d/epel*
[root@centos ~]# yum makecache


//创建nginx系统用户
[root@centos ~]# useradd -r -M -s /sbin/nologin nginx


//安装依赖环境
[root@centos ~]# yum -y install pcre-devel openssl openssl-devel gd-devel --nobest
[root@centos ~]# yum -y install gcc gcc-c++ --allowerasing
[root@centos ~]# yum -y install wget vim make
[root@centos ~]# yum -y groups mark install 'Development Tools'

//创建日志存放目录
[root@centos ~]# mkdir -p /var/log/nginx
[root@centos ~]# chown -R nginx.nginx /var/log/nginx

//下载nginx源码包
[root@centos ~]# wget http://nginx.org/download/nginx-1.22.1.tar.gz -P /usr/src/

//编译安装
[root@centos ~]# cd /usr/src/
[root@centos src]# tar -xf nginx-1.22.1.tar.gz
[root@centos src]# cd nginx-1.22.1/
[root@centos nginx-1.22.1]#./configure \
--prefix=/usr/local/nginx \
--user=nginx \
--group=nginx \
--with-debug \
--with-http_ssl_module \
--with-http_realip_module \
--with-http_image_filter_module \
--with-http_gunzip_module \
--with-http_gzip_static_module \
--with-http_stub_status_module \
--http-log-path=/var/log/nginx/access.log \
--error-log-path=/var/log/nginx/error.log
...

[root@centos nginx-1.22.1]# make -j4 && make install
...
nginx安装后配置
//服务控制方式,使用nginx命令
    -t  //检查配置文件语法
    -v  //输出nginx的版本
    -c  //指定配置文件的路径
    -s  //发送服务控制信号,可选值有{stop|quit|reopen|reload}(最常用的是reload)
配置:
//配置环境变量
[root@centos ~]# echo 'export PATH=/usr/local/nginx/sbin:$PATH' > /etc/profile.d/nginx.sh
[root@centos ~]# source /etc/profile.d/nginx.sh

//查看版本
[root@centos ~]# nginx -v
nginx version: nginx/1.22.1


//启动nginx,端口号是80
[root@centos ~]# nginx
[root@centos ~]# ss -anlt
State  Recv-Q Send-Q Local Address:Port Peer Address:Port Process
LISTEN 0      128          0.0.0.0:80        0.0.0.0:*
LISTEN 0      128          0.0.0.0:22        0.0.0.0:*
LISTEN 0      128             [::]:22           [::]:*

//关闭nginx,端口号80没有了
[root@centos ~]# nginx -s stop
[root@centos ~]# ss -anlt
State  Recv-Q Send-Q Local Address:Port Peer Address:Port Process
LISTEN 0      128          0.0.0.0:22        0.0.0.0:*
LISTEN 0      128             [::]:22           [::]:*

//加入systemctl管理
[root@centos ~]# vim /usr/lib/systemd/system/nginx.service
[root@centos ~]# cat /usr/lib/systemd/system/nginx.service
[Unit]
Description=nginx server daemon
After=network.target

[Service]
Type=forking
ExecStart=/usr/local/nginx/sbin/nginx
ExecStop=/usr/local/nginx/sbin/nginx -s stop
ExecReload=/usr/local/nginx/sbin/nginx -s reload

[Install]
WantedBy=multi-user.target

//重新读取配置文件
[root@centos ~]# systemctl daemon-reload

//设置开机自启
[root@centos ~]# systemctl enable nginx.service
Created symlink /etc/systemd/system/multi-user.target.wants/nginx.service → /usr/lib/systemd/system/nginx.service.

//查看状态(如果要查看状态,要先用原始方法关闭,再用systemctl启动才可以看见)
[root@centos ~]# systemctl start nginx.service
[root@centos ~]# systemctl status nginx.service
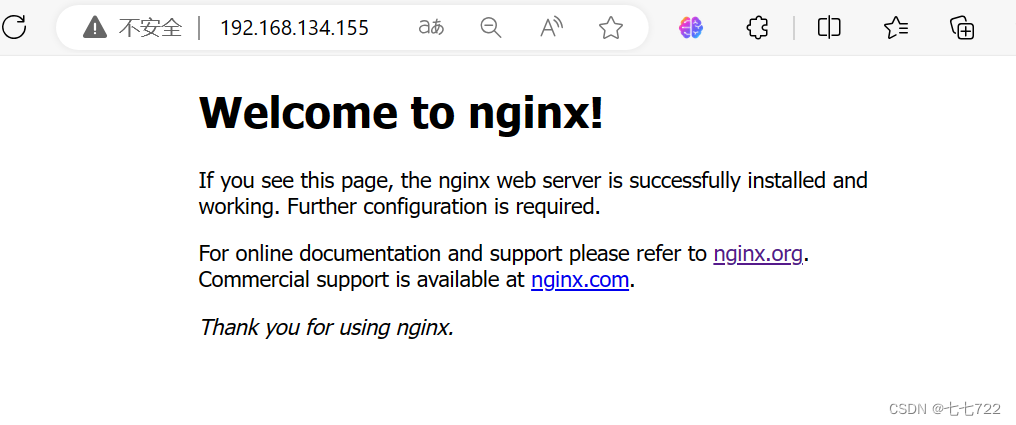
访问
//确保nginx服务已经启动
[root@centos ~]# ss -antl
State  Recv-Q Send-Q Local Address:Port Peer Address:Port Process
LISTEN 0      128          0.0.0.0:80        0.0.0.0:*
LISTEN 0      128          0.0.0.0:22        0.0.0.0:*
LISTEN 0      128             [::]:22           [::]:*
[root@centos ~]# ps -ef | grep nginx
root       25838       1  0 06:07 ?        00:00:00 nginx: master process nginx
nginx      25839   25838  0 06:07 ?        00:00:00 nginx: worker process
root       25870    1383  0 06:11 pts/0    00:00:00 grep --color=auto nginx
nginx的配置文件详解
主配置文件:/usr/local/nginx/conf/nginx.conf(安装路径下的/conf/nginx.conf)
默认启动nginx时,使用的配置文件是:安装路径/conf/nginx.conf文件
可以在启动nginx时通过-c选项来指定要读取的配置文件(nginx -c /opt/nginx.conf)
nginx常见的配置文件及其作用
| 配置文件 | 作用 |
|---|---|
| nginx.conf | nginx的基本配置文件 |
| mime.types | MIME类型关联的扩展文件 |
| fastcgi.conf | 与fastcgi相关的配置 |
| proxy.conf | 与proxy相关的配置 |
| sites.conf | 配置nginx提供的网站,包括虚拟主机 |
//常见配置文件(如果是源码安装的nginx是没有proxy.conf和sites.conf的,yum装的就会有)
[root@centos ~]# cd /usr/local/nginx/conf/
[root@centos conf]# ls
fastcgi.conf            koi-win             scgi_params
fastcgi.conf.default    mime.types          scgi_params.default
fastcgi_params          mime.types.default  uwsgi_params
fastcgi_params.default  nginx.conf          uwsgi_params.default
koi-utf                 nginx.conf.default  win-utf
nginx.conf配置详解
nginx.conf的内容分为以下几段:
- main配置段:全局配置段。其中main配置段中可能包含event配置段
- event {}:定义event模型工作特性
- http {}:定义http协议相关的配置
配置指令:要以分号结尾,语法格式如下:
derective value1 [value2 ...];
支持使用变量:
- 内置变量:模块会提供内建变量定义
- 自定义变量:
set var_name value
用于调试、定位问题的配置参数
daemon {on|off};    //是否以守护进程方式运行nginx,调试时应设置为off
master_process {on|off};    //是否以master/worker模型来运行nginx,调试时可以设置为off
error_log 位置 级别;    //配置错误日志
如:
//关闭master/worker模式
//关闭前 先查看配置文件前五行内容
[root@centos ~]# head -5 /usr/local/nginx/conf/nginx.conf

#user  root;
worker_processes  1;

#error_log  logs/error.log;

[root@centos ~]# ps -ef | grep nginx
root       25838       1  0 06:07 ?        00:00:00 nginx: master process nginx
nginx      25839   25838  0 06:07 ?        00:00:00 nginx: worker process
root       25925    1383  0 06:20 pts/0    00:00:00 grep --color=auto nginx

//添加master_process off;参数关闭
[root@centos ~]# vim /usr/local/nginx/conf/nginx.conf
[root@centos ~]# head -5 /usr/local/nginx/conf/nginx.conf

#user  nobody;
master_process off;
worker_processes  1;

//改变工作模式后要重启服务,重新加载配置文件不会生效
[root@centos ~]# nginx -s stop
[root@centos ~]# nginx
[root@centos ~]# ps -ef | grep nginx
root       25931       1  0 06:22 ?        00:00:00 nginx
root       25933    1383  0 06:22 pts/0    00:00:00 grep --color=auto nginx
error_log里的位置和级别能有以下可选项:
| 位置 | 级别 |
|---|---|
| file stderr syslog:server=address[,parameter=value] memory:size | debug:若要使用debug级别,需要在编译nginx时使用–with-debug选项 info notice warn error crit alert emerg |
//打开日志功能
[root@centos ~]# vim /usr/local/nginx/conf/nginx.conf
[root@centos ~]# head -7 /usr/local/nginx/conf/nginx.conf

user  root;
worker_processes  1;

error_log  logs/error.log;    #取消注释,默认是error级别
#error_log  logs/error.log  notice;    #这是notice级别的
#error_log  logs/error.log  info;
[root@centos ~]# nginx -s reload
[root@centos ~]# ls /usr/local/nginx/logs/
error.log  nginx.pid          #有日志文件了
正常运行必备的配置参数
user USERNAME [GROUPNAME];    //指定运行worker进程的用户和组
pid /path/to/pid_file;    //指定nginx守护进程的pid文件
worker_rlimit_nofile number;    //设置所有worker进程最大可以打开的文件数,默认为1024
worker_rlimit_core size;    //指明所有worker进程所能够使用的总体的最大核心文件大小,保持默认即可
//默认是以nginx用户运行的
[root@centos ~]# ps -ef | grep nginx
root       54876       1  0 15:59 ?        00:00:00 nginx: master process /usr/local/nginx/sbin/nginx
nginx      55006   54876  0 16:22 ?        00:00:00 nginx: worker process
root       55008    1702  0 16:22 pts/0    00:00:00 grep --color=auto nginx

//改为root用户
[root@centos ~]# vim /usr/local/nginx/conf/nginx.conf
[root@centos ~]# head -5 /usr/local/nginx/conf/nginx.conf

user  root;      #改为root
worker_processes  1;

#error_log  logs/error.log;
[root@centos ~]# nginx -s reload
[root@centos ~]# ps -ef | grep nginx
root       54876       1  0 15:59 ?        00:00:00 nginx: master process /usr/local/nginx/sbin/nginx
root       55113   54876  0 16:26 ?        00:00:00 nginx: worker process
root       55115    1702  0 16:26 pts/0    00:00:00 grep --color=auto nginx
优化性能的配置参数
worker_processes n;    //启动n个worker进程,这里的n为了避免上下文切换,通常设置为cpu总核心数-1或等于总核心数
worker_cpu_affinity cpumask ...;    //将进程绑定到某cpu中,避免频繁刷新缓存
//cpumask:使用8位二进制表示cpu核心,如:
    0000 0001   //第一颗cpu核心
    0000 0010   //第二颗cpu核心
    0000 0100   //第三颗cpu核心
    0000 1000   //第四颗cpu核心
    0001 0000   //第五颗cpu核心
    0010 0000   //第六颗cpu核心
    0100 0000   //第七颗cpu核心
    1000 0000   //第八颗cpu核心
timer_resolution interval;    //计时器解析度。降低此值,可减少gettimeofday()系统调用的次数
worker_priority number;    //指明worker进程的nice值
//启动3个worker进程,并绑定3个CPU核心
[root@centoscentoscentos ~]# vim /usr/local/nginx/conf/nginx.conf
[root@centoscentos ~]# head -5 /usr/local/nginx/conf/nginx.conf

user  nginx nginx;
worker_processes  3;
worker_rlimit_nofile 65535;
worker_cpu_affinity 0001 0010 0100;
[root@centos ~]# nginx -s reload
[root@centos ~]# ps -ef | grep nginx
root       55173       1  0 16:45 ?        00:00:00 nginx: master process nginx
nginx      55174   55173  0 16:45 ?        00:00:00 nginx: worker process
nginx      55175   55173  0 16:45 ?        00:00:00 nginx: worker process
nginx      55176   55173  0 16:45 ?        00:00:00 nginx: worker process
root       55182    1702  0 16:46 pts/0    00:00:00 grep --color=auto nginx
事件相关的配置:event{}段中的配置参数
accept_mutex {off|on};    //master调度用户请求至各worker进程时使用的负载均衡锁;on表示能让多个worker轮流地、序列化地去响应新请求
lock_file file;    //accept_mutex用到的互斥锁锁文件路径
use [epoll | rtsig | select | poll];    //指明使用的事件模型,建议让nginx自行选择
worker_connections #;    //每个进程能够接受的最大连接数
网络连接相关的配置参数
keepalive_timeout number;    //长连接的超时时长,默认为65s
keepalive_requests number;    //在一个长连接上所能够允许请求的最大资源数
keepalive_disable [msie6|safari|none];    //为指定类型的UserAgent禁用长连接
tcp_nodelay on|off;    //是否对长连接使用TCP_NODELAY选项,为了提升用户体验,通常设为on
client_header_timeout number;    //读取http请求报文首部的超时时长
client_body_timeout number;    //读取http请求报文body部分的超时时长
send_timeout number;    //发送响应报文的超时时长
oll];    //指明使用的事件模型,建议让nginx自行选择
worker_connections #;    //每个进程能够接受的最大连接数
网络连接相关的配置参数
keepalive_timeout number;    //长连接的超时时长,默认为65s
keepalive_requests number;    //在一个长连接上所能够允许请求的最大资源数
keepalive_disable [msie6|safari|none];    //为指定类型的UserAgent禁用长连接
tcp_nodelay on|off;    //是否对长连接使用TCP_NODELAY选项,为了提升用户体验,通常设为on
client_header_timeout number;    //读取http请求报文首部的超时时长
client_body_timeout number;    //读取http请求报文body部分的超时时长
send_timeout number;    //发送响应报文的超时时长


 53万+
53万+


 被折叠的 条评论
为什么被折叠?
被折叠的 条评论
为什么被折叠?
 到【灌水乐园】发言


