


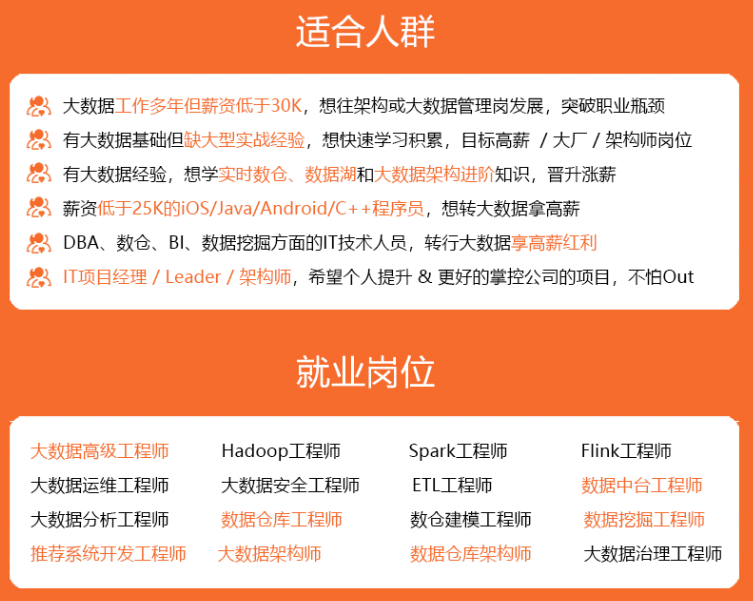

既有适合小白学习的零基础资料,也有适合3年以上经验的小伙伴深入学习提升的进阶课程,涵盖了95%以上大数据知识点,真正体系化!
由于文件比较多,这里只是将部分目录截图出来,全套包含大厂面经、学习笔记、源码讲义、实战项目、大纲路线、讲解视频,并且后续会持续更新
#ifndef TIMESERVER\_H
#define TIMESERVER\_H

#include <QTcpServer>
class Dialog;
class TimeServer : public QTcpServer
{
   Q_OBJECT
public:
    TimeServer(QObject \*parent=0);
protected:
    /\*重写此虚函数。这个函数在 TCP服务器端有新的连接时被调用,其参数为所接收新连接的套接字描述符。\*/
    void incomingConnection(qintptr socketDescriptor);
private:
    /\*用于记录创建这个 TCP 服务器端对象的父类,这里是界面指针,通过这个指针将线程发出的消息关联到界面的槽函数中。\*/
    Dialog \*dig;

};

#endif // TIMESERVER\_H
timethread.h
#ifndef TIMETHREAD\_H
#define TIMETHREAD\_H

#include <QThread>
#include <QtNetwork>
#include <QTcpSocket>
class TimeThread : public QThread
{
    Q_OBJECT
public:
    TimeThread(qintptr socketDescriptor,QObject \*parent=0);
    void run();              //重写此虚函数
signals:
     void error(QTcpSocket::SocketError socketError); //出错信号
private:
     qintptr socketDescriptor;  //套接字描述符
};

#endif // TIMETHREAD\_H
dialog.cpp
#include "dialog.h"
#include <QHBoxLayout>
#include <QVBoxLayout>
#include <QMessageBox>
#include "timeserver.h"
Dialog::Dialog(QWidget \*parent)
    : QDialog(parent)
{
    setWindowTitle(tr("多线程时间服务器"));
    Label1 =new QLabel(tr(" 服务器端口:"));
    Label2 = new QLabel;
    quitBtn = new QPushButton(tr(" 退出"));
    QHBoxLayout \*BtnLayout = new QHBoxLayout;  /\*画出界面的类\*/
    BtnLayout->addStretch(1); /\*addStretch平均分配\*/
    BtnLayout->addWidget(quitBtn);
    BtnLayout->addStretch(1);
    QVBoxLayout \*mainLayout = new QVBoxLayout(this); /\*画出界面的类\*/
    mainLayout->addWidget(Label1);
    mainLayout->addWidget(Label2);
    mainLayout->addLayout(BtnLayout);
    connect(quitBtn, SIGNAL (clicked()), this, SLOT (close()));
    count=0;
    timeServer= new TimeServer(this);
    if (!timeServer->listen ())
    {
        QMessageBox::critical(this, tr(" 多线程时间服务器 "),
        tr(" 无法启动服务器: %1.") .arg(timeServer->errorString()));
        close();
        return;
    }
    Label1->setText(tr(" 服务器端口: %1. ") .arg (timeServer->serverPort ()));
}

Dialog::~Dialog()
{

}
/\*此槽函数用于界面上显示的请求次数\*/
void Dialog::slotShow()
{
    Label2->setText(tr(" 第 %1 次请求完毕。") .arg(++count));
}
main.cpp
#include "dialog.h"
#include <QApplication>

int main(int argc, char \*argv[])
{
    QApplication a(argc, argv);
    Dialog w;
    w.show();

    return a.exec();
}
timeserver.cpp
#include "timeserver.h"
#include "timethread.h"
#include "dialog.h"
TimeServer::TimeServer(QObject \*parent):QTcpServer(parent)
{
    dig =(Dialog \*)parent;
}
void TimeServer::incomingConnection(qintptr socketDescriptor)
{
    /\*以返回的套接字描述符socketDescriptor 创建一个工作线程 TimeThread 。\*/
    TimeThread \*thread= new TimeThread(socketDescriptor,0);

    /\*将上述创建的线程结束消息函数 finished()关联到槽函数 slotShow()用于显示请求计数 。
 \* 此操作中,因为信号是跨线程的,所以使用了排队连接方式 。
 \*/
    connect (thread, SIGNAL (finished()), dig, SLOT (slotShow ()));

    /\*将上述创建的线程结束消息函数 finished()关联到线程自身的槽函数 deleteLater()用于结束线程 。
 \* 在此操作中,因为信号是在同 一个线程中的,使用了直接连接方式,故最后一个参数可以省略而使用 Qt 的自动连接选择方式 。
 \* 另外,由于工作线程中存在网络事件,所以不能被外界线程销毁,这里使用了延迟销毁函数 deleteLater()保证由工作线程自身销毁 。
 \*/
    connect (thread, SIGNAL (finished()) , thread, SLOT(deleteLater()),Qt::DirectConnection);
    /\*启动上述创建的线程 。 执行此语句后,工作线程 (TimeThread) 的虚函数 run()开始执行。\*/
    thread->start();
}
timethread.cpp
#include "timethread.h"
#include <QDateTime>
#include <QByteArray>
#include <QDataStream>
TimeThread::TimeThread(qintptr socketDescriptor,QObject \*parent)
    :QThread(parent),socketDescriptor(socketDescriptor)
{

}
void TimeThread::run()
{
    QTcpSocket tcpSocket;  //创建一个 QTcpSocket 类
    /\*将以上创建的 QTcpSocket 类置以从构造函数中传入的套接字描述符,用于向客户端传回服务器端的当前时间。\*/
    if(!tcpSocket.setSocketDescriptor(socketDescriptor))
    {
        /\*如果出错,则发出 error(tcpSocket.error())信号报告错误。\*/
        emit error (tcpSocket.error ());
        return;
    }
    QByteArray block;
    QDataStream out(&block,QIODevice::WriteOnly);
    out.setVersion (QDataStream::Qt_5_11);
    /\*如果不出错,则开始获取当前时间。\*/

    /\*此处需要注意的是时间数据的传输格式, Qt 虽然可以很方便地通过 QDateTime 类的静态函
数 currentDateTime()获取一个时间对象,但类结构是无法直接在网络间传输的,此时需要将它转
换为一个标准的数据类型后再传输 。 而 QDateTime 类提供了 uint toTime\_t() const 函数,这个函
数返回当前自 1970-01-01 00:00:00 (UNIX 纪元)经过了多少秒,返回值为一个 uint 类型,可以
将这个值传输给客户端。在客户端方面,使用 QDateTime 类的 void setTime\_t(uint seconds)将这
个时间还原 。\*/

    uint time2u = QDateTime::currentDateTime().toTime\_t(); //(c)
    out<<time2u;
    tcpSocket.write(block);     //将获得的当前时间传回客户端
    tcpSocket.disconnectFromHost(); //断开连接
    tcpSocket.waitForDisconnected(); //等待返回

}
二、客户端编程
首先在TimeServer.pro中加入 QT +=network
QT += network
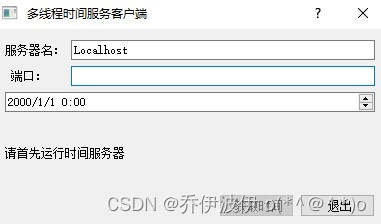
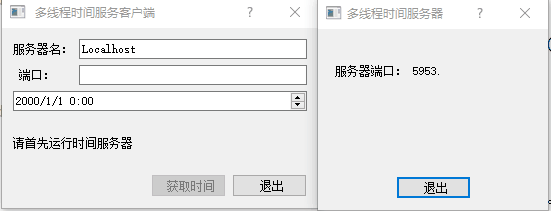
2.1、效果实例
图二
图三
2.2、原码实例
timeclient.h
#ifndef TIMECLIENT\_H
#define TIMECLIENT\_H

#include <QDialog>
#include <QLabel>
#include <QLineEdit>
#include <QPushButton>
#include <QDateTimeEdit>
#include <QTcpSocket>
#include <QAbstractSocket>
class TimeClient : public QDialog
{
    Q_OBJECT

public:
    TimeClient(QWidget \*parent = 0);
    ~TimeClient();
public slots:
    void enableGetBtn();
    void getTime();
    void readTime();
    void showError(QAbstractSocket::SocketError socketError);
private:
    QLabel \*serverNameLabel;
    QLineEdit \*serverNameLineEdit;
    QLabel \*portLabel;
    QLineEdit  \*portLineEdit;
    QDateTimeEdit \*dateTimeEdit;
    QLabel \*stateLabel;
    QPushButton \*getBtn;
    QPushButton \*quitBtn;
    uint time2u;
    QTcpSocket \*tcpSocket;
};

#endif // TIMECLIENT\_H
main.cpp
#include "timeclient.h"
#include <QApplication>

int main(int argc, char \*argv[])
{
    QApplication a(argc, argv);
    TimeClient w;
    w.show();

    return a.exec();
}
timeclient.cpp
#include "timeclient.h"
#include <QHBoxLayout>
#include <QVBoxLayout>
#include <QGridLayout>
#include <QDataStream>
#include <QMessageBox>
TimeClient::TimeClient(QWidget \*parent)
: QDialog(parent)
{
/\*初始化界面\*/
setWindowTitle(tr(" 多线程时间服务客户端"));
serverNameLabel =new QLabel(tr("服务器名:"));
serverNameLineEdit = new QLineEdit("Localhost");
portLabel =new QLabel(tr(" 端口:"));
portLineEdit = new QLineEdit;
QGridLayout \*layout= new QGridLayout;
layout->addWidget(serverNameLabel,0,0);
layout->addWidget(serverNameLineEdit,0,1);
layout->addWidget(portLabel,1,0);
layout->addWidget(portLineEdit,1,1);
dateTimeEdit = new QDateTimeEdit(this);
QHBoxLayout \*layout1 = new QHBoxLayout;
layout1->addWidget(dateTimeEdit);
stateLabel =new QLabel(tr("请首先运行时间服务器"));
QHBoxLayout \*layout2 = new QHBoxLayout;
layout2->addWidget(stateLabel);
getBtn = new QPushButton(tr(" 获取时间")) ;
getBtn->setDefault(true);
getBtn->setEnabled(false);
quitBtn = new QPushButton(tr(" 退出")) ;
QHBoxLayout \*layout3 = new QHBoxLayout;
layout3->addStretch ();
layout3->addWidget(getBtn);
layout3->addWidget(quitBtn);


**网上学习资料一大堆,但如果学到的知识不成体系,遇到问题时只是浅尝辄止,不再深入研究,那么很难做到真正的技术提升。**
**[需要这份系统化资料的朋友,可以戳这里获取](https://bbs.csdn.net/forums/4f45ff00ff254613a03fab5e56a57acb)**
**一个人可以走的很快,但一群人才能走的更远!不论你是正从事IT行业的老鸟或是对IT行业感兴趣的新人,都欢迎加入我们的的圈子(技术交流、学习资源、职场吐槽、大厂内推、面试辅导),让我们一起学习成长!**
(quitBtn);
[外链图片转存中...(img-X7INtYtO-1715335112656)]
[外链图片转存中...(img-sJ0zusHX-1715335112656)]
**网上学习资料一大堆,但如果学到的知识不成体系,遇到问题时只是浅尝辄止,不再深入研究,那么很难做到真正的技术提升。**
**[需要这份系统化资料的朋友,可以戳这里获取](https://bbs.csdn.net/forums/4f45ff00ff254613a03fab5e56a57acb)**
**一个人可以走的很快,但一群人才能走的更远!不论你是正从事IT行业的老鸟或是对IT行业感兴趣的新人,都欢迎加入我们的的圈子(技术交流、学习资源、职场吐槽、大厂内推、面试辅导),让我们一起学习成长!**


 8565
8565


 被折叠的 条评论
为什么被折叠?
被折叠的 条评论
为什么被折叠?
 到【灌水乐园】发言


