


目录
2.关闭selinux(安全增强型 Linux(Security-Enhanced Linux))
6.在etc目录下创建创建/httpd/conf.d/openlab.conf 文件,并在文件内部写如下命令
7.创建目录,并在创建文件下写入welcome to openlabll !!!
1.创建三个目录/wwww/data,/wwww/money,/wwww/student,之后在这三个目录下创建html文件随便写入内容
2.进入配置文件/etc/httpd/conf.d/openlab.conf 进行配置
3.进入配置文件/etc/httpd/conf.d/openlab.conf 配置如下
1.基于yum install mod_ssl -y进行操作
3.进入配置文件/etc/httpd/conf.d/openlab.conf 配置如下
网站需求:
1.基于域名www.openlab.com可以访问网站内容为 welcome to openlab!!!
2.给该公司创建三个网站目录分别显示学生信息,教学资料和缴费网站,基于www.openlab.com/student 网站访问学生信息,www.openlab.com/data网站访问教学资料
www.openlab.com/money网站访问缴费网站。
3.要求(1)学生信息网站只有song和tian两人可以访问,其他网站所有用户用能访问。
(2)访问缴费网站实现数据加密基于https访问。
第1个实验步骤:
1.关闭防火墙
[root@localhost ~]# systemctl stop firewalld
2.关闭selinux(安全增强型 Linux(Security-Enhanced Linux))
[root@localhost ~]# setenforce 0
3.安装服务软件
[root@localhost ~]# mount /dev/sr0 /mnt #挂载
[root@localhost ~]# vim /etc/yum.repos.d/base.repo #进到/etc/yum.repos.d/base.repo
[1]
name=1
baseurl=file:///mnt/AppStream
gpgcheck=0
[2]
name=2
baseurl=file:///mnt/BaseOS
gpgcheck=0
4.安装httpd
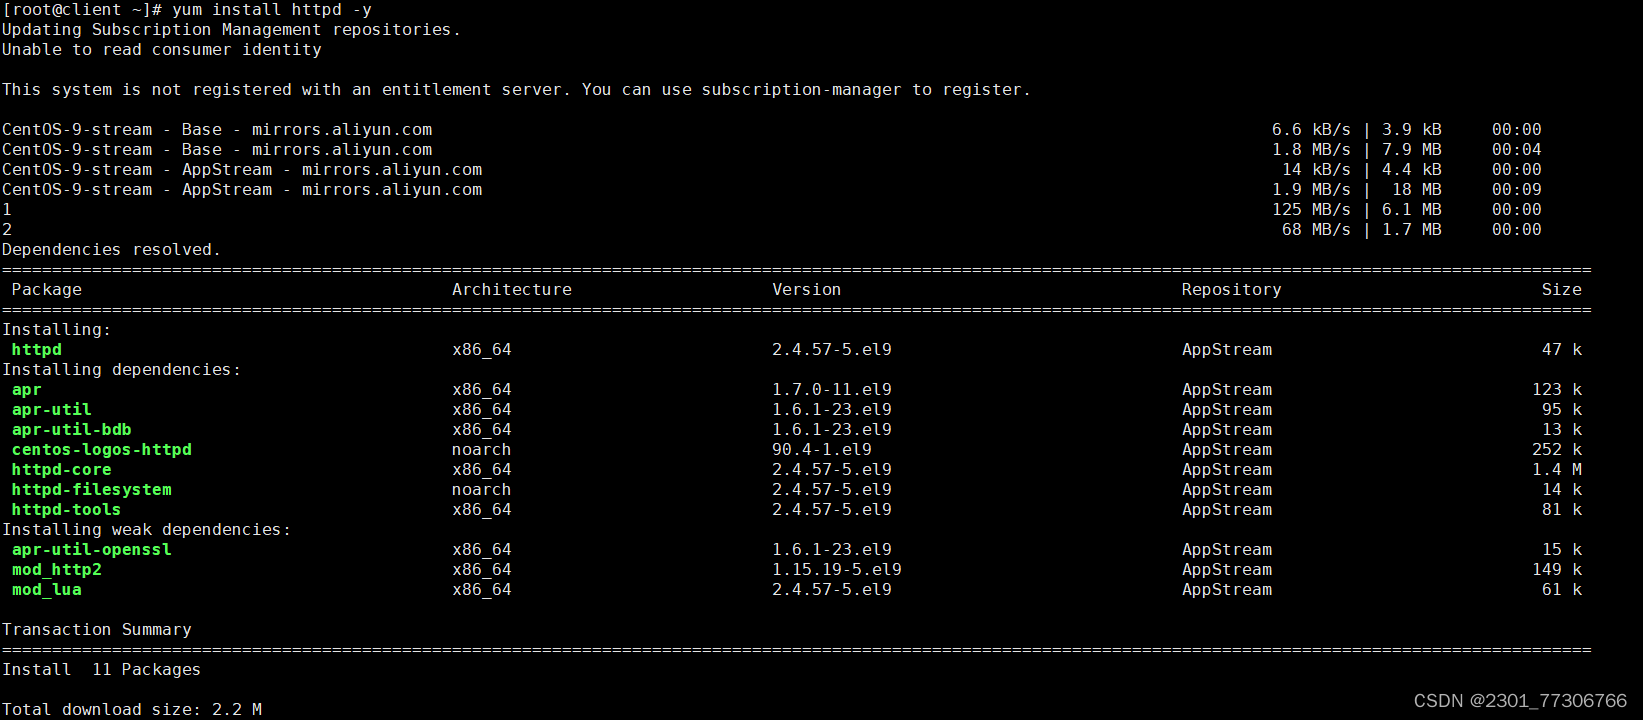
[root@localhost ~]# yum install httpd -y
5.更改linux本地文件配置
进入 /etc/hosts,另起一行配置文件写入 192.168.17.128 www.openlab.com
[root@client ~]# vim /etc/hosts

6.在etc目录下创建创建/httpd/conf.d/openlab.conf 文件,并在文件内部写如下命令
[root@client ~]# vim /etc/httpd/conf.d/openlab.conf
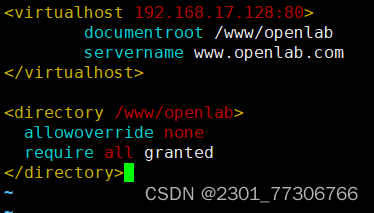
7.创建目录,并在创建文件下写入welcome to openlabll !!!
[root@client ~]# mkdir /www/openlab -pv
mkdir: created directory '/www'
mkdir: created directory '/www/openlab'
[root@client ~]# cd /www/openlab/
[root@client openlab]# touch index.html
[root@client openlab]# vim index.html[root@client openlab]# cd ~
[root@client ~]# cat /www/openlab/index.html
welcome to openlab!!!
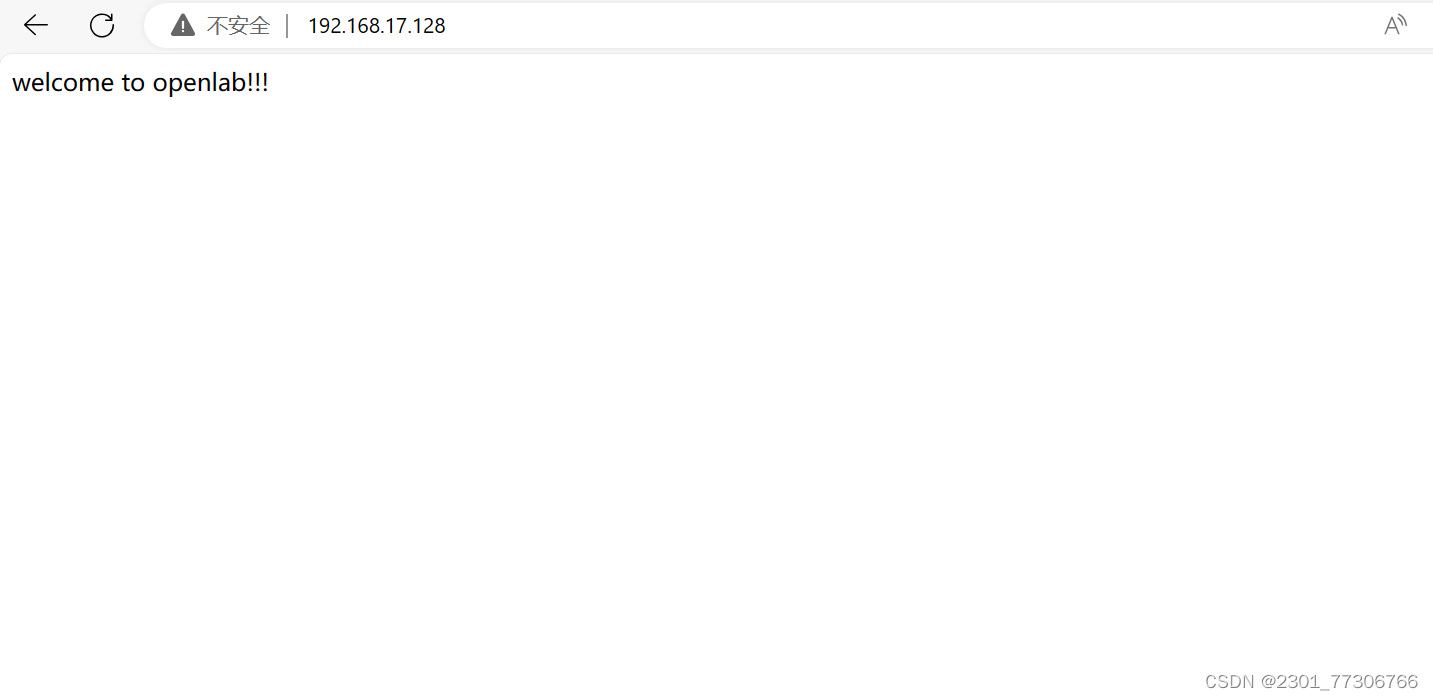
8.重启服务进行验证
[root@client ~]# systemctl restart httpd.service
[root@client ~]# curl www.openlab.com
![]()
第2个实验步骤:
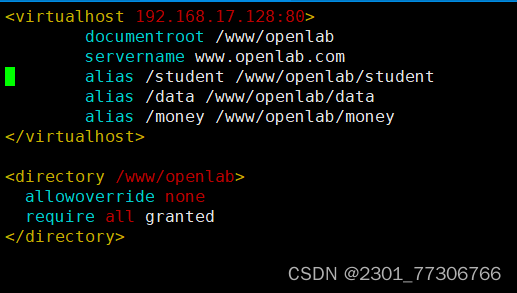
1.创建三个目录/wwww/data,/wwww/money,/wwww/student,之后在这三个目录下创建html文件随便写入内容
[root@client ~]# vim /etc/httpd/conf.d/openlab.conf
[root@client ~]# mkdir -pv /www/openlab/student
mkdir: created directory '/www/openlab/student'
[root@client ~]# mkdir -pv /www/openlab/data
mkdir: created directory '/www/openlab/data'
[root@client ~]# mkdir -pv /www/openlab/money
mkdir: created directory '/www/openlab/money'
[root@client ~]# echo "学生信息" > /www/openlab/student/index.html
[root@client ~]# echo "教学资料" > /www/openlab/data/index.html
[root@client ~]# echo "缴费" > /www/openlab/money/index.html
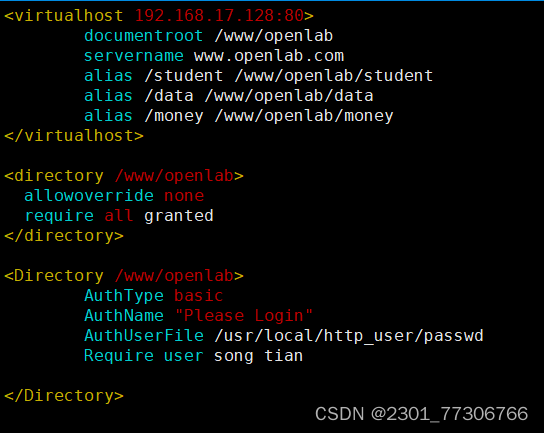
2.进入配置文件/etc/httpd/conf.d/openlab.conf 进行配置
[root@client data]# vim /etc/httpd/conf.d/openlab.conf
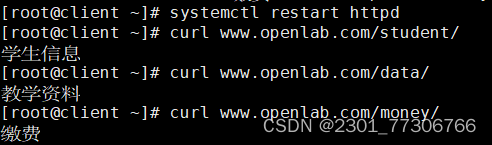
3.重启服务进行验证
[root@client ~]# systemctl restart httpd
[root@client ~]# curl www.openlab.com/student/
[root@client ~]# curl www.openlab.com/data/
[root@client ~]# curl www.openlab.com/money/
第3个实验步骤(1):
1.创建mima文件
[root@client ~]# touch /etc/httpd/mima
2.创建song和tian用户,为其输入密码
[root@client ~]# htpasswd -c /etc/httpd/mima song
New password: #输入密码
Re-type new password: #再次确认密码
Adding password for user song
[root@client ~]# htpasswd -c /etc/httpd/mima tian
New password:
Re-type new password:
Adding password for user tian
3.进入配置文件/etc/httpd/conf.d/openlab.conf 配置如下
[root@client ~]# vim /etc/httpd/conf.d/openlab.conf
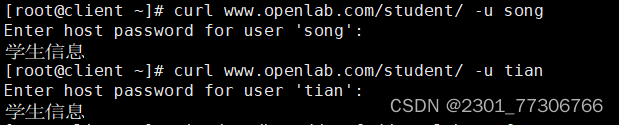
4.直接验证(不需要重启服务)
[root@client ~]# curl www.openlab.com/student/ -u song
[root@client ~]# curl www.openlab.com/student/ -u tian
第3个实验步骤(2):
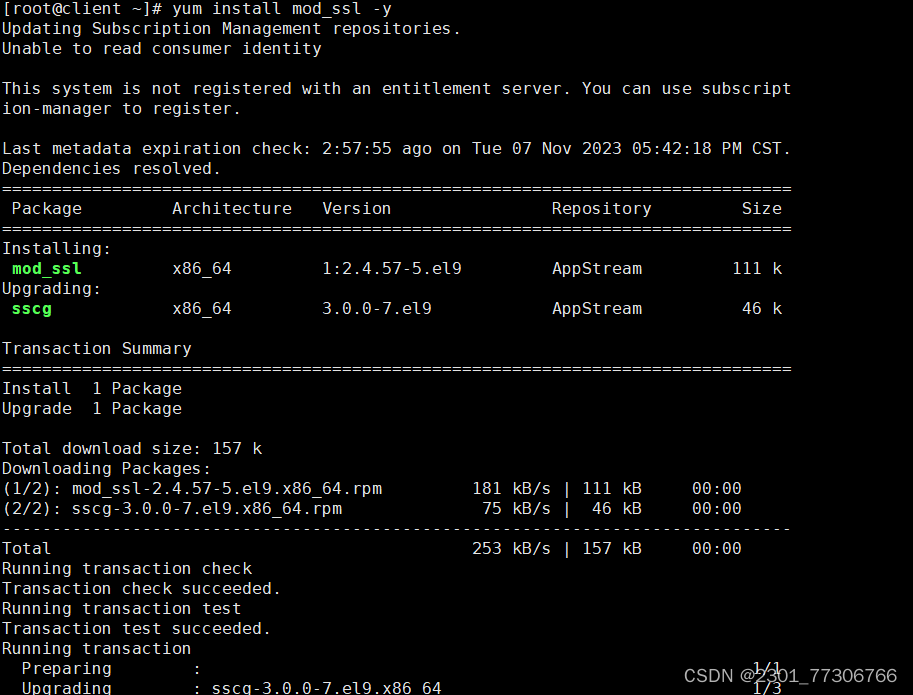
1.基于yum install mod_ssl -y进行操作
[root@client ~]# yum install mod_ssl -y
2.制作密钥及证书
[root@localhost ~]# cd /etc/pki/tls/certs/
[root@localhost certs]# openssl genrsa 2048 > openlab1.key
[root@localhost certs]# openssl req -utf8 -new -key /etc/pki/tls/certs/openlab1.key -x509 -days 365 -out openlab1.crt
You are about to be asked to enter information that will be incorporated
into your certificate request.
What you are about to enter is what is called a Distinguished Name or a DN.
There are quite a few fields but you can leave some blank
For some fields there will be a default value,
If you enter '.', the field will be left blank.
-----
Country Name (2 letter code) [XX]:86
State or Province Name (full name) []:shannxi
Locality Name (eg, city) [Default City]:xian
Organization Name (eg, company) [Default Company Ltd]:openlab1
Organizational Unit Name (eg, section) []:ce
Common Name (eg, your name or your server's hostname) []:www.openlab1.com
Email Address []:admin@admin.com
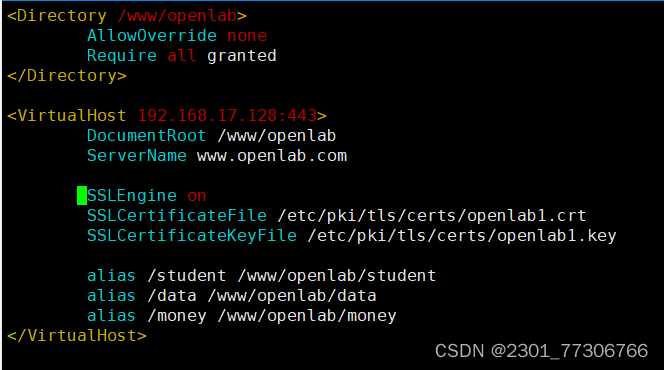
3.进入配置文件/etc/httpd/conf.d/openlab.conf 配置如下
[root@localhost certs]# vim /etc/httpd/conf.d/myhosts.conf
4.重启服务进行验证
[root@localhost certs]# systemctl restart httpd
[root@localhost certs]# curl https://www.openlab.com/money/ -k


 113
113


 被折叠的 条评论
为什么被折叠?
被折叠的 条评论
为什么被折叠?
 到【灌水乐园】发言


