


 本文详细描述了如何在云端环境中进行云服务器配置、Web集群部署、NFS服务设置、ELB负载均衡器配置以及Elasticsearch日志分析系统的部署和管理,包括搭建实验环境、配置管理任务和API操作等内容。
往期回顾:
云端技术驾驭DAY01——云计算底层技术奥秘、云服务器磁盘技术、虚拟化管理、公有云概述
云端技术驾驭DAY02——华为云管理、云主机管理、跳板机配置、制作私有镜像模板
云端技术驾驭DAY03
云主机网站部署
实验环境准备
- 购买并准备以下云主机
| 名称 | IP地址 | 配置 |
|---|---|---|
| ecs-proxy | 192.168.1.252 | 2CPU,4G内存 |
| nfs | 192.168.1.10 | 1CPU,1G内存 |
| web-0001 | 192.168.1.11 | 2CPU,4G内存 |
| web-0002 | 192.168.1.12 | 2CPU,4G内存 |
| web-0003 | 192.168.1.13 | 2CPU,4G内存 |
| es-0001 | 192.168.1.21 | 2CPU,4G内存 |
| es-0002 | 192.168.1.22 | 2CPU,4G内存 |
| es-0003 | 192.168.1.23 | 2CPU,4G内存 |
| es-0004 | 192.168.1.24 | 2CPU,4G内存 |
| es-0005 | 192.168.1.25 | 2CPU,4G内存 |
web集群架构图
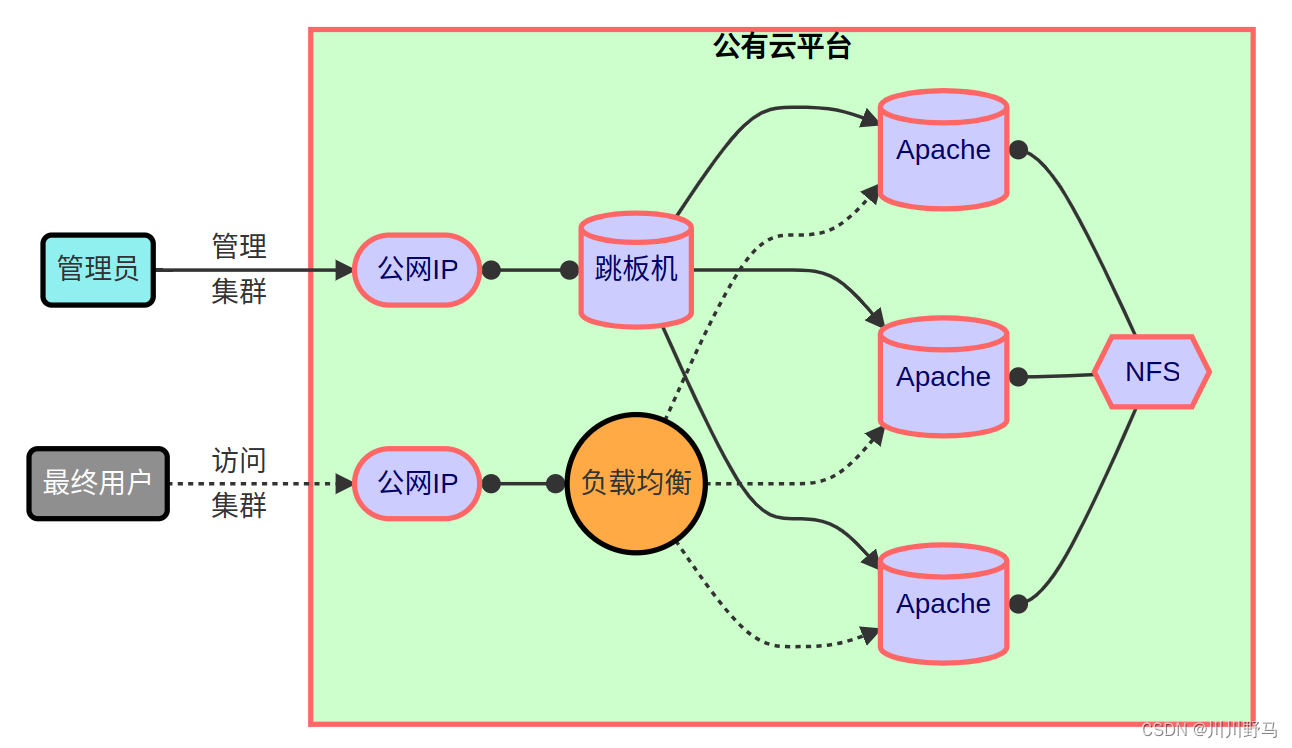
部署NFS服务
- 将网站页面从跳板机拷贝到NFS主机
[root@ecs-proxy ~]# rsync -av public/website.tar.gz 192.168.1.10:
- 创建共享目录,并部署网站页面
[root@nfs ~]# mkdir -p /var/webroot
[root@nfs ~]# tar -zxf website.tar.gz -C /var/webroot/
- 部署nfs服务
[root@nfs ~]# dnf install -y nfs-utils
[root@nfs ~]# vim /etc/exports
/var/webroot    192.168.1.0/24(rw,no_root_squash)
[root@nfs ~]# systemctl enable --now nfs-server.service
部署web服务
- 创建ansible工作环境
[root@ecs-proxy ~]# mkdir website
[root@ecs-proxy ~]# cd website
[root@ecs-proxy website]# vim ansible.cfg
[defaults]
inventory         = inventory
host_key_checking = False
[root@ecs-proxy website]# vim inventory
[web]
192.168.1.[11:13]
[root@ecs-proxy website]# locale   // 查看语言环境
[root@ecs-proxy website]# export LANG="en_US.UTF-8" LC_ALL="en_US.UTF-8"   // 修改语言环境
[root@ecs-proxy website]# echo 'export LANG="en_US.UTF-8"' >>/etc/profile.d/lang.sh
- 编写playbook
[root@ecs-proxy website]# vim web_install.yml
---
- hosts: web
  tasks:
    - dnf:
        name:
          - httpd
          - php
          - nfs-utils
        update_cache: yes
    - service:
        name: httpd
        state: started
        enabled: yes
    - lineinfile:
        path: /etc/fstab
        regexp: '^192.168.1.10:/.*'
        line: '192.168.1.10:/var/webroot /var/www/html nfs defaults,_netdev,nolock 1 1'
        create: yes
    - shell:
        cmd: mount /var/www/html
[root@ecs-proxy website]# ansible-playbook web_install.yml // 执行playbook
ELB负载均衡
ELB概述
- 弹性公网IP只适合单一主机的访问
- 在互联网发布很多机器,比如一个web集群,就需要使用ELB负载均衡
– 弹性负载均衡ELB(Elastic Load Balance)是将访问流量根据转发策略分发到后端多台服务器的流量分发控制服务
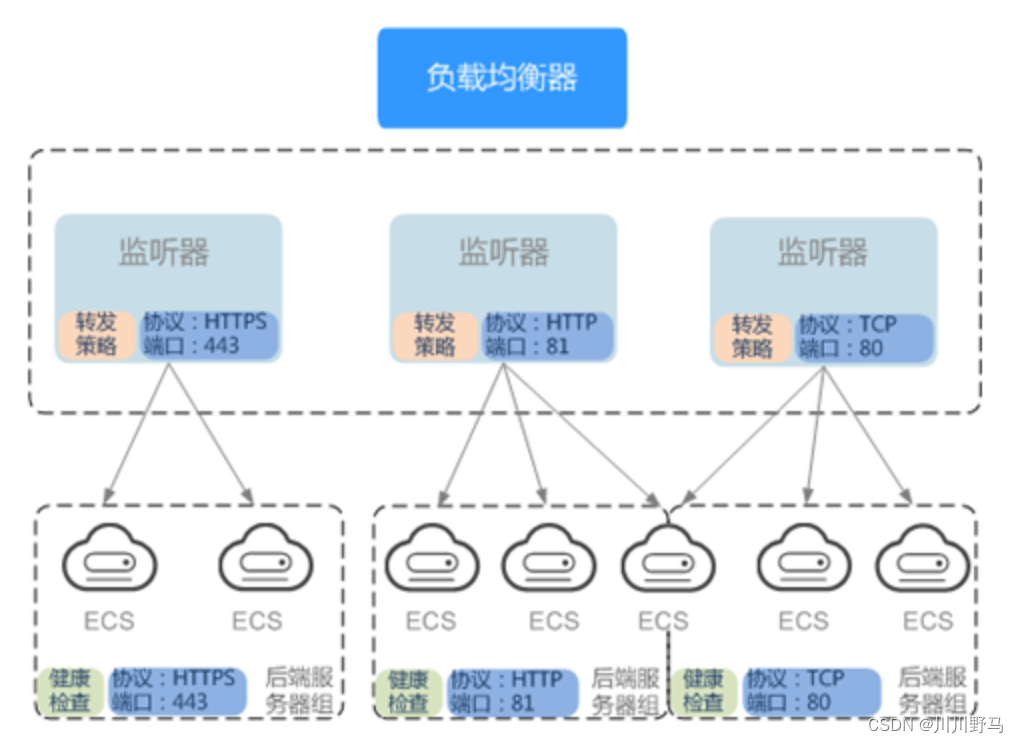
– 弹性负载均衡可以通过流量分发扩展应用系统对外的服务能力,通过消除单点故障提升应用系统的可用性 - ELB架构原理:
– 监听器
– 后端服务
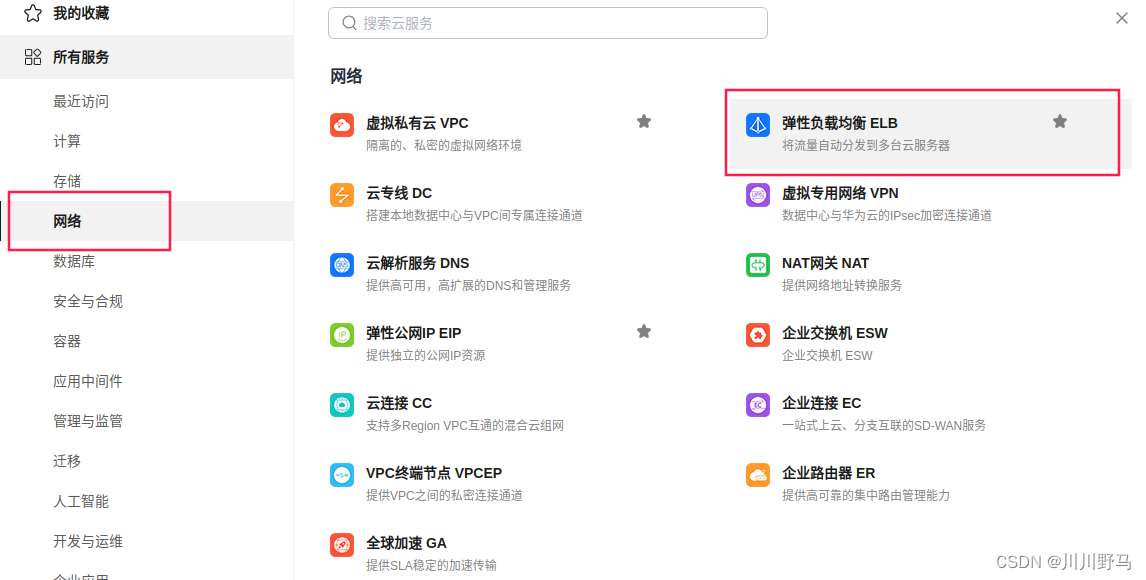
选择负载均衡ELB

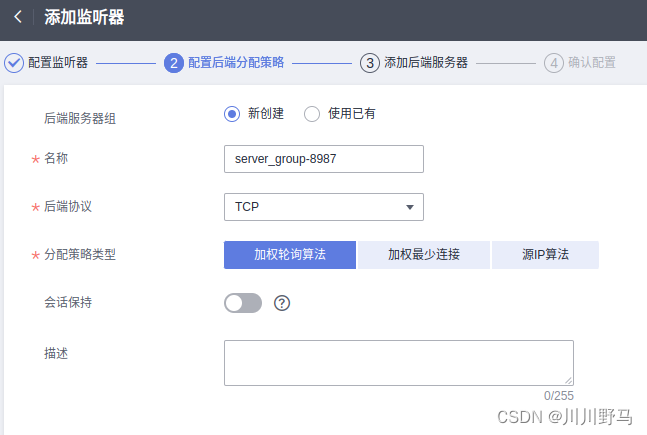
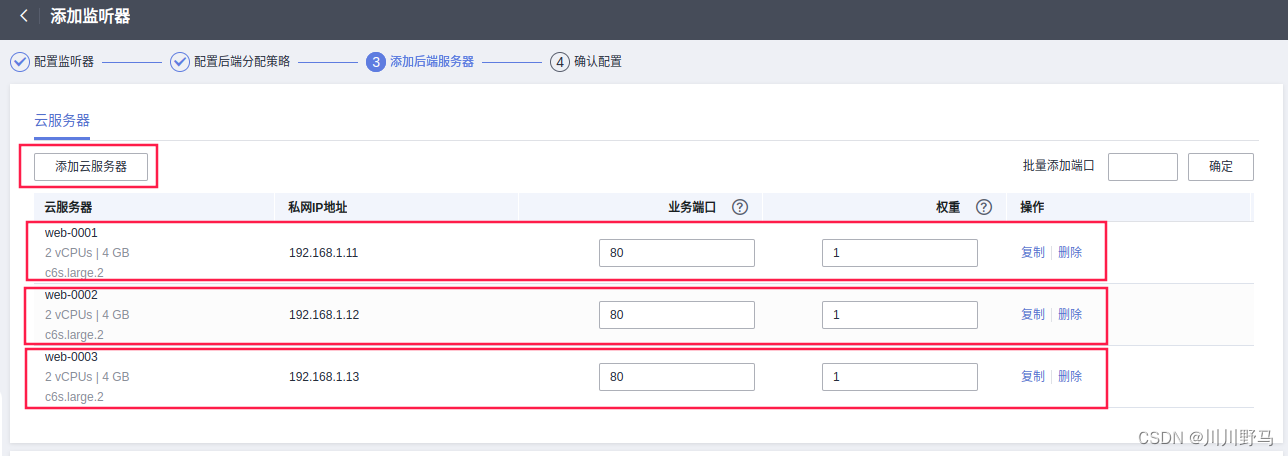
配置监听器
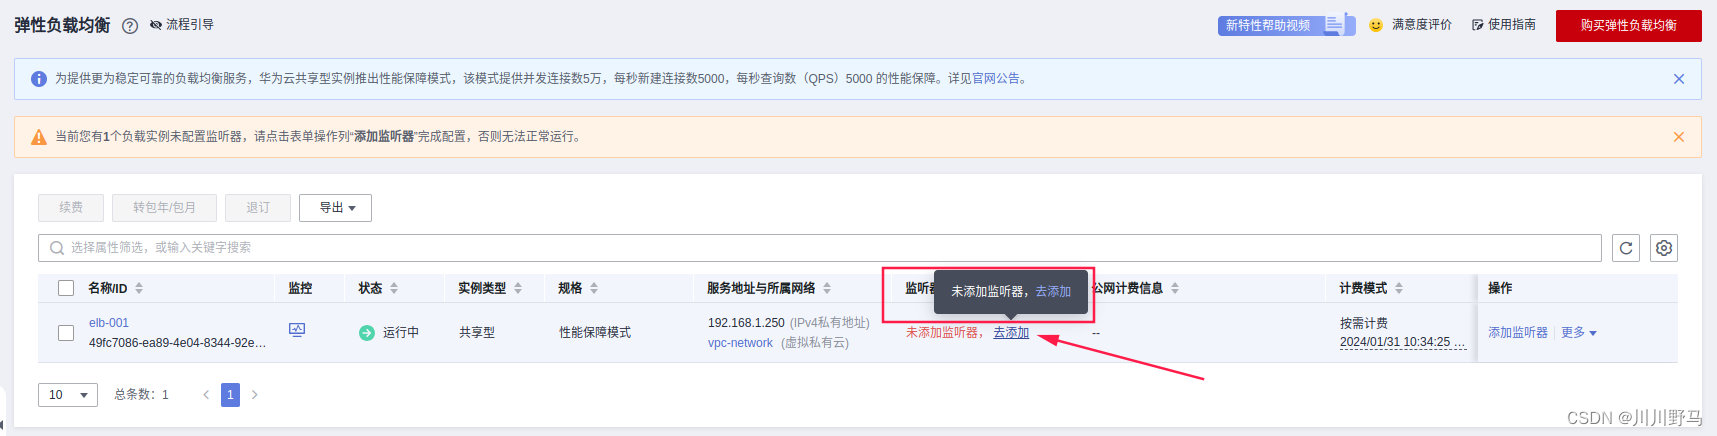
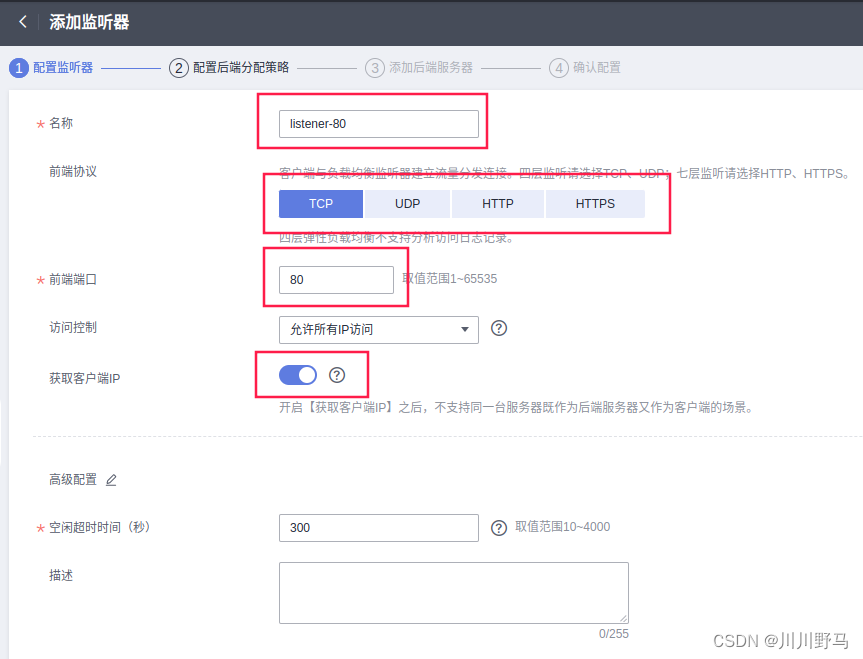
返回列表后,健康检查会出现异常,这是正常现象,此时华为云正在安装健康检查程序,一分钟左右就会恢复正常

验证ELB服务
[root@ecs-proxy website]# curl http://192.168.1.250/index.php
绑定弹性公网
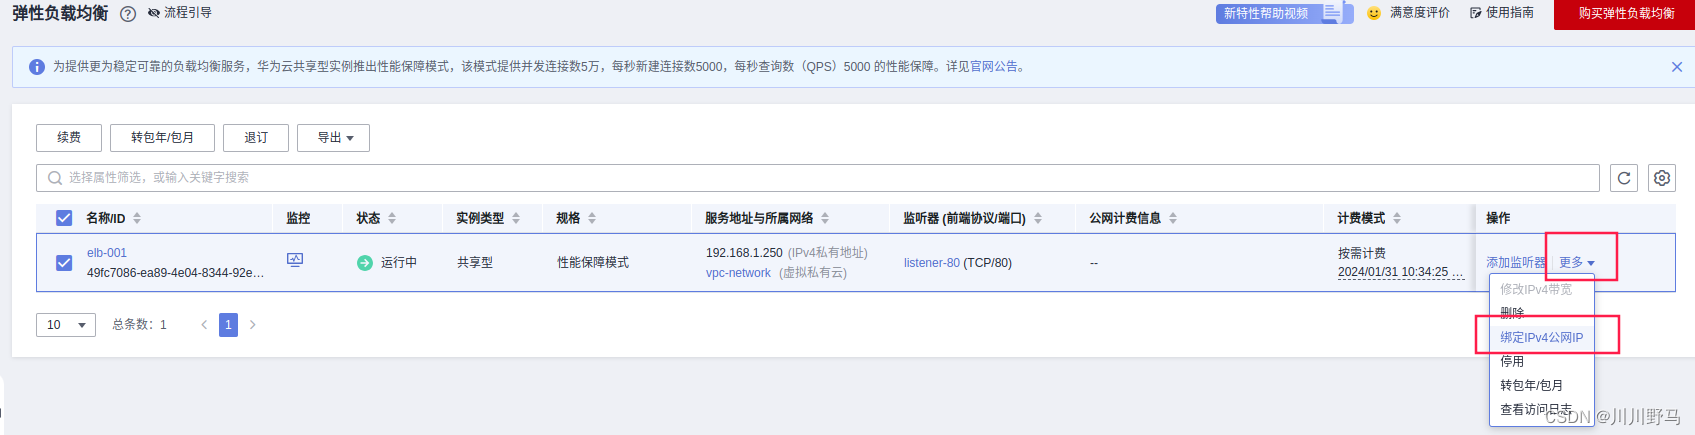
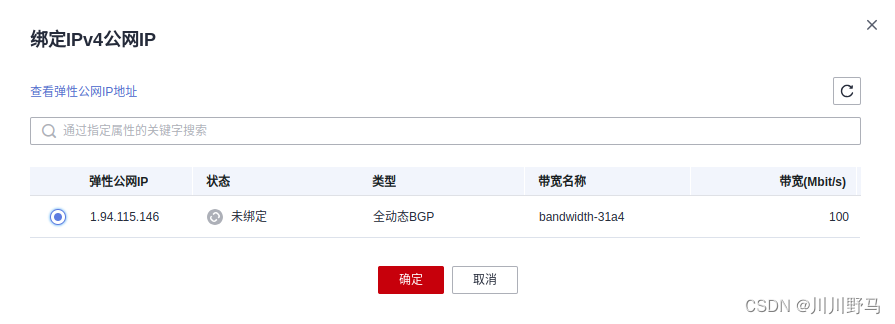
绑定后浏览器输入:http://1.94.115.146 就能看到网页内容
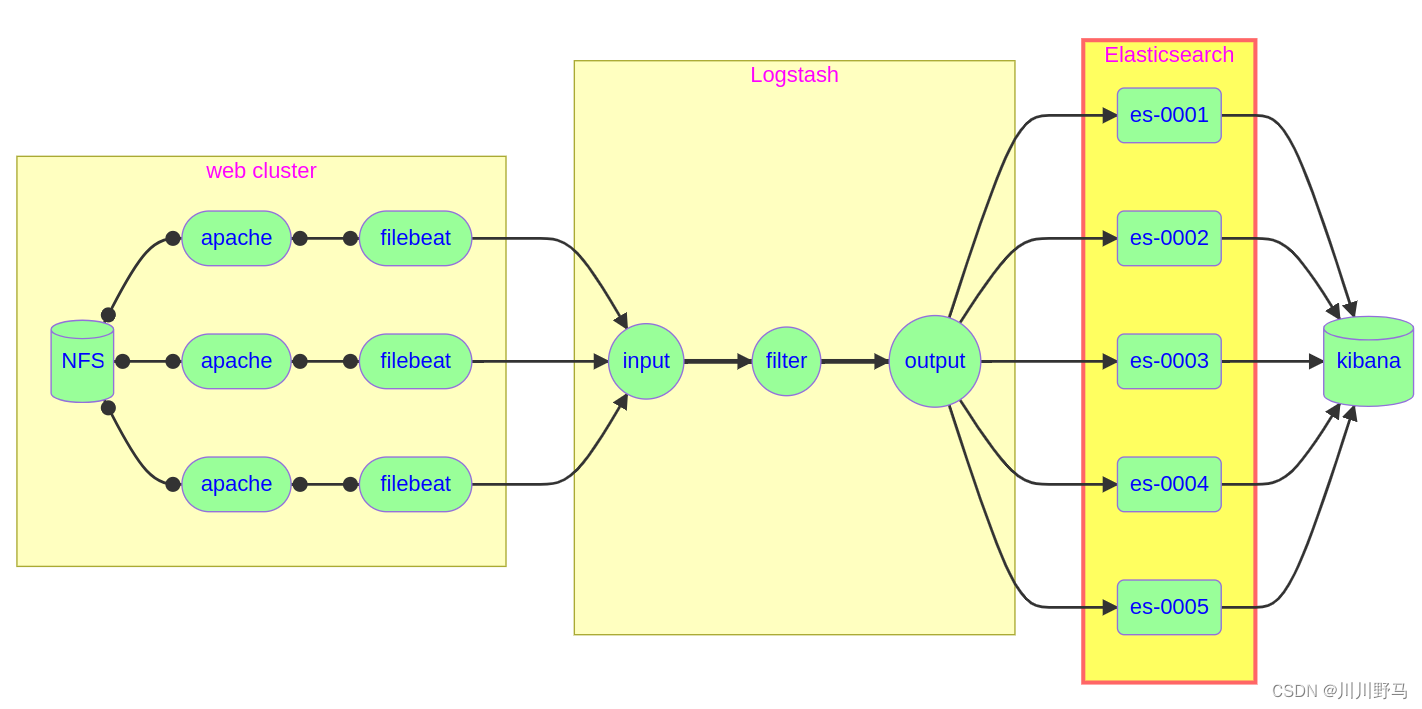
日志分析系统ELK
ELK概述
- ELK是什么?
– ELK是一整套解决方案,是三个软件产品的首字母缩写
– Elasticsearch:负责日志检索和储存
– Logstash:负责日志的收集和分析、处理
– Kibana:负责日志的可视化
集群安装部署
项目架构图
Elasticsearch概述
- 概述
– Elasticsearch是一个基于Lucene的搜索服务器
– 它提供了一个分布式多用户能力的全文搜索引擎,基于RESTful API的web接口 - 主要特点
– 实时分析,文档导向,分布式实时文件存储
– 高可用性,易扩展,支持集群、分片和复制
– 接口友好,支持JSON
– 没有典型意义的事务
– 是一种面向文档的数据库 - Elasticsearch与关系型数据库对比
| Relational Database | Elasticsearch |
|---|---|
| Database | Index |
| Table | Type |
| Column | Filed |
| Row | Document |
| Insert | PUT http:// |
| Delete | DELETE http:// |
| Update | POST http:// |
| Select | GET http:// |
部署Elasticsearch集群
- 下载Elasticsearch软件,移动到自定义仓库中
[root@ecs-proxy ~]# mv elasticsearch-7.17.8-x86_64.rpm elk/
[root@ecs-proxy ~]# mv elk/ /var/localrepo/
[root@ecs-proxy ~]# createrepo --update /var/localrepo/
- 部署es-0001
[root@es-0001 ~]# vim /etc/hosts   // 添加成员
... ...
192.168.1.21    es-0001
192.168.1.22    es-0002
192.168.1.23    es-0003
192.168.1.24    es-0004
192.168.1.25    es-0005
[root@es-0001 ~]# dnf -y install elasticsearch
[root@es-0001 ~]# vim /etc/elasticsearch/elasticsearch.yml
17:  cluster.name: my-es   // 集群名称
23:  node.name: es-0001   // 本机主机名
56:  network.host: 0.0.0.0
70:  discovery.seed_hosts: ["es-0001", "es-0002", "es-0003"]   // 集群广播成员
74:  cluster.initial_master_nodes: ["es-0001", "es-0002", "es-0003"]   // 集群创始人成员
[root@es-0001 ~]# systemctl enable --now elasticsearch
- 部署es-0002
[root@es-0002 ~]# vim /etc/hosts
... ...
192.168.1.21    es-0001
192.168.1.22    es-0002
192.168.1.23    es-0003
192.168.1.24    es-0004
192.168.1.25    es-0005
[root@es-0002 ~]# dnf -y install elasticsearch
[root@es-0002 ~]# vim /etc/elasticsearch/elasticsearch.yml
17:  cluster.name: my-es
23:  node.name: es-0002
56:  network.host: 0.0.0.0
70:  discovery.seed_hosts: ["es-0001", "es-0002", "es-0003"]
74:  cluster.initial_master_nodes: ["es-0001", "es-0002", "es-0003"]
[root@es-0002 ~]# systemctl enable --now elasticsearch
[root@es-0002 ~]# curl http://es-0001:9200/_cat/nodes?pretty   // 验证集群状态
192.168.1.22 10 87 34 0.53 0.19 0.06 cdfhilmrstw * es-0002
192.168.1.21  7 87  1 0.06 0.04 0.02 cdfhilmrstw - es-0001
集群扩容
- 在所有es主机安装elasticsearch
[root@ecs-proxy ~]# mkdir es
[root@ecs-proxy ~]# cd es
[root@ecs-proxy es]# vim ansible.cfg
[defaults]
inventory         = inventory
host_key_checking = False
[root@ecs-proxy es]# vim inventory
[es]
192.168.1.[21:25]
[root@ecs-proxy es]# rsync -av 192.168.1.21:/etc/elasticsearch/elasticsearch.yml elasticsearch.j2
[root@ecs-proxy es]# vim elasticsearch.j2
23:  node.name: {{ansible_hostname}}   // 仅修改这一行即可,其他配置和es-0001和es-0002一样
[root@ecs-proxy es]# vim es_install.yml
---
- hosts: es
  tasks:
    - copy:
        dest: /etc/hosts
        owner: root
        group: root
        mode: "0644"
        content: |
          ::1     localhost localhost.localdomain localhost6 localhost6.localdomain6
          127.0.0.1   localhost localhost.localdomain localhost4 localhost4.localdomain4
          {% for i in groups.es %}
          {{hostvars[i].ansible_eth0.ipv4.address}} {{hostvars[i].ansible_hostname}}
          {% endfor %}
    - dnf:
        name: elasticsearch
        state: latest
        update_cache: yes
    - template:
        src: elasticsearch.j2
        dest: /etc/elasticsearch/elasticsearch.yml
        owner: root
        group: elasticsearch
        mode: '0660'
    - service:
        name: elasticsearch
        state: started
        enabled: yes
[root@ecs-proxy es]# ansible-playbook es_install.yml
[root@ecs-proxy es]# curl http://192.168.1.21:9200/_cat/nodes?pretty   // 再次验证集群状态
192.168.1.22 20 87  0 0.03 0.01 0.00 cdfhilmrstw * es-0002
192.168.1.23 18 95 45 0.99 0.29 0.10 cdfhilmrstw - es-0003
192.168.1.21 13 88  0 0.00 0.00 0.00 cdfhilmrstw - es-0001
192.168.1.24 20 95 45 0.97 0.26 0.09 cdfhilmrstw - es-0004
192.168.1.25 21 95 40 0.99 0.27 0.09 cdfhilmrstw - es-0005
集群管理
Head插件配置管理
- head插件
– 它展现ES集群的拓扑结构,并且可以通过它来进行索引(index)和节点(node)级别的操作
– 它提供一组针对集群的查询API,并将结果以json和表格形式返回
– 它提供一些快捷菜单,用于展现集群的各种状态 - head插件图例
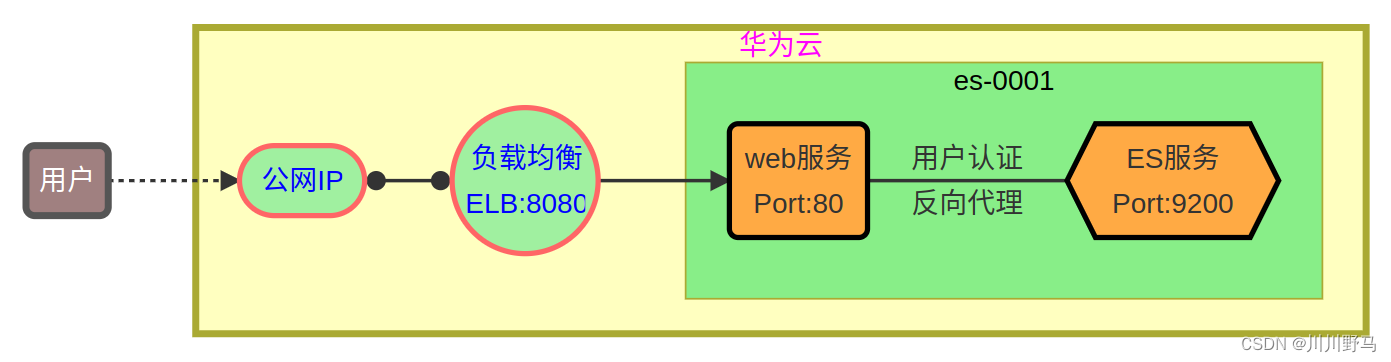
- head插件安装
– 目标:1.在es-0001上安装web服务,并部署插件页面。2.通过ELB映射8080端口,发布web服务
[root@ecs-proxy ~]# rsync -av public/head.tar.gz 192.168.1.21: // 下载插件,拷贝到es-0001主机
// 在es-0001部署head插件
[root@es-0001 ~]# dnf -y install nginx
[root@es-0001 ~]# systemctl enable nginx --now
[root@es-0001 ~]# tar zxf head.tar.gz -C /usr/share/nginx/html/
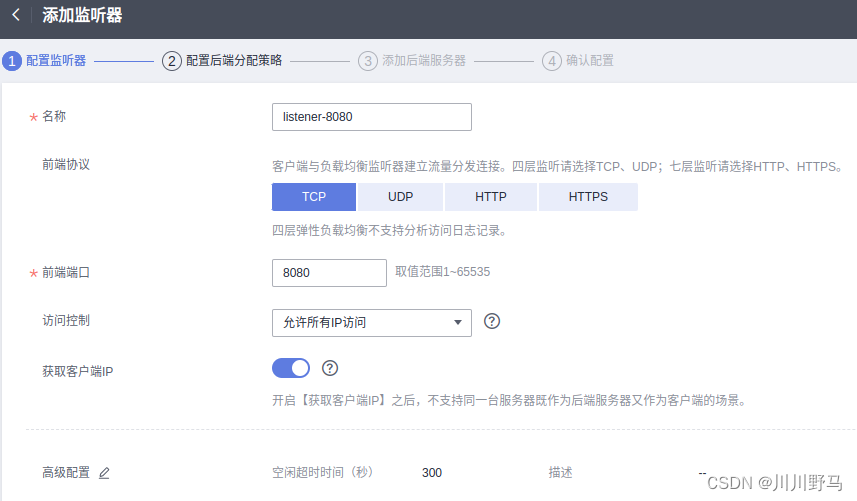
在ELB中添加监听器
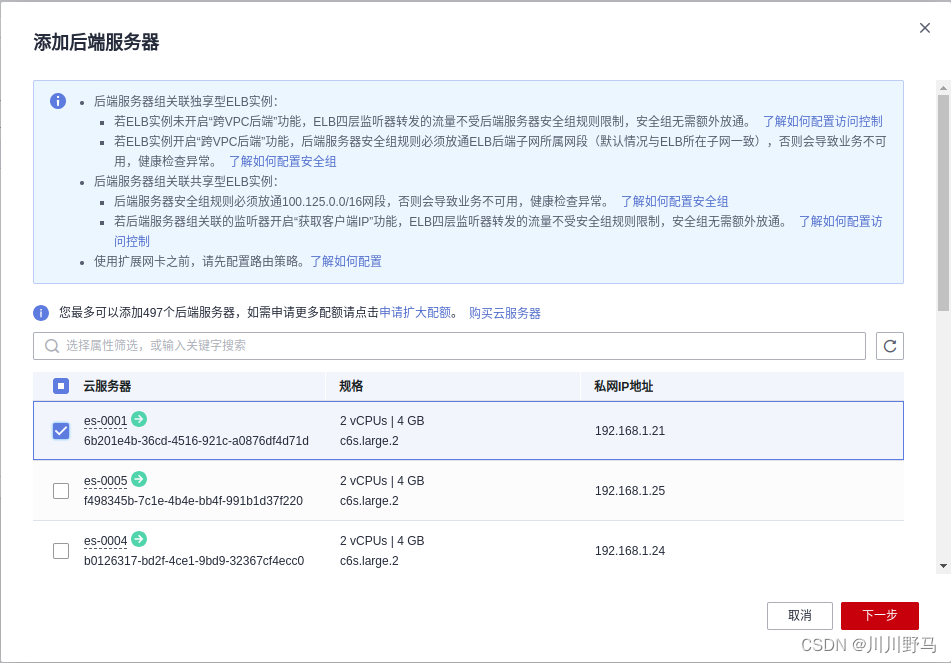
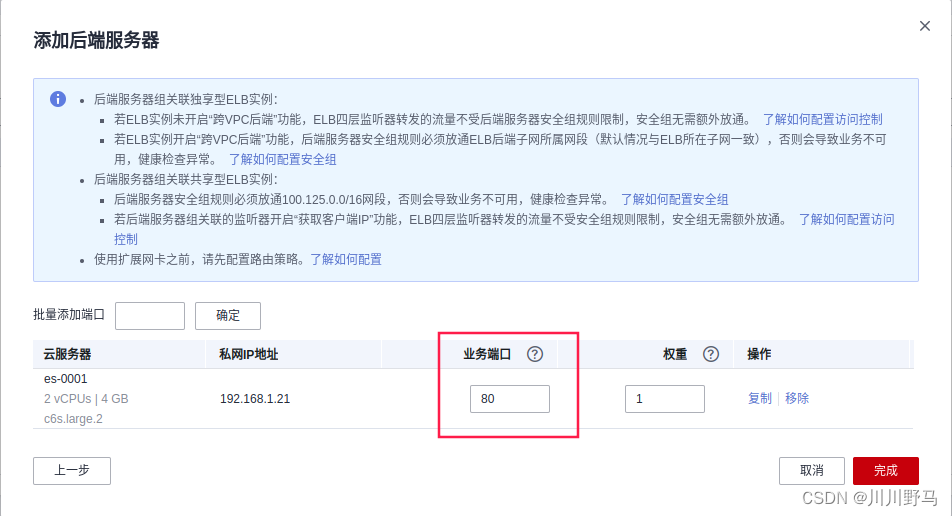
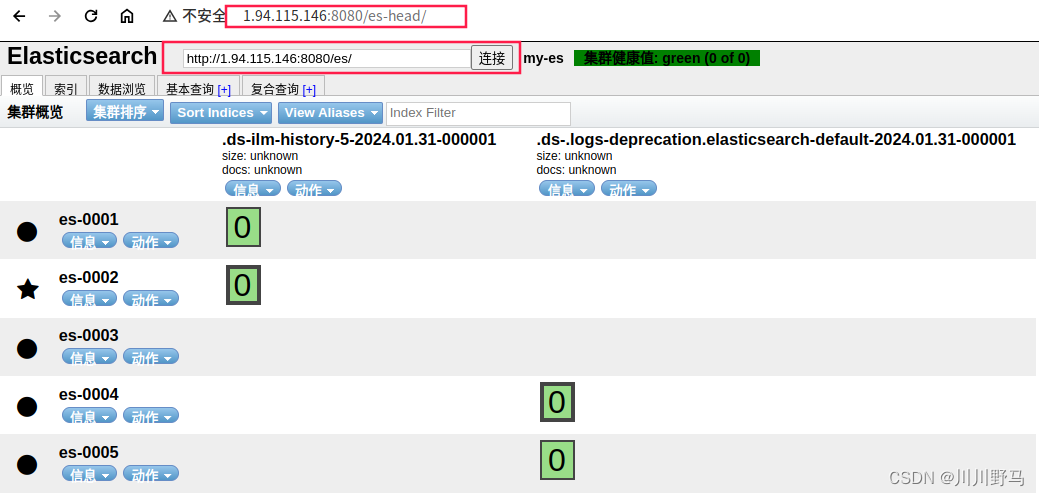
浏览器访问http://1.94.115.146:8080/es-head/
[root@es-0001 ~]# dnf -y install httpd-tools
[root@es-0001 ~]# htpasswd -cm /etc/nginx/auth-user admin   // 创建用户名和密码文件
New password:
Re-type new password:
Adding password for user admin

// 配置认证和代理
[root@es-0001 ~]# vim /etc/nginx/default.d/esproxy.conf
location ~* ^/es/(.*)$ {
    proxy_pass http://127.0.0.1:9200/$1;
    auth_basic "Elasticsearch admin";   // 设置http身份验证
    auth_basic_user_file /etc/nginx/auth-user;    // 指定包含用户名和密码的文件
}
填写帐号密码,输入"http://1.94.115.146:8080/es/"连接数据库
API原语管理
- Elasticsearch提供基于http协议的管理方式(API)
- http请求由三部分组成
– 请求行、消息报头、请求正文
– 请求行: Method Request-URI HTTP-Version - 与Elasticsearch交互的数据需使用json格式
- Elasticsearch使用的请求方法
| 请求方法 | 解释 |
|---|---|
| PUT | 增 |
| DELETE | 删 |
| POST | 改 |
| GET | 查 |
- curl是一个利用url规则在命令行下工作的文件传输工具,它支持多种请求模式,自定义请求头等功能
– 使用格式:
curl -X '请求方法' -H '请求头' http://请求地址
- _cat 关键字用来查询集群状态,节点信息等
– 显示详细信息(?v),显示帮助信息(?help)
– json使用易读的调试格式显示(?pretty)
// 查询支持的关键字
[root@es-0001 ~]# curl -XGET http://127.0.0.1:9200/_cat/
// 查具体的信息
[root@es-0001 ~]# curl -XGET http://127.0.0.1:9200/_cat/master
// 显示详细信息 ?v
[root@es-0001 ~]# curl -XGET http://127.0.0.1:9200/_cat/master?v
// 显示帮助信息 ?help
[root@es-0001 ~]# curl -XGET http://127.0.0.1:9200/_cat/master?help
// 显示易读格式 ?pretty
[root@es-0001 ~]# curl -XGET http://127.0.0.1:9200/_cat/master?pretty
- 创建索引
// 设置默认分片副本数量
[root@es-0001 ~]# curl -XPUT -H 'Content-Type: application/json' \
    http://127.0.0.1:9200/_template/index_defaults -d '{
      "template": "*",
      "settings": {
        "number_of_shards": 5,
        "number_of_replicas": 1
      }
    }'
{"acknowledged":true}

// 创建 test 索引
[root@es-0001 ~]# curl -XPUT http://127.0.0.1:9200/test?pretty
{
  "acknowledged" : true,
  "shards_acknowledged" : true,
  "index" : "test"
}
- 增加数据
[root@es-0001 ~]# curl -XPUT -H "Content-Type: application/json" \
    http://127.0.0.1:9200/test/teacher/1?pretty -d '{
        "职业": "诗人","名字": "李白","称号": "诗仙","年代": "唐"
    }'
- 查询数据
[root@es-0001 ~]# curl -XGET http://127.0.0.1:9200/test/teacher/_search?pretty
[root@es-0001 ~]# curl -XGET http://127.0.0.1:9200/test/teacher/1?pretty
- 修改数据
[root@es-0001 ~]# curl -XPOST -H "Content-Type: application/json" \
    http://127.0.0.1:9200/test/teacher/1/_update -d '{
      "doc": {"年代":"公元701"}
    }'
- 删除数据
// 删除一条
[root@es-0001 ~]# curl -XDELETE http://127.0.0.1:9200/test/teacher/1
// 删除索引
[root@es-0001 ~]# curl -XDELETE http://127.0.0.1:9200/test


 497
497


 被折叠的 条评论
为什么被折叠?
被折叠的 条评论
为什么被折叠?
 到【灌水乐园】发言


