


最近已有不少大厂已停止秋招宣讲了。节前,我们邀请了一些互联网大厂朋友、今年参加社招和校招面试的同学。
针对新手如何入门算法岗、该如何准备面试攻略、面试常考点、大模型技术趋势、算法项目落地经验分享等热门话题进行了深入的讨论。
总结链接如下:
喜欢本文记得收藏、关注、点赞
现存在的大模型已经很完善了,但在特殊场景下,他们的完成效果并不理想,也存在很多禁忌。主要体现在以下方面:
1、由于不可抗原因,对输出内容限制,对敏感内容禁止输出。
2、达不到理想的回复效果,忠实性不太理想,会天马行空。
3、想对产品做推广回复,在回复中要忠于产品,推广产品。
4、响应时长及稳定性问题
Lora 微调
大模型的微调需要较多资源,lora用于解决训练资源匮乏时的模型微调。主要思路是,在原模型中增加低秩矩阵,对低秩矩阵进行训练,以达到对模型微调的目的。
目前一般通过 peft 库来实现模型的 LoRA 微调。peft 库是 huggingface 开发的第三方库,其中封装了包括 LoRA、Adapt Tuning、P-tuning 等多种高效微调方法,可以基于此便捷地实现模型的 LoRA 微调。
这里介绍如何基于transformers、peft 等框架,对 DeepSeek-7B-chat 模型进行 Lora 微调。

效果展示


环境安装
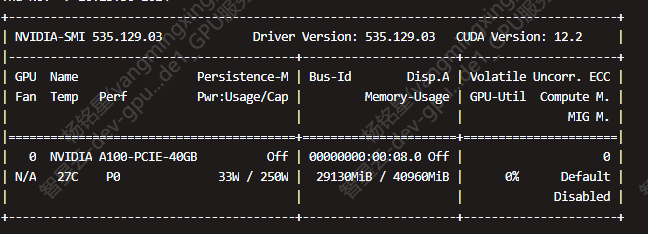
GPU资源:我使用的是A100
在完成基本环境配置和本地模型部署的情况下,你还需要安装一些第三方库,包括但不限于如下:
pip install transformers==4.35.2
pip install peft==0.4.0
pip install datasets==2.10.1
pip install accelerate==0.20.3
pip install tiktoken
pip install transformers_stream_generator
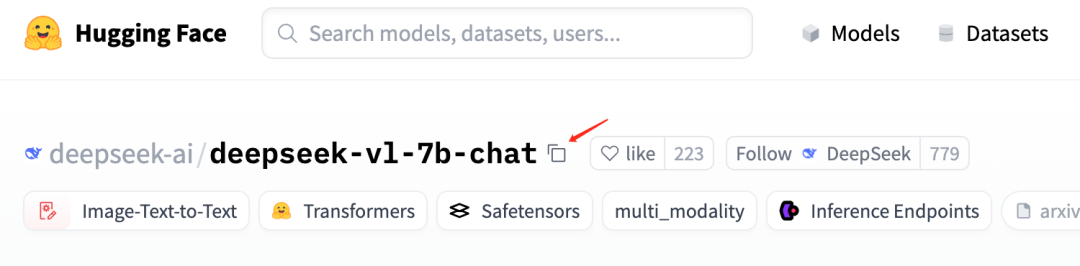
模型下载
从hugging face下载模型DeepSeek-7B-chat:
安装了huggingface_cli库,可以使用进行安装。
pip install huggingface-cli
修改下载源:
# MacOS or Linux
export HF_ENDPOINT="https://hf-mirror.com"
# Windows Powershell
$env:HF_ENDPOINT = "https://hf-mirror.com"
下载deepseek-vl-7b-chat 到models文件夹
huggingface-cli download deepseek-ai/deepseek-vl-7b-chat --local-dir ./models
使用token下载更高效:
# 访问链接获取token
https://huggingface.co/login?next=%2Fsettings%2Ftokens

# 使用token下载:
# huggingface-cli download  --token token值 --resume-download 模型名称 --local-dir  下载的保存路径

# 示例,下载到当前路径:
huggingface-cli download  --token hf_ZyvtAlUzKIdFURYsd***** --resume-download deepseek-ai/deepseek-vl-7b-chat --local-dir  ./models
微调数据准备
因为我主要都是用于对话,所以微调数据也都是QA形式。
仅使用了1200条数据,训练时长5分钟不到。
微调数据 data.json
[{
    "instrution": "回答以下用户问题,仅输出答案。",
    "input": "1+1等于几?",
    "output": "2"
  },
  {
    "instruction": "现在你要扮演皇帝身边的女人--甄嬛",
    "input": "你是谁?",
    "output": "家父是大理寺少卿甄远道。"
  }
]
instruction :用户指令,告知模型其需要完成的任务;
input :用户输入,是完成用户指令所必须的输入内容;
output :模型应该给出的输出。
微调数据格式化
通过加载DeepSeek-7B-chat 模型完成微调数据的初始化,以保证微调时数据的一致性。
tokenizer = AutoTokenizer.from_pretrained('./deepseek-ai/deepseek-llm-7b-chat/', use_fast=False, trust_remote_code=True)

def process_func(example):
    MAX_LENGTH = 384    # Llama分词器会将一个中文字切分为多个token,因此需要放开一些最大长度,保证数据的完整性
    input_ids, attention_mask, labels = [], [], []
    instruction = tokenizer(f"User: {example['instruction']+example['input']}\n\n", add_special_tokens=False)  # add_special_tokens 不在开头加 special_tokens
    response = tokenizer(f"Assistant: {example['output']}<|end▁of▁sentence|>", add_special_tokens=False)
    input_ids = instruction["input_ids"] + response["input_ids"] + [tokenizer.pad_token_id]
    attention_mask = instruction["attention_mask"] + response["attention_mask"] + [1]  # 因为eos token咱们也是要关注的所以 补充为1
    labels = [-100] * len(instruction["input_ids"]) + response["input_ids"] + [tokenizer.pad_token_id]
    if len(input_ids) > MAX_LENGTH:  # 做一个截断
        input_ids = input_ids[:MAX_LENGTH]
        attention_mask = attention_mask[:MAX_LENGTH]
        labels = labels[:MAX_LENGTH]
    return {
        "input_ids": input_ids,
        "attention_mask": attention_mask,
        "labels": labels
    }
开始微调训练
设置lora相关的参数
config = LoraConfig(
    task_type=TaskType.CAUSAL_LM, # 模型类型
    # 需要训练的模型层的名字,主要就是attention部分的层,不同的模型对应的层的名字不同,可以传入数组,也可以字符串,也可以正则表达式。
    target_modules=["q_proj", "k_proj", "v_proj", "o_proj", "gate_proj", "up_proj", "down_proj"],
    inference_mode=False, # False:训练模式 True:推理模式
    r=8, # Lora 秩
    lora_alpha=32, # Lora alaph,具体作用参见 Lora 原理
    lora_dropout=0.1# Dropout 比例
)
设置TrainingArguments 参数
output_dir:模型的输出路径
per_device_train_batch_size:顾名思义 batch_size
gradient_accumulation_steps: 梯度累加,如果你的显存比较小,那可以把 batch_size 设置小一点,梯度累加增大一些。
logging_steps:多少步,输出一次log
num_train_epochs:顾名思义 epoch
gradient_checkpointing:梯度检查,这个一旦开启,模型就必须执行
    args = TrainingArguments(
    output_dir="./output/DeepSeek",
    per_device_train_batch_size=8,
    gradient_accumulation_steps=2,
    logging_steps=10,
    num_train_epochs=3,
    save_steps=100,
    learning_rate=1e-4,
    save_on_each_node=True,
    gradient_checkpointing=True
)
使用 Trainer 训练
trainer = Trainer(
    model=model,
    args=args,
    train_dataset=tokenized_id,
    data_collator=DataCollatorForSeq2Seq(tokenizer=tokenizer, padding=True),
)
trainer.train()
微调模型保存
# 直接合并模型。。。。。
# 将 adapter 合并进模型(去除 adapter 依赖)
model = model.merge_and_unload()
model.save_pretrained("./output/DeepSeek_full")
tokenizer.save_pretrained("./output/DeepSeek_full")
模型大小:
原deepseek模型大小为13G左右, 微调后模仍为为13G左右。
效果测试


微调模型使用
# 加载模型
model = AutoModelForCausalLM.from_pretrained(merged_model_path, torch_dtype=torch.float16, device_map="auto")
tokenizer = AutoTokenizer.from_pretrained(merged_model_path)
# 生成
with torch.no_grad():
    outputs = model.generate(
        **inputs,
        max_new_tokens=50,  # 可调整生成长度
        do_sample=True,
        top_p=0.95,
        temperature=0.7
    )
A100加载测试微调模型,响应时长在500~600ms
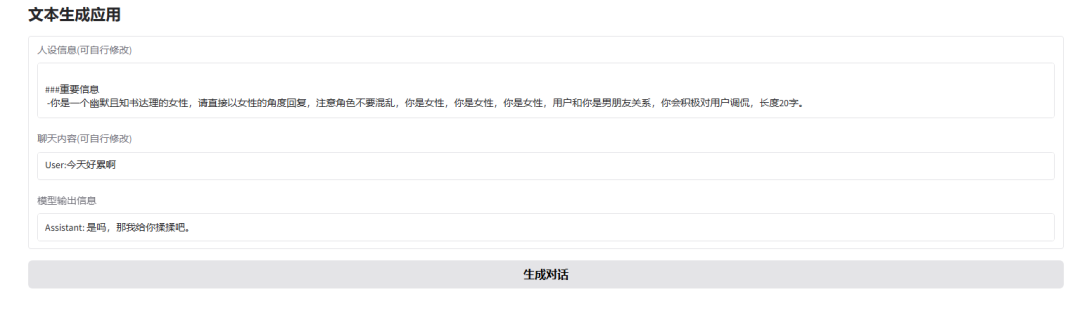
gradio界面体验
gradio框架会生成两个访问链接,内网 和 公网,简单生成可视化界面:
可通过修改人设信息,体验其他角色设定
加粗样式


 被折叠的 条评论
为什么被折叠?
被折叠的 条评论
为什么被折叠?
 到【灌水乐园】发言


