


文章同步更新于我的个人博客:松果猿的博客,欢迎访问获取更多技术分享。
同时,您也可以关注我的微信公众号:松果猿的代码工坊,获取最新文章推送和编程技巧。
记录本人 three.js 的学习之路
前言
通过前两期关于 three.js 的文章,我们已经对 three.js 有了比较清晰的认识。下面跟着我制作一个 three.js 的简易版我的世界。
既然是简易版,下面是这个 Minecraft 必须要有的几个功能:
- 可以放置方块和破坏方块
- 前后左右移动跳跃
- 有简单的 UI 框,可以选择放置方块类型
当然我也是初学者,制作过程遇到了两个比较困难的点:
- 如何计算放置方块的位置
- 人物和方块的碰撞检测
这两个点我后面都会给出我的解决方法
初始化项目
使用 Vite 创建一个新的项目,选择 “Vanilla” 模板。
将多余的文件都删去,文件目录为:
Three_Minecraft/
├── index.html
├── package.json
├── vite.config.js
├── public/
│   └── textures/
│       ├── blocks/
│       │   ├── grass.png
│       │   ├── dirt.png
│       │   └── stone.png
│       └── skybox/
│           ├── right.png
│           ├── left.png
│           ├── top.png
│           ├── bottom.png
│           ├── front.png
│           └── back.png
└── src/
    ├── main.js                # 主入口文件
    ├── scene.js              # 场景相关
    ├── player.js             # 玩家控制相关
    ├── physics.js            # 物理检测相关
    ├── events.js             # 事件处理相关
    ├── blocks/
        ├── blockSystem.js    # 方块系统
        └── blockTypes.js     # 方块类型定义
修改index.html,创建方块选择界面和十字光标
<!DOCTYPE html>
<html lang="en">
  <head>
    <meta charset="UTF-8" />
    <title>Minecraft Clone</title>
    <style>
      body {
        margin: 0;
      }
      #ui {
        position: fixed;
        bottom: 20px;
        left: 50%;
        transform: translateX(-50%);
        background: rgba(0, 0, 0, 0.5);
        padding: 10px;
        border-radius: 5px;
        display: flex;
        gap: 10px;
      }
      .block-option {
        width: 40px;
        height: 40px;
        background-size: cover;
        cursor: pointer;
        border: 2px solid transparent;
      }
      .block-option.selected {
        border-color: white;
      }
      #crosshair {
        position: fixed;
        top: 50%;
        left: 50%;
        transform: translate(-50%, -50%);
        pointer-events: none;
        display: block;
        width: 20px;
        height: 20px;
      }
      #crosshair::before,
      #crosshair::after {
        content: "";
        position: absolute;
        background: white;
        opacity: 0.8;
      }
      #crosshair::before {
        width: 2px;
        height: 20px;
        left: 50%;
        transform: translateX(-50%);
      }
      #crosshair::after {
        width: 20px;
        height: 2px;
        top: 50%;
        transform: translateY(-50%);
      }
    </style>
  </head>
  <body>
    <div id="crosshair"></div>
    <div id="ui">
      <div class="block-option" data-type="grass"></div>
      <div class="block-option" data-type="dirt"></div>
      <div class="block-option" data-type="stone"></div>
    </div>
    <script type="module" src="/src/main.js"></script>
  </body>
</html>
方块
在blockTypes.js中添加如下代码,可见方块类型有草块、土块、石块三种类型:
import * as THREE from "three";

//===方块类型===
export class BlockType {
  static GRASS = "grass";
  static DIRT = "dirt";
  static STONE = "stone";
}

//===方块管理器===
export class BlockManager {
  constructor() {
    this.blocks = new Map();
    this.textureLoader = new THREE.TextureLoader();

    const grassTexture = this.textureLoader.load("/textures/blocks/grass.png");
    const dirtTexture = this.textureLoader.load("/textures/blocks/dirt.png");
    const stoneTexture = this.textureLoader.load("/textures/blocks/stone.png");

    this.materials = {
      [BlockType.GRASS]: new THREE.MeshStandardMaterial({ map: grassTexture }),
      [BlockType.DIRT]: new THREE.MeshStandardMaterial({ map: dirtTexture }),
      [BlockType.STONE]: new THREE.MeshStandardMaterial({ map: stoneTexture }),
    };

    this.geometry = new THREE.BoxGeometry(1, 1, 1);
  }

  createBlock(type, position) {
    const block = new THREE.Mesh(this.geometry, this.materials[type]);
    block.position.copy(position);
    block.userData.type = type;
    return block;
  }
}
注意这里的纹理贴图文件需要存储在根目录 public 下,一开始我将图片放在src/static/texture目录下,THREE.TextureLoader()使用相对路径加载不成功,在网上找到了解决方法:Vue3 THREE.TextureLoader()加载图片失败_vue3 textureloader().load-CSDN 博客
在blockSystem.js添加如下代码,创建一个初始地面以及更新方块事件:
//===方块系统===

import { BlockType, BlockManager } from "./blocks";
import * as THREE from "three";

export function initBlockSystem(scene) {
  const blockManager = new BlockManager();

  // 创建初始地面
  for (let x = -10; x <= 10; x++) {
    for (let z = -10; z <= 10; z++) {
      const block = blockManager.createBlock(
        BlockType.GRASS,
        new THREE.Vector3(x, -1, z)
      );
      scene.add(block);
    }
  }

  return {
    blockManager,
    selectedBlockType: BlockType.GRASS,
    updateBlockSelection,
  };
}
// 更新选中的方块类型
function updateBlockSelection(type) {
  document.querySelectorAll(".block-option").forEach((opt) => {
    opt.classList.remove("selected");
    if (opt.dataset.type === type) {
      opt.classList.add("selected");
    }
  });
}
人物
毕竟是第一人称,控件肯定不能是 OrbitControls,而应该是 PointerLockControls:
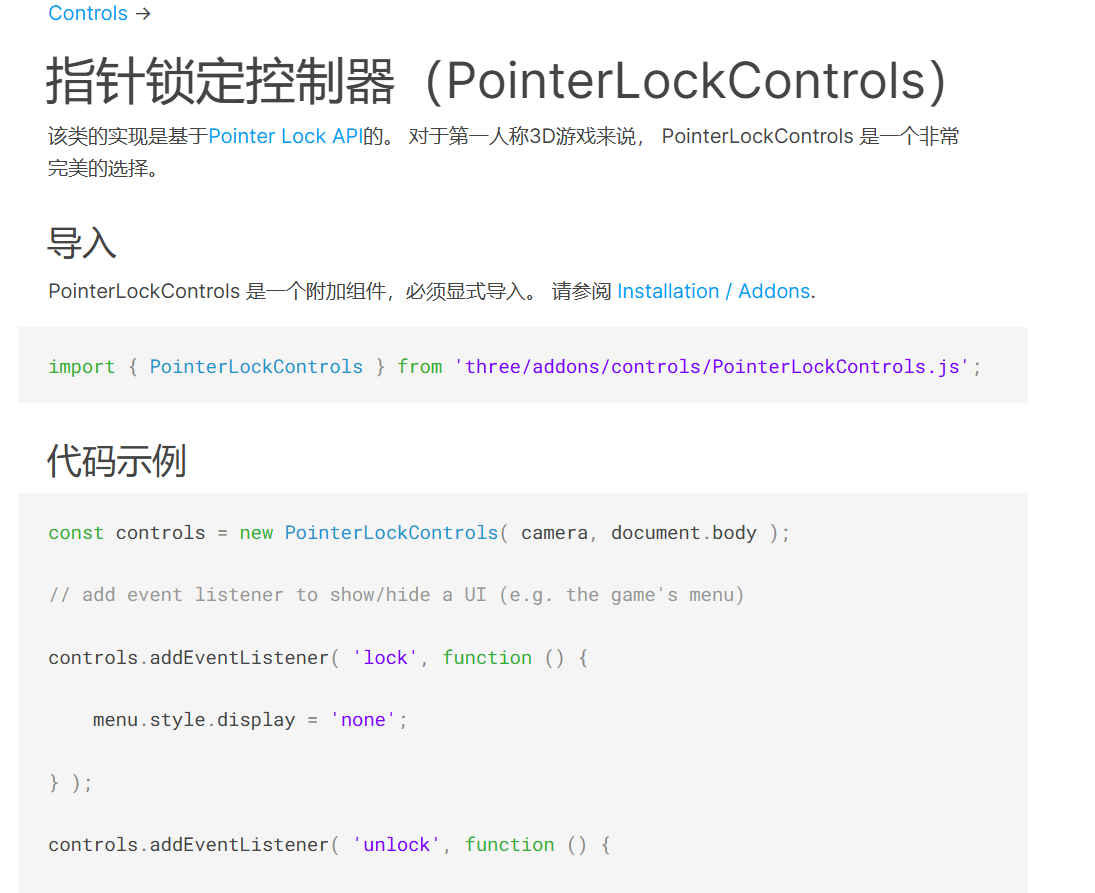
在players添加如下代码,初始化玩家控制器和状态:
//===玩家===

import * as THREE from "three";
import { PointerLockControls } from "three/examples/jsm/controls/PointerLockControls";

export function initPlayer(camera, element) {
  const controls = new PointerLockControls(camera, element);

  const playerState = {
    velocity: new THREE.Vector3(),
    moveForward: false,
    moveBackward: false,
    moveLeft: false,
    moveRight: false,
    canJump: true,
    frontCollide: false,
    backCollide: false,
    leftCollide: false,
    rightCollide: false,
    onGround: false,
    height: 2,
    width: 1,
    speed: 5.0,
    boundingBox: new THREE.Box3(),
  };

  return { controls, playerState };
}
场景
在scene.js中添加如下代码,向场景中添加一个天空盒,以及环境光AmbientLight和平行光DirectionalLight
//===场景===
import * as THREE from "three";

export function initScene() {
  const scene = new THREE.Scene();

  // 设置天空盒
  const skyboxTextures = new THREE.CubeTextureLoader().load([
    "/textures/skybox/right.png",
    "/textures/skybox/left.png",
    "/textures/skybox/top.png",
    "/textures/skybox/bottom.png",
    "/textures/skybox/front.png",
    "/textures/skybox/back.png",
  ]);
  scene.background = skyboxTextures;

  // 添加光源
  scene.add(new THREE.AmbientLight(0xffffff, 0.6));
  const directionalLight = new THREE.DirectionalLight(0xffffff, 0.6);
  directionalLight.position.set(10, 20, 0);
  scene.add(directionalLight);

  return scene;
}
放置和破坏方块
这里就碰到了我的第一个难点:如何找到放置方块的位置?
选中场景中的某个方块一般来说都是通过射线拾取方法:
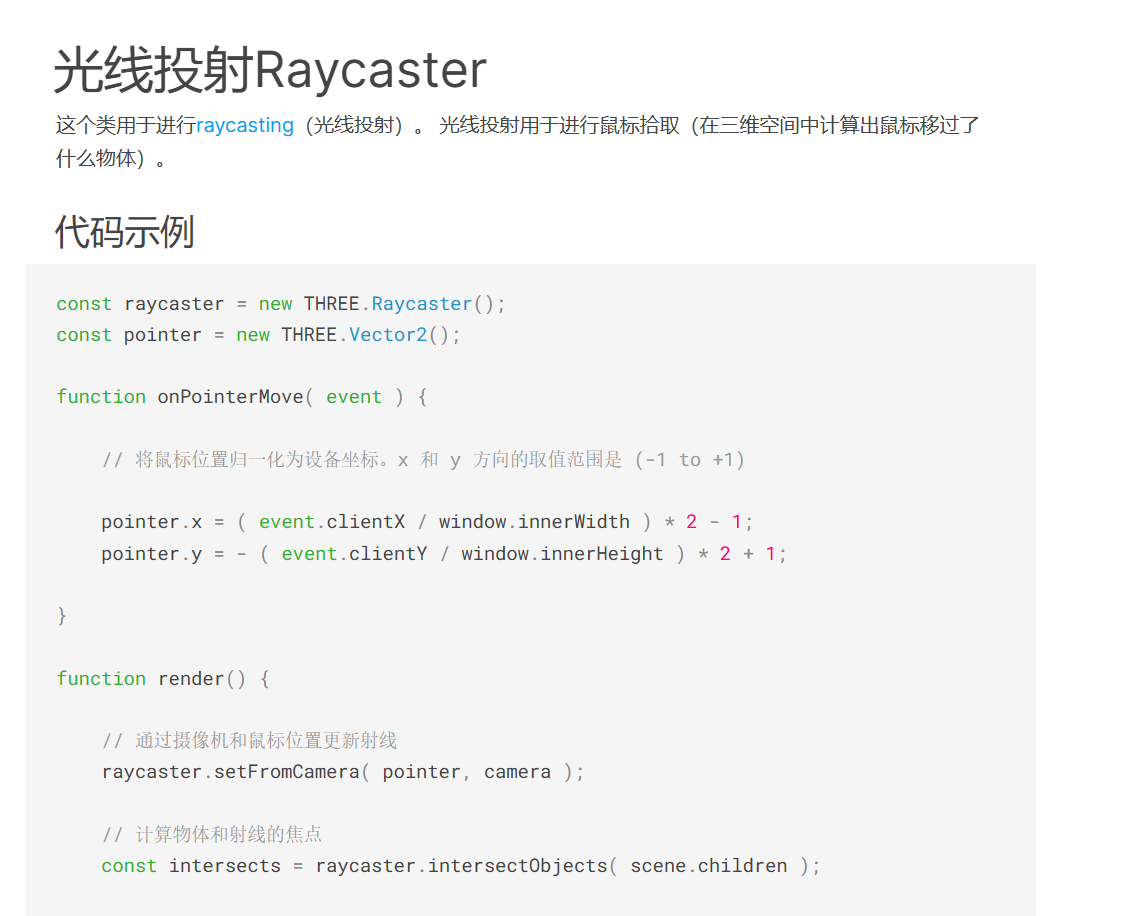
通过屏幕中心射出一条射线获取到交互的对象属性,破坏方块简单,直接将交互对象删去就行,放置方块就比较复杂。
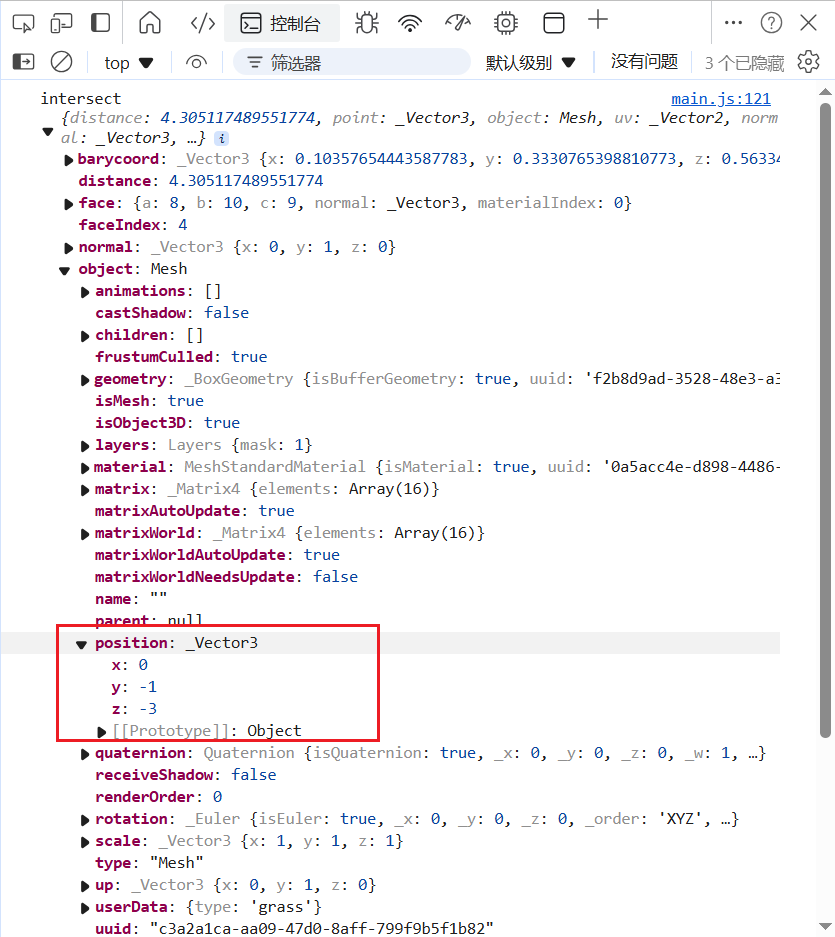
玩过 Minecraft 都知道,如果想要放置方块,点击最近的相邻的方块面就可以放置,那我们通过射线拾取的交互对象的坐标计算出需要放置的坐标就可以了,我们先看一下 three.js 射线交互可以获取到哪些属性:
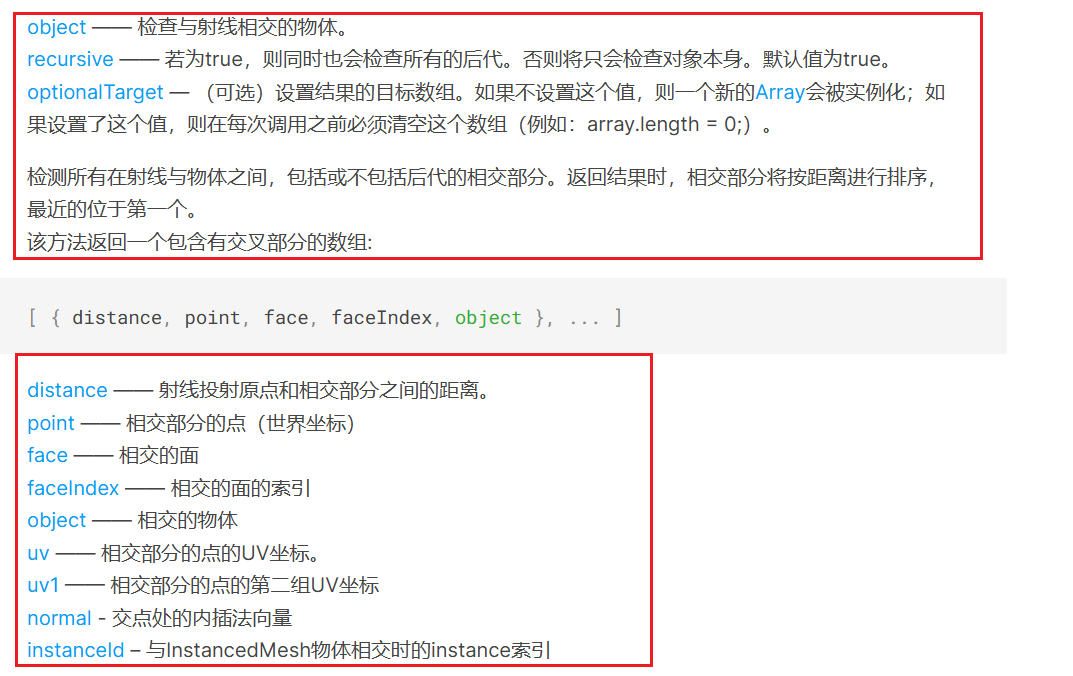
当然一开始我根本没注意到 object 这个属性,我首先注意到的是相交部分的点point和相交的面face以及内插法向量,我想直接通过点或者面的中心点加上这个内插法向量再四舍五入一下不就得到了方块的中心点吗(我们初始场景的方块的中心点都是整数,方便后面计算)
然后就有了下面的代码:
.....
raycaster.setFromCamera(mouse, camera);
// 检测与场景中对象的交互
const intersects = raycaster.intersectObjects(scene.children);

// 如果有交互对象
if (intersects.length > 0) {
const intersect = intersects[0];
const point = intersect.point;

// 右键点击:创建一个块
if (event.button === 2) {
   const position = point.add(intersect.face.normal);
   // 将位置四舍五入到整数,确保方块对齐到网格
   position.x = Math.round(point.x);
   position.y = Math.round(point.y);
   position.z = Math.round(point.z);
   ........
似乎不太行,因为总是会有防置不了方块的情况,而且还是特定方向放不了。
经过调试纠错,我想大概是四舍五入的问题,因为不管射线与哪个方块的面交互,交互点的坐标的 xyz 总有一个小数部分是 0.5(方块中心点是整数,方块边长是 1),如果小数部分是 0.5,则不能按照常规的四舍五入方法,这样就会隔一个方块放置:
function customRound(value) {
  const decimal = Math.abs(value) % 1;
  if (decimal === 0.5) {
    return Math.floor(value);
  }
  return Math.round(value);
}
.....
raycaster.setFromCamera(mouse, camera);
// 检测与场景中对象的交互
const intersects = raycaster.intersectObjects(scene.children);

// 如果有交互对象
if (intersects.length > 0) {
const intersect = intersects[0];
const point = intersect.point;

// 右键点击:创建一个块
if (event.button === 2) {
   const position = point.add(intersect.face.normal);
   // 将位置四舍五入到整数,确保方块对齐到网格
   position.x = customRound(point.x);
   position.y = customRound(point.y);
   position.z = customRound(point.z);
   ........
还是没解决,我又想是不是 js 精度的问题,众所周知在 javascript 中0.1 + 0.2 == 0.3的结果实际上是 false,一番折腾后还是不对;然后又想是不是要考虑正负号的情况…
随后偶然看到了交互属性里有 object,而且也有中心点,那直接将中心点加上内插值向量不就可以了!
如下所示:
function handleClick(event, controls, scene, camera, blockSystem, playerState) {
  if (!controls.isLocked) {
    controls.lock();
    document.getElementById("crosshair").style.display = "block";
    return;
  }
  const raycaster = new THREE.Raycaster();
  const mouse = new THREE.Vector2(
    (window.innerWidth / 2 / window.innerWidth) * 2 - 1,
    (-window.innerHeight / 2 / window.innerHeight) * 2 + 1
  );
  raycaster.setFromCamera(mouse, camera);
  const intersects = raycaster.intersectObjects(scene.children);
  if (intersects.length > 0) {
    const intersect = intersects[0];
    if (event.button === 2) {
      // 右键放置方块
      const position = intersect.object.position
        .clone()
        .add(intersect.face.normal);
      const blockBox = new THREE.Box3();
      blockBox.setFromCenterAndSize(position, new THREE.Vector3(1, 1, 1));
      playerState.boundingBox.setFromCenterAndSize(
        camera.position,
        new THREE.Vector3(
          playerState.width * 0.8,
          playerState.height,
          playerState.width * 0.8
        )
      );
      if (!blockBox.intersectsBox(playerState.boundingBox)) {
        const block = blockSystem.blockManager.createBlock(
          blockSystem.selectedBlockType,
          position
        );
        scene.add(block);
      }
    } else if (event.button === 0) {
      // 左键破坏方块
      scene.remove(intersect.object);
    }
  }
}
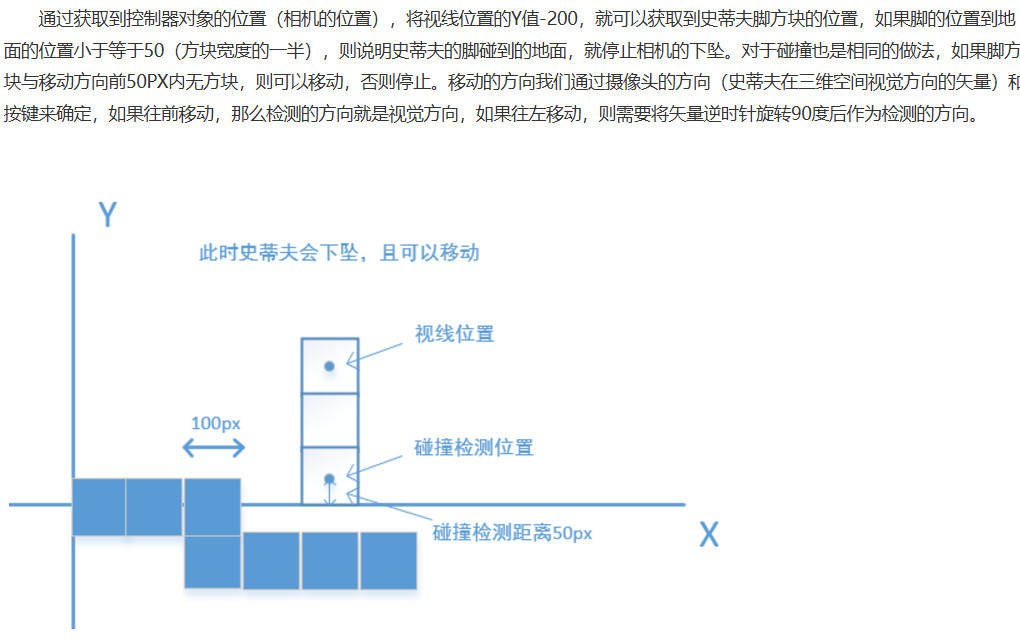
碰撞检测
这个是第二个难点,花了我许多时间,就是没有非常好的方法,要不然就是人物卡住不能动,要不然就是一碰撞到物体就“吸附”在上面
。然后上网上找解决方法,直到我看到这么一篇博客:https://www.cnblogs.com/sincw/p/9161922.html,这个问题才迎刃而解:
在physics.js中添加碰撞检测逻辑代码:
//===射线检测===
import * as THREE from "three";

// 检测射线是否与场景中的物体发生碰撞
export function checkCollision(origin, direction, scene, distance) {
  const raycaster = new THREE.Raycaster();
  raycaster.set(origin, direction.normalize());
  const intersects = raycaster
    .intersectObjects(scene.children)
    .filter(
      (intersect) => Math.abs(intersect.object.position.y - origin.y) < 1
    );
  return intersects.length > 0 && intersects[0].distance <= distance;
}
// 检测射线是否与地面发生碰撞
export function checkGroundCollision(origin, scene) {
  const raycaster = new THREE.Raycaster();
  const direction = new THREE.Vector3(0, -1, 0);
  raycaster.set(origin, direction);
  const intersects = raycaster
    .intersectObjects(scene.children)
    .filter((intersect) => intersect.object.position.y < origin.y);
  return intersects.length > 0 && intersects[0].distance <= 0.2;
}
在player.js中添加移动逻辑方法:
export function handleMovement(delta, playerState, controls, scene, camera) {
  const cameraAngle = getCameraDirection(camera);

  // 地面检测
  const feetPosition = camera.position.clone();
  feetPosition.y -= playerState.height / 2 - 0.1;
  playerState.onGround = checkGroundCollision(feetPosition, scene);

  // 重力和跳跃
  if (!playerState.onGround) {
    playerState.velocity.y -= 20 * delta;
  } else if (playerState.velocity.y <= 0) {
    playerState.velocity.y = 0;
    playerState.canJump = true;
  }

  camera.position.y += playerState.velocity.y * delta;

  // 移动碰撞检测和移动
  handleCollisionAndMovement(
    playerState,
    controls,
    scene,
    feetPosition,
    cameraAngle,
    delta
  );

  // 防止掉出地图
  if (camera.position.y < -10) {
    camera.position.y = 10;
    playerState.velocity.y = 0;
  }
}

// 获取相机方向
function getCameraDirection(camera) {
  const direction = new THREE.Vector3();
  camera.getWorldDirection(direction);
  return Math.atan2(direction.x, direction.z);
}

// 获取移动方向
function getMovementDirection(angle, moveType) {
  const direction = new THREE.Vector3();
  switch (moveType) {
    case "forward":
      direction.set(Math.sin(angle), 0, Math.cos(angle));
      break;
    case "backward":
      direction.set(-Math.sin(angle), 0, -Math.cos(angle));
      break;
    case "left":
      direction.set(Math.cos(angle), 0, -Math.sin(angle));
      break;
    case "right":
      direction.set(-Math.cos(angle), 0, Math.sin(angle));
      break;
  }
  return direction;
}

// 处理碰撞和移动
function handleCollisionAndMovement(
  playerState,
  controls,
  scene,
  feetPosition,
  cameraAngle,
  delta
) {
  const { moveForward, moveBackward, moveLeft, moveRight, speed } = playerState;

  if (moveForward) {
    const direction = getMovementDirection(cameraAngle, "forward");
    if (!checkCollision(feetPosition, direction, scene, 0.3)) {
      controls.moveForward(speed * delta);
    }
  }

  if (moveBackward) {
    const direction = getMovementDirection(cameraAngle, "backward");
    if (!checkCollision(feetPosition, direction, scene, 0.3)) {
      controls.moveForward(-speed * delta);
    }
  }

  if (moveLeft) {
    const direction = getMovementDirection(cameraAngle, "left");
    if (!checkCollision(feetPosition, direction, scene, 0.3)) {
      controls.moveRight(-speed * delta);
    }
  }

  if (moveRight) {
    const direction = getMovementDirection(cameraAngle, "right");
    if (!checkCollision(feetPosition, direction, scene, 0.3)) {
      controls.moveRight(speed * delta);
    }
  }
}
结语
下面我们将所有代码补充完整:
events.js,监听鼠标点击事件
//===事件===

import * as THREE from "three";

export function initEventListeners(
  controls,
  scene,
  camera,
  blockSystem,
  playerState
) {
  // UI事件
  initBlockSelectionUI(blockSystem);

  // 鼠标事件
  document.addEventListener("click", (event) =>
    handleClick(event, controls, scene, camera, blockSystem, playerState)
  );

  // 键盘事件
  document.addEventListener("keydown", (event) =>
    handleKeyDown(event, playerState, blockSystem)
  );
  document.addEventListener("keyup", (event) =>
    handleKeyUp(event, playerState)
  );
}

// 初始化方块选择UI
function initBlockSelectionUI(blockSystem) {
  document.querySelectorAll(".block-option").forEach((option) => {
    const type = option.dataset.type;
    option.style.backgroundImage = `url(/textures/blocks/${type}.png)`;
    option.addEventListener("click", () => {
      blockSystem.selectedBlockType = type;
      blockSystem.updateBlockSelection(type);
    });
  });
}
// 鼠标点击事件
function handleClick(event, controls, scene, camera, blockSystem, playerState) {
  if (!controls.isLocked) {
    controls.lock();
    document.getElementById("crosshair").style.display = "block";
    return;
  }
  const raycaster = new THREE.Raycaster();
  const mouse = new THREE.Vector2(
    (window.innerWidth / 2 / window.innerWidth) * 2 - 1,
    (-window.innerHeight / 2 / window.innerHeight) * 2 + 1
  );
  raycaster.setFromCamera(mouse, camera);
  const intersects = raycaster.intersectObjects(scene.children);
  if (intersects.length > 0) {
    const intersect = intersects[0];
    if (event.button === 2) {
      // 右键放置方块
      const position = intersect.object.position
        .clone()
        .add(intersect.face.normal);
      const blockBox = new THREE.Box3();
      blockBox.setFromCenterAndSize(position, new THREE.Vector3(1, 1, 1));
      playerState.boundingBox.setFromCenterAndSize(
        camera.position,
        new THREE.Vector3(
          playerState.width * 0.8,
          playerState.height,
          playerState.width * 0.8
        )
      );
      if (!blockBox.intersectsBox(playerState.boundingBox)) {
        const block = blockSystem.blockManager.createBlock(
          blockSystem.selectedBlockType,
          position
        );
        scene.add(block);
      }
    } else if (event.button === 0) {
      // 左键破坏方块
      scene.remove(intersect.object);
    }
  }
}

// 键盘按下事件
function handleKeyDown(event, playerState, blockSystem) {
  switch (event.code) {
    case "ArrowUp":
    case "KeyW":
      playerState.moveForward = true;
      break;
    case "ArrowDown":
    case "KeyS":
      playerState.moveBackward = true;
      break;
    case "ArrowLeft":
    case "KeyA":
      playerState.moveLeft = true;
      break;
    case "ArrowRight":
    case "KeyD":
      playerState.moveRight = true;
      break;
    case "Space":
      if (playerState.canJump) {
        playerState.velocity.y = 10;
        playerState.canJump = false;
      }
      break;
    // 选择方块类型
    case "Digit1":
      blockSystem.selectedBlockType = BlockType.GRASS;
      blockSystem.updateBlockSelection(BlockType.GRASS);
      break;
    case "Digit2":
      blockSystem.selectedBlockType = BlockType.DIRT;
      blockSystem.updateBlockSelection(BlockType.DIRT);
      break;
    case "Digit3":
      blockSystem.selectedBlockType = BlockType.STONE;
      blockSystem.updateBlockSelection(BlockType.STONE);
      break;
  }
}

// 键盘抬起事件
function handleKeyUp(event, playerState) {
  switch (event.code) {
    case "ArrowUp":
    case "KeyW":
      playerState.moveForward = false;
      break;
    case "ArrowDown":
    case "KeyS":
      playerState.moveBackward = false;
      break;
    case "ArrowLeft":
    case "KeyA":
      playerState.moveLeft = false;
      break;
    case "ArrowRight":
    case "KeyD":
      playerState.moveRight = false;
      break;
  }
}
main.js,主文件:
import * as THREE from "three";
import { initScene } from "./scene";
import { initPlayer, handleMovement } from "./player";
import { initBlockSystem } from "./blocks/blockSystem";
import { initEventListeners } from "./events";
// 初始化主要组件
const scene = initScene();
const camera = new THREE.PerspectiveCamera(
  75,
  window.innerWidth / window.innerHeight,
  0.1,
  1000
);
const renderer = new THREE.WebGLRenderer();
renderer.shadowMap.enabled = true;
const { controls, playerState } = initPlayer(camera, document.body);
const blockSystem = initBlockSystem(scene);

const clock = new THREE.Clock();
function animate() {
  requestAnimationFrame(animate);
  if (controls.isLocked) {
    const delta = clock.getDelta();
    handleMovement(delta, playerState, controls, scene, camera);
  }
  renderer.render(scene, camera);
}

// 初始化和启动
function init() {
  renderer.setSize(window.innerWidth, window.innerHeight);
  document.body.appendChild(renderer.domElement);
  camera.position.set(0, 5, 0);
  initEventListeners(controls, scene, camera, blockSystem, playerState);
  animate();
}
init();


 4739
4739

 被折叠的 条评论
为什么被折叠?
被折叠的 条评论
为什么被折叠?
 到【灌水乐园】发言


