


Cython学习
1.概述
1.简述
之前遇到的很多python题目逆向都是pyc的逆向比较简单,最近遇到了很多cpython的题目,但是不太清楚原理做的就很难受,这里就想梳理一下cpython的原理
2.Cpython的概述
这里引自官方文档:
Cython - an overview — Cython 3.1.0a0 documentation
Cython是一种编程语言,可以编写 C 扩展 对于 Python 语言来说,就像 Python 本身一样简单 它旨在成为 语言的超集,赋予它高级, 面向对象、函数式和动态编程。
主要的 Python 执行环境通常称为 CPython用 C 语言编写的。 其他主要实现使用 Java 和 Python 本身 。
它的主要特点 :
- 支持可选的静态类型声明,如 语言的一部分。
- 源代码被翻译成优化的 C/C++ 代码并编译为 Python 扩展模块
- 允许程序执行速度非常快,并且与外部 C 紧密集成 库,同时保持高生产力
3.Cython的起源
Cython 项目最初基于著名的 [Pyrex Pyrex] 已经通过源代码编译器解决了这个问题 将 Python 代码转换为等效的 C 代码
特性:
- 保留了 Python 的原始界面源代码
- 可以直接从 Python 代码中使用
- 使用快速二进制模块扩展 CPython 解释器
- 将Python 代码与外部C库连接
2.Cython环境配置
与大多数 Python 软件不同,Cython 需要在系统上存在 C 编译器
1.不同系统的配置
1.Linux
GNU C 编译器(gcc)通常存在,或通过包系统轻松获得
在 Ubuntu 或 Debian 命令:
sudo apt-get install build-essential
2.Mac OS X
木有apple,所以自己官网看
https://developer.apple .com /
3.Windows
使用开源 MinGW(Windows 的 gcc 分发版)
2.安装操作
1.直接包安装
pip install Cython
2.官网下载安装最新版本
https://cython.org/
解压缩 tarball 或 zip 文件,输入目录
再运行
python setup.py install
pip install cython setuptools
3.语言特性分析
前言
1.学习
跟着无名侠仙贝学习Cython Reverse - Pandaos’s blog (panda0s.top)
2.编译
1.原理
Cython 有一个个功能可以将 Python 编译成 C语言实现,再由 GCC/Clang 将 C 编译成动态库
2.build(便于对应分析)
build的源码:
from setuptools import setup
from Cython.Build import cythonize

setup(
    ext_modules = cythonize("hello.pyx", annotate=True)
)
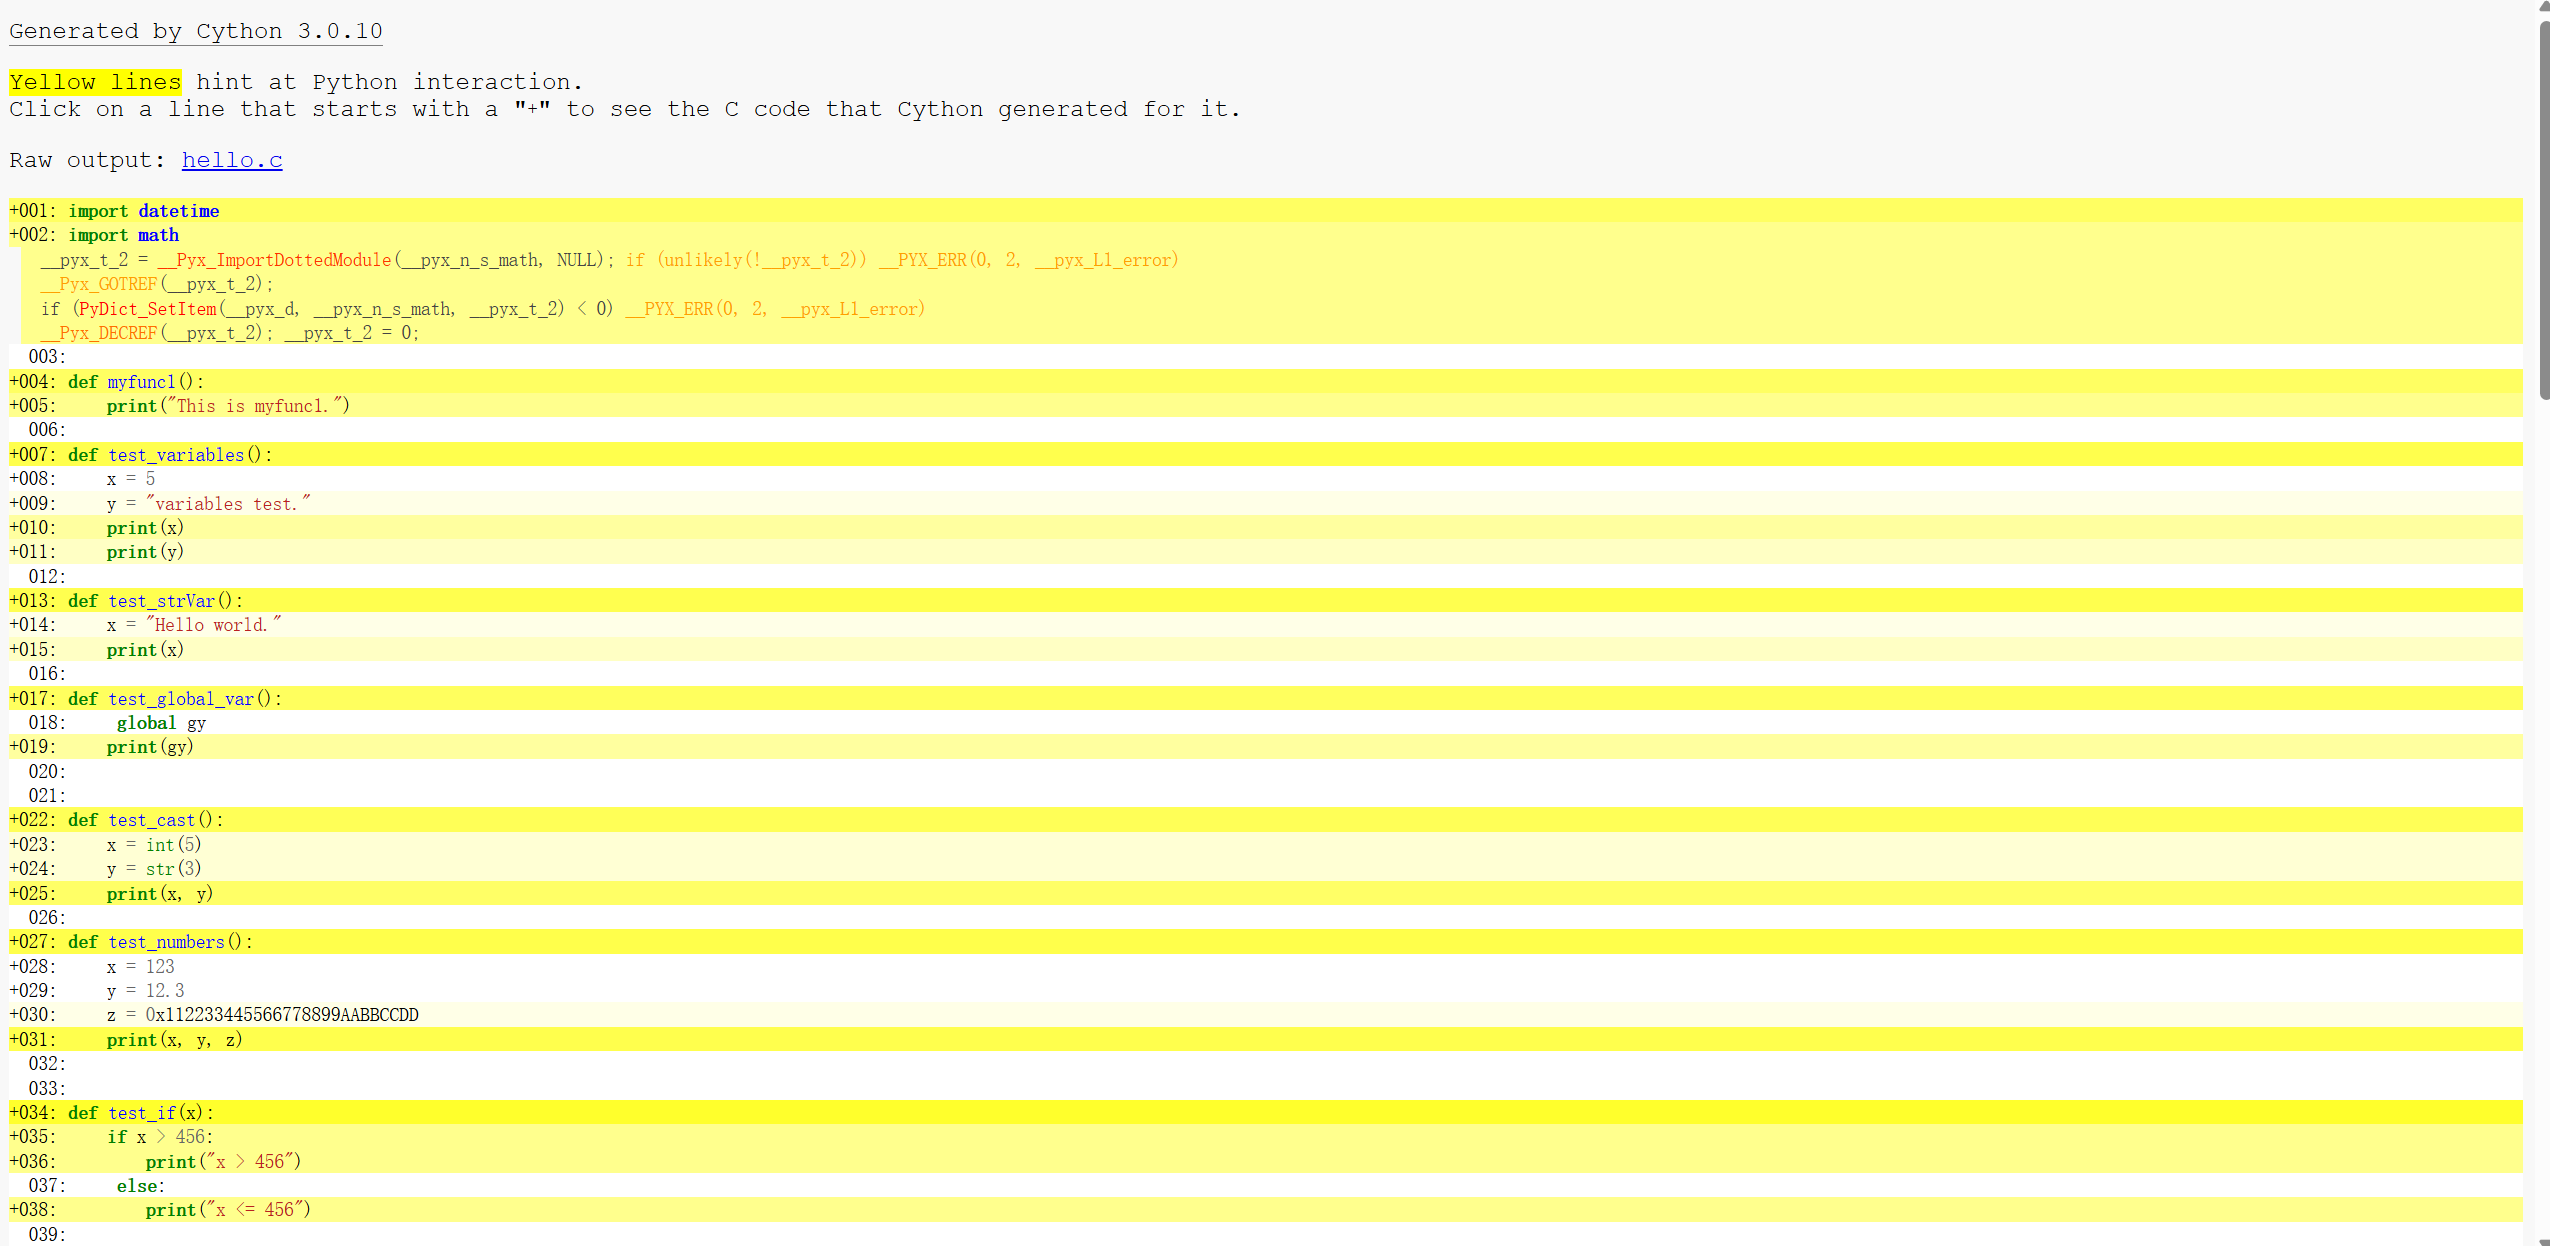
annotate=True 选项可以生成一个 html 页面
显示 Py源码与生成的C代码的对应关系
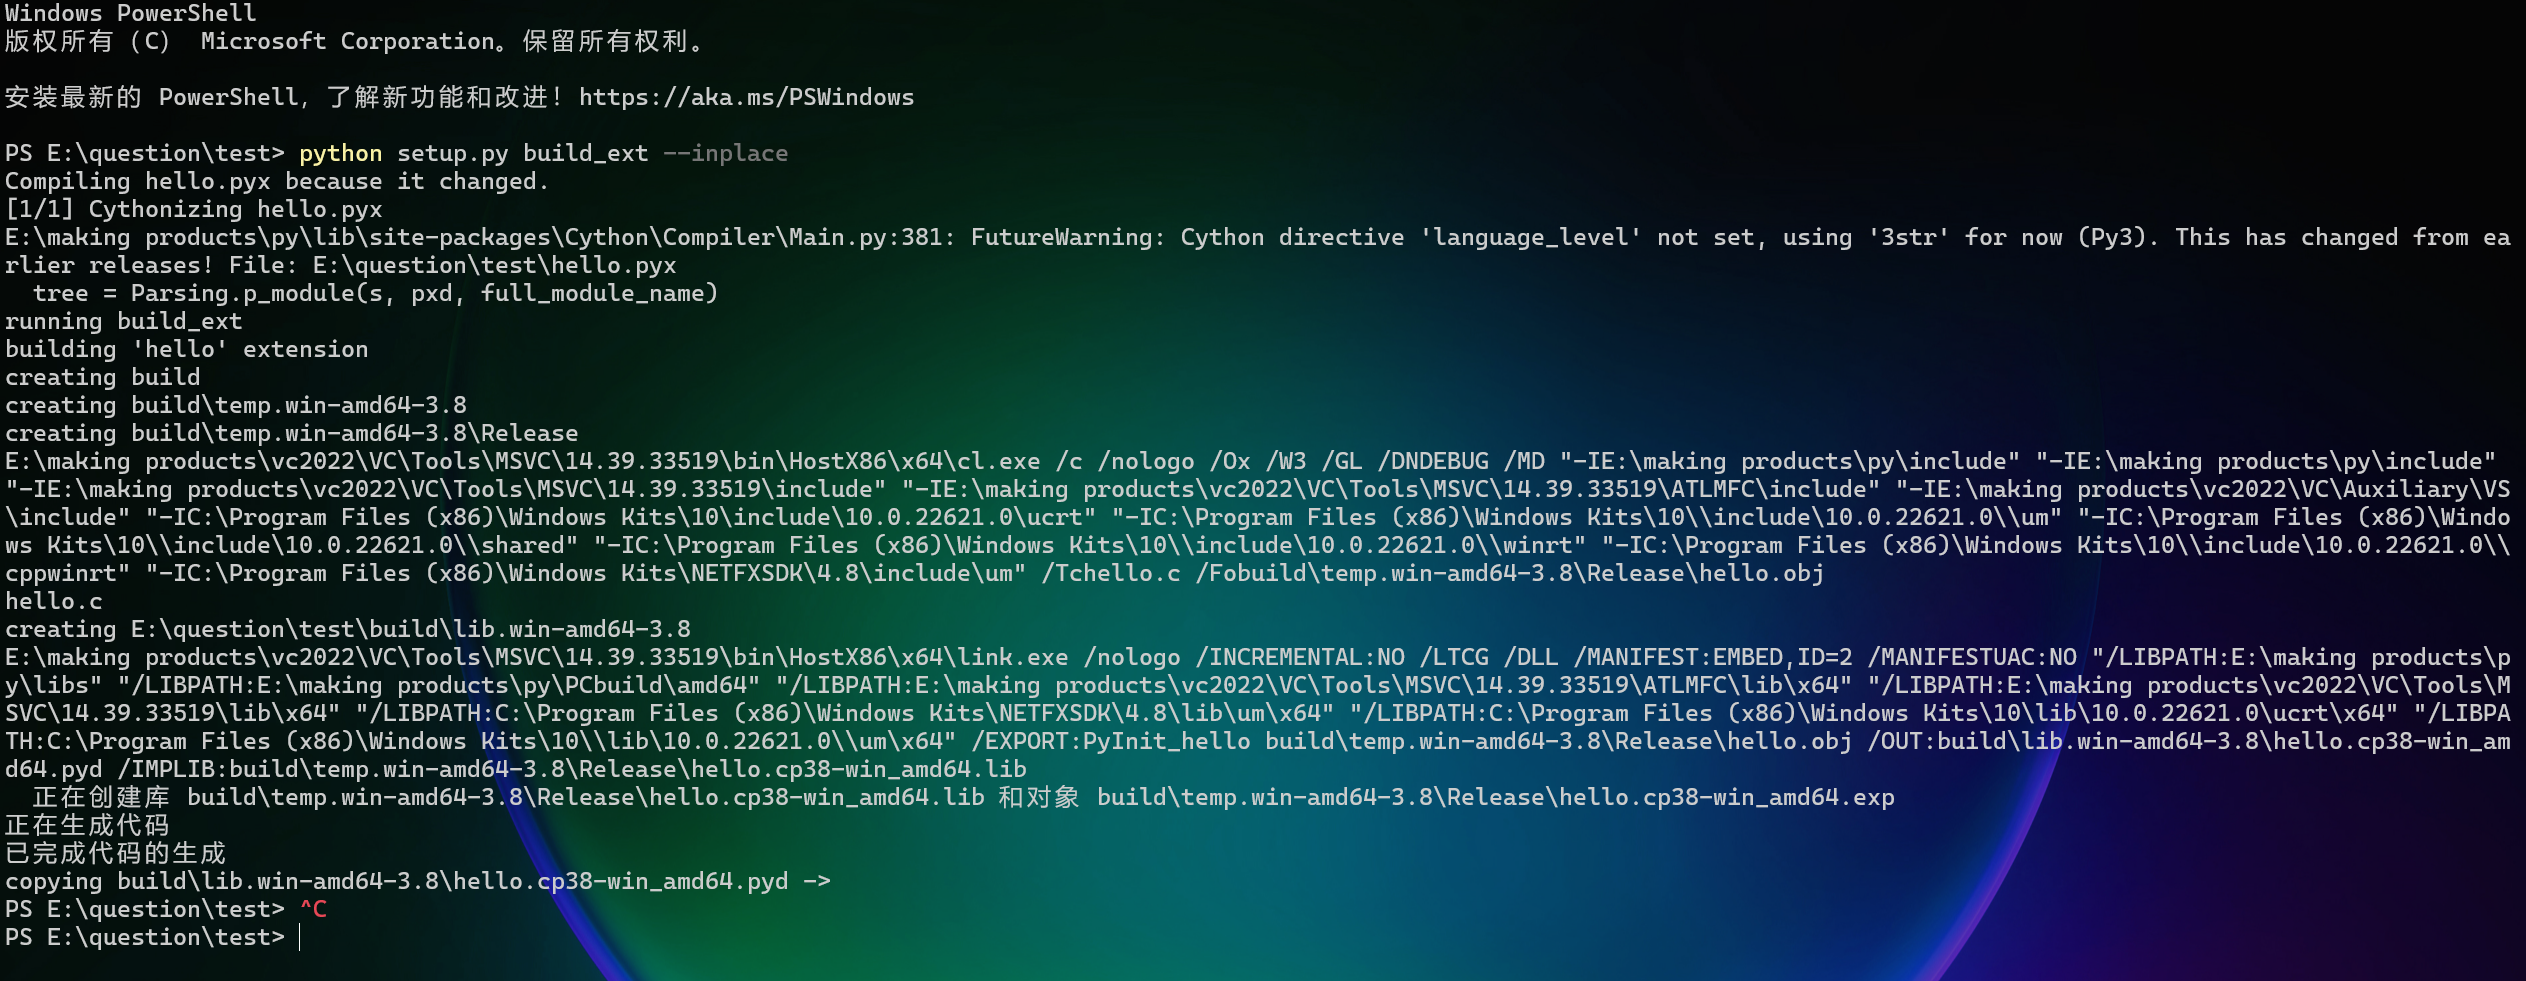
build命令:
python setup.py build_ext --inplace
成功后在当前目录下找到对应的动态库与对应的 xxx.c 源文件
直接用 python import 导入
3.基于Hello.py 编译成的动态库分析
版本: Python 3.7.6,Cython 0.29.21
1.将这个文件改为pyx后缀

2.运行前面的build命令
3.进入文件夹中查看便于分析的html文件
4.源码
import datetime
import math

def myfunc1():
    print("This is myfunc1.")

def test_variables():
    # 定义局部变量并打印
    x = 5
    y = "variables test."
    print(x)
    print(y)

def test_strVar():
    # 定义字符串变量并打印
    x = "Hello world."
    print(x)

def test_global_var():
    # 使用全局变量 gy 并打印
    global gy
    print(gy)

def test_cast():
    # 类型转换:将整数和字符串进行类型转换并打印
    x = int(5)
    y = str(3)
    print(x, y)

def test_numbers():
    # 打印整数、浮点数和大整数(十六进制)
    x = 123
    y = 12.3
    z = 0x112233445566778899AABBCCDD
    print(x, y, z)

def test_if(x):
    # 条件语句:判断 x 是否大于 456
    if x > 456:
        print("x > 456")
    else:
        print("x <= 456")

def test_string():
    # 字符串操作:获取长度、索引、切片,并检查子字符串
    x = "I am str."
    y = len(x)
    z = x[1]
    w = x[2:]
    print(x, y, z, w)

    if "am" in x:
        print("yes")
    else:
        print("wrong")

def test_list():
    # 列表操作:添加元素、遍历、切片和替换部分元素
    x = list()
    x.append(1)
    x.append(2)
    x.append(3)
    x.append(4)
    x.append("five")
    print(x)
    print(len(x))
    for i in x:
        print(i)
    x = x[1:]
    x[2:4] = [22, 33]

def test_dict():
    # 字典操作:添加键值对、访问值、检查键和遍历字典
    x = {}
    x["one"] = 1
    x["two"] = 2
    x["three"] = 3
    y = x["one"]
    z = x["two"]
    if "one" in x:
        print(y)

    for k in x:
        print(k, x[k])

def test_for():
    # for 循环:计算 0 到 100 的和
    s = 0
    for i in range(101):
        s = s + i
    print(s)

def test_while():
    # while 循环:计算 1 到 100 的和
    s = 0
    i = 1
    while i <= 100:
        s = s + i
        i += 1
    print(s)

def test_exception():
    # 异常处理:尝试执行错误操作并捕获异常
    x = 1
    try:
        x = x + "1"
        print(x)
    except NameError:
        print("Variable x is not defined")
    except:
        print("Something else went wrong")

def test_datetime():
    # 获取并打印当前日期和时间
    x = datetime.datetime.now()
    print(x)

def test_format():
    # 字符串格式化:使用 % 操作符进行字符串格式化
    x = 1
    y = "One"
    z = "%s is %d" % (y, x)
    print(z)

def test_math():
    # 数学函数:使用 ceil 和 floor 函数
    x = math.ceil(1.4)
    y = math.floor(1.4)
    print(x) # 返回 2
    print(y) # 返回 1

def test_arg(x, y, z):
    # 传递参数:修改参数并打印
    x = x + 1
    y = y + "2"
    z = z[:]
    print(x, y, z)

class test_class:
    # 定义一个类及其方法
    def __init__(self):
        self.aa = 1

    def test_class_hh(self):
        print(self.aa)

# 定义全局变量并调用所有函数
gy = 123
myfunc1()
test_variables()
test_strVar()
test_global_var()
test_cast()
test_numbers()
test_string()
test_list()
test_dict()
test_for()
test_while()
test_exception()
test_datetime()
test_format()
test_math()
test_arg(1, "2", [4, 5, 6])
1.__pyx_string_tab
1.概述
在pyx文件编译为.c的文件时,__pyx_string_tab是一个包含代码中所有需要使用的字符串(避免重复创建相同的字符串,从而优化字符串的使用和查找)
2.查看源码
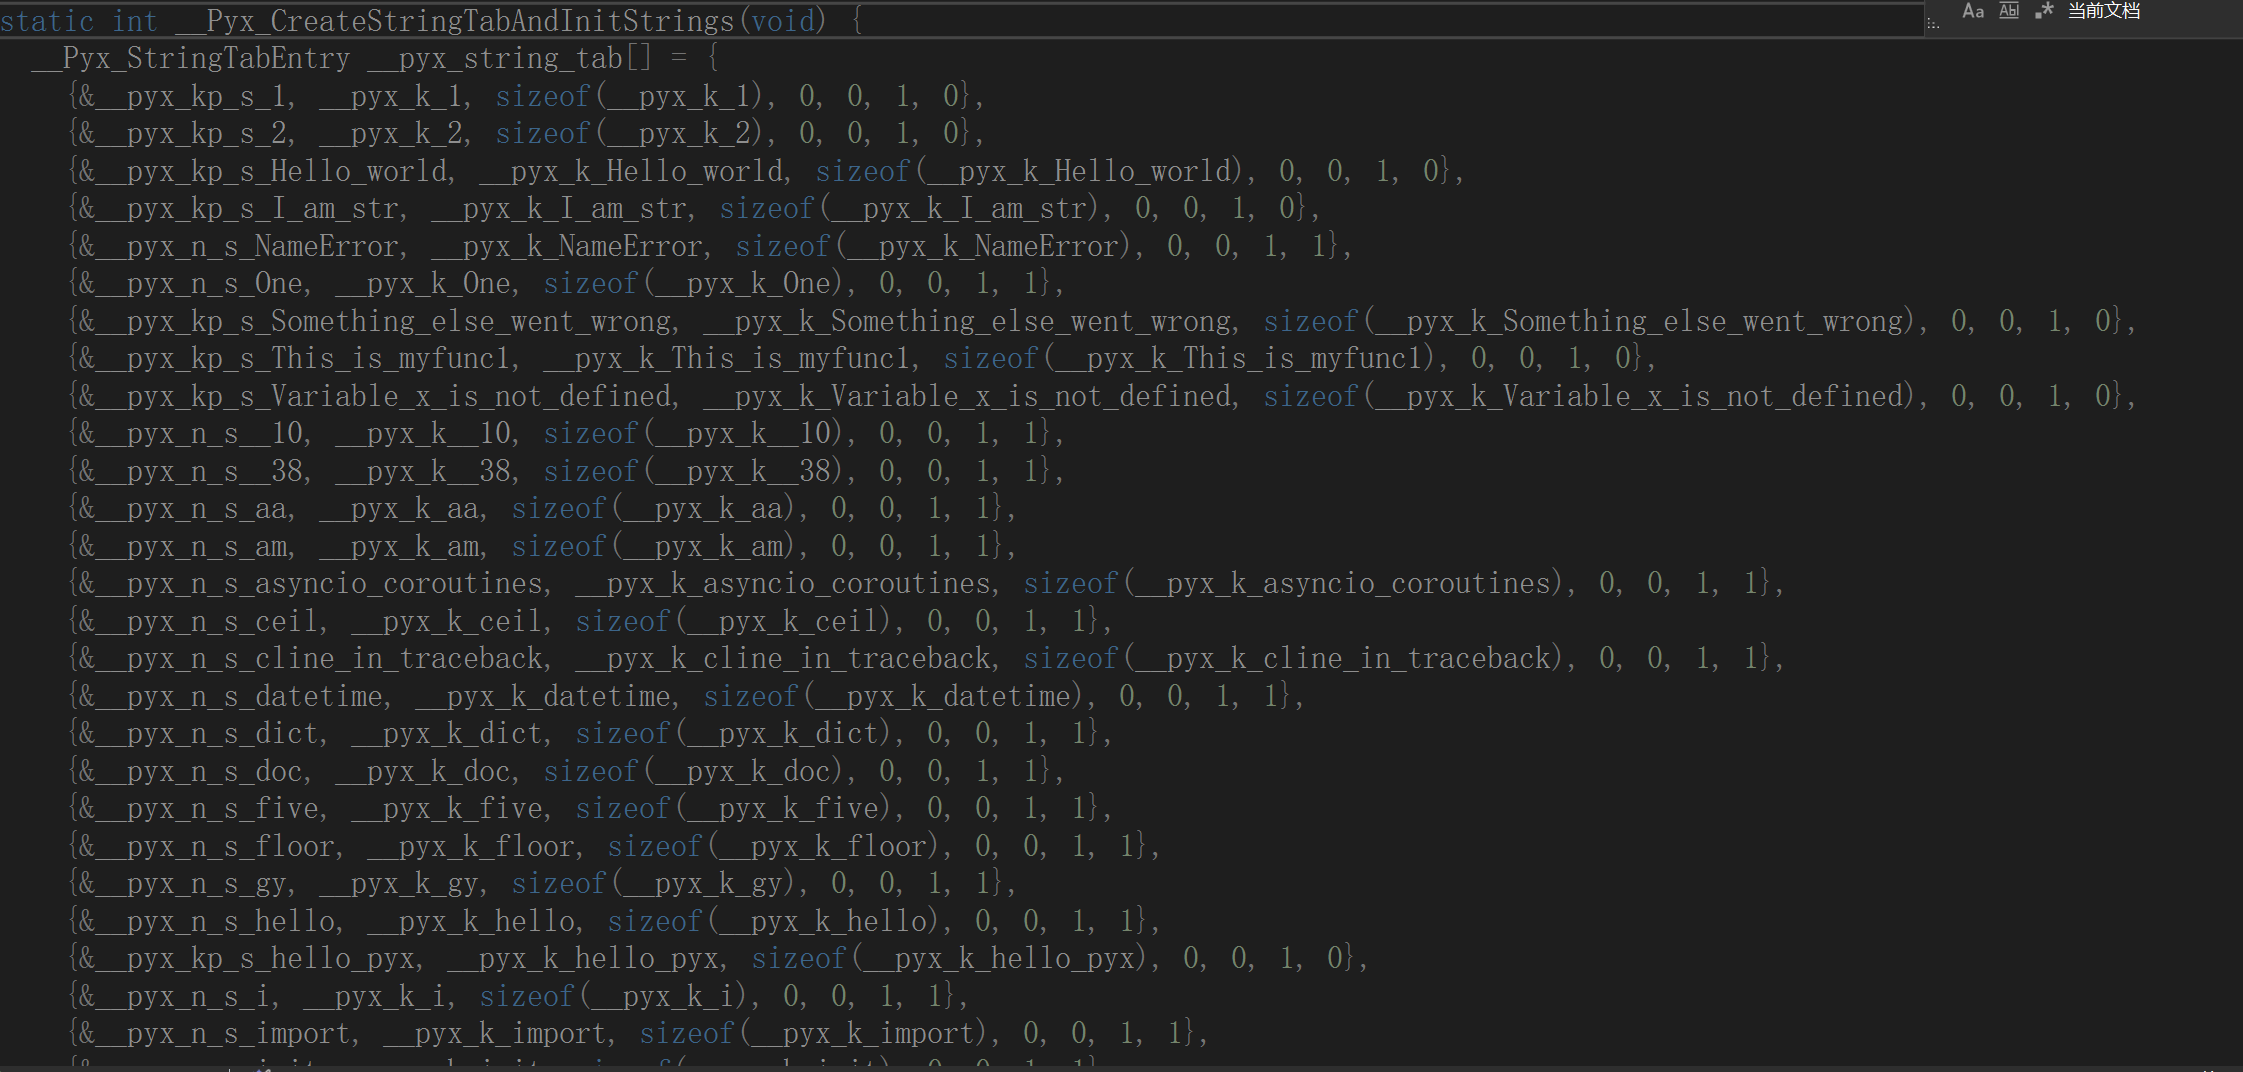
static int __Pyx_CreateStringTabAndInitStrings(void) {
  __Pyx_StringTabEntry __pyx_string_tab[] = {
    {&__pyx_kp_s_1, __pyx_k_1, sizeof(__pyx_k_1), 0, 0, 1, 0},
    {&__pyx_kp_s_2, __pyx_k_2, sizeof(__pyx_k_2), 0, 0, 1, 0},
    {&__pyx_kp_s_Hello_world, __pyx_k_Hello_world, sizeof(__pyx_k_Hello_world), 0, 0, 1, 0},
    {&__pyx_kp_s_I_am_str, __pyx_k_I_am_str, sizeof(__pyx_k_I_am_str), 0, 0, 1, 0},
    {&__pyx_n_s_NameError, __pyx_k_NameError, sizeof(__pyx_k_NameError), 0, 0, 1, 1},
    {&__pyx_n_s_One, __pyx_k_One, sizeof(__pyx_k_One), 0, 0, 1, 1},
    {&__pyx_kp_s_Something_else_went_wrong, __pyx_k_Something_else_went_wrong, sizeof(__pyx_k_Something_else_went_wrong), 0, 0, 1, 0},
    {&__pyx_kp_s_This_is_myfunc1, __pyx_k_This_is_myfunc1, sizeof(__pyx_k_This_is_myfunc1), 0, 0, 1, 0},
    {&__pyx_kp_s_Variable_x_is_not_defined, __pyx_k_Variable_x_is_not_defined, sizeof(__pyx_k_Variable_x_is_not_defined), 0, 0, 1, 0},
    {&__pyx_n_s__10, __pyx_k__10, sizeof(__pyx_k__10), 0, 0, 1, 1},
    {&__pyx_n_s__38, __pyx_k__38, sizeof(__pyx_k__38), 0, 0, 1, 1},
    {&__pyx_n_s_aa, __pyx_k_aa, sizeof(__pyx_k_aa), 0, 0, 1, 1},
    {&__pyx_n_s_am, __pyx_k_am, sizeof(__pyx_k_am), 0, 0, 1, 1},
    {&__pyx_n_s_asyncio_coroutines, __pyx_k_asyncio_coroutines, sizeof(__pyx_k_asyncio_coroutines), 0, 0, 1, 1},
    {&__pyx_n_s_ceil, __pyx_k_ceil, sizeof(__pyx_k_ceil), 0, 0, 1, 1},
    {&__pyx_n_s_cline_in_traceback, __pyx_k_cline_in_traceback, sizeof(__pyx_k_cline_in_traceback), 0, 0, 1, 1},
    {&__pyx_n_s_datetime, __pyx_k_datetime, sizeof(__pyx_k_datetime), 0, 0, 1, 1},
    {&__pyx_n_s_dict, __pyx_k_dict, sizeof(__pyx_k_dict), 0, 0, 1, 1},
    {&__pyx_n_s_doc, __pyx_k_doc, sizeof(__pyx_k_doc), 0, 0, 1, 1},
    {&__pyx_n_s_five, __pyx_k_five, sizeof(__pyx_k_five), 0, 0, 1, 1},
    {&__pyx_n_s_floor, __pyx_k_floor, sizeof(__pyx_k_floor), 0, 0, 1, 1},
    {&__pyx_n_s_gy, __pyx_k_gy, sizeof(__pyx_k_gy), 0, 0, 1, 1},
    {&__pyx_n_s_hello, __pyx_k_hello, sizeof(__pyx_k_hello), 0, 0, 1, 1},
    {&__pyx_kp_s_hello_pyx, __pyx_k_hello_pyx, sizeof(__pyx_k_hello_pyx), 0, 0, 1, 0},
    {&__pyx_n_s_i, __pyx_k_i, sizeof(__pyx_k_i), 0, 0, 1, 1},
    {&__pyx_n_s_import, __pyx_k_import, sizeof(__pyx_k_import), 0, 0, 1, 1},
    {&__pyx_n_s_init, __pyx_k_init, sizeof(__pyx_k_init), 0, 0, 1, 1},
    {&__pyx_n_s_init_subclass, __pyx_k_init_subclass, sizeof(__pyx_k_init_subclass), 0, 0, 1, 1},
    {&__pyx_n_s_initializing, __pyx_k_initializing, sizeof(__pyx_k_initializing), 0, 0, 1, 1},
    {&__pyx_n_s_is_coroutine, __pyx_k_is_coroutine, sizeof(__pyx_k_is_coroutine), 0, 0, 1, 1},
    {&__pyx_n_s_k, __pyx_k_k, sizeof(__pyx_k_k), 0, 0, 1, 1},
    {&__pyx_n_s_main, __pyx_k_main, sizeof(__pyx_k_main), 0, 0, 1, 1},
    {&__pyx_n_s_math, __pyx_k_math, sizeof(__pyx_k_math), 0, 0, 1, 1},
    {&__pyx_n_s_metaclass, __pyx_k_metaclass, sizeof(__pyx_k_metaclass), 0, 0, 1, 1},
    {&__pyx_n_s_module, __pyx_k_module, sizeof(__pyx_k_module), 0, 0, 1, 1},
    {&__pyx_n_s_myfunc1, __pyx_k_myfunc1, sizeof(__pyx_k_myfunc1), 0, 0, 1, 1},
    {&__pyx_n_s_name, __pyx_k_name, sizeof(__pyx_k_name), 0, 0, 1, 1},
    {&__pyx_n_s_now, __pyx_k_now, sizeof(__pyx_k_now), 0, 0, 1, 1},
    {&__pyx_n_s_one, __pyx_k_one, sizeof(__pyx_k_one), 0, 0, 1, 1},
    {&__pyx_n_s_prepare, __pyx_k_prepare, sizeof(__pyx_k_prepare), 0, 0, 1, 1},
    {&__pyx_n_s_print, __pyx_k_print, sizeof(__pyx_k_print), 0, 0, 1, 1},
    {&__pyx_n_s_qualname, __pyx_k_qualname, sizeof(__pyx_k_qualname), 0, 0, 1, 1},
    {&__pyx_n_s_range, __pyx_k_range, sizeof(__pyx_k_range), 0, 0, 1, 1},
    {&__pyx_n_s_s, __pyx_k_s, sizeof(__pyx_k_s), 0, 0, 1, 1},
    {&__pyx_kp_s_s_is_d, __pyx_k_s_is_d, sizeof(__pyx_k_s_is_d), 0, 0, 1, 0},
    {&__pyx_n_s_self, __pyx_k_self, sizeof(__pyx_k_self), 0, 0, 1, 1},
    {&__pyx_n_s_set_name, __pyx_k_set_name, sizeof(__pyx_k_set_name), 0, 0, 1, 1},
    {&__pyx_n_s_spec, __pyx_k_spec, sizeof(__pyx_k_spec), 0, 0, 1, 1},
    {&__pyx_n_s_super, __pyx_k_super, sizeof(__pyx_k_super), 0, 0, 1, 1},
    {&__pyx_n_s_test, __pyx_k_test, sizeof(__pyx_k_test), 0, 0, 1, 1},
    {&__pyx_n_s_test_arg, __pyx_k_test_arg, sizeof(__pyx_k_test_arg), 0, 0, 1, 1},
    {&__pyx_n_s_test_cast, __pyx_k_test_cast, sizeof(__pyx_k_test_cast), 0, 0, 1, 1},
    {&__pyx_n_s_test_class, __pyx_k_test_class, sizeof(__pyx_k_test_class), 0, 0, 1, 1},
    {&__pyx_n_s_test_class___init, __pyx_k_test_class___init, sizeof(__pyx_k_test_class___init), 0, 0, 1, 1},
    {&__pyx_n_s_test_class_hh, __pyx_k_test_class_hh, sizeof(__pyx_k_test_class_hh), 0, 0, 1, 1},
    {&__pyx_n_s_test_class_test_class_hh, __pyx_k_test_class_test_class_hh, sizeof(__pyx_k_test_class_test_class_hh), 0, 0, 1, 1},
    {&__pyx_n_s_test_datetime, __pyx_k_test_datetime, sizeof(__pyx_k_test_datetime), 0, 0, 1, 1},
    {&__pyx_n_s_test_dict, __pyx_k_test_dict, sizeof(__pyx_k_test_dict), 0, 0, 1, 1},
    {&__pyx_n_s_test_exception, __pyx_k_test_exception, sizeof(__pyx_k_test_exception), 0, 0, 1, 1},
    {&__pyx_n_s_test_for, __pyx_k_test_for, sizeof(__pyx_k_test_for), 0, 0, 1, 1},
    {&__pyx_n_s_test_format, __pyx_k_test_format, sizeof(__pyx_k_test_format), 0, 0, 1, 1},
    {&__pyx_n_s_test_global_var, __pyx_k_test_global_var, sizeof(__pyx_k_test_global_var), 0, 0, 1, 1},
    {&__pyx_n_s_test_if, __pyx_k_test_if, sizeof(__pyx_k_test_if), 0, 0, 1, 1},
    {&__pyx_n_s_test_list, __pyx_k_test_list, sizeof(__pyx_k_test_list), 0, 0, 1, 1},
    {&__pyx_n_s_test_math, __pyx_k_test_math, sizeof(__pyx_k_test_math), 0, 0, 1, 1},
    {&__pyx_n_s_test_numbers, __pyx_k_test_numbers, sizeof(__pyx_k_test_numbers), 0, 0, 1, 1},
    {&__pyx_n_s_test_strVar, __pyx_k_test_strVar, sizeof(__pyx_k_test_strVar), 0, 0, 1, 1},
    {&__pyx_n_s_test_string, __pyx_k_test_string, sizeof(__pyx_k_test_string), 0, 0, 1, 1},
    {&__pyx_n_s_test_variables, __pyx_k_test_variables, sizeof(__pyx_k_test_variables), 0, 0, 1, 1},
    {&__pyx_n_s_test_while, __pyx_k_test_while, sizeof(__pyx_k_test_while), 0, 0, 1, 1},
    {&__pyx_n_s_three, __pyx_k_three, sizeof(__pyx_k_three), 0, 0, 1, 1},
    {&__pyx_n_s_two, __pyx_k_two, sizeof(__pyx_k_two), 0, 0, 1, 1},
    {&__pyx_kp_s_variables_test, __pyx_k_variables_test, sizeof(__pyx_k_variables_test), 0, 0, 1, 0},
    {&__pyx_n_s_w, __pyx_k_w, sizeof(__pyx_k_w), 0, 0, 1, 1},
    {&__pyx_n_s_wrong, __pyx_k_wrong, sizeof(__pyx_k_wrong), 0, 0, 1, 1},
    {&__pyx_n_s_x, __pyx_k_x, sizeof(__pyx_k_x), 0, 0, 1, 1},
    {&__pyx_kp_s_x_456, __pyx_k_x_456, sizeof(__pyx_k_x_456), 0, 0, 1, 0},
    {&__pyx_kp_s_x_456_2, __pyx_k_x_456_2, sizeof(__pyx_k_x_456_2), 0, 0, 1, 0},
    {&__pyx_n_s_y, __pyx_k_y, sizeof(__pyx_k_y), 0, 0, 1, 1},
    {&__pyx_n_s_yes, __pyx_k_yes, sizeof(__pyx_k_yes), 0, 0, 1, 1},
    {&__pyx_n_s_z, __pyx_k_z, sizeof(__pyx_k_z), 0, 0, 1, 1},
    {0, 0, 0, 0, 0, 0, 0}
  };
  return __Pyx_InitStrings(__pyx_string_tab);
3.利用
__pyx_string_tab将字符串与PyObject联系,再调用
__Pyx_InitStrings初始化字符串对象(详解__Pyx_InitStrings使用)
C++ __Pyx_InitStrings函数代码示例 - 纯净天空 (vimsky.com)
在逆向时,可以通过这个特性快速找到对应的project
4.辨析一下__Pyx_StringTabEntry和__pyx_string_tab
我在审计的时候发现了__Pyx_StringTabEntry结构体,发现和前面的__pyx_string_tab数组有点关系分析一下
如下:

1.Pyx_StringTabEntry结构体的定义
typedef struct {
    const char *p;    /* 存储字符串对象的指针 */
    const char *s;    /* 字符串的内容*/
    Py_ssize_t n;     /* 字符串的长度*/
    int t;            /* 字符串的类型 */
    int intern;       /* Whether the string is interned or not */
} __Pyx_StringTabEntry;
2.举个例子
def greet():
    return "Hello, World!"
cython代码大致结构
static const char __pyx_k_Hello_World[] = "Hello, World!";

static __Pyx_StringTabEntry __pyx_string_tab[] = {
    {&__pyx_n_s_Hello_World, __pyx_k_Hello_World, sizeof(__pyx_k_Hello_World) - 1, 0, 1},
    {0, 0, 0, 0, 0}
};
完整的实现
在模块初始化过程中,Cython 会调用一个函数(如 __Pyx_InitStrings),使用 __pyx_string_tab 来初始化所有字符串常量,
然后这个函数遍历 __pyx_string_tab,初始化每个字符串条目,并将字符串对象的指针存储在相应的结构体字段中
static int __Pyx_InitStrings(__Pyx_StringTabEntry *t) {
    while (t->p) {
        // 初始化字符串对象,并将其指针赋值给 t->p
        t++;
    }
    return 0;
}
2.整数常量的构造
1.概述
整数常量的构造涉及将 Python 代码中的整数常量转换为 C 代码中的相应表示形式。这包括处理各种整数类型(如短整型、整型、长整型和超长整型)以及确保在生成的 C 代码中正确初始化和使用这些常量
2.简要分析
1.整数类型转换
在cython是可以直接引用
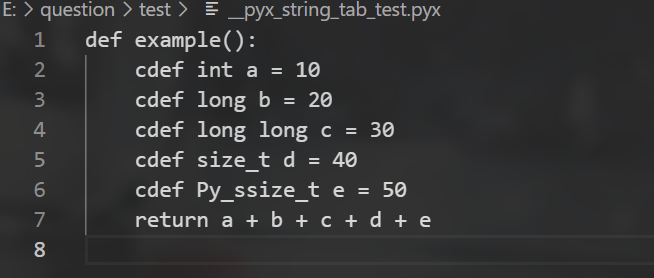
def example():
    cdef int a = 10
    cdef long b = 20
    cdef long long c = 30
    cdef size_t d = 40
    cdef Py_ssize_t e = 50
    return a + b + c + d + e
但是转化为c代码时,类似于(简化版本)
static PyObject *__pyx_pf_7example(void) {
    int __pyx_v_a;
    long __pyx_v_b;
    long long __pyx_v_c;
    size_t __pyx_v_d;
    Py_ssize_t __pyx_v_e;
    PyObject *__pyx_r = NULL;
    __Pyx_RefNannyDeclarations
    __Pyx_RefNannySetupContext("example", 0);

    // 初始化整数常量
    __pyx_v_a = 10;
    __pyx_v_b = 20;
    __pyx_v_c = 30;
    __pyx_v_d = 40;
    __pyx_v_e = 50;

    // 计算和返回结果
    __pyx_r = PyInt_FromLong((__pyx_v_a + __pyx_v_b + __pyx_v_c + __pyx_v_d + __pyx_v_e));
    __Pyx_RefNannyFinishContext();
    return __pyx_r;
}
2.处理大整数
超出 C 的基本整数类型范围的整数,Cython 使用 Python 的 PyLong 类型来表示
例如:
def large_int_example():
    cdef long long big_int = 12345678901234567890
    return big_int
转换
static PyObject *__pyx_pf_14large_int_example(void) {
    long long __pyx_v_big_int;
    PyObject *__pyx_r = NULL;
    __Pyx_RefNannyDeclarations
    __Pyx_RefNannySetupContext("large_int_example", 0);

    // 初始化大整数常量
    __pyx_v_big_int = 12345678901234567890LL;

    // 返回结果
    __pyx_r = PyLong_FromLongLong(__pyx_v_big_int);
    __Pyx_RefNannyFinishContext();
    return __pyx_r;
}
3.源码分析
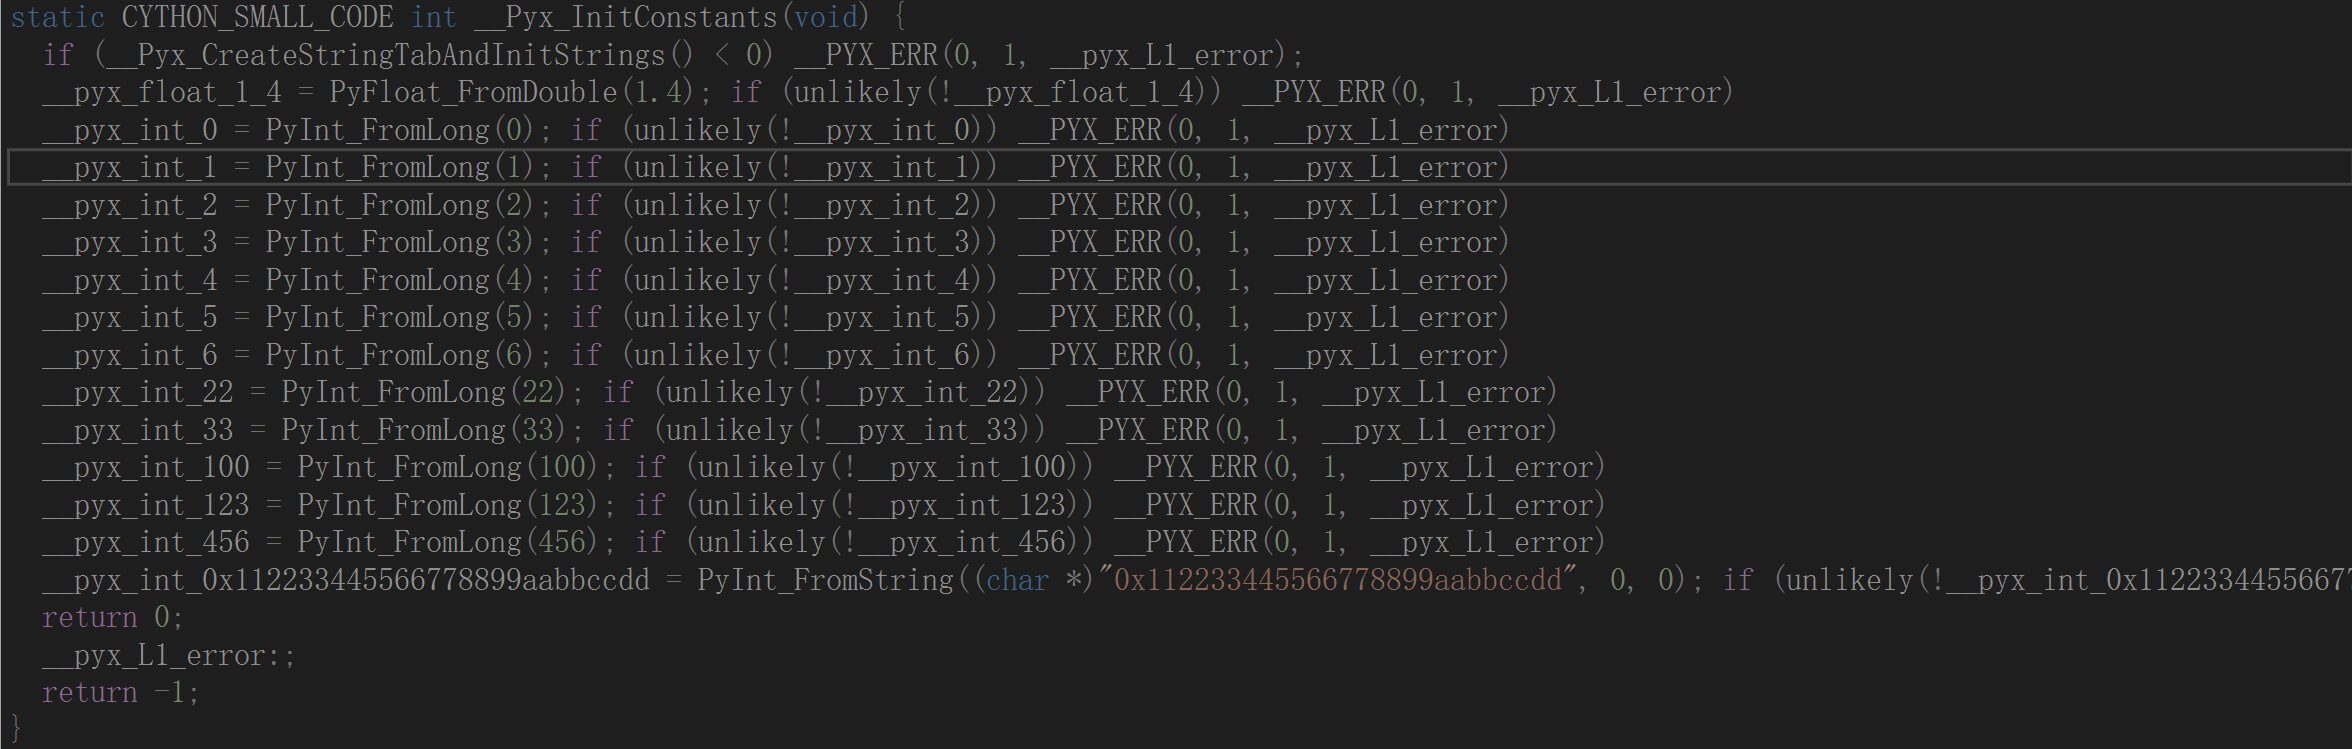
整数属于全局变量,在 __Pyx_InitGlobals 中初始化
static CYTHON_SMALL_CODE int __Pyx_InitConstants(void) {
  if (__Pyx_CreateStringTabAndInitStrings() < 0) __PYX_ERR(0, 1, __pyx_L1_error);
  __pyx_float_1_4 = PyFloat_FromDouble(1.4); if (unlikely(!__pyx_float_1_4)) __PYX_ERR(0, 1, __pyx_L1_error)
  __pyx_int_0 = PyInt_FromLong(0); if (unlikely(!__pyx_int_0)) __PYX_ERR(0, 1, __pyx_L1_error)
  __pyx_int_1 = PyInt_FromLong(1); if (unlikely(!__pyx_int_1)) __PYX_ERR(0, 1, __pyx_L1_error)
  __pyx_int_2 = PyInt_FromLong(2); if (unlikely(!__pyx_int_2)) __PYX_ERR(0, 1, __pyx_L1_error)
  __pyx_int_3 = PyInt_FromLong(3); if (unlikely(!__pyx_int_3)) __PYX_ERR(0, 1, __pyx_L1_error)
  __pyx_int_4 = PyInt_FromLong(4); if (unlikely(!__pyx_int_4)) __PYX_ERR(0, 1, __pyx_L1_error)
  __pyx_int_5 = PyInt_FromLong(5); if (unlikely(!__pyx_int_5)) __PYX_ERR(0, 1, __pyx_L1_error)
  __pyx_int_6 = PyInt_FromLong(6); if (unlikely(!__pyx_int_6)) __PYX_ERR(0, 1, __pyx_L1_error)
  __pyx_int_22 = PyInt_FromLong(22); if (unlikely(!__pyx_int_22)) __PYX_ERR(0, 1, __pyx_L1_error)
  __pyx_int_33 = PyInt_FromLong(33); if (unlikely(!__pyx_int_33)) __PYX_ERR(0, 1, __pyx_L1_error)
  __pyx_int_100 = PyInt_FromLong(100); if (unlikely(!__pyx_int_100)) __PYX_ERR(0, 1, __pyx_L1_error)
  __pyx_int_123 = PyInt_FromLong(123); if (unlikely(!__pyx_int_123)) __PYX_ERR(0, 1, __pyx_L1_error)
  __pyx_int_456 = PyInt_FromLong(456); if (unlikely(!__pyx_int_456)) __PYX_ERR(0, 1, __pyx_L1_error)
  __pyx_int_0x112233445566778899aabbccdd = PyInt_FromString((char *)"0x112233445566778899aabbccdd", 0, 0); if (unlikely(!__pyx_int_0x112233445566778899aabbccdd)) __PYX_ERR(0, 1, __pyx_L1_error)
  return 0;
  __pyx_L1_error:;
  return -1;
}
3.函数声明
1.概述
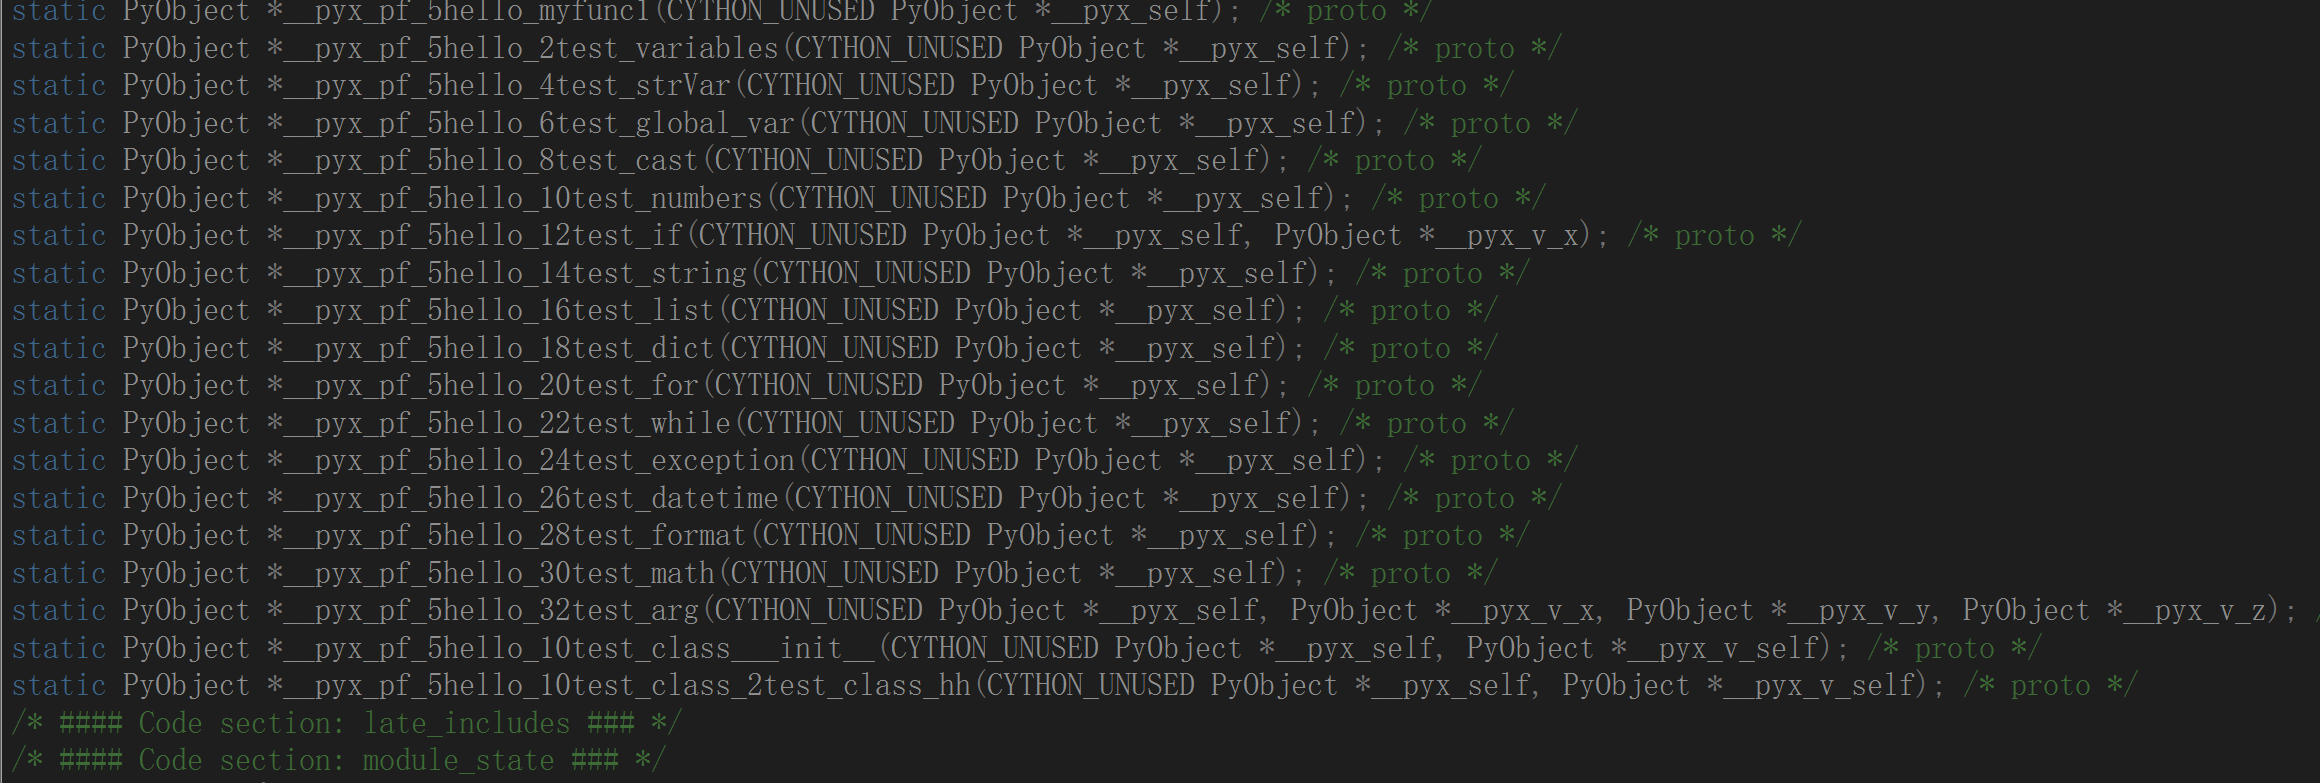
2.源码
static PyObject *__pyx_pf_5hello_myfunc1(CYTHON_UNUSED PyObject *__pyx_self); /* proto */
static PyObject *__pyx_pf_5hello_2test_variables(CYTHON_UNUSED PyObject *__pyx_self); /* proto */
static PyObject *__pyx_pf_5hello_4test_strVar(CYTHON_UNUSED PyObject *__pyx_self); /* proto */
static PyObject *__pyx_pf_5hello_6test_global_var(CYTHON_UNUSED PyObject *__pyx_self); /* proto */
static PyObject *__pyx_pf_5hello_8test_cast(CYTHON_UNUSED PyObject *__pyx_self); /* proto */
static PyObject *__pyx_pf_5hello_10test_numbers(CYTHON_UNUSED PyObject *__pyx_self); /* proto */
static PyObject *__pyx_pf_5hello_12test_if(CYTHON_UNUSED PyObject *__pyx_self, PyObject *__pyx_v_x); /* proto */
static PyObject *__pyx_pf_5hello_14test_string(CYTHON_UNUSED PyObject *__pyx_self); /* proto */
static PyObject *__pyx_pf_5hello_16test_list(CYTHON_UNUSED PyObject *__pyx_self); /* proto */
static PyObject *__pyx_pf_5hello_18test_dict(CYTHON_UNUSED PyObject *__pyx_self); /* proto */
static PyObject *__pyx_pf_5hello_20test_for(CYTHON_UNUSED PyObject *__pyx_self); /* proto */
static PyObject *__pyx_pf_5hello_22test_while(CYTHON_UNUSED PyObject *__pyx_self); /* proto */
static PyObject *__pyx_pf_5hello_24test_exception(CYTHON_UNUSED PyObject *__pyx_self); /* proto */
static PyObject *__pyx_pf_5hello_26test_datetime(CYTHON_UNUSED PyObject *__pyx_self); /* proto */
static PyObject *__pyx_pf_5hello_28test_format(CYTHON_UNUSED PyObject *__pyx_self); /* proto */
static PyObject *__pyx_pf_5hello_30test_math(CYTHON_UNUSED PyObject *__pyx_self); /* proto */
static PyObject *__pyx_pf_5hello_32test_arg(CYTHON_UNUSED PyObject *__pyx_self, PyObject *__pyx_v_x, PyObject *__pyx_v_y, PyObject *__pyx_v_z); /* proto */
static PyObject *__pyx_pf_5hello_10test_class___init__(CYTHON_UNUSED PyObject *__pyx_self, PyObject *__pyx_v_self); /* proto */
static PyObject *__pyx_pf_5hello_10test_class_2test_class_hh(CYTHON_UNUSED PyObject *__pyx_self, PyObject *__pyx_v_self); /* proto */
/* #### Code section: late_includes ### */
/* #### Code section: module_state ### */
2.详细分析一下__pyx_pf_5hello_32test_arg和 __pyx_pf_5hello_10test_class_2test_class_hh函数
1.__pyx_pf_5hello_32test_arg
这个函数对应于 Python 定义的函数 test_arg(x, y, z),它在 Cython 中被编译成如下形式:
def test_arg(x, y, z):
    # function body
在 Cython 编译过程中,这个 Python 函数被转换为 C 函数,形式如下:
static PyObject *__pyx_pf_5hello_32test_arg(CYTHON_UNUSED PyObject *__pyx_self, PyObject *__pyx_v_x, PyObject *__pyx_v_y, PyObject *__pyx_v_z);
1.__pyx_pf_5hello_32test_arg是C 函数的名称
- 前缀 __pyx_pf_是 Cython 生成的函数前缀
- 5hello`表示模块名
- 32test_arg` 表示函数名
2.CYTHON_UNUSED PyObject *__pyx_self 是第一个参数
通常在 Cython 中用作占位符,因为函数没有 self`参数
3.PyObject *__pyx_v_x, PyObject *__pyx_v_y, PyObject *__pyx_v_z 参数
对应于 Python 函数参数 x, y, z`的 C 对象
2.__pyx_pf_5hello_10test_class_2test_class_hh
这个函数对应于一个类方法 test_class.test_class_hh,其 Python 定义如下:
class test_class:
    def test_class_hh(self):
        # method body
在 Cython 编译过程中,这个类方法被转换为 C 函数,形式如下:
static PyObject *__pyx_pf_5hello_10test_class_2test_class_hh(CYTHON_UNUSED PyObject *__pyx_self, PyObject *__pyx_v_self);
1.__pyx_pf_5hello_10test_class_2test_class_hh 是 C 函数的名称
- pyx_pf 是 Cython 生成的函数前缀
- 5hello 表示模块名
- 10test_class表示类名
- 2test_class_hh表示方法名
2.CYTHON_UNUSED PyObject *__pyx_self是第一个参数
通常在 Cython 中用作占位符,因为方法没有 self参数
3.PyObject *__pyx_v_self参数
对应于 Python 方法中的 self参数的 C 对象
4.myfunc1() 分析
1.源码
04: def myfunc1():
/* Python wrapper */
static PyObject *__pyx_pw_5hello_1myfunc1(PyObject *__pyx_self, CYTHON_UNUSED PyObject *unused); /*proto*/
static PyMethodDef __pyx_mdef_5hello_1myfunc1 = {"myfunc1", (PyCFunction)__pyx_pw_5hello_1myfunc1, METH_NOARGS, 0};
static PyObject *__pyx_pw_5hello_1myfunc1(PyObject *__pyx_self, CYTHON_UNUSED PyObject *unused) {
  CYTHON_UNUSED PyObject *const *__pyx_kwvalues;
  PyObject *__pyx_r = 0;
  __Pyx_RefNannyDeclarations
  __Pyx_RefNannySetupContext("myfunc1 (wrapper)", 0);
  __pyx_kwvalues = __Pyx_KwValues_VARARGS(__pyx_args, __pyx_nargs);
  __pyx_r = __pyx_pf_5hello_myfunc1(__pyx_self);

  /* function exit code */
  __Pyx_RefNannyFinishContext();
  return __pyx_r;
}

static PyObject *__pyx_pf_5hello_myfunc1(CYTHON_UNUSED PyObject *__pyx_self) {
  PyObject *__pyx_r = NULL;
/* … */
  /* function exit code */
  __pyx_r = Py_None; __Pyx_INCREF(Py_None);
  goto __pyx_L0;
  __pyx_L1_error:;
  __Pyx_XDECREF(__pyx_t_1);
  __Pyx_AddTraceback("hello.myfunc1", __pyx_clineno, __pyx_lineno, __pyx_filename);
  __pyx_r = NULL;
  __pyx_L0:;
  __Pyx_XGIVEREF(__pyx_r);
  __Pyx_RefNannyFinishContext();
  return __pyx_r;
}
/* … */
  __pyx_t_2 = __Pyx_CyFunction_New(&__pyx_mdef_5hello_1myfunc1, 0, __pyx_n_s_myfunc1, NULL, __pyx_n_s_hello, __pyx_d, ((PyObject *)__pyx_codeobj__11)); if (unlikely(!__pyx_t_2)) __PYX_ERR(0, 4, __pyx_L1_error)
  __Pyx_GOTREF(__pyx_t_2);
  if (PyDict_SetItem(__pyx_d, __pyx_n_s_myfunc1, __pyx_t_2) < 0) __PYX_ERR(0, 4, __pyx_L1_error)
  __Pyx_DECREF(__pyx_t_2); __pyx_t_2 = 0;
/* … */
  __pyx_codeobj__11 = (PyObject*)__Pyx_PyCode_New(0, 0, 0, 0, 0, CO_OPTIMIZED|CO_NEWLOCALS, __pyx_empty_bytes, __pyx_empty_tuple, __pyx_empty_tuple, __pyx_empty_tuple, __pyx_empty_tuple, __pyx_empty_tuple, __pyx_kp_s_hello_pyx, __pyx_n_s_myfunc1, 4, __pyx_empty_bytes); if (unlikely(!__pyx_codeobj__11)) __PYX_ERR(0, 4, __pyx_L1_error)
+005:     print("This is myfunc1.")
  __pyx_t_1 = __Pyx_PyObject_Call(__pyx_builtin_print, __pyx_tuple_, NULL); if (unlikely(!__pyx_t_1)) __PYX_ERR(0, 5, __pyx_L1_error)
  __Pyx_GOTREF(__pyx_t_1);
  __Pyx_DECREF(__pyx_t_1); __pyx_t_1 = 0;
/* … */
  __pyx_tuple_ = PyTuple_Pack(1, __pyx_kp_s_This_is_myfunc1); if (unlikely(!__pyx_tuple_)) __PYX_ERR(0, 5, __pyx_L1_error)
  __Pyx_GOTREF(__pyx_tuple_);
  __Pyx_GIVEREF(__pyx_tuple_);
 006:
字符串常量
字符串常量 __pyx_kp_s_This_is_myfunc1被初始化为 “This is myfunc1.”
创建元组
创建包含该字符串的元组:
__pyx_tuple_ = PyTuple_Pack(1, __pyx_kp_s_This_is_myfunc1);
if (unlikely(!__pyx_tuple_)) __PYX_ERR(0, 5, __pyx_L1_error)
__Pyx_GOTREF(__pyx_tuple_);
__Pyx_GIVEREF(__pyx_tuple_);
- PyTuple_Pack(1, __pyx_kp_s_This_is_myfunc1):创建一个包含一个元素的元组,该元素是字符串 __pyx_kp_s_This_is_myfunc1
- if (unlikely(!_pyx_tuple)) __PYX_ERR(0, 5, __pyx_L1_error):检查元组创建是否成功,如果失败,则跳转到错误处理代码
- __Pyx_GOTREF(_pyx_tuple):记录元组对象 pyx_tuple 的引用,防止垃圾回收
- __Pyx_GIVEREF(_pyx_tuple):告诉垃圾回收器这个对象已经被引用了
2.分析printf的实现
print("This is myfunc1.")
  __pyx_t_1 = __Pyx_PyObject_Call(__pyx_builtin_print, __pyx_tuple_, NULL); if (unlikely(!__pyx_t_1)) __PYX_ERR(0, 5, __pyx_L1_error)
  __Pyx_GOTREF(__pyx_t_1);
  __Pyx_DECREF(__pyx_t_1); __pyx_t_1 = 0;
/* … */
  __pyx_tuple_ = PyTuple_Pack(1, __pyx_kp_s_This_is_myfunc1); if (unlikely(!__pyx_tuple_)) __PYX_ERR(0, 5, __pyx_L1_error)
  __Pyx_GOTREF(__pyx_tuple_);
  __Pyx_GIVEREF(__pyx_tuple_);
__pyx_t_1 = __Pyx_PyObject_Call(__pyx_builtin_print, _pyx_tuple, NULL);
if (unlikely(!__pyx_t_1)) __PYX_ERR(0, 5, __pyx_L1_error)
__Pyx_GOTREF(__pyx_t_1);
__Pyx_DECREF(__pyx_t_1); __pyx_t_1 = 0;
- __pyx_t_1:存储函数调用的返回值
- __Pyx_PyObject_Call(__pyx_builtin_print, _pyx_tuple, NULL):调用 print 函数,参数是 _pyx_tuple(即包含字符串 “This is myfunc1.” 的元组),没有关键字参数
- 检查 print 调用是否成功,如果失败,则跳转到错误处理代码
- __Pyx_GOTREF(__pyx_t_1):记录 __pyx_t_1 的引用
- __Pyx_DECREF(__pyx_t_1); __pyx_t_1 = 0:减少 __pyx_t_1 的引用计数,并将其设置为 0,防止后续使用无效指针
3.回收站
前面我们提到了回收站机制,这里详细解释cython中严格处理的回收站的机制
1.基本原理
引用计数:
- 每个对象维护一个引用计数,当有新的引用指向该对象时,引用计数增加;当引用被删除时,引用计数减少
- 当对象的引用计数降为零时,说明没有任何地方引用该对象,可以安全地回收其占用的内存
标记-清除(Mark and Sweep):
- 垃圾回收器定期扫描所有对象,标记可达的(仍在使用的)对象
- 然后清除所有未标记的对象(即不再使用的对象),释放它们占用的内存
2.cython中的调用处理
__Pyx_GOTREF(__pyx_t_1);//增加 __pyx_t_1 的引用计数,表示当前代码块持有这个对象的引用
__Pyx_DECREF(__pyx_t_1); //减少 __pyx_t_1 的引用计数,当引用计数为零时,内存会被回收
__pyx_t_1 = 0;//__pyx_t_1 = 0;:将指针设置为 0,防止悬空指针
3.实现的大致代码框架
# 定义一个 Cython 类 MyClass
cdef class MyClass:
    cdef int value  # 类的成员变量,类型为 int

    # 类的构造函数,用于初始化对象
    def __cinit__(self, int value):
        self.value = value  # 将传入的值赋给成员变量 value

    # 类的析构函数,当对象被垃圾回收时调用
    def __dealloc__(self):
        print("Deallocating MyClass with value:", self.value)  # 打印对象被回收时的消息

    # 一个方法,用于获取对象的 value 值
    def get_value(self):
        return self.value

# 创建多个 MyClass 对象的函数
def create_objects(int n):
    cdef list objects = []  # 定义一个列表用于存储对象
    for i in range(n):  # 循环创建 n 个 MyClass 对象
        obj = MyClass(i)  # 创建一个 MyClass 对象,并传入当前的循环计数 i 作为参数
        objects.append(obj)  # 将创建的对象添加到列表中
    return objects  # 返回包含所有创建对象的列表
转换为cython代码
/* Deallocating MyClass with value: ... */
static void __pyx_tp_dealloc_MyClass(PyObject *o) {
    MyClass *p = (MyClass *)o;
    PyObject_GC_UnTrack(o);
    Py_TRASHCAN_SAFE_BEGIN(o)
    p->__pyx_vtab = NULL;
    __Pyx_call_destructor(p);
    PyObject_GC_Del(o);
    Py_TRASHCAN_SAFE_END(o)
}
5.test_variables()分析
这里关于def函数的定义比较冗杂,简单看看就行
1.cython生成一个test_variables包装器
static PyObject *__pyx_pw_5hello_3test_variables(PyObject *__pyx_self, CYTHON_UNUSED PyObject *unused); /*proto*/
static PyMethodDef __pyx_mdef_5hello_3test_variables = {"test_variables", (PyCFunction)__pyx_pw_5hello_3test_variables, METH_NOARGS, 0};//定义了一个 PyMethodDef 结构体,将 test_variables 函数绑定到模块 hello 上
2.Python 包装器的实现
static PyObject *__pyx_pw_5hello_3test_variables(PyObject *__pyx_self, CYTHON_UNUSED PyObject *unused) {
    CYTHON_UNUSED PyObject *const *__pyx_kwvalues;
    PyObject *__pyx_r = 0;
    __Pyx_RefNannyDeclarations
    __Pyx_RefNannySetupContext("test_variables (wrapper)", 0);
    __pyx_kwvalues = __Pyx_KwValues_VARARGS(__pyx_args, __pyx_nargs);
    __pyx_r = __pyx_pf_5hello_2test_variables(__pyx_self);//调用实际实现函数_pyx_pf_5hello_2test_variables 并将结果赋给 __pyx_r

    /* function exit code */
    __Pyx_RefNannyFinishContext();//在函数结束时,完成引用计数管理并返回结果
    return __pyx_r;//pyx_r返回值指针,初始为 0
}
- __pyx_pw_5hello_3test_variables是Python 包装器函数,它将调用委托给实际的实现函数 __pyx_pf_5hello_2test_variables
- __Pyx_RefNannySetupContext`和 __Pyx_RefNannyFinishContext用于引用计数管理,帮助避免内存泄漏
- pyx_kwvalues处理可变参数,但这里没有用到,因为函数不接受参数
3.实现函数
static PyObject *__pyx_pf_5hello_2test_variables(CYTHON_UNUSED PyObject *__pyx_self) {//__pyx_pf_5hello_2test_variables 是实际的实现函数
    long __pyx_v_x;//__pyx_v_x是局部变量 x,类型为long
    PyObject *__pyx_v_y = NULL;//__pyx_v_y是局部变量 y,类型为 PyObject*Python 对象
    PyObject *__pyx_r = NULL;

    __pyx_v_x = 5;
    __pyx_v_y = __Pyx_PyObject_FromString("variables test.");//将y赋值为字符串 "variables test.",并进行错误检查
    if (unlikely(!__pyx_v_y)) __PYX_ERR(0, 9, __pyx_L1_error)

    __pyx_t_1 = __Pyx_PyInt_From_long(__pyx_v_x); //使用 __Pyx_PyInt_From_long将x转换为 Python 整数对象并打印
    if (unlikely(!__pyx_t_1)) __PYX_ERR(0, 10, __pyx_L1_error)
    __Pyx_GOTREF(__pyx_t_1);
    __pyx_t_2 = PyTuple_New(1);
    if (unlikely(!__pyx_t_2)) __PYX_ERR(0, 10, __pyx_L1_error)
    __Pyx_GOTREF(__pyx_t_2);
    __Pyx_INCREF(__pyx_t_1);
    PyTuple_SET_ITEM(__pyx_t_2, 0, __pyx_t_1);
    __pyx_t_1 = 0;
    __pyx_t_1 = __Pyx_PyObject_Call(__pyx_builtin_print, __pyx_t_2, NULL);
    if (unlikely(!__pyx_t_1)) __PYX_ERR(0, 10, __pyx_L1_error)
    __Pyx_GOTREF(__pyx_t_1);
    __Pyx_DECREF(__pyx_t_2);
    __pyx_t_2 = 0;
    __Pyx_DECREF(__pyx_t_1);
    __pyx_t_1 = 0;

    __pyx_t_1 = __Pyx_PyObject_CallOneArg(__pyx_builtin_print, __pyx_v_y);
    if (unlikely(!__pyx_t_1)) __PYX_ERR(0, 11, __pyx_L1_error)
    __Pyx_GOTREF(__pyx_t_1);
    __Pyx_DECREF(__pyx_t_1);
    __pyx_t_1 = 0;

    __pyx_r = Py_None; //如果没有错误,返回 Py_None (Python 的 None 对象)
    __Pyx_INCREF(Py_None);
    goto __pyx_L0;
    __pyx_L1_error:;//如果有错误,进行错误处理,释放资源并添加回溯信息
    __Pyx_XDECREF(__pyx_t_1);
    __Pyx_XDECREF(__pyx_t_2);
    __Pyx_AddTraceback("hello.test_variables", __pyx_clineno, __pyx_lineno, __pyx_filename);
    __pyx_r = NULL;
    __pyx_L0:;
    __Pyx_XDECREF(__pyx_v_y);
    __Pyx_XGIVEREF(__pyx_r);
    __Pyx_RefNannyFinishContext();
    return __pyx_r;//函数结束时,释放 __pyx_v_y的引用,返回结果 __pyx_r
}
4.printf的调用
v0 = __pyx_kp_s_variables_test; // 引用字符串
x = PyLong_FromLong(5LL);

args = PyTuple_Pack(1LL, x);// 调用 print
v6 = PyObject_GetAttr(__pyx_b, __pyx_n_s_print);
PyObject_Call(v6, args, 0LL);
6.test_global_var() 分析
def test_global_var():
    global gy
    print(gy)
这里关于def的函数定义就不再解析了,大体差不多
主要解析这里引用字符串和调用print的函数
v0 = PyObject_GetAttr(__pyx_b, __pyx_n_s_gy); // 从当前模块查找globals,__pyx_b是指向__builtin__的指针,__pyx_n_s_gy是一个指向gy的指针,PyObject_GetAttr从__builtin__获得gy的属性
// 调用 print
v1 = PyTuple_Pack(1LL, v0);//创建一个包含给定元素数量的元组,这里是包含1LL元素v0的元组
v3 = PyObject_GetAttr(__pyx_b, __pyx_n_s_print);//跟上面获取gy元素的格式相似,目的就是调用print函数
PyObject_Call(v3, v2, 0LL);//调用print函数传递v1作为参数(0LL表示没有关键字参数)
__builtin__是cython中的一个内置模块:
包含所有的内置对象,函数,异常,常量(提供一组标准的内置对象,会自动加载的这个模块,不会在用户处显示的导入),比如
函数:print,len,range
异常:Exception,TyprError
常量:none,true,false
7.test_numbers() 分析
def test_numbers():
    x = 123
    y = 12.3
    z = 0x112233445566778899AABBCCDD
    print(x, y, z)
查看这个地方构造元组的汇编
mov     edi, 3          ; size//创建一个包含三个元素的元组
call    _PyTuple_New//调用 _PyTuple_New根据前面传入的参数的个数进行元组对象的构造
mov     [rax+18h], r12  ; 123//rax通常保存 _PyTuple_New返回的元组的对象的基地址
mov     [rax+20h], r15  ; 12.3//第二个参数
mov     [rax+28h], r14  ; 0x112233445566778899AABBCCDD//第三个参数
8.test_if() 分析
def test_if(x):
    if x > 456:
        print("x > 456")
    else:
        print("x <= 456")
分析cython的实现
v2 = PyObject_RichCompare(a2, __pyx_int_456, 4);//调用PyObject_RichCompare比较a2和456,这个地方4是比较操作符,比较两个数值是否相等
v5 = PyObject_IsTrue(v2);//调用PyObject_IsTrue将v2转换为一个布尔值,v2为true则v5为1,反之为0
if (v5)
    goto LABEL_8;
goto LABEL_13;

LABEL_8://为真就跳转
    // 输出 x > 456
    printf("x > 456\n");
    // 其他代码
    return;

LABEL_13://为假就跳转
    // 输出 x <= 456
    printf("x <= 456\n");
    // 其他代码
    return;
详细说明:
v2 = PyObject_RichCompare(a2, __pyx_int_456, 4)
这个地方的4是指比较操作符的代码,gpt的解释有问题,这里在官方文档中找到关于他的使用
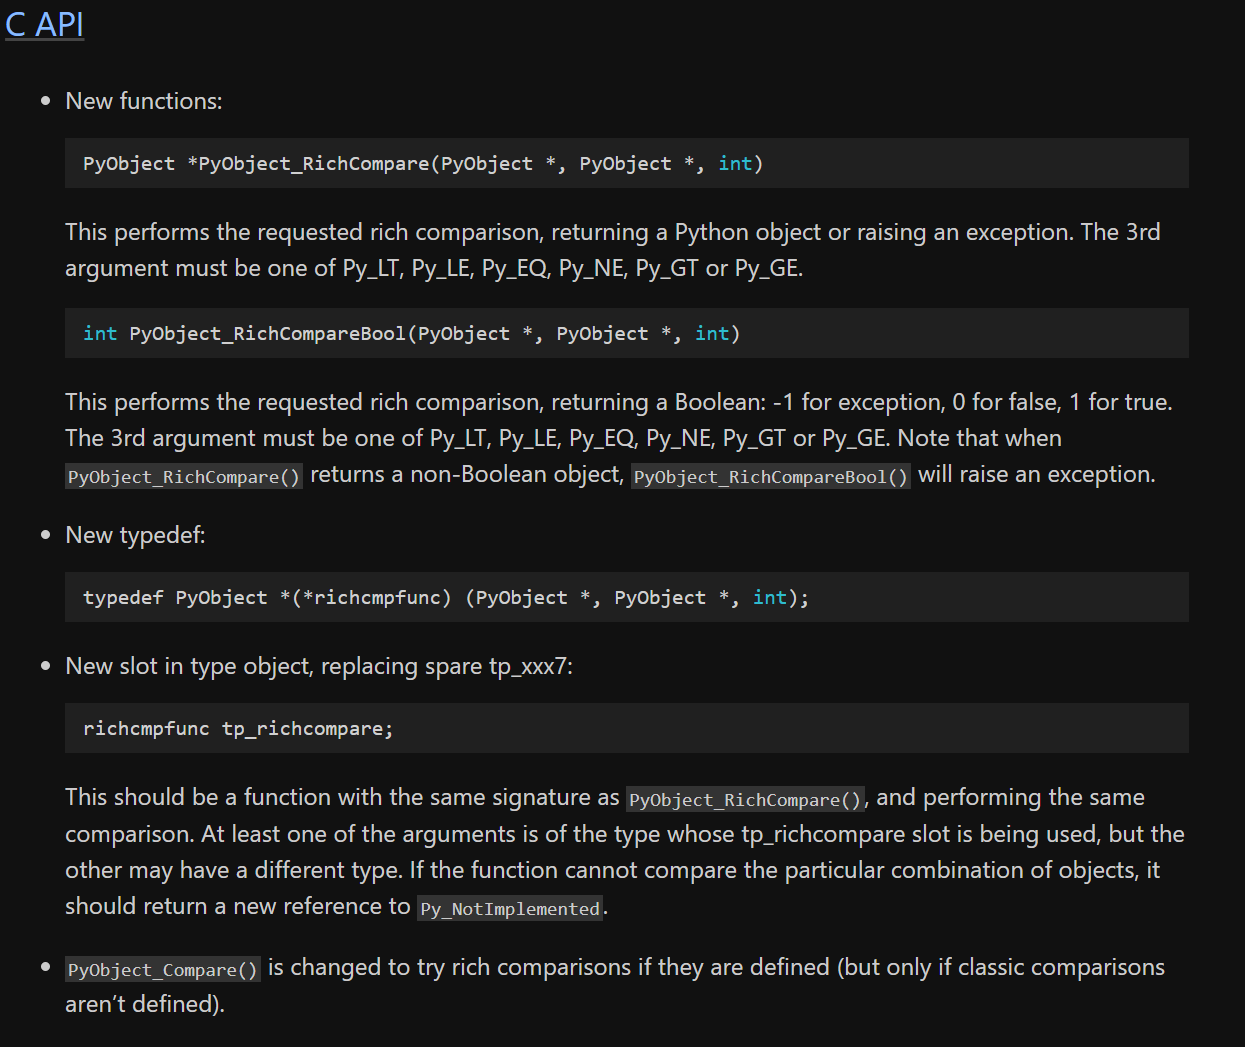
简单来说就是一个比较函数,返回一个布尔值(异常返回-1,结果为假0,为真返回1)
第三个参数的op为6种比较操作符之一
Py_LT(1):小于 <
Py_LE(2):小于等于 <=
Py_EQ(3):等于 ==
Py_NE(4):不等于 !=
Py_GT(5):大于 >
Py_GE(6):大于等于 >=
9.test_string() 分析
def test_string():
    x = "I am str."
    y = len(x)
    z = x[1]
    w = x[2:]
    print(x, y, z, w)

    if "am" in x:
        print("yes")
    else:
        print("w
对照源码分析
def test_string():
+041:     x = "I am str."
  __Pyx_INCREF(__pyx_kp_s_I_am_str);//这里是前面说过的回收站机制,为字符串__pyx_kp_s_I_am_str添加引用计数
  __pyx_v_x = __pyx_kp_s_I_am_str;//赋值
+042:     y = len(x)
  __pyx_t_1 = PyObject_Length(__pyx_v_x); //获取长度,并将长度保存在t_1中
  if (unlikely(__pyx_t_1 == ((Py_ssize_t)-1))) __PYX_ERR(0, 42, __pyx_L1_error)//检查长度是否异常
  __pyx_v_y = __pyx_t_1;//将长度赋值给y
+043:     z = x[1]
  __pyx_t_2 = __Pyx_GetItemInt(__pyx_v_x, 1, long, 1, __Pyx_PyInt_From_long, 0, 0, 1); //将x中索引次数为1的字符存储在t_2中
  if (unlikely(!__pyx_t_2)) __PYX_ERR(0, 43, __pyx_L1_error)//检测是否存储成功,错误则跳转到__pyx_L1_error
  __Pyx_GOTREF(__pyx_t_2);//继续增加该字符串的计数,防止回收
  __pyx_v_z = __pyx_t_2;
  __pyx_t_2 = 0;//重置临时变量t_2
+044:     w = x[2:]
  __pyx_t_2 = __Pyx_PyObject_GetSlice(__pyx_v_x, 2, 0, NULL, NULL, &__pyx_slice__4, 1, 0, 1); //获取字符串 x 的切片,从索引 2 开始,直到结束,并将结果存储在 __pyx_t_2 中
  if (unlikely(!__pyx_t_2)) __PYX_ERR(0, 44, __pyx_L1_error)
  __Pyx_GOTREF(__pyx_t_2);
  __pyx_v_w = __pyx_t_2;
  __pyx_t_2 = 0;
/* … */
  __pyx_slice__4 = PySlice_New(__pyx_int_2, Py_None, Py_None); //创建一个新的 PySlice 对象,表示从索引 2 开始直到末尾
  if (unlikely(!__pyx_slice__4)) __PYX_ERR(0, 44, __pyx_L1_error)
  __Pyx_GOTREF(__pyx_slice__4);
  __Pyx_GIVEREF(__pyx_slice__4);
+045:     print(x, y, z, w)
  __pyx_t_2 = PyInt_FromSsize_t(__pyx_v_y); //将 y 转换为 Python 整数对象,并将结果存储在 __pyx_t_2 中
  if (unlikely(!__pyx_t_2)) __PYX_ERR(0, 45, __pyx_L1_error)
  __Pyx_GOTREF(__pyx_t_2);
  __pyx_t_3 = PyTuple_New(4); //创建一个新的 Python 元组,大小为 4
  if (unlikely(!__pyx_t_3)) __PYX_ERR(0, 45, __pyx_L1_error)
  __Pyx_GOTREF(__pyx_t_3);
  __Pyx_INCREF(__pyx_v_x);
  __Pyx_GIVEREF(__pyx_v_x);
  if (__Pyx_PyTuple_SET_ITEM(__pyx_t_3, 0, __pyx_v_x)) __PYX_ERR(0, 45, __pyx_L1_error);//将 __pyx_t_x(即 y)设置为元组的第一个元素
  __Pyx_GIVEREF(__pyx_t_2);
  if (__Pyx_PyTuple_SET_ITEM(__pyx_t_3, 1, __pyx_t_2)) __PYX_ERR(0, 45, __pyx_L1_error);//将 __pyx_t_2(即 y)设置为元组的第二个元素
  __Pyx_INCREF(__pyx_v_z);
  __Pyx_GIVEREF(__pyx_v_z);
  if (__Pyx_PyTuple_SET_ITEM(__pyx_t_3, 2, __pyx_v_z)) __PYX_ERR(0, 45, __pyx_L1_error);//将 z 设置为元组的第三个元素
  __Pyx_INCREF(__pyx_v_w);
  __Pyx_GIVEREF(__pyx_v_w);
  if (__Pyx_PyTuple_SET_ITEM(__pyx_t_3, 3, __pyx_v_w)) __PYX_ERR(0, 45, __pyx_L1_error);//将 w 设置为元组的第四个元素
  __pyx_t_2 = 0;
  __pyx_t_2 = __Pyx_PyObject_Call(__pyx_builtin_print, __pyx_t_3, NULL);
  if (unlikely(!__pyx_t_2)) __PYX_ERR(0, 45, __pyx_L1_error)
  __Pyx_GOTREF(__pyx_t_2);
  __Pyx_DECREF(__pyx_t_3); __pyx_t_3 = 0;
  __Pyx_DECREF(__pyx_t_2); __pyx_t_2 = 0;
切片访问
从一个序列(如列表、元组或字符串)中提取一个子序列
__pyx_t_2 = __Pyx_PyObject_GetSlice(__pyx_v_x, 2, 0, NULL, NULL, &__pyx_slice__4, 1, 0, 1);
cython实现
通过__Pyx_PyObject_GetSlice辅助函数
__pyx_v_x: 这是需要进行切片操作的 Python 对象
2: 这是切片操作的起始索引。即,从索引 2 开始进行切片
0: 这是切片操作的结束索引(0一般表示切片一直进行到对象的末尾)
&__pyx_slice__4代表一个包含切片信息的 PyObject,实际相当于 slice(2, None)
python中实现
sequence[start:stop:step]
start: 切片开始的索引(包括)
stop: 切片结束的索引(不包括)
step: 步长,表示从 start 到 stop 之间每隔多少个元素取一个
示例:
s = "I am a string"
print(s[2:7])     # 输出 "am a "
print(s[::2])     # 输出 "Ia  tig"
print(s[::-1])    # 输出 "gnirts a ma I"
索引访问
索引访问只能获取单个元素,而不能获取多个元素或子序列
s = "I am a string"
print(s[0])       # 输出 "I"
print(s[-1])      # 输出 "g"
10.test_for()分析
源码
def test_for():
    s = 0
    for i in range(101):
        s = s + i
    print(s)对照源码分析
def test_for():
+080:     s = 0
+081:     for i in range(101):
  for (__pyx_t_1 = 0;__pyx_t_1 < 0x65;__pyx_t_1+=1) {//初始化循环变量__pyx_t_1,设置循环变量的大小
    __pyx_t_2 = __Pyx_PyInt_From_long(__pyx_t_1); //类型转换
    if (unlikely(!__pyx_t_2)) __PYX_ERR(0, 81, __pyx_L1_error)//异常判断
    __Pyx_GOTREF(__pyx_t_2);//计数
    __Pyx_XDECREF_SET(__pyx_v_i, __pyx_t_2);//引用的回收释放
    __pyx_t_2 = 0;
+082:         s = s + i
    __pyx_t_2 = PyNumber_Add(__pyx_v_s, __pyx_v_i); //调用windows的api进行加法
    if (unlikely(!__pyx_t_2)) __PYX_ERR(0, 82, __pyx_L1_error)
    __Pyx_GOTREF(__pyx_t_2);
    __Pyx_DECREF_SET(__pyx_v_s, __pyx_t_2);
    __pyx_t_2 = 0;
  }
+083:     print(s)
  __pyx_t_2 = __Pyx_PyObject_CallOneArg(__pyx_builtin_print, __pyx_v_s);
  if (unlikely(!__pyx_t_2)) __PYX_ERR(0, 83, __pyx_L1_error)
  __Pyx_GOTREF(__pyx_t_2);
  __Pyx_DECREF(__pyx_t_2);
  __pyx_t_2 = 0;
11.test_list()分析
def test_list():
    x = list()
    x.append(1)
    x.append(2)
    x.append(3)
    x.append(4)
    x.append("five")
    print(x)
    print(len(x))
    for i in x:
        print(i)
    x = x[1:]
    x[2:4] = [22, 33]
对照源码分析
def test_list():
+053:     x = list()//创建一个空列表
  __pyx_t_1 = PyList_New(0); if (unlikely(!__pyx_t_1)) __PYX_ERR(0, 53, __pyx_L1_error)//PyList_New(0)调用Python的C API函数来创建一个新列表
  __Pyx_GOTREF(__pyx_t_1);//__Pyx_GOTREF宏用于管理引用计数,确保回收机制的正常运行
  __pyx_v_x = ((PyObject*)__pyx_t_1);
  __pyx_t_1 = 0;
+054:     x.append(1)//向列表添加元素
+055:     x.append(2)
+056:     x.append(3)
+057:     x.append(4)
+058:     x.append("five")
+059:     print(x)//每一行x.append(...)调用都被转换为调用__Pyx_PyObject_Append函数,该函数执行实际的附加操作,并处理可能的错误
  __pyx_t_1 = __Pyx_PyObject_CallOneArg(__pyx_builtin_print, __pyx_v_x); if (unlikely(!__pyx_t_1)) __PYX_ERR(0, 59, __pyx_L1_error)/
  __Pyx_GOTREF(__pyx_t_1);
  __Pyx_DECREF(__pyx_t_1); __pyx_t_1 = 0;
+060:     print(len(x))
  __pyx_t_3 = __Pyx_PyList_GET_SIZE(__pyx_v_x); if (unlikely(__pyx_t_3 == ((Py_ssize_t)-1))) __PYX_ERR(0, 60, __pyx_L1_error)
  __pyx_t_1 = PyInt_FromSsize_t(__pyx_t_3); if (unlikely(!__pyx_t_1)) __PYX_ERR(0, 60, __pyx_L1_error)
  __Pyx_GOTREF(__pyx_t_1);
  __pyx_t_4 = __Pyx_PyObject_CallOneArg(__pyx_builtin_print, __pyx_t_1); if (unlikely(!__pyx_t_4)) __PYX_ERR(0, 60, __pyx_L1_error)
  __Pyx_GOTREF(__pyx_t_4);
  __Pyx_DECREF(__pyx_t_1); __pyx_t_1 = 0;
  __Pyx_DECREF(__pyx_t_4); __pyx_t_4 = 0;///调用__Pyx_PyList_GET_SIZE用于获取列表的长度,然后再调用__Pyx_PyObject_CallOneArg调用Python的print函数打印列表x及其长度
+061:     for i in x:
  __pyx_t_4 = __pyx_v_x; __Pyx_INCREF(__pyx_t_4);
  __pyx_t_3 = 0;
  for (;;) {
    {
      Py_ssize_t __pyx_temp = __Pyx_PyList_GET_SIZE(__pyx_t_4);
      #if !CYTHON_ASSUME_SAFE_MACROS
      if (unlikely((__pyx_temp < 0))) __PYX_ERR(0, 61, __pyx_L1_error)
      #endif
      if (__pyx_t_3 >= __pyx_temp) break;
    }
    #if CYTHON_ASSUME_SAFE_MACROS && !CYTHON_AVOID_BORROWED_REFS
    __pyx_t_1 = PyList_GET_ITEM(__pyx_t_4, __pyx_t_3); __Pyx_INCREF(__pyx_t_1); __pyx_t_3++; if (unlikely((0 < 0))) __PYX_ERR(0, 61, __pyx_L1_error)
    #else
    __pyx_t_1 = __Pyx_PySequence_ITEM(__pyx_t_4, __pyx_t_3); __pyx_t_3++; if (unlikely(!__pyx_t_1)) __PYX_ERR(0, 61, __pyx_L1_error)
    __Pyx_GOTREF(__pyx_t_1);
    #endif
    __Pyx_XDECREF_SET(__pyx_v_i, __pyx_t_1);
    __pyx_t_1 = 0;
/* … */
  }
  __Pyx_DECREF(__pyx_t_4); __pyx_t_4 = 0;
+062:         print(i)
    __pyx_t_1 = __Pyx_PyObject_CallOneArg(__pyx_builtin_print, __pyx_v_i); if (unlikely(!__pyx_t_1)) __PYX_ERR(0, 62, __pyx_L1_error)
    __Pyx_GOTREF(__pyx_t_1);
    __Pyx_DECREF(__pyx_t_1); __pyx_t_1 = 0;//通过PyList_GET_ITEM来获取每个元素,并实现for循环通过__Pyx_PyObject_CallOneArg调用print函数来打印获取到的元素
+063:     x = x[1:]
+064:     x[2:4] = [22, 33]
  __pyx_t_4 = PyList_New(2); if (unlikely(!__pyx_t_4)) __PYX_ERR(0, 64, __pyx_L1_error)
  __Pyx_GOTREF(__pyx_t_4);
  __Pyx_INCREF(__pyx_int_22);
  __Pyx_GIVEREF(__pyx_int_22);
  if (__Pyx_PyList_SET_ITEM(__pyx_t_4, 0, __pyx_int_22)) __PYX_ERR(0, 64, __pyx_L1_error);
  __Pyx_INCREF(__pyx_int_33);
  __Pyx_GIVEREF(__pyx_int_33);
  if (__Pyx_PyList_SET_ITEM(__pyx_t_4, 1, __pyx_int_33)) __PYX_ERR(0, 64, __pyx_L1_error);
  if (__Pyx_PyObject_SetSlice(__pyx_v_x, __pyx_t_4, 2, 4, NULL, NULL, NULL, 1, 1, 1) < 0) __PYX_ERR(0, 64, __pyx_L1_error)//通过__Pyx_PyObject_SetSlice对列表进行切片
  __Pyx_DECREF(__pyx_t_4); __pyx_t_4 = 0;//列表[22, 33]赋值给x[2:4]
12.test_dict() 分析
def test_dict():
    x = {}
    x["one"] = 1
    x["two"] = 2
    x["three"] = 3
    y = x["one"]
    z = x["two"]
    if "one" in x:
        print(y)

    for k in x:
        print(k, x[k])
对照源码分析
def test_dict():
+067:     x = {}
  __pyx_v_x = PyDict_New();
  if (unlikely(!__pyx_v_x))
    __PYX_ERR(0, 67, __pyx_L1_error)
  __Pyx_GOTREF(__pyx_v_x);//初始化空字典x
+068:     x["one"] = 1
  if (unlikely((PyDict_SetItem(__pyx_v_x, __pyx_n_s_one, __pyx_int_1) < 0))) __PYX_ERR(0, 68, __pyx_L1_error)//x["key"] = value调用被转换为调用PyDict_SetItem函数,并且处理可能的错误
+069:     x["two"] = 2
  if (unlikely((PyDict_SetItem(__pyx_v_x, __pyx_n_s_two, __pyx_int_2) < 0))) __PYX_ERR(0, 69, __pyx_L1_error)
+070:     x["three"] = 3
  if (unlikely((PyDict_SetItem(__pyx_v_x, __pyx_n_s_three, __pyx_int_3) < 0))) __PYX_ERR(0, 70, __pyx_L1_error)
//向字典加入键值对
      +071:     y = x["one"]
  __pyx_t_1 = __Pyx_PyDict_GetItem(__pyx_v_x, __pyx_n_s_one); if (unlikely(!__pyx_t_1)) __PYX_ERR(0, 71, __pyx_L1_error)//__Pyx_PyDict_GetItem用于从字典中获取指定键的值

  __Pyx_GOTREF(__pyx_t_1);
  __pyx_v_y = __pyx_t_1;
  __pyx_t_1 = 0;//从字典x中获取键为"one"和"two"的值,并将其分别赋给变量y和z
+072:     z = x["two"]
  __pyx_t_1 = __Pyx_PyDict_GetItem(__pyx_v_x, __pyx_n_s_two); if (unlikely(!__pyx_t_1)) __PYX_ERR(0, 72, __pyx_L1_error)//__Pyx_PyDict_ContainsTF用于检查字典中是否包含指定键,并返回布尔值

  __Pyx_GOTREF(__pyx_t_1);
  __pyx_v_z = __pyx_t_1;
  __pyx_t_1 = 0;
+073:     if "one" in x:
  __pyx_t_2 = (__Pyx_PyDict_ContainsTF(__pyx_n_s_one, __pyx_v_x, Py_EQ)); if (unlikely((__pyx_t_2 < 0))) __PYX_ERR(0, 73, __pyx_L1_error)
  if (__pyx_t_2) {
/* … */
  }
+074:         print(y)
13.test_datetime () 分析
+103: def test_datetime():
+104:     x = datetime.datetime.now()
  __Pyx_GetModuleGlobalName(__pyx_t_2, __pyx_n_s_datetime); if (unlikely(!__pyx_t_2)) __PYX_ERR(0, 104, __pyx_L1_error)
  __Pyx_GOTREF(__pyx_t_2);//从全局命名空间中获取datetime模块对象,并存储在__pyx_t_2中
  __pyx_t_3 = __Pyx_PyObject_GetAttrStr(__pyx_t_2, __pyx_n_s_datetime); 释放__pyx_t_3的引用计数
if (unlikely(!__pyx_t_3)) __PYX_ERR(0, 104, __pyx_L1_error)
  __Pyx_GOTREF(__pyx_t_3);//释放__pyx_t_3的引用计数
  __Pyx_DECREF(__pyx_t_2); __pyx_t_2 = 0;
  __pyx_t_2 = __Pyx_PyObject_GetAttrStr(__pyx_t_3, __pyx_n_s_now);
if (unlikely(!__pyx_t_2)) __PYX_ERR(0, 104, __pyx_L1_error)
  __Pyx_GOTREF(__pyx_t_2);
  __Pyx_DECREF(__pyx_t_3);
  __pyx_t_3 = 0;//释放__pyx_t_3的引用计数
  __pyx_t_3 = NULL;
  __pyx_t_4 = 0;
  #if CYTHON_UNPACK_METHODS
  if (likely(PyMethod_Check(__pyx_t_2))) {
    __pyx_t_3 = PyMethod_GET_SELF(__pyx_t_2);//先检查__pyx_t_2是否是一个方法,并获取它的self
    if (likely(__pyx_t_3)) {
      PyObject* function = PyMethod_GET_FUNCTION(__pyx_t_2);
      __Pyx_INCREF(__pyx_t_3);
      __Pyx_INCREF(function);
      __Pyx_DECREF_SET(__pyx_t_2, function);
      __pyx_t_4 = 1;
    }
  }
  #endif
  {
    PyObject *__pyx_callargs[2] = {__pyx_t_3, NULL};
    __pyx_t_1 = __Pyx_PyObject_FastCall(__pyx_t_2, __pyx_callargs+1-__pyx_t_4, 0+__pyx_t_4);//使用__Pyx_PyObject_FastCall快速调用该方法,将结果存储在__pyx_v_x中
    __Pyx_XDECREF(__pyx_t_3); __pyx_t_3 = 0;
    if (unlikely(!__pyx_t_1)) __PYX_ERR(0, 104, __pyx_L1_error)
    __Pyx_GOTREF(__pyx_t_1);
    __Pyx_DECREF(__pyx_t_2); __pyx_t_2 = 0;
  }
  __pyx_v_x = __pyx_t_1;
  __pyx_t_1 = 0;
+105:     print(x)//调用print函数打印当前时间
14.test_format() 分析
def test_format():
    x = 1
    y = "One"
    z = "%s is %d" % (y, x)
    print(z)
对照源码分析
def test_format():
+108:     x = 1
+109:     y = "One"
+110:     z = "%s is %d" % (y, x)
  __pyx_t_1 = __Pyx_PyInt_From_long(__pyx_v_x); if (unlikely(!__pyx_t_1)) __PYX_ERR(0, 110, __pyx_L1_error)//__Pyx_PyInt_From_long是一个宏,将C语言中的long类型转换为Python的int类型
  __Pyx_GOTREF(__pyx_t_1);
  __pyx_t_2 = PyTuple_New(2);
  if (unlikely(!__pyx_t_2)) __PYX_ERR(0, 110, __pyx_L1_error)//创建一个新的Python元组对象,长度为2,并将其引用存储在__pyx_t_2中
  __Pyx_GOTREF(__pyx_t_2);
  __Pyx_INCREF(__pyx_v_y);
  __Pyx_GIVEREF(__pyx_v_y);
  if (__Pyx_PyTuple_SET_ITEM(__pyx_t_2, 0, __pyx_v_y)) __PYX_ERR(0, 110, __pyx_L1_error);//将y增加引用计数并赋值给元组的第一个元素
  __Pyx_GIVEREF(__pyx_t_1);
  if (__Pyx_PyTuple_SET_ITEM(__pyx_t_2, 1, __pyx_t_1)) __PYX_ERR(0, 110, __pyx_L1_error);//__Pyx_PyString_Format是一个宏,用于执行Python的字符串格式化操作,__pyx_t_1赋值给元组的第二个元素,并将__pyx_t_1重置为0以释放其引用
  __pyx_t_1 = 0;
  __pyx_t_1 = __Pyx_PyString_Format(__pyx_kp_s_s_is_d, __pyx_t_2); if (unlikely(!__pyx_t_1)) __PYX_ERR(0, 110, __pyx_L1_error)//使用__Pyx_PyString_Format进行字符串格式化操作,将结果存储在__pyx_t_1中
  __Pyx_GOTREF(__pyx_t_1);
  __Pyx_DECREF(__pyx_t_2); __pyx_t_2 = 0;
  __pyx_v_z = ((PyObject*)__pyx_t_1);
  __pyx_t_1 = 0;
+111:     print(z)
格式化字符串的汇编实现
mov     r14, cs:___pyx_n_s_One
mov     edi, 1          ; __int64
//edi 寄存器被加载为整数值 1,表示将整数 1 转换为 Python 的长整型对象,返回值存储在 rax 寄存器中,并且被复制到 r15 寄存器中
call    _PyLong_FromLong
mov     r15, rax ; r15 = _PyLong_FromLong(1)
mov     edi, 2          ; size
//edi 寄存器被加载为 2,表示创建一个包含两个元素的元组
call    _PyTuple_New
//_PyTuple_New 是 Python/C API 中的函数,用于创建一个新的元组对象。调用此函数后,返回值存储在 rax 寄存器中,并且被复制到 rbx 寄存器中
mov     rbx, rax
mov     [rax+18h], r14 ; "One"
//[rax+18h] 和 [rax+20h] 分别将字符串 "One" 和整数 1 存储到新创建的元组对象中的对应位置
mov     [rax+20h], r15 ; 1

mov     rdi, cs:___pyx_kp_s_s_is_d ; %s is %d
//rdi 寄存器被加载为 ___pyx_kp_s_s_is_d,这是一个常量字符串,在此处表示 "%s is %d" 的格式化模板
mov     rsi, rax                   ; Tuple("One", 1)
call    _PyUnicode_Format
//_PyUnicode_Format Python/C API 中的函数,用于根据格式化模板将元组中的值格式化成一个 Unicode 字符串,返回格式化后的 Unicode 字符串对象
4.利用frida获取UTF-8 dump 信息
动态调用 Python/C API 中的函数来实现在运行时获取 PyObject 指针对应的字符串表示形式的 UTF-8 dump 信息
根据python将对象转换为UTF-8字符串的汇编实现,编译frida的脚本
汇编实现
.text:00007FFBC501B615 mov     rcx, rbx           ; 将 rbx 寄存器中的值(Python 对象的地址)移动到 rcx 寄存器
.text:00007FFBC501B618 call    python38_PyObject_Str ; 调用 PyObject_Str 函数,获取 Python 对象的字符串表示形式
.text:00007FFBC501B61D mov     rcx, rax           ; 将 rax 寄存器中的值(PyObject_Str 的返回值)移动到 rcx 寄存器
.text:00007FFBC501B620 call    python38_PyUnicode_AsUTF8 ; 调用 PyUnicode_AsUTF8 函数,将字符串表示形式转换为 UTF-8 编码
frida脚本
function DumpPyObject(address) {
  // 检查进程架构是否为 x64(64 位)
  if (Process.arch === "x64") {
    // 将地址转换为 NativePointer,以便可以在该地址处读取和写入内存
    var native_address = new NativePointer(address);

    // 查找进程中加载的 "python38.dll" 模块。这包含我们所需的必要函数
    var module = Process.findModuleByName("python38.dll");

    // 获取 "python38.dll" 中导出函数 'PyObject_Str' 的地址。
    // 'PyObject_Str' 用于获取 Python 对象的字符串表示形式
    var PyObject_Str = new NativeFunction(module.findExportByName("PyObject_Str"), "pointer", ["pointer"], "win64");

    // 获取 "python38.dll" 中导出函数 'PyUnicode_AsUTF8' 的地址。
    // 'PyUnicode_AsUTF8' 将 Unicode 对象转换为 UTF-8 编码的字符串
    var PyUnicode_AsUTF8 = new NativeFunction(module.findExportByName("PyUnicode_AsUTF8"), "pointer", ["pointer"], "win64");

    // 使用 'PyObject_Str' 获取对象的字符串表示
    var obj = PyObject_Str(native_address);

    // 将获取的 Unicode 对象转换为 UTF-8 字符串
    var p = PyUnicode_AsUTF8(obj);

    // 读取并打印 UTF-8 编码的字符串
    console.log(p.readUtf8String());
  }
}
对应解析
1.将地址传递给 PyObject_Str 函数
汇编:
mov rcx, rbx
call python38_PyObject_Str
脚本:
var obj = PyObject_Str(native_address);
2.将 PyObject_Str 的返回值传递给 PyUnicode_AsUTF8 函数
汇编:
mov rcx, rax
call python38_PyUnicode_AsUTF8
脚本:
var p = PyUnicode_AsUTF8(obj);
3.读取并打印 UTF-8 字符串
脚本实现
console.log(p.readUtf8String());


 1275
1275

 被折叠的 条评论
为什么被折叠?
被折叠的 条评论
为什么被折叠?
 到【灌水乐园】发言


