


<LinearLayout xmlns:android=“http://schemas.android.com/apk/res/android”
android:layout_width=“match_parent”
android:layout_height=“match_parent”
android:orientation=“vertical” >
<Button android:id=“@+id/button”
android:layout_width=“200dp”
android:layout_height=“wrap_content”
android:text=“B1” />
<Button android:id=“@+id/button2”
android:layout_width=“match_parent”
android:layout_height=“wrap_content”
android:text=“B2” />
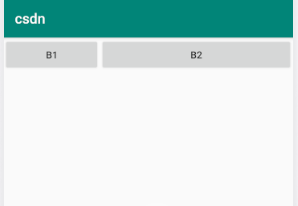
结果:

上面例子1中的两个按钮是垂直排列。
而如果将orientation的值改为horizontal(水平排列),则效果为:

layout_width,layout_height,layout_weight
layout_width:宽度,可以设值任意的确定值(填写数值后面+“dp”,如:“200dp”),也可以写成wrap_content或match_parent
layout_height :高度。
wrap_content :指示您的视图将其大小调整为内容所需的尺寸,可以理解为默认大小。
match_parent :指示您的视图尽可能采用其父视图组所允许的最大尺寸。
效果还是如例子1。
layout_weight:直接填写数值(不用+“dp”),可以理解为权重或占比。
例子2:
<?xml version="1.0" encoding="utf-8"?><LinearLayout xmlns:android=“http://schemas.android.com/apk/res/android”
android:layout_width=“match_parent”
android:layout_height=“match_parent”
android:orientation=“horizontal” >
<Button android:id=“@+id/button”
android:layout_width=“0dp”
android:layout_height=“wrap_content”
android:layout_weight=“1”
android:text=“B1” />
<Button android:id=“@+id/button2”
android:layout_width=“0dp”
android:layout_height=“wrap_content”
android:layout_weight=“1”
android:text=“B2” />

例子2中,存在两个按钮,layout_weight都属性设为1,就是两个按钮中每个占据了1/2。同理,如果三个按钮,则每个按钮占据1/3。
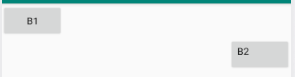
如果两个按钮中,layout_weight值分别为1和2,则占据1/3和2/3。如图:
需要注意,以上例子都是在orientation=“horizontal” 且Button的layout_width="0dp"时 。如果orientation=“vertical”,则需将layout_height=“0dp”
layout_gravity和gravity
layout_gravity: 控件位于屏幕的位置
gravity: 控件的内容位于控件的位置
如例子3:
<LinearLayout xmlns:android=“http://schemas.android.com/apk/res/android”
android:layout_width=“match_parent”
android:layout_height=“match_parent”
android:orientation=“vertical” >
<LinearLayout
android:layout_width=“match_parent”
android:layout_height=“wrap_content”
android:orientation=“vertical”>
<Button android:id=“@+id/button”
android:layout_width=“wrap_content”
android:layout_height=“wrap_content”
android:text=“B1” />
<Button android:id=“@+id/button2”
android:layout_width=“wrap_content”
android:layout_height=“wrap_content”
android:layout_gravity=“right”
android:gravity=“left”
android:text=“B2” />
其中Button2的 android:layout_gravity=“right”,android:gravity=“left”
就是Button2位于屏幕的右方,内容“B2”在控件中左对齐。
============================================================================
适配器也存在很多种,这次添加的是SimpleAdapter适配器。
首先需要一个主布局main.xml承载一个ListView
<?xml version="1.0" encoding="utf-8"?><LinearLayout xmlns:android=“http://schemas.android.com/apk/res/android”
android:layout_width=“match_parent”
android:layout_height=“match_parent”>
<ListView
android:id=“@+id/listView”
android:layout_width=“match_parent”
android:layout_height=“match_parent”>
还需要一个布局文件item.xml来对每个控件进行布局设置
<?xml version="1.0" encoding="utf-8"?><LinearLayout xmlns:android=“http://schemas.android.com/apk/res/android”
android:layout_width=“match_parent”
android:layout_height=“match_parent”
android:orientation=“horizontal”>
<ImageView
android:id=“@+id/imageView”
android:layout_width=“70dp”
android:layout_height=“70dp”>
<LinearLayout
android:layout_width=“wrap_content”
android:layout_height=“wrap_content”
android:orientation=“vertical”>
<TextView
android:id=“@+id/textView”
android:layout_width=“wrap_content”
android:layout_height=“0dp”
android:layout_weight=“2”
android:textSize=“30dp”/>
<TextView
android:id=“@+id/textView2”
android:layout_width=“wrap_content”
android:layout_height=“0dp”
android:layout_weight=“1”/>
最后
自我介绍一下,小编13年上海交大毕业,曾经在小公司待过,也去过华为、OPPO等大厂,18年进入阿里一直到现在。
深知大多数初中级Android工程师,想要提升技能,往往是自己摸索成长,自己不成体系的自学效果低效漫长且无助。
因此我收集整理了一份《2024年Android移动开发全套学习资料》,初衷也很简单,就是希望能够帮助到想自学提升又不知道该从何学起的朋友,同时减轻大家的负担。


既有适合小白学习的零基础资料,也有适合3年以上经验的小伙伴深入学习提升的进阶课程,基本涵盖了95%以上Android开发知识点!不论你是刚入门Android开发的新手,还是希望在技术上不断提升的资深开发者,这些资料都将为你打开新的学习之门
如果你觉得这些内容对你有帮助,需要这份全套学习资料的朋友可以戳我获取!!
由于文件比较大,这里只是将部分目录截图出来,每个节点里面都包含大厂面经、学习笔记、源码讲义、实战项目、讲解视频,并且会持续更新!
链图片转存中…(img-Q4RGiMHs-1715895733087)]
既有适合小白学习的零基础资料,也有适合3年以上经验的小伙伴深入学习提升的进阶课程,基本涵盖了95%以上Android开发知识点!不论你是刚入门Android开发的新手,还是希望在技术上不断提升的资深开发者,这些资料都将为你打开新的学习之门
如果你觉得这些内容对你有帮助,需要这份全套学习资料的朋友可以戳我获取!!
由于文件比较大,这里只是将部分目录截图出来,每个节点里面都包含大厂面经、学习笔记、源码讲义、实战项目、讲解视频,并且会持续更新!


 1062
1062


 被折叠的 条评论
为什么被折叠?
被折叠的 条评论
为什么被折叠?
 到【灌水乐园】发言


