


【Android】数据存储——数据持久化
简介
Android系统中主要提供了3种方式用于简单地实现数据持久化功能——文件存储、SharedPreferences存储、数据库存储
文件存储
Context类中提供了一个openFIleOutPut()方法,用于将数据存储到指定文件中。
包含两个参数,第一个参数是文件名,第二个参数是文件的操作模式
MODE_PRIVATE:默认的操作模式,写入的内容会覆盖原文件内容
MODE_APPEND:表示如果文件已经存爱,就往文件里追加内容,不存在就创建文件
下面的代码展示了如何将一段文本内容保存到文件中:
public void save() {
    // 要保存的数据
    String data = "Data to save";
    FileOutputStream out = null;
    BufferedWriter writer = null;
    try {
        // 以私有模式打开文件输出流
        out = openFileOutput("data", Context.MODE_PRIVATE);
        // 使用输出流创建BufferedWriter
        writer = new BufferedWriter(new OutputStreamWriter(out));
        // 写入数据到文件
        writer.write(data);
    } catch (IOException e) {
        // 捕获并打印IO异常
        e.printStackTrace();
    } finally {
        // 确保BufferedWriter在最终阶段关闭
        try {
            if (writer != null) {
                writer.close();
            }
        } catch (IOException e) {
            // 捕获并打印在关闭BufferedWriter时的IO异常
            e.printStackTrace();
        }
    }
}
先通过openFileOutput()方法能够得到一个FileOutputStream对象,然后借助它构建一个OutputStreamWriter对象,然后使用OutputStreamWriter构建出BufferedWriter对象,然后就可以通过BufferedWriter来将文本写到文件中了
下来学习如何在Android项目中实现文件存储
创建FilePersistenceTest项目,修改activity_main中的代码:
<?xml version="1.0" encoding="utf-8"?>
<LinearLayout xmlns:android="http://schemas.android.com/apk/res/android"
    android:id="@+id/main"
    android:orientation="vertical"
    android:layout_width="match_parent"
    android:layout_height="match_parent">

    <EditText
        android:id="@+id/edit"
        android:layout_width="match_parent"
        android:layout_height="wrap_content"
        android:hint="Type something here"/>

</LinearLayout>
我们添加了一个文本输入框,但是输入东西后如果退出,文字就消失了。我们需要把输入的文字储存到文件中
修改MainActivity:
public class MainActivity extends AppCompatActivity {

    private EditText edit;

    @Override
    protected void onCreate(Bundle savedInstanceState) {
        super.onCreate(savedInstanceState);
        setContentView(R.layout.activity_main);
        edit = (EditText) findViewById(R.id.edit);
    }

    @Override
    protected void onDestroy() {
        super.onDestroy();
        String inputText = edit.getText().toString();
        save(inputText);
    }

    public void save(String inputText) {
        FileOutputStream out = null;
        BufferedWriter writer = null;
        try {
            out = openFileOutput("data", Context.MODE_PRIVATE);
            writer = new BufferedWriter(new OutputStreamWriter(out));
            writer.write(inputText);
        } catch (IOException e) {
            e.printStackTrace();
        } finally {
            try {
                if (writer != null) {
                    writer.close();
                }
            } catch (IOException e) {
                e.printStackTrace();
            }
        }
    }
}
我们在onCreate()方法中获取了EditText()的实例,然后重写onDestroy()方法,在onDestroy()方法中调用了save()方法把输入的文本内容储存到文件中,命名为data
Context类中还提供了一个openFileInput()方法,用于从文件中读取数据。比openFileOutput()简单一点,因为它只接收一个参数(要读取的文件名),返回一盒FileInputStream对象,在通过Java流方式就可以读取出来了:
public String Load() {
    FileInputStream in = null;
    BufferedReader reader = null;
    StringBuilder content = new StringBuilder();
    try {
        in = openFileInput("data");
        reader = new BufferedReader(new InputStreamReader(in));
        String line = "";
        while ((line = reader.readLine()) != null) {
            content.append(line);
        }
    } catch (IOException e) {
        e.printStackTrace();
    } finally {
        if (reader != null) {
            try {
                reader.close();
            } catch (IOException e) {
                e.printStackTrace();
            }
        }
    }
    return content.toString();
}
首先通过openFileInput()收到了一个FileInputStream对象,然后构建出了InputStreamReader对象,然后用InputStreamReader构建出了BufferedReader对象,然后使用BufferedReader一行行读取,把文件中的内容全部读取出来并放在StringBuilder对象中,返回内容
了解了读取数据的方法,下来开始修改MainActivity中的代码:
public class MainActivity extends AppCompatActivity {

    private EditText edit;

    @Override
    protected void onCreate(Bundle savedInstanceState) {
        super.onCreate(savedInstanceState);
        setContentView(R.layout.activity_main);
        edit = (EditText) findViewById(R.id.edit);
        String inputText = load();
        if (!TextUtils.isEmpty(inputText)) {
            edit.setText(inputText);
            edit.setSelection(inputText.length());
            Toast.makeText(this, "Restoring succeeded", Toast.LENGTH_SHORT).show();
        }
    }

    public String load() {
        FileInputStream in = null;
        BufferedReader reader = null;
        StringBuilder content = new StringBuilder();
        try {
            in = openFileInput("data");
            reader = new BufferedReader(new InputStreamReader(in));
            String line = "";
            while ((line = reader.readLine()) != null) {
                content.append(line);
            }
        } catch (IOException e) {
            e.printStackTrace();
        } finally {
            if (reader != null) {
                try {
                    reader.close();
                } catch (IOException e) {
                    e.printStackTrace();
                }
            }
        }
        return content.toString();
    }

    public String Load() {
        FileInputStream in = null;
        BufferedReader reader = null;
        StringBuilder content = new StringBuilder();
        try {
            in = openFileInput("data");
            reader = new BufferedReader(new InputStreamReader(in));
            String line = "";
            while ((line = reader.readLine()) != null) {
                content.append(line);
            }
        } catch (IOException e) {
            e.printStackTrace();
        } finally {
            if (reader != null) {
                try {
                    reader.close();
                } catch (IOException e) {
                    e.printStackTrace();
                }
            }
        }
        return content.toString();
    }

    @Override
    protected void onDestroy() {
        super.onDestroy();
        String inputText = edit.getText().toString();
        save(inputText);
    }

    public void save(String inputText) {
        FileOutputStream out = null;
        BufferedWriter writer = null;
        try {
            out = openFileOutput("data", Context.MODE_PRIVATE);
            writer = new BufferedWriter(new OutputStreamWriter(out));
            writer.write(inputText);
        } catch (IOException e) {
            e.printStackTrace();
        } finally {
            try {
                if (writer != null) {
                    writer.close();
                }
            } catch (IOException e) {
                e.printStackTrace();
            }
        }
    }
}
在onCreate()方法中调用liad()方法读取文件中存储的文本内容,如果不为null,则调用EditText的setText()方法将内容填充到EditText里,并调用setSelection()方法将光标移动到文本末尾便于继续输入,弹出还原成功的提示
TextUtils.isEmpty()可以判断传入的字符串为null或者为空字符串,都会返回true
SharedPreferences存储
将数据存储到SharedPreferences中
不同于文件的存储方式,SharedPreferences是使用键值对的方式来存储数据的
想用SharedPreferences存储数据,首先要获取SharedPreferences对象。Android中提供了三种方法用于得到SharedPreferences对象
1.Context类中的getSharedPerences
此方法接收两个参数,第一个用于指定SharedPreferences文件的名称,不存在则创建一个,第二个参数用于指定操作模式,目前只能选MODE_PRIVATE这一种模式,是默认操作模式,表示只有当前程序才可以对这个SharedPreferences文件进行读写。
2.Activity类中的getPreferences()方法
这个方法和Context中的getSharedPreferences()方法很相似,但是只接收一个操作模式参数
3.PreferenceManager类中的getDefaultSharedPreferences()方法
这是一个静态方法,接收一个Context参数,并且自动使用当前应用程序的包名作为前缀来命名SharedPreferences文件。得到SharedPreferences对象就可以开始向SharedPreferences文件中存储数据了,分为3步:
- 调用SharedPreferences对象的edit()方法来获取一个SharedPreferences.Editor对象
- 向SharedPreferences.Editor对象中添加数据
- 调用apply()方法将添加的数据提交,完成存储操作
下面举例子:
新建SharedPreferencesTest项目,修改activity_main中的代码:
<?xml version="1.0" encoding="utf-8"?>
<LinearLayout xmlns:android="http://schemas.android.com/apk/res/android"
    android:orientation="vertical"
    android:layout_width="match_parent"
    android:layout_height="match_parent">

    <Button
        android:id="@+id/save_data"
        android:layout_width="match_parent"
        android:layout_height="wrap_content"
        android:text="Save data"/>

</LinearLayout>
简单放置了一个按钮
修改MainActivity中的代码:
public class MainActivity extends AppCompatActivity {

    @Override
    protected void onCreate(Bundle savedInstanceState) {
        super.onCreate(savedInstanceState);
        setContentView(R.layout.activity_main);
        Button saveData = (Button) findViewById(R.id.save_data);
        saveData.setOnClickListener(new View.OnClickListener() {
            @Override
            public void onClick(View v) {
                SharedPreferences.Editor editor = getSharedPreferences("data", MODE_PRIVATE).edit();
                editor.putString("name", "Tom");
                editor.putInt("age", 28);
                editor.putBoolean("married", false);
                editor.apply();
            }
        });
    }
}
先注册点击事件,然后通过getSharedPreferences指定SharedPreferences文件名为data,并且得到了SharedPreferences.Editor对象。添加了三条数据,用apply()提交。
从SharedPreferences中读取数据
使用SharedPreferences存数据很简单,读数据也一样
SharedPreferences对象中提供了一系列get方法用于读取数据,同时对应着put方法
修改activity_main中的代码:
<?xml version="1.0" encoding="utf-8"?>
<LinearLayout xmlns:android="http://schemas.android.com/apk/res/android"
    android:orientation="vertical"
    android:layout_width="match_parent"
    android:layout_height="match_parent">

    <Button
        android:id="@+id/save_data"
        android:layout_width="match_parent"
        android:layout_height="wrap_content"
        android:text="Save data"/>

    <Button
        android:id="@+id/restore_data"
        android:layout_width="match_parent"
        android:layout_height="wrap_content"
        android:text="Restore data"/>

</LinearLayout>
增加了一个还原数据的按钮
修改MainActivity中的代码:
public class MainActivity extends AppCompatActivity {

    @Override
    protected void onCreate(Bundle savedInstanceState) {
        super.onCreate(savedInstanceState);
        setContentView(R.layout.activity_main);
        Button saveData = (Button) findViewById(R.id.save_data);
        saveData.setOnClickListener(new View.OnClickListener() {
            @Override
            public void onClick(View v) {
                SharedPreferences.Editor editor = getSharedPreferences("data", MODE_PRIVATE).edit();
                editor.putString("name", "Tom");
                editor.putInt("age", 28);
                editor.putBoolean("married", false);
                editor.apply();
            }
        });
        Button restoreData = (Button) findViewById(R.id.restore_data);
        restoreData.setOnClickListener(new View.OnClickListener() {
            @Override
            public void onClick(View v) {
                SharedPreferences pref = getSharedPreferences("data", MODE_PRIVATE);
                String name = pref.getString("name", "");
                int age = pref.getInt("age", 0);
                boolean married = pref.getBoolean("married", false);
                Log.d("MainActivity", "name is" + name);
                Log.d("MainActivity", "age is" + age);
                Log.d("MainActivity", "married is" + married);
            }
        });
    }
}
先通过getSharedPreferences方法得到SharedPreferences对象,然后获取姓名,年龄,是否已婚,通过Log将这些值打印出来:

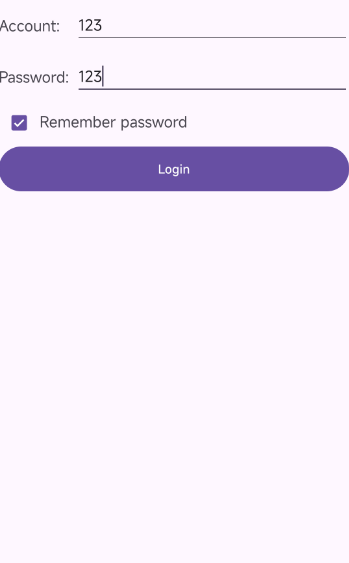
实现记住密码功能
这里可以在上一章(广播)的最佳实践项目代码上继续写,因为已经实现了登录界面了
博客链接为:【Android】广播机制-CSDN博客
修改activity_log中的代码:
<?xml version="1.0" encoding="utf-8"?>
<LinearLayout xmlns:android="http://schemas.android.com/apk/res/android"
    android:orientation="vertical"
    android:layout_width="match_parent"
    android:layout_height="match_parent">

    <LinearLayout
        android:orientation="horizontal"
        android:layout_width="match_parent"
        android:layout_height="60dp">
        <TextView
            android:layout_width="90dp"
            android:layout_height="wrap_content"
            android:layout_gravity="center_vertical"
            android:text="Account:"
            android:textSize="18sp"/>

        <EditText
            android:id="@+id/account"
            android:layout_width="0dp"
            android:layout_height="wrap_content"
            android:layout_weight="1"
            android:layout_gravity="center_vertical"/>
    </LinearLayout>
    <LinearLayout
        android:orientation="horizontal"
        android:layout_width="match_parent"
        android:layout_height="60dp">
        <TextView
            android:layout_width="90dp"
            android:layout_height="wrap_content"
            android:layout_gravity="center_vertical"
            android:text="Password:"
            android:textSize="18sp"/>

        <EditText
            android:id="@+id/password"
            android:layout_width="0dp"
            android:layout_height="wrap_content"
            android:layout_weight="1"
            android:layout_gravity="center_vertical"/>
    </LinearLayout>

    <LinearLayout
        android:orientation="horizontal"
        android:layout_width="match_parent"
        android:layout_height="wrap_content">
        <CheckBox
            android:id="@+id/remember_pass"
            android:layout_width="wrap_content"
            android:layout_height="wrap_content"/>
        <TextView
            android:layout_width="wrap_content"
            android:layout_height="wrap_content"
            android:textSize="18sp"
            android:text="Remember password"/>

    </LinearLayout>

    <Button
        android:id="@+id/login"
        android:layout_width="match_parent"
        android:layout_height="60dp"
        android:text="Login"/>


</LinearLayout>
使用了新控件CheckBox(复选框控件),用户可以通过点击的方式进行选中和取消
修改LogActivity中的代码:
public class LogActivity extends BaseActivity {

    private EditText accountEdit;
    private EditText passwordEdit;
    private Button login;

    private SharedPreferences pref;
    private SharedPreferences.Editor editor;
    private CheckBox rememberPass;
    @Override
    protected void onCreate(Bundle savedInstanceState) {
        super.onCreate(savedInstanceState);
        setContentView(R.layout.activity_log);
        pref = PreferenceManager.getDefaultSharedPreferences(this);
        accountEdit = (EditText) findViewById(R.id.account);
        passwordEdit = (EditText) findViewById(R.id.password);
        rememberPass = (CheckBox) findViewById(R.id.remember_pass);
        login = (Button) findViewById(R.id.login);
        boolean isRemember = pref.getBoolean("remember_password", false);
        if (isRemember) {
            String accout = pref.getString("account", "");
            String password = pref.getString("password", "");
            accountEdit.setText(accout);
            passwordEdit.setText(password);
            rememberPass.setChecked(true);
        }
        login.setOnClickListener(new View.OnClickListener() {
            @Override
            public void onClick(View v) {
                String account = accountEdit.getText().toString();
                String password = passwordEdit.getText().toString();
                if (account.equals("123") && password.equals("123")) {
                    editor = pref.edit();
                    if (rememberPass.isChecked()) {
                        editor.putBoolean("remember_password", true);
                        editor.putString("account", account);
                        editor.putString("password", password);
                    } else {
                        editor.clear();
                    }
                    editor.apply();
                    Intent intent = new Intent(LogActivity.this, MainActivity.class);
                    startActivity(intent);
                    finish();
                } else {
                    Toast.makeText(LogActivity.this, "account or password is invalid", Toast.LENGTH_SHORT).show();
                }
            }
        });
    }
}
首先在onCreate()方法中获取到的SharedPreferences对象,然后调用getBoolean()方法获取remember_password键对应的值(开始默认为false)。登陆成功后会一调用CheckBox的isChecked()方法来检查复选框是否被选中,被选中则将remember_password设置为true,把账号和密码都存入SharedPreferences并提交,没被选中就调用clear()清除数据。
下面是运行的结果:


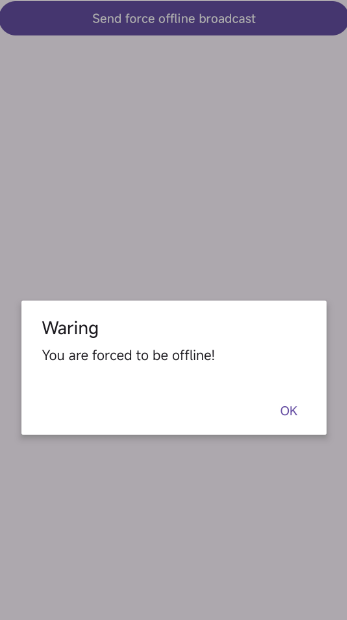
强制下线后:
SQLite数据库存储
创建数据库
为了方便管理数据库,Android专门提供了一个SQLiteOpenHelper帮助类,使用这个类可以对数据库进行创建和升级,下面介绍一下用法:
SQLiteOpenHelper是一个抽象类,所以使用的时候需要写一个自己的帮助类去继承他。SQLiteOpenHelper中有两个抽象方法onCreate()、onUpgrade(),需要进行重写
SQLiteOpenHelper还有两个很重要的实例方法:getReadableDatabase()和getWritableDatabase(),可以打开数据库并返回一个可对数据库进行改写的对象
getReadableDatabase():当数据库不可写入,则返回对象只读
getWritableDatabase():当数据库不可写入,则方法出现异常
SQLiteOpenHelper有两个构造方法可供重写,一般选择参数少的
接收4个参数:Context,数据库名,自定义Cursor(一般为null),当前数据库的版本号
新建DatabaseTest项目
新建MyDatabaseHelper类继承SQLiteOpenHelper:
public class MyDatabaseHelper extends SQLiteOpenHelper {

    public static final String CREATE_BOOK = "create table book ("
            + "id integer primary key autoincrement,"
            + "author text,"
            + "price real,"
            + "pages integer,"
            + "name text)";
    private Context mContext;


    public MyDatabaseHelper(@Nullable Context context, @Nullable String name, @Nullable SQLiteDatabase.CursorFactory factory, int version) {
        super(context, name, factory, version);
        mContext = context;
    }

    @Override
    public void onCreate(SQLiteDatabase db) {
        db.execSQL(CREATE_BOOK);
        Toast.makeText(mContext, "Create succeed", Toast.LENGTH_SHORT).show();
    }

    @Override
    public void onUpgrade(SQLiteDatabase db, int oldVersion, int newVersion) {
    }
}
我们把建表语句定义为一个字符串常量,在onCreate()方法中调用了execSQL()方法执行建表语句,弹出Toast提示创建成功
下来修改activity_main中的代码:
<?xml version="1.0" encoding="utf-8"?>
<LinearLayout xmlns:android="http://schemas.android.com/apk/res/android"
    android:orientation="vertical"
    android:layout_width="match_parent"
    android:layout_height="match_parent">

    <Button
        android:id="@+id/create_database"
        android:layout_width="match_parent"
        android:layout_height="wrap_content"
        android:text="Create database"/>

</LinearLayout>
简单加入了一个按钮,最后修改MainActivity中的代码:
public class MainActivity extends AppCompatActivity {

    private MyDatabaseHelper dbHelper;
    @Override
    protected void onCreate(Bundle savedInstanceState) {
        super.onCreate(savedInstanceState);
        setContentView(R.layout.activity_main);
        dbHelper = new MyDatabaseHelper(this, "BookStore.db", null, 1);
        Button createDatabase = (Button) findViewById(R.id.create_database);
        createDatabase.setOnClickListener(new View.OnClickListener() {
            @Override
            public void onClick(View v) {
                dbHelper.getWritableDatabase();
            }
        });
    }
}
先创建了MyDatabaseHelper对象,将数据库名指定为BookStore.db,版本号为1,然后在点击事件里调用getWritableDatabase()方法。
升级数据库
onUpgrade方法用于升级数据库
目前项目已经有一张Book表用于存放数的各种详细数据,如果想再加一张Catagory表用于记录图书的分类,我们需要这么做
修改MyDatabaseHelper代码:
public class MyDatabaseHelper extends SQLiteOpenHelper {

    public static final String CREATE_BOOK = "create table book ("
            + "id integer primary key autoincrement,"
            + "author text,"
            + "price real,"
            + "pages integer,"
            + "name text)";

    public static final String CREATE_CATEGORY = "create table Category ("
            + "id integer primary key autoincrement,"
            + "category_name text,"
            + "category_code integer)";

    private Context mContext;


    public MyDatabaseHelper(@Nullable Context context, @Nullable String name, @Nullable SQLiteDatabase.CursorFactory factory, int version) {
        super(context, name, factory, version);
        mContext = context;
    }

    @Override
    public void onCreate(SQLiteDatabase db) {
        db.execSQL(CREATE_BOOK);
        db.execSQL(CREATE_CATEGORY);
        Toast.makeText(mContext, "Create succeed", Toast.LENGTH_SHORT).show();
    }

    @Override
    public void onUpgrade(SQLiteDatabase db, int oldVersion, int newVersion) {
    }
}
这样修改代码的话,运行起来我们会发现创建失败,因为我们已经存在BookStore.db数据库了,所以我们需要对数据库进行升级:
@Override
    public void onUpgrade(SQLiteDatabase db, int oldVersion, int newVersion) {
        db.execSQL("drop table if exists Book");
        db.execSQL("drop table if exists Category");
        onCreate(db);
    }
要让onUpgrade()运行,我们只需要将版本号改为比1大的数字就可以了:
dbHelper = new MyDatabaseHelper(this, "BookStore.db", null, 2);
添加数据
前面已经知道,调用SQLiteOpenHelper的getReadableDatabase()或getWritableDatabase()都是可以用于创建和升级数据库的,丙炔会返回一个SQLiteDatabase对象,借助这个对象就可以进行CRUD操作了
CRUD:添加(Create),查询(Retrieve),更新(Update),删除(Delete)
SQLiteDatabase提供了一个insert()方法专门用于添加数据,它接收三个参数:表名、可以直接传入null、ContentValues对象
下来举例子:
修改activity_main中的代码:
<?xml version="1.0" encoding="utf-8"?>
<LinearLayout xmlns:android="http://schemas.android.com/apk/res/android"
    android:orientation="vertical"
    android:layout_width="match_parent"
    android:layout_height="match_parent">

    <Button
        android:id="@+id/create_database"
        android:layout_width="match_parent"
        android:layout_height="wrap_content"
        android:text="Create database"/>

    <Button
        android:id="@+id/add_data"
        android:layout_width="match_parent"
        android:layout_height="wrap_content"
        android:text="Add data"/>

</LinearLayout>
新增了一个按钮
修改MainActivity:
public class MainActivity extends AppCompatActivity {

    private MyDatabaseHelper dbHelper;
    @Override
    protected void onCreate(Bundle savedInstanceState) {
        super.onCreate(savedInstanceState);
        setContentView(R.layout.activity_main);
        dbHelper = new MyDatabaseHelper(this, "BookStore.db", null, 1);
        Button createDatabase = (Button) findViewById(R.id.create_database);
        createDatabase.setOnClickListener(new View.OnClickListener() {
            @Override
            public void onClick(View v) {
                dbHelper.getWritableDatabase();
            }
        });
        Button addData = (Button) findViewById(R.id.add_data);
        addData.setOnClickListener(new View.OnClickListener() {
            @Override
            public void onClick(View v) {
                SQLiteDatabase db = dbHelper.getWritableDatabase();
                ContentValues values = new ContentValues();

                values.put("name", "The Da Vinci Code");
                values.put("author", "Dan Brown");
                values.put("pages", 454);
                values.put("price", 16.96);
                db.insert("Book", null, values);
                values.clear();

                values.put("name", "The Lost Symbol");
                values.put("author", "Dan Brown");
                values.put("pages", 510);
                values.put("price", 19.95);
                db.insert("Book", null, values);
            }
        });
    }
}
id自增长,会自动生成
更新数据
修改activity_main中的代码:
<?xml version="1.0" encoding="utf-8"?>
<LinearLayout xmlns:android="http://schemas.android.com/apk/res/android"
    android:orientation="vertical"
    android:layout_width="match_parent"
    android:layout_height="match_parent">

    <Button
        android:id="@+id/create_database"
        android:layout_width="match_parent"
        android:layout_height="wrap_content"
        android:text="Create database"/>

    <Button
        android:id="@+id/add_data"
        android:layout_width="match_parent"
        android:layout_height="wrap_content"
        android:text="Add data"/>

    <Button
        android:id="@+id/update_data"
        android:layout_width="match_parent"
        android:layout_height="wrap_content"
        android:text="Update data"/>

</LinearLayout>
多添加了一个按钮用于更新数据
修改MainActivity中的代码:
public class MainActivity extends AppCompatActivity {

    private MyDatabaseHelper dbHelper;

    @Override
    protected void onCreate(Bundle savedInstanceState) {
        super.onCreate(savedInstanceState);
        setContentView(R.layout.activity_main);
        dbHelper = new MyDatabaseHelper(this, "BookStore.db", null, 1);
        Button createDatabase = (Button) findViewById(R.id.create_database);
        createDatabase.setOnClickListener(new View.OnClickListener() {
            @Override
            public void onClick(View v) {
                dbHelper.getWritableDatabase();
            }
        });
        Button addData = (Button) findViewById(R.id.add_data);
        addData.setOnClickListener(new View.OnClickListener() {
            @Override
            public void onClick(View v) {
                SQLiteDatabase db = dbHelper.getWritableDatabase();
                ContentValues values = new ContentValues();

                values.put("name", "The Da Vinci Code");
                values.put("author", "Dan Brown");
                values.put("pages", 454);
                values.put("price", 16.96);
                db.insert("Book", null, values);
                values.clear();

                values.put("name", "The Lost Symbol");
                values.put("author", "Dan Brown");
                values.put("pages", 510);
                values.put("price", 19.95);
                db.insert("Book", null, values);
            }
        });
        Button updateData = (Button) findViewById(R.id.update_data);
        updateData.setOnClickListener(new View.OnClickListener() {
            @Override
            public void onClick(View v) {
                SQLiteDatabase db = dbHelper.getWritableDatabase();
                ContentValues values = new ContentValues();
                values.put("price", 10.99);
                db.update("Book", values, "name = ?", new String[]{"The Da Vinci Code"});
            }
        });
    }
}
其中,先指定了一组数据,说明想把price改为10.99,下面使用update()方法去进行更新操作
第三个参数中'?'是占位符,第四个参数可以给占位符提供相应内容
删除数据
SQLiteDatabase中也提供了delete()方法,第一个参数是表名,第二个和第三个是对删除进行限制(默认删除所有行)
修改activity_main:
<?xml version="1.0" encoding="utf-8"?>
<LinearLayout xmlns:android="http://schemas.android.com/apk/res/android"
    android:orientation="vertical"
    android:layout_width="match_parent"
    android:layout_height="match_parent">

    <Button
        android:id="@+id/create_database"
        android:layout_width="match_parent"
        android:layout_height="wrap_content"
        android:text="Create database"/>

    <Button
        android:id="@+id/add_data"
        android:layout_width="match_parent"
        android:layout_height="wrap_content"
        android:text="Add data"/>

    <Button
        android:id="@+id/update_data"
        android:layout_width="match_parent"
        android:layout_height="wrap_content"
        android:text="Update data"/>

    <Button
        android:id="@+id/delete_data"
        android:layout_width="match_parent"
        android:layout_height="wrap_content"
        android:text="Delete data"/>

</LinearLayout>
又增加一个按钮用于删除
修改MainActivity中的代码:
public class MainActivity extends AppCompatActivity {

    private MyDatabaseHelper dbHelper;

    @Override
    protected void onCreate(Bundle savedInstanceState) {
        super.onCreate(savedInstanceState);
        setContentView(R.layout.activity_main);
        dbHelper = new MyDatabaseHelper(this, "BookStore.db", null, 1);
        Button createDatabase = (Button) findViewById(R.id.create_database);
        createDatabase.setOnClickListener(new View.OnClickListener() {
            @Override
            public void onClick(View v) {
                dbHelper.getWritableDatabase();
            }
        });
        Button addData = (Button) findViewById(R.id.add_data);
        addData.setOnClickListener(new View.OnClickListener() {
            @Override
            public void onClick(View v) {
                SQLiteDatabase db = dbHelper.getWritableDatabase();
                ContentValues values = new ContentValues();

                values.put("name", "The Da Vinci Code");
                values.put("author", "Dan Brown");
                values.put("pages", 454);
                values.put("price", 16.96);
                db.insert("Book", null, values);
                values.clear();

                values.put("name", "The Lost Symbol");
                values.put("author", "Dan Brown");
                values.put("pages", 510);
                values.put("price", 19.95);
                db.insert("Book", null, values);
            }
        });
        Button updateData = (Button) findViewById(R.id.update_data);
        updateData.setOnClickListener(new View.OnClickListener() {
            @Override
            public void onClick(View v) {
                SQLiteDatabase db = dbHelper.getWritableDatabase();
                ContentValues values = new ContentValues();
                values.put("price", 10.99);
                db.update("Book", values, "name = ?", new String[]{"The Da Vinci Code"});
            }
        });
        Button deleteButton = (Button) findViewById(R.id.delete_data);
        deleteButton.setOnClickListener(new View.OnClickListener() {
            @Override
            public void onClick(View v) {
                SQLiteDatabase db = dbHelper.getWritableDatabase();
                db.delete("Book", "pages > ?", new String[]{"500"});
            }
        });
    }
}
查询数据
查询数据为CRUD中最复杂的一种操作
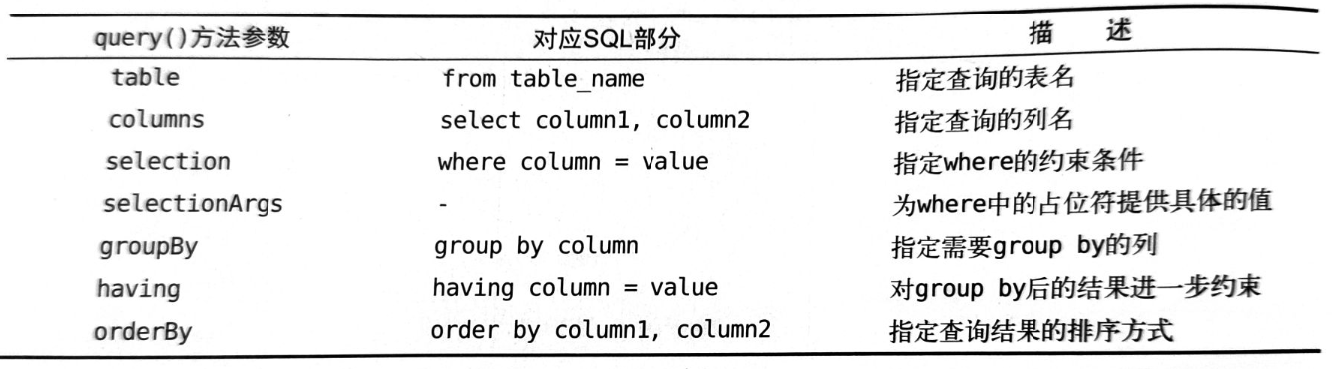
SQLiteDatabase提供了query(),但是参数最少都需要7个
第一个参数还是表名,第二个参数指定查询哪几列,第三、四个参数用于约束查询某几行的数据,第五个参数指定需要去group by的列,第六个参数用于对group by数据进行进一步过滤,第七个参数指定排序方式。
修改activity_main中的代码:
<?xml version="1.0" encoding="utf-8"?>
<LinearLayout xmlns:android="http://schemas.android.com/apk/res/android"
    android:orientation="vertical"
    android:layout_width="match_parent"
    android:layout_height="match_parent">

    <Button
        android:id="@+id/create_database"
        android:layout_width="match_parent"
        android:layout_height="wrap_content"
        android:text="Create database"/>

    <Button
        android:id="@+id/add_data"
        android:layout_width="match_parent"
        android:layout_height="wrap_content"
        android:text="Add data"/>

    <Button
        android:id="@+id/update_data"
        android:layout_width="match_parent"
        android:layout_height="wrap_content"
        android:text="Update data"/>

    <Button
        android:id="@+id/delete_data"
        android:layout_width="match_parent"
        android:layout_height="wrap_content"
        android:text="Delete data"/>

    <Button
        android:id="@+id/query_data"
        android:layout_width="match_parent"
        android:layout_height="wrap_content"
        android:text="Query data"/>

</LinearLayout>
修改MainActivity总的代码:
public class MainActivity extends AppCompatActivity {

    private MyDatabaseHelper dbHelper;

    @Override
    protected void onCreate(Bundle savedInstanceState) {
        super.onCreate(savedInstanceState);
        setContentView(R.layout.activity_main);
        dbHelper = new MyDatabaseHelper(this, "BookStore.db", null, 1);
        Button createDatabase = (Button) findViewById(R.id.create_database);
        createDatabase.setOnClickListener(new View.OnClickListener() {
            @Override
            public void onClick(View v) {
                dbHelper.getWritableDatabase();
            }
        });
        Button addData = (Button) findViewById(R.id.add_data);
        addData.setOnClickListener(new View.OnClickListener() {
            @Override
            public void onClick(View v) {
                SQLiteDatabase db = dbHelper.getWritableDatabase();
                ContentValues values = new ContentValues();

                values.put("name", "The Da Vinci Code");
                values.put("author", "Dan Brown");
                values.put("pages", 454);
                values.put("price", 16.96);
                db.insert("Book", null, values);
                values.clear();

                values.put("name", "The Lost Symbol");
                values.put("author", "Dan Brown");
                values.put("pages", 510);
                values.put("price", 19.95);
                db.insert("Book", null, values);
            }
        });
        Button updateData = (Button) findViewById(R.id.update_data);
        updateData.setOnClickListener(new View.OnClickListener() {
            @Override
            public void onClick(View v) {
                SQLiteDatabase db = dbHelper.getWritableDatabase();
                ContentValues values = new ContentValues();
                values.put("price", 10.99);
                db.update("Book", values, "name = ?", new String[]{"The Da Vinci Code"});
            }
        });
        Button deleteButton = (Button) findViewById(R.id.delete_data);
        deleteButton.setOnClickListener(new View.OnClickListener() {
            @Override
            public void onClick(View v) {
                SQLiteDatabase db = dbHelper.getWritableDatabase();
                db.delete("Book", "pages > ?", new String[]{"500"});
            }
        });

        Button queryButton = (Button) findViewById(R.id.query_data);
        queryButton.setOnClickListener(new View.OnClickListener() {
            @Override
            public void onClick(View v) {
                SQLiteDatabase db = dbHelper.getWritableDatabase();
                Cursor cursor = db.query("Book", null, null, null, null, null, null);
                if (cursor.moveToFirst()) {
                    while (cursor.moveToNext()){
                        @SuppressLint("Range") String name = cursor.getString(cursor.getColumnIndex("name"));
                        @SuppressLint("Range") String author = cursor.getString(cursor.getColumnIndex("author"));
                        @SuppressLint("Range") int pages = cursor.getInt(cursor.getColumnIndex("pages"));
                        @SuppressLint("Range") double price = cursor.getDouble(cursor.getColumnIndex("price"));
                        Log.d("MainActivity", "Book name is " + name);
                        Log.d("MainActivity", "Book author is " + author);
                        Log.d("MainActivity", "Book pages is " + pages);
                        Log.d("MainActivity", "Book price is " + price);
                    }
                }
                cursor.close();
            }
        });
    }
}
最后要用close()方法关闭Cursor


 3892
3892

 被折叠的 条评论
为什么被折叠?
被折叠的 条评论
为什么被折叠?
 到【灌水乐园】发言


