


目录
布局子视图
当父视图大小发生变化时,我们想让子视图跟着父视图一起变化,可以使用自动布局和手动布局两种方式
手动布局子视图
#import <UIKit/UIKit.h>

NS_ASSUME_NONNULL_BEGIN

@interface superView : UIView
{
    UIView* _view01;
    UIView* _view02;
    UIView* _view03;
    UIView* _view04;
    UIView* _view05;
}

- (void)createSubViews;
@end
#import "superView.h"
@implementation superView
- (void)createSubViews {
_view01 = [[UIView alloc] init];
_view01.frame = CGRectMake(0, 0, 40, 40);
_view02 = [[UIView alloc] init];
_view02.frame = CGRectMake(self.bounds.size.width - 40, 0, 40, 40);
_view03 = [[UIView alloc] init];
_view03.frame = CGRectMake(self.bounds.size.width - 40, self.bounds.size.height - 40, 40, 40);
_view04 = [[UIView alloc] init];
_view04.frame = CGRectMake(0, self.bounds.size.height - 40, 40, 40);
_view01.backgroundColor = [UIColor cyanColor];
_view02.backgroundColor = [UIColor cyanColor];
_view03.backgroundColor = [UIColor cyanColor];
_view04.backgroundColor = [UIColor cyanColor];
[self addSubview:_view01];
[self addSubview:_view02];
[self addSubview:_view03];
[self addSubview:_view04];
}
//当需要重新布局时调用此函数
//通过此函数重新设定子视图的位置
//手动调整子视图的位置
- (void)layoutSubviews {
[UIView animateWithDuration:1 animations:^{
self->_view01.frame = CGRectMake(0, 0, 40, 40);
self->_view02.frame = CGRectMake(self.bounds.size.width - 40, 0, 40, 40);
self->_view03.frame = CGRectMake(self.bounds.size.width - 40, self.bounds.size.height - 40, 40, 40);
self->_view04.frame = CGRectMake(0, self.bounds.size.height - 40, 40, 40);
}];
}#import "ViewController.h"
#import "superView.h"
@interface ViewController ()
@end
@implementation ViewController
- (void)viewDidLoad {
[super viewDidLoad];
// Do any additional setup after loading the view.
//创建父亲视图
superView* sView = [[superView alloc] init];
sView.frame = CGRectMake(20, 20, 180, 280);
[sView createSubViews];
sView.backgroundColor = [UIColor orangeColor];
[self.view addSubview:sView];
UIButton* btn = [UIButton buttonWithType:UIButtonTypeRoundedRect];
btn.frame = CGRectMake(240, 480, 80, 40);
[btn setTitle:@"放大" forState:UIControlStateNormal];
[btn addTarget:self action:@selector(pressLarge) forControlEvents:UIControlEventTouchUpInside];
[self.view addSubview:btn];
UIButton* btn1 = [UIButton buttonWithType:UIButtonTypeRoundedRect];
btn1.frame = CGRectMake(240, 520, 80, 40);
[btn1 setTitle:@"缩小" forState:UIControlStateNormal];
[btn1 addTarget:self action:@selector(pressSmall) forControlEvents:UIControlEventTouchUpInside];
[self.view addSubview:btn1];
sView.tag = 101;
}
//放大父视图
- (void)pressLarge {
superView* sView = (superView*)[self.view viewWithTag:101];
[UIView animateWithDuration:1 animations:^{
sView.frame = CGRectMake(20, 20, 300, 480);
}];
}
//缩小父视图
- (void)pressSmall {
superView* sView = (superView*)[self.view viewWithTag:101];
[UIView animateWithDuration:1 animations:^{
sView.frame = CGRectMake(20, 20, 180, 280);
}];
}
@end效果如下:

自动布局子视图
自动布局子视图通过OC语言提供的属性和方法来完成
#import <UIKit/UIKit.h>

@interface ViewController : UIViewController {
    UIView* _superView;
    UILabel* _label1;
    UILabel* _label2;
    UILabel* _label3;
    UILabel* _label4;
    UIView* _viewCenter;
}


@end
#import "ViewController.h"

@interface ViewController ()

@end

@implementation ViewController

- (void)viewDidLoad {
    [super viewDidLoad];
    // Do any additional setup after loading the view.
    _superView = [[UIView alloc] init];
    _superView.frame = CGRectMake(20, 20, 180, 280);
    _superView.backgroundColor = [UIColor orangeColor];

    _label1 = [[UILabel alloc] init];
    _label1.frame = CGRectMake(0, 0, 40, 40);
    _label1.text = @"1";
    _label1.backgroundColor = [UIColor cyanColor];
    _label1.textAlignment = NSTextAlignmentCenter;

    _label2 = [[UILabel alloc] init];
    _label2.frame = CGRectMake(140, 0, 40, 40);
    _label2.text = @"2";
    _label2.backgroundColor = [UIColor cyanColor];
    _label2.textAlignment = NSTextAlignmentCenter;

    _label3 = [[UILabel alloc] init];
    _label3.frame = CGRectMake(140, 240, 40, 40);
    _label3.text = @"3";
    _label3.backgroundColor = [UIColor cyanColor];
    _label3.textAlignment = NSTextAlignmentCenter;

    _label4 = [[UILabel alloc] init];
    _label4.frame = CGRectMake(0, 240, 40, 40);
    _label4.text = @"4";
    _label4.backgroundColor = [UIColor cyanColor];
    _label4.textAlignment = NSTextAlignmentCenter;

    [_superView addSubview:_label1];
    [_superView addSubview:_label2];
    [_superView addSubview:_label3];
    [_superView addSubview:_label4];

    [self.view addSubview:_superView];

    _viewCenter = [[UIView alloc] init];
    _viewCenter.frame = CGRectMake(0, 0, _superView.bounds.size.width, 40);
    _viewCenter.center = CGPointMake(90, 140);
    _viewCenter.backgroundColor = [UIColor magentaColor];
    [_superView addSubview:_viewCenter];

    //自动布局属性,通过此变量来调整视图在父亲视图中的位置和大小
    _label1.autoresizingMask = UIViewAutoresizingFlexibleRightMargin;
    _label2.autoresizingMask = UIViewAutoresizingFlexibleLeftMargin;
    _label3.autoresizingMask = UIViewAutoresizingFlexibleTopMargin|UIViewAutoresizingFlexibleLeftMargin;
    _label4.autoresizingMask = UIViewAutoresizingFlexibleTopMargin;
    _viewCenter.autoresizingMask = UIViewAutoresizingFlexibleTopMargin|UIViewAutoresizingFlexibleWidth|UIViewAutoresizingFlexibleBottomMargin;
}

- (void)touchesBegan:(NSSet<UITouch *> *)touches withEvent:(UIEvent *)event {
    static BOOL isLarge = NO;
    [UIView animateWithDuration:1 animations:^{
        if (isLarge == NO) {
            self->_superView.frame = CGRectMake(10, 10, 300, 480);
        } else {
            self->_superView.frame = CGRectMake(20, 20, 180, 280);
        }
        isLarge = !isLarge;
    }];
}

@end
效果如下:

导航控制器
导航控制器基础
导航控制器(UINavigationController)是一个控制导航栏(navigationBar)的控件,在导航栏上的按钮叫UINavigationIitm,在导航控制器中控制一个视图控制器(UIViewController),而每个视图控制器中对应一个导航引入项(navigationItem),导航引入项也就是显示在导航栏上的内容,包括leftBarButtonItem(导航栏左侧按钮),titleView(导航栏中间标题),rightBarButtonItem(导航栏右侧按钮)
用代码来演示一下导航控制器的创建和使用:
#import "SceneDelegate.h"
#import "VCRoot.h"

@interface SceneDelegate ()

@end

@implementation SceneDelegate


- (void)scene:(UIScene *)scene willConnectToSession:(UISceneSession *)session options:(UISceneConnectionOptions *)connectionOptions {
    self.window.frame = [UIScreen mainScreen].bounds;

    //创建一个根视图控制器
    VCRoot *root = [[VCRoot alloc] init];

    //创建导航控制器,它主要是用于管理多个视图控制器的切换
    //用层级的方式来管理多个视图的切换
    //创建导航控制器的时候一定要有一个根视图控制器
    UINavigationController *nav = [[UINavigationController alloc] initWithRootViewController: root];


    //将window的根视图设置为导航控制器
    self.window.rootViewController = nav;

    [self.window makeKeyAndVisible];
}
#import "VCRoot.h"
@interface VCRoot ()
@end
@implementation VCRoot
- (void)viewDidLoad {
[super viewDidLoad];
//设置根视图颜色
self.view.backgroundColor = [UIColor cyanColor];
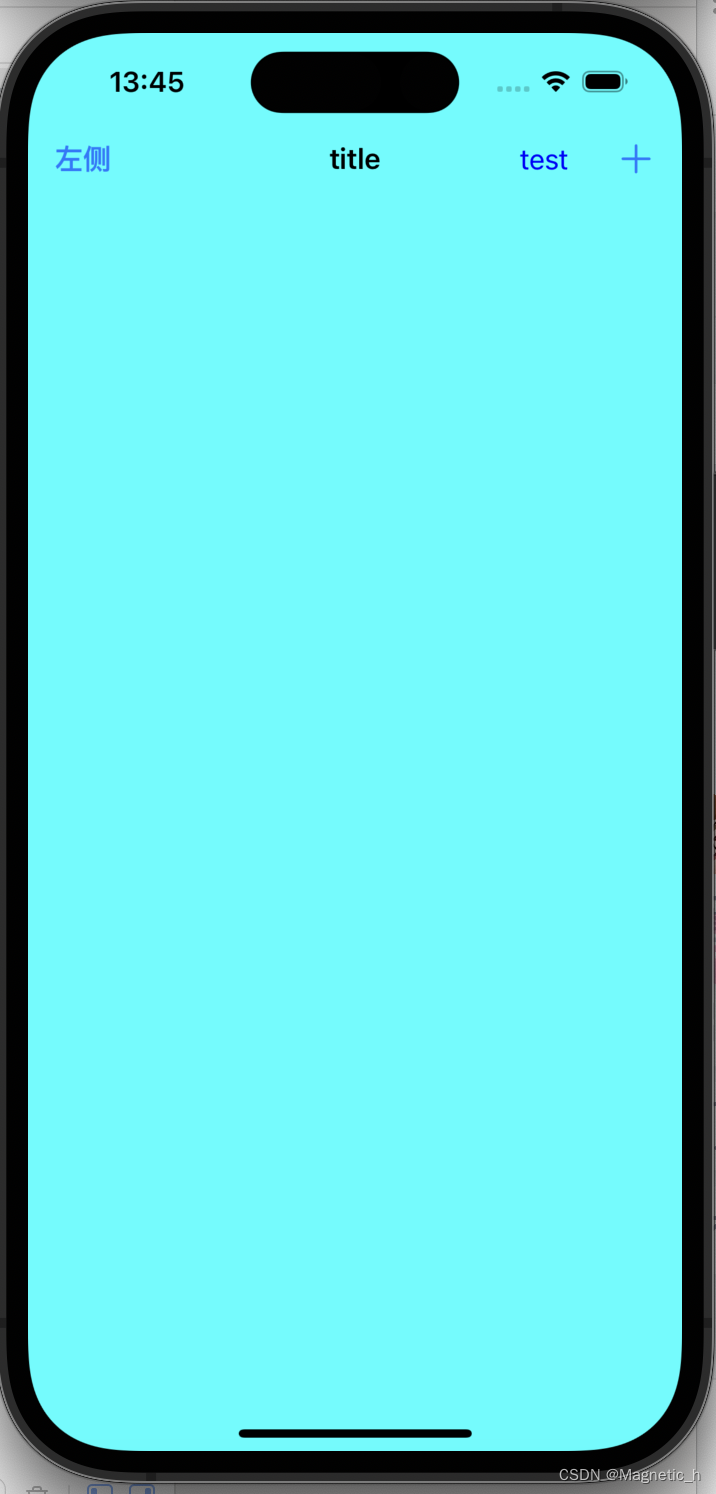
//设置导航栏文字内容
self.title = @"根视图";
//设置导航元素项的标题,它和上面那一条的区别是
//如果没有设置navigationItem的title,为nil,系统会自动使用self.title作为标题
//如果navigationItem的title不为nil,则将navigationItem的title设置为标题
//如果navigationItem的title和self.title都为nil,则没有标题
self.navigationItem.title = @"title";
//创建一个导航栏左侧的按钮,这是根据title文字来创建的,传入四个参数
//第一个参数是按钮上的文字内容;第二个参数是按钮风格
//第三个参数是事件的拥有者;第四个参数是按钮的事件函数
UIBarButtonItem *leftBtn = [[UIBarButtonItem alloc] initWithTitle: @"左侧" style: UIBarButtonItemStyleDone target: self action: @selector(pressLeft)];
//给导航栏的左侧按钮属性赋值为我们创建好的左侧按钮
self.navigationItem.leftBarButtonItem = leftBtn;
//右侧按钮
//和左侧按钮不同的是,这里创建右侧按钮的时候我们使用的初始化方法是不一样的
//这里的初始化方法不需要输入文字内容,而是指定了系统提供的风格样式,系统风格的按钮内容或标题文字不可更改
UIBarButtonItem *rightBtn = [[UIBarButtonItem alloc] initWithBarButtonSystemItem: UIBarButtonSystemItemAdd target: self action: @selector(pressRight)];
self.navigationItem.rightBarButtonItem = rightBtn;
//创建多按钮:
//先创建一个标签对象
UILabel *label = [[UILabel alloc] initWithFrame: CGRectMake(10, 10, 50, 40)];
label.text = @"test";
//将label设置为居中
label.textAlignment = NSTextAlignmentCenter;
label.textColor = [UIColor blueColor];
//将UIlabel类型的控件添加到导航栏按钮
//initWithCustomView就代表以自定义控件来初始化
UIBarButtonItem *item3 = [[UIBarButtonItem alloc] initWithCustomView: label];
//创建一个按钮数组
NSArray *arrayBtn = [NSArray arrayWithObjects: rightBtn, item3, nil];
//将右侧按钮数组赋值
self.navigationItem.rightBarButtonItems = arrayBtn;
}
- (void) pressLeft {
NSLog(@"左侧按钮被按下");
}
- (void) pressRight {
NSLog(@"右侧按钮被按下");
}
/*
#pragma mark - Navigation
// In a storyboard-based application, you will often want to do a little preparation before navigation
- (void)prepareForSegue:(UIStoryboardSegue *)segue sender:(id)sender {
// Get the new view controller using [segue destinationViewController].
// Pass the selected object to the new view controller.
}
*/
@end
效果如下:
导航控制器切换
导航控制器切换一般用这一对方法:
pushViewController:推入视图控制器
popViewController:弹出视图控制器
#import "SceneDelegate.h"
#import "VCRoot.h"

@interface SceneDelegate ()

@end

@implementation SceneDelegate


- (void)scene:(UIScene *)scene willConnectToSession:(UISceneSession *)session options:(UISceneConnectionOptions *)connectionOptions {
    // Use this method to optionally configure and attach the UIWindow `window` to the provided UIWindowScene `scene`.
    // If using a storyboard, the `window` property will automatically be initialized and attached to the scene.
    // This delegate does not imply the connecting scene or session are new (see `application:configurationForConnectingSceneSession` instead).
    self.window.rootViewController = [[UINavigationController alloc] initWithRootViewController: [[VCRoot alloc] init]];
    [self.window makeKeyAndVisible];
}
#import "VCRoot.h"
#import "VCsecond.h"
@interface VCRoot ()
@end
@implementation VCRoot
- (void)viewDidLoad {
[super viewDidLoad];
// Do any additional setup after loading the view.
//设置导航栏的透明度
//默认透明度为YES:可透明的
//NO:使导航栏不透明
self.navigationController.navigationBar.translucent = NO;
self.navigationController.navigationBar.barStyle = UIBarStyleDefault;
self.view.backgroundColor = [UIColor blueColor];
self.title = @"根视图";
UIBarButtonItem* next = [[UIBarButtonItem alloc] initWithTitle:@"下一级" style:UIBarButtonItemStylePlain target:self action:@selector(pressNext)];
self.navigationItem.rightBarButtonItem = next;
}
-(void) pressNext {
//创建一个新的视图控制器
VCsecond* vcSecond = [[VCsecond alloc] init];
//使用当前视图控制器的导航控制器对象
//注意两种切换视图的写法的区别
//[self presentViewController:vcSecond animated:YES completion:nil];
//[self.navigationController presentViewController:vcSecond animated:YES completion:nil];
[self.navigationController pushViewController:vcSecond animated:YES];
}
/*
#pragma mark - Navigation
// In a storyboard-based application, you will often want to do a little preparation before navigation
- (void)prepareForSegue:(UIStoryboardSegue *)segue sender:(id)sender {
// Get the new view controller using [segue destinationViewController].
// Pass the selected object to the new view controller.
}
*/
@end
#import "VCsecond.h"
#import "VCthird.h"

@interface VCsecond ()

@end

@implementation VCsecond

- (void)viewDidLoad {
    [super viewDidLoad];
    // Do any additional setup after loading the view.
    self.view.backgroundColor = [UIColor greenColor];
    self.title = @"视图二";
    UIBarButtonItem* btnNext = [[UIBarButtonItem alloc] initWithTitle:@"第三级" style:UIBarButtonItemStylePlain target:self action:@selector(pressNext)];
    self.navigationItem.rightBarButtonItem = btnNext;
}

- (void)pressNext {
    VCthird* vc = [[VCthird alloc] init];
    //推入第三个视图控制器
    [self.navigationController pushViewController:vc animated:YES];
}

/*
#pragma mark - Navigation

// In a storyboard-based application, you will often want to do a little preparation before navigation
- (void)prepareForSegue:(UIStoryboardSegue *)segue sender:(id)sender {
    // Get the new view controller using [segue destinationViewController].
    // Pass the selected object to the new view controller.
}
*/

@end
#import "VCthird.h"

@interface VCthird ()

@end

@implementation VCthird

- (void)viewDidLoad {
    [super viewDidLoad];
    // Do any additional setup after loading the view.
    self.view.backgroundColor = [UIColor orangeColor];
    self.title = @"第三级";

    UIBarButtonItem* btnLeft = [[UIBarButtonItem alloc] initWithTitle:@"返回" style:UIBarButtonItemStylePlain target:self action:@selector(pressBack)];
    //当自己设定左侧按钮时,返回按钮会自动被替代
    self.navigationItem.leftBarButtonItem = btnLeft;

    UIBarButtonItem* btnR = [[UIBarButtonItem alloc] initWithTitle:@"返回根视图" style:UIBarButtonItemStylePlain target:self action:@selector(pressRight)];
    self.navigationItem.rightBarButtonItem = btnR;
}

-(void) pressRight{
    //直接返回到根视图
    [self.navigationController popToRootViewControllerAnimated:YES];
}

- (void)pressBack {
    NSLog(@"返回上一级");
    [self.navigationController popViewControllerAnimated:YES];
}
/*
#pragma mark - Navigation

// In a storyboard-based application, you will often want to do a little preparation before navigation
- (void)prepareForSegue:(UIStoryboardSegue *)segue sender:(id)sender {
    // Get the new view controller using [segue destinationViewController].
    // Pass the selected object to the new view controller.
}
*/

@end
这里三个视图控制器的头文件过于简单 就省略了
效果如下:

导航栏和工具栏
在iOS13之后,设置导航栏的颜色等样式要按如下方式:
UIBarAppearance是iOS13后推出的一个对相应空间设置外观样式的类,可以统一配置NavigationBar、TabBar、ToolBar等的外观样式
UINavigationBarAppearance可以设置导航栏对象的外观样式
在使用这些方法设置导航栏外观样式之前,需要创建一个UINavigationBarAppearance对象
#import "VCRoot.h"
#import "VCSecond.h"
@interface VCRoot ()
@end
@implementation VCRoot
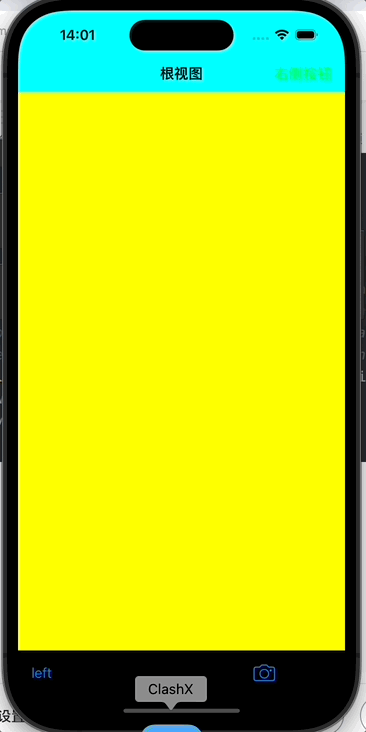
- (void)viewDidLoad {
[super viewDidLoad];
self.view.backgroundColor = [UIColor yellowColor];
//设置导航栏风格颜色 默认是透明的
//UIBarStyleBlack 透明的
self.navigationController.navigationBar.barStyle = UIBarStyleDefault;
//将风格设置为不透明
self.navigationController.navigationBar.translucent = NO;
//设置导航栏的风格颜色
//self.navigationController.navigationBar.barTintColor = [UIColor redColor];
//UIBarAppearance是iOS13后推出的一个对相应空间设置外观样式的类,可以统一配置NavigationBar、TabBar、ToolBar等的外观样式
//UINavigationBarAppearance可以设置导航栏对象的外观样式
//创建一个UINavigationBarAppearance对象
UINavigationBarAppearance *appearance = [[UINavigationBarAppearance alloc] init];
//设置该对象的背景颜色
appearance.backgroundColor = [UIColor cyanColor];
//创建该对象的阴影图像
appearance.shadowImage = [[UIImage alloc] init];
//设置该对象的阴影颜色
appearance.shadowColor = nil;
//self.navigationController.navigationBar.standardAppearance = appearance;
self.navigationController.navigationBar.scrollEdgeAppearance = appearance;
//设置导航元素项目按钮的风格颜色
self.navigationController.navigationBar.tintColor = [UIColor greenColor];
//self.navigationController.navigationBarHidden = YES;
//self.navigationController.navigationBar.hidden = YES;
//隐藏导航栏 一个是导航控制器的属性 一个是导航栏属性
self.navigationController.toolbarHidden = NO;
self.title = @"根视图";
UIBarButtonItem* btn = [[UIBarButtonItem alloc] initWithTitle:@"右侧按钮" style:UIBarButtonItemStylePlain target:nil action:nil];
self.navigationItem.rightBarButtonItem = btn;
//实现工具栏对象
//默认工具栏是隐藏的
self.navigationController.toolbarHidden = NO;
self.navigationController.toolbar.translucent = NO;
//创建三个工具栏按钮
UIBarButtonItem* btn1 = [[UIBarButtonItem alloc] initWithTitle:@"left" style:UIBarButtonItemStylePlain target:nil action:nil];
UIBarButtonItem* btn2 = [[UIBarButtonItem alloc] initWithBarButtonSystemItem:UIBarButtonSystemItemCamera target:self action:@selector(pressNext)];
UIButton* btnImage = [UIButton buttonWithType:UIButtonTypeCustom];
[btnImage setImage:[UIImage imageNamed:@"1.jpg"] forState:UIControlStateNormal];
btnImage.frame = CGRectMake(0, 0, 60, 60);
UIBarButtonItem* btn3 = [[UIBarButtonItem alloc] initWithCustomView:btnImage];
//固定宽度分割占位按钮
UIBarButtonItem* btnf01 = [[UIBarButtonItem alloc] initWithBarButtonSystemItem:UIBarButtonSystemItemFixedSpace target:nil action:nil];
btnf01.width = 100;
UIBarButtonItem* btnf02 = [[UIBarButtonItem alloc] initWithBarButtonSystemItem:UIBarButtonSystemItemFlexibleSpace menu:nil];
//按钮数组的创建
NSArray* arrayBtns = [NSArray arrayWithObjects:btn1, btnf02, btn2, btn3, nil];
self.toolbarItems = arrayBtns;
// Do any additional setup after loading the view.
}
- (void)pressNext {
VCSecond* vc = [[VCSecond alloc] init];
[self.navigationController pushViewController:vc animated:YES];
}
//导航栏和工具栏是公用的,但是导航栏和工具栏上的按钮是独立的
/*
#pragma mark - Navigation
// In a storyboard-based application, you will often want to do a little preparation before navigation
- (void)prepareForSegue:(UIStoryboardSegue *)segue sender:(id)sender {
// Get the new view controller using [segue destinationViewController].
// Pass the selected object to the new view controller.
}
*/
@end
#import "VCSecond.h"

@interface VCSecond ()

@end

@implementation VCSecond

- (void)viewDidLoad {
    [super viewDidLoad];
    // Do any additional setup after loading the view.
    self.view.backgroundColor = [UIColor orangeColor];
}
#import "SceneDelegate.h"
#import "VCRoot.h"
@interface SceneDelegate ()
@end
@implementation SceneDelegate
- (void)scene:(UIScene *)scene willConnectToSession:(UISceneSession *)session options:(UISceneConnectionOptions *)connectionOptions {
// Use this method to optionally configure and attach the UIWindow `window` to the provided UIWindowScene `scene`.
// If using a storyboard, the `window` property will automatically be initialized and attached to the scene.
// This delegate does not imply the connecting scene or session are new (see `application:configurationForConnectingSceneSession` instead).
UINavigationController* nav = [[UINavigationController alloc] initWithRootViewController:[[VCRoot alloc] init]];
self.window.rootViewController = nav;
[self.window makeKeyAndVisible];
}效果如下:
在以上代码中有一些方法:
barStyle:导航栏风格
barTintColor:导航栏颜色
tintColor:导航栏风格颜色
toolBarItems:工具栏元素数组
UIBarItemFlexibleSpace:自动调整距离按钮
分栏控制器
分栏控制器基础
分栏控制器就是一个可以在几个视图控制器间切换的控件
#import "VCFirst.h"

@interface VCFirst ()

@end

@implementation VCFirst

- (void)viewDidLoad {
    [super viewDidLoad];
    // Do any additional setup after loading the view.
    //创建一个分栏按钮对象
    //第一个参数是文字
    //第二个参数表示是否显示图片图标
    //第三个参数是设置按钮的tag值
    //方法一
    //UITabBarItem* tabBarItem = [[UITabBarItem alloc] initWithTitle:@"111" image:nil tag:101];
    //self.tabBarItem = tabBarItem;

    //根据系统风格创建分栏按钮
    //第一个参数表示系统风格
    UITabBarItem* tabBarItem = [[UITabBarItem alloc] initWithTabBarSystemItem:UITabBarSystemItemContacts tag:101];
    //按钮右上角的提示信息
    //通常用来提示未读的信息
    tabBarItem.badgeValue = @"22";
    self.tabBarItem = tabBarItem;
}
#import "VCSecond.h"

@interface VCSecond ()

@end

@implementation VCSecond

- (void)viewDidLoad {
    [super viewDidLoad];
    // Do any additional setup after loading the view.
}
#import "VCThird.h"
@interface VCThird ()
@end
@implementation VCThird
- (void)viewDidLoad {
[super viewDidLoad];
// Do any additional setup after loading the view.
}#import "SceneDelegate.h"
#import "VCFirst.h"
#import "VCSecond.h"
#import "VCThird.h"
@interface SceneDelegate ()
@end
@implementation SceneDelegate
- (void)scene:(UIScene *)scene willConnectToSession:(UISceneSession *)session options:(UISceneConnectionOptions *)connectionOptions {
// Use this method to optionally configure and attach the UIWindow `window` to the provided UIWindowScene `scene`.
// If using a storyboard, the `window` property will automatically be initialized and attached to the scene.
// This delegate does not imply the connecting scene or session are new (see `application:configurationForConnectingSceneSession` instead).
//显示window
[self.window makeKeyAndVisible];
//创建视图控制器一
VCFirst* vcFirst = [[VCFirst alloc] init];
//创建视图控制器二
VCSecond* vcSecond = [[VCSecond alloc] init];
vcSecond.view.backgroundColor = [UIColor yellowColor];
//创建控制视图器三
VCThird* vcThird = [[VCThird alloc] init];
//橘色背景
vcThird.view.backgroundColor = [UIColor orangeColor];
vcFirst.title = @"视图1";
vcSecond.title = @"视图2";
vcThird.title = @"视图3";
vcFirst.view.backgroundColor = [UIColor whiteColor];
//创建分栏控制器对象
UITabBarController* tbController = [[UITabBarController alloc] init];
//创建一个控制器数组对象
//将所有要被分栏控制器管理的对象添加到数组中
NSArray* arrayVC = [NSArray arrayWithObjects:vcFirst, vcSecond, vcThird, nil];
//将分栏控制器管理数组赋值
tbController.viewControllers = arrayVC;
//将分栏控制器作为根视图控制器
self.window.rootViewController = tbController;
//设置选中视图控制器的索引
//通过索引来确定显示哪一个控制器
tbController.selectedIndex = 2;
//当前选中的控制器对象
if (tbController.selectedViewController == vcThird) {
NSLog(@"当前显示的是控制器三~");
}
效果如下:

可以归纳出以下属性:
UITabBarltem:分栏按钮元素对象
badgeValue:分栏按钮提示信息
selectedIndex:分栏控制器选中的控制索引
viewControllers:分栏控制器管理数组
selectedViewController:分栏控制器选中的控制器对象
分栏控制器高级
有一些关于分栏控制器的高级方法:
willBeginCustomizingViewControllers:即将显示编辑方法
willEndCustomizingViewControllers:即将结束编辑方法
didEndCustomizingViewControllers:已经结束编辑方法
didSelectViewController:选中控制器切换方法
调用这些方法需要遵守UITabBarControllerDelegate协议
当分栏控制器按钮多于五个时,会将第五个替换成more,点击more可以点击右上角edit按钮来编辑分栏控制器上展现的按钮
用代码来演示一下:
首先创建六个视图控制器,这里就省略不写了
在scenedelegate中创建分栏控制器:
#import "SceneDelegate.h"
#import "VCFirst.h"
#import "VCSecond.h"
#import "VCThird.h"
#import "VCFourth.h"
#import "VCFifth.h"
#import "VCSixth.h"

@interface SceneDelegate ()

@end

@implementation SceneDelegate


- (void)scene:(UIScene *)scene willConnectToSession:(UISceneSession *)session options:(UISceneConnectionOptions *)connectionOptions {
    // Use this method to optionally configure and attach the UIWindow `window` to the provided UIWindowScene `scene`.
    // If using a storyboard, the `window` property will automatically be initialized and attached to the scene.
    // This delegate does not imply the connecting scene or session are new (see `application:configurationForConnectingSceneSession` instead).

    VCFirst* vc01 = [[VCFirst alloc] init];
    VCSecond* vc02 = [[VCSecond alloc] init];
    VCThird* vc03 = [[VCThird alloc] init];
    VCFourth* vc04 = [[VCFourth alloc] init];
    VCFifth* vc05 = [[VCFifth alloc] init];
    VCSixth* vc06 = [[VCSixth alloc] init];

    vc01.view.backgroundColor = [UIColor blueColor];
    vc02.view.backgroundColor = [UIColor purpleColor];
    vc03.view.backgroundColor = [UIColor grayColor];
    vc04.view.backgroundColor = [UIColor greenColor];
    vc05.view.backgroundColor = [UIColor orangeColor];
    vc06.view.backgroundColor = [UIColor yellowColor];

    vc01.title = @"视图1";
    vc02.title = @"视图2";
    vc03.title = @"视图3";
    vc04.title = @"视图4";
    vc05.title = @"视图5";
    vc06.title = @"视图6";

    //创建数组
    NSArray* arrayVC = [NSArray arrayWithObjects:vc01, vc02, vc03, vc04, vc05, vc06, nil];

    UITabBarController* tbc = [[UITabBarController alloc] init];
    tbc.viewControllers = arrayVC;
    tbc.tabBar.translucent = YES;
    self.window.rootViewController = tbc;
    //这个修改没用
    tbc.tabBar.barTintColor = [UIColor redColor];
    tbc.tabBar.tintColor = [UIColor blackColor];

    //设置代理
    tbc.delegate = self;
}

//开始编辑前调用
-(void) tabBarController:(UITabBarController *)tabBarController willBeginCustomizingViewControllers:(nonnull NSArray<__kindof UIViewController *> *)viewControllers {
    NSLog(@"编辑器前");
}

//
-(void) tabBarController:(UITabBarController *)tabBarController willEndCustomizingViewControllers:(NSArray<__kindof UIViewController *> *)viewControllers changed:(BOOL)changed {
    NSLog(@"即将结束前!");
}

-(void) tabBarController:(UITabBarController *)tabBarController didEndCustomizingViewControllers:(NSArray<__kindof UIViewController *> *)viewControllers changed:(BOOL)changed {
    if (changed == YES) {
        NSLog(@"顺序发生改变!");
    }
    NSLog(@"已经结束编辑!");
}

- (void) tabBarController:(UITabBarController *)tabBarController didSelectViewController:(UIViewController *)viewController {
    NSLog(@"选中控制器对象");
}
效果如下:

多界面传值
可以通过代理来完成多界面之间的传值,通过代理可以将第二个对象访问不到的第一个对象的情况下,将代理(delegate)做为类之间的接收对象。代理对象必须实现代理函数
#import <UIKit/UIKit.h>

NS_ASSUME_NONNULL_BEGIN

//定义一个视图控制器二的代理协议
@protocol SecondVCDelegate <NSObject>

- (void)changeColor: (UIColor*)color;

@end
@interface SecondViewController : UIViewController

@property (assign, nonatomic) NSInteger tag;
//定义一个代理对象,代理对象会执行协议函数
//通过代理对象实现协议函数,达到代理对象改变本身属性的目的
//代理对象一定要实现代理协议
@property (assign, nonatomic) id<SecondVCDelegate> delegate;


@end
#import "SecondViewController.h"
@interface SecondViewController ()
@end
@implementation SecondViewController
- (void)viewDidLoad {
[super viewDidLoad];
// Do any additional setup after loading the view.
self.view.backgroundColor = [UIColor purpleColor];
UIBarButtonItem* btnChange = [[UIBarButtonItem alloc] initWithTitle:@"改变颜色" style:UIBarButtonItemStyleDone target:self action:@selector(pressChange)];
self.navigationItem.rightBarButtonItem = btnChange;
}
- (void) pressChange {
[_delegate changeColor:[UIColor purpleColor]];
}
/*
#pragma mark - Navigation
#import <UIKit/UIKit.h>
#import "SecondViewController.h"

NS_ASSUME_NONNULL_BEGIN

@interface FirstViewController : UIViewController <SecondVCDelegate>

- (void)changeColor : (UIColor *)color;

@end
#import "FirstViewController.h"
#import "SecondViewController.h"

@interface FirstViewController ()

@end

@implementation FirstViewController

- (void)viewDidLoad {
    [super viewDidLoad];
    // Do any additional setup after loading the view.
}

//点击视图空白处,推出视图控制器二
- (void)touchesBegan:(NSSet<UITouch *> *)touches withEvent:(UIEvent *)event {
    SecondViewController* vc2 = [[SecondViewController alloc] init];
    vc2.view.backgroundColor = [UIColor orangeColor];
    //将当前视图控制器设置为代理对象
    vc2.delegate = self;
    [self.navigationController pushViewController:vc2 animated:YES];
}

//实现视图控制器二的代理协议
- (void)changeColor:(UIColor *)color {
    self.view.backgroundColor = color;
}
效果如下:
UITableView
UITableView基础
UITableView也叫数据视图,例如表格,在创建时要注意实现协议中的几个函数:
1、tableView(获取每组元素的个数);
2、numberOfSectionsInTableView(设置数据视图的组数);
3、tableView: cellForRowAtIndexPath:(创建单元格对象函数)
另外,在数据视图的协议中,还有以下几个函数:
dataSource:设置数据代理对象
delegate:设置普通代理对象
numberOfSectionsInTableView:获取组数
numberOfRowsInSection:获取行数
cellForRowAtIndexPath:创建单元格
下面用代码来演示一下:
#import <UIKit/UIKit.h>

@interface ViewController : UIViewController <
//实现数据视图的普通协议
//数据视图的普通事件处理
UITableViewDelegate,
//实现数据视图的数据代理协议
//处理数据视图的数据代理
UITableViewDataSource>
{
    //定义一个数据视图对象
    //数据视图用来显示大量相同格式的信息的视图
    //例如:电话通讯录、qq好友、微信朋友圈
    UITableView* _tableView;
}

@end
#import "ViewController.h"
@interface ViewController ()
@end
@implementation ViewController
- (void)viewDidLoad {
[super viewDidLoad];
// Do any additional setup after loading the view.
//创建数据视图
//第一个参数是数据视图的位置
//第二个参数是数据视图的风格
//UITableViewStylePlain:普通风格
//UITableViewStyleGrouped:分组风格
_tableView = [[UITableView alloc] initWithFrame:self.view.bounds style:UITableViewStyleGrouped];
//UITableViewStyleGrouped:分组风格
//UITableViewStylePlain:普通风格
//设置数据视图的代理对象
_tableView.delegate = self;
//设置数据视图的数据源对象
_tableView.dataSource = self;
[self.view addSubview:_tableView];
}
//获取每组元素的个数
//必须要实现的协议函数
//程序在现实数据视图时会调用此函数
//返回值是表示每组元素的个数
//第一个参数是数据视图本身
//第二个参数是那一组需要的行数
- (NSInteger) tableView:(UITableView *)tableView numberOfRowsInSection:(NSInteger)section {
return 5;
}
- (NSInteger) numberOfSectionsInTableView:(UITableView *)tableView {
return 3;
}
//创建单元格对象函数
//第一个参数是数据视图 第二个参数是索引
- (UITableViewCell*) tableView:(UITableView *)tableView cellForRowAtIndexPath:(NSIndexPath *)indexPath {
NSString* cellStr = @"cell";
UITableViewCell* cell = [_tableView dequeueReusableCellWithIdentifier:cellStr];
if (cell == nil) {
//创建一个单元格对象
//第一个参数是单元格的样式
//第二个参数是单元格的复用标记
cell = [[UITableViewCell alloc] initWithStyle:UITableViewCellStyleDefault reuseIdentifier:cellStr];
}
NSString* str = [NSString stringWithFormat:@"第%ld组,第%ld行",indexPath.section, indexPath.row];
//将单元格的主文字内容赋值
cell.textLabel.text = str;
return cell;
}
@end
效果图:

UITableView协议
UITableView有关的协议UITableViewDelegate,UITableViewDataSource中有几个函数:
heightForRowAtIndexPath:获得单元格高度协议
heightForHeaderInSection:数据视图头部高度协议
heightForFooterInSection:数据视图尾部高度协议
titleForFooterInSection:数据视图尾部的标题协议
titleForHeaderInSection:数据视图头部标题协议
#import <UIKit/UIKit.h>

@interface ViewController : UIViewController <
//数据代理协议
UITableViewDataSource,
//普通代理协议
UITableViewDelegate> {
    //定义数据视图对象
    UITableView* _tableView;
    //声明一个数据源
    NSMutableArray* _arrayData;
}


@end
#import "ViewController.h"
@interface ViewController ()
@end
@implementation ViewController
- (void)viewDidLoad {
[super viewDidLoad];
//创建数据视图对象
_tableView = [[UITableView alloc] initWithFrame:CGRectMake(0, 40, 320, 536) style:UITableViewStyleGrouped];
//设置代理对象
_tableView.delegate = self;
//设置数据代理对象
_tableView.dataSource =self;
//数据视图显示
[self.view addSubview:_tableView];
//创建一个可变数组
_arrayData = [[NSMutableArray alloc] init];
for (int i = 'A'; i <= 'Z'; i++) {
//定义小数组
NSMutableArray* arraySmall = [[NSMutableArray alloc] init];
for (int j = 1; j < 5; j++) {
NSString* str = [NSString stringWithFormat:@"%c%d",i,j];
[arraySmall addObject:str];
}
//生成一个二维数组
[_arrayData addObject:arraySmall];
}
}
//获取组数
- (NSInteger) numberOfSectionsInTableView:(UITableView *)tableView {
return _arrayData.count;
}
//获取每组的元素个数
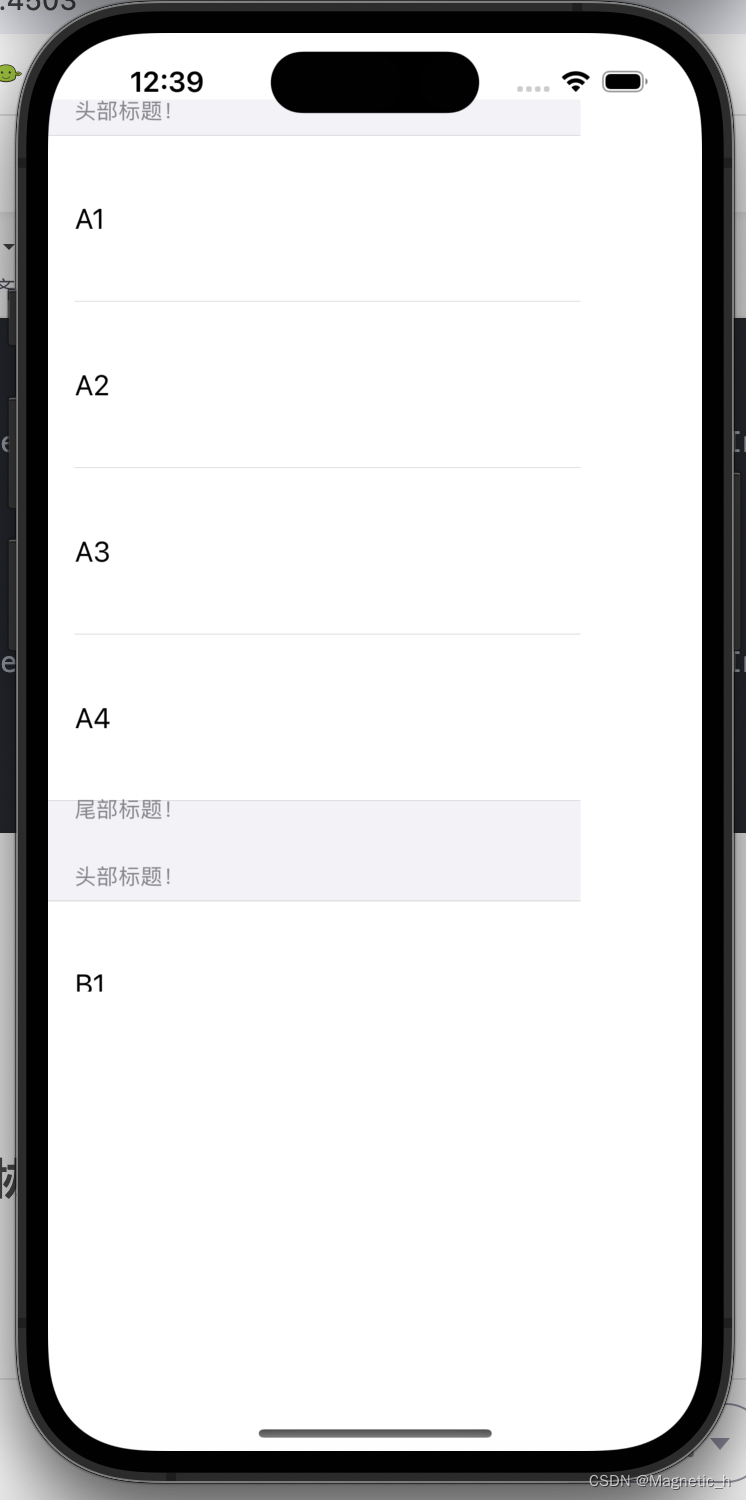
- (NSInteger) tableView:(UITableView *)tableView numberOfRowsInSection:(NSInteger)section {
//因为前面创建了一个二维数组,这里的section返回的是_arrayData二维数组中的以行为元素的一维数组,然后再对用其count方法取这个一维数组的元素个数
NSInteger numRow = [[_arrayData objectAtIndex:section] count] ;
return numRow;
}
- (UITableViewCell*) tableView:(UITableView *)tableView cellForRowAtIndexPath:(NSIndexPath *)indexPath {
NSString* str = @"cell";
UITableViewCell* cell = [_tableView dequeueReusableCellWithIdentifier:str];
if (cell == nil) {
cell = [[UITableViewCell alloc] initWithStyle:UITableViewCellStyleDefault reuseIdentifier:str];
}
cell.textLabel.text = _arrayData[indexPath.section][indexPath.row];
return cell;
}
//获取单元格高度
- (CGFloat) tableView:(UITableView*)tableView heightForRowAtIndexPath:(NSIndexPath *)indexPath {
return 100;
}
//获取每组头部标题
- (NSString*) tableView:(UITableView *)tableView titleForHeaderInSection:(NSInteger)section {
return @"头部标题!";
}
//获取每组尾部标题
- (NSString*) tableView:(UITableView *)tableView titleForFooterInSection:(NSInteger)section {
return @"尾部标题!";
}
//获取头部高度
- (CGFloat) tableView:(UITableView *)tableView heightForHeaderInSection:(NSInteger)section {
return 40;
}
//获取尾部高度
- (CGFloat) tableView:(UITableView *)tableView heightForFooterInSection:(NSInteger)section {
return 20;
}
@end
效果如下:
UITableView高级协议与单元格
UITableView有关协议中有以下几个高级协议函数:
commitEditingStyle:提交编辑函数
canEditRowAtIndexPath:开启关闭编辑单元格
editingStyleForRowAtIndexPath:编辑单元格风格设定
didSelectRowAtIndexPath:选中单元格相应协议
didDeselectRowAtIndexPath:反选单元格相应协议
在使用这些协议函数时,首先要创建一个导航控制器作为根视图控制器
@interface SceneDelegate ()

@end

@implementation SceneDelegate


- (void)scene:(UIScene *)scene willConnectToSession:(UISceneSession *)session options:(UISceneConnectionOptions *)connectionOptions {
    self.window.frame = [UIScreen mainScreen].bounds;
    UINavigationController* nav = [[UINavigationController alloc] initWithRootViewController:[[ViewController alloc] init]];
    self.window.rootViewController = nav;
    [self.window makeKeyAndVisible];
}
然后应用协议并实现协议函数:
#import <UIKit/UIKit.h>

@interface ViewController : UIViewController <UITableViewDataSource, UITableViewDelegate> {
    //数据视图
    UITableView* _tableView;
    //数据源
    NSMutableArray* _arrayData;

    //添加导航按钮
    UIBarButtonItem* _btnEdit;
    UIBarButtonItem* _btnFinish;
    UIBarButtonItem* _btnDelete;

    //设置编辑状态
    BOOL _isEdit;
}


@end
#import "ViewController.h"
@interface ViewController ()
@end
@implementation ViewController
- (void)viewDidLoad {
[super viewDidLoad];
// Do any additional setup after loading the view.
_tableView = [[UITableView alloc] initWithFrame:self.view.bounds style:UITableViewStylePlain];
//自动调整子视图的大小
_tableView.autoresizingMask = UIViewAutoresizingFlexibleHeight|UIViewAutoresizingFlexibleWidth;
//设置代理
_tableView.delegate = self;
_tableView.dataSource = self;
//数据视图的头部视图的设定
_tableView.tableHeaderView = nil;
//数据视图的尾部视图
_tableView.tableFooterView = nil;
[self.view addSubview: _tableView];
//初始化数据源数组
_arrayData = [[NSMutableArray alloc] init];
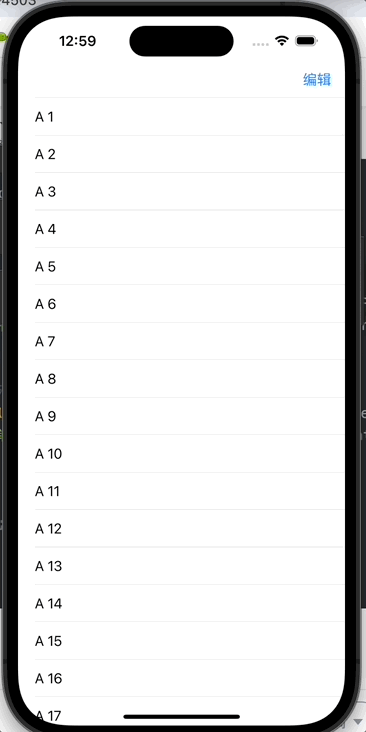
for (int i = 1; i < 20; i++) {
NSString* str = [NSString stringWithFormat:@"A %d", i];
[_arrayData addObject:str];
}
//当数据的数据源发生变化时
//更新数据视图,重新加载数据
[_tableView reloadData];
}
- (void) createBtn {
_isEdit = NO;
//创建功能按钮
_btnEdit = [[UIBarButtonItem alloc] initWithTitle:@"编辑" style:UIBarButtonItemStylePlain target:self action:@selector(pressEdit)];
_btnFinish = [[UIBarButtonItem alloc] initWithTitle:@"完成" style:UIBarButtonItemStylePlain target:self action:@selector(pressFinish)];
_btnDelete =[[UIBarButtonItem alloc] initWithTitle:@"删除" style:UIBarButtonItemStylePlain target:self action:@selector(pressDelete)];
self.navigationItem.rightBarButtonItem = _btnEdit;
}
//单元格显示效果协议
- (UITableViewCellEditingStyle)tableView:(UITableView *)tableView editingStyleForRowAtIndexPath:(NSIndexPath *)indexPath {
//UITableViewCellEdit
//默认为删除
return UITableViewCellEditingStyleDelete;
//添加状态
//return UITableViewCellEditingStyleInsert
//空状态
//return UITableViewCellEditingstyleNone
//组合在一起就会表现多选状态
//return UITableViewCellEditingStyleDelete|UITableViewCellEditingStyleInsert
}
//当手指在单元格上移动时可以显示编辑状态
//这里通过手指滑动来实现删除按钮的功能
- (void)pressEdit {
//修改对象编辑状态
_isEdit = YES;
self.navigationItem.rightBarButtonItem = _btnFinish;
//开启编辑状态
[_tableView setEditing:YES];
self.navigationItem.leftBarButtonItem = _btnDelete;
}
- (void)pressFinish {
_isEdit = NO;
self.navigationItem.rightBarButtonItem = _btnEdit;
[_tableView setEditing:NO];
self.navigationItem.leftBarButtonItem = nil;
}
-(NSInteger) tableView:(UITableView *)tableView numberOfRowsInSection:(NSInteger)section {
return _arrayData.count;
}
//默认数组返回1
//-(NSInteger) numberOfSectionInTableView:(UITableView *)tableView {
//return 1;
//}
- (UITableViewCell*)tableView:(UITableView *)tableView cellForRowAtIndexPath:(NSIndexPath *)indexPath {
NSString* strID = @"ID";
//尝试获得可复用的单元格
//如果得不到 返回为nil
UITableViewCell* cell = [_tableView dequeueReusableCellWithIdentifier:strID];
if (cell == nil) {
cell = [[UITableViewCell alloc] initWithStyle:UITableViewCellStyleDefault reuseIdentifier:strID];
}
//单元格文字赋值
cell.textLabel.text = [_arrayData objectAtIndex:indexPath.row];
[self createBtn];
return cell;
}
//当手指在单元格上移动时可以显示编辑状态
//这里通过手指滑动来实现删除按钮的功能
- (void)tableView:(UITableView *)tableView commitEditingStyle:(UITableViewCellEditingStyle)editingStyle forRowAtIndexPath:(NSIndexPath *)indexPath {
//删除对应数据
[_arrayData removeObjectAtIndex:indexPath.row];
//数据源更新
[_tableView reloadData];
NSLog(@"删除");
}
//选中单元格时执行
- (void)tableView:(UITableView *)tableView didSelectRowAtIndexPath:(NSIndexPath *)indexPath {
NSLog(@"选中单元格!%lu, %lu", indexPath.section, indexPath.row);
}
//反选函数:使选择某单元格时,取消选中上一个单元格
- (void)tableView:(UITableView *)tableView didDeselectRowAtIndexPath:(NSIndexPath *)indexPath {
NSLog(@"取消选中单元格!%lu, %lu", indexPath.section, indexPath.row);
}
- (void)pressDelete {
NSLog(@"没用!");
}
@end
效果如下:
UIView动画基础
现在UI中使用动画效果一般都使用如下函数:
    [UIView transitionWithView:@"动画视图" duration:@"时间" options:@"上述动画效果" animations:^{

        dispatch_async(dispatch_get_main_queue(), ^{

           //动画执行过程中的动作,可以是跳页的等

        });

    } completion:^(BOOL finished) {


    }];
此处options有以下几个选择:
UIViewAnimationOptionLayoutSubviews:动画过程中保证子视图跟随运动
UIViewAnimationOptionAllowUserInteraction:动画过程中允许用户交互。
UIViewAnimationOptionBeginFromCurrentState:所有视图从当前状态开始运行。
UIViewAnimationOptionRepeat:重复运行动画。
UIViewAnimationOptionAutoreverse :动画运行到结束点后仍然以动画方式回到初始点。
UIViewAnimationOptionOverrideInheritedDuration:忽略嵌套动画时间设置。
UIViewAnimationOptionOverrideInheritedCurve:忽略嵌套动画速度设置。
UIViewAnimationOptionAllowAnimatedContent:动画过程中重绘视图(注意:仅仅适用于转场动画)。
UIViewAnimationOptionShowHideTransitionViews:视图切换时直接隐藏旧视图、显示新视图,而不是将旧视图从父视图移除(仅仅适用于转场动画
UIViewAnimationOptionOverrideInheritedOptions :不继承父动画设置或动画类型。
有一些跳页时经常使用的:
UIViewAnimationOptionTransitionNone:没有动画效果。
UIViewAnimationOptionTransitionFlipFromLeft :从左侧翻转效果。
UIViewAnimationOptionTransitionFlipFromRight:从右侧翻转效果。
UIViewAnimationOptionTransitionCurlUp:向后翻页的动画过渡效果。
UIViewAnimationOptionTransitionCurlDown :向前翻页的动画过渡效果。
UIViewAnimationOptionTransitionCrossDissolve:旧视图溶解消失显示下一个新视图的效果。
UIViewAnimationOptionTransitionFlipFromTop :从上方翻转效果。
UIViewAnimationOptionTransitionFlipFromBottom:从底部翻转效果。
还有一些和时间有关的:
UIViewAnimationOptionCurveEaseInOut:动画效果先缓后逐渐加速再逐渐减速。
UIViewAnimationOptionCurveEaseIn :动画效果逐渐变慢。
UIViewAnimationOptionCurveEaseOut:动画效果逐渐加速。
UIViewAnimationOptionCurveLinear :动画效果匀速执行(默认)。
#import <UIKit/UIKit.h>

@interface ViewController : UIViewController {
    //图像视图对象
    UIImageView* _imageView;
}
#import "ViewController.h"
@interface ViewController ()
@end
@implementation ViewController
- (void)viewDidLoad {
[super viewDidLoad];
// Do any additional setup after loading the view.
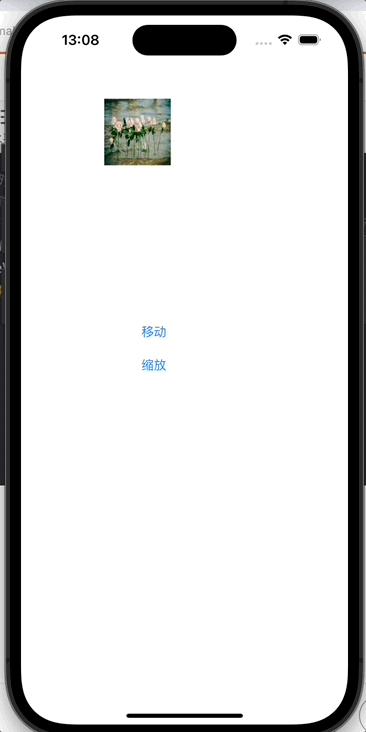
//创建视图对象
_imageView = [[UIImageView alloc] init];
_imageView.frame = CGRectMake(100, 100, 80, 80);
_imageView.image = [UIImage imageNamed:@"7.jpg"];
[self.view addSubview:_imageView];
//设置移动按钮
UIButton* btnMove = [UIButton buttonWithType:UIButtonTypeRoundedRect];
btnMove.frame = CGRectMake(120, 360, 80, 40);
[btnMove setTitle:@"移动" forState:UIControlStateNormal];
[btnMove addTarget:self action:@selector(pressMove) forControlEvents:UIControlEventTouchUpInside];
[self.view addSubview:btnMove];
//设置圆角按钮
UIButton* btnScale = [UIButton buttonWithType:UIButtonTypeRoundedRect];
btnScale.frame = CGRectMake(120, 400, 80, 40);
[btnScale setTitle:@"缩放" forState:UIControlStateNormal];
[btnScale addTarget:self action:@selector(pressScale) forControlEvents:UIControlEventTouchUpInside];
[self.view addSubview:btnScale];
}
- (void)pressMove {
//设置动画的执行时间和执行动作
// [UIView animateWithDuration: 3 animations: ^ {
// self->_imageView.frame = CGRectMake(50, 700, 130, 130);
// }];
//设置动画开始的延时时间长度
//进行延时动画的处理
//options有几个属性:UIViewAnimationOptionRepeat表示动画重复执行;UIViewAnimationOptionAutoreverse表示动画结束后再逆执行动画
[UIView animateWithDuration: 3 delay: 4 options: UIViewAnimationOptionCurveLinear animations: ^{
self->_imageView.frame = CGRectMake(50, 700, 130, 130);
} completion:^(BOOL finished) {
}];
}
- (void)pressScale {
}
@end
效果如下:
导航控制器动画
先用代码展示一下导航控制器的语法:
#import "SceneDelegate.h"
#import "VCFirst.h"

@interface SceneDelegate ()

@end

@implementation SceneDelegate


- (void)scene:(UIScene *)scene willConnectToSession:(UISceneSession *)session options:(UISceneConnectionOptions *)connectionOptions {
    self.window.frame = [UIScreen mainScreen].bounds;
    //创建导航控制器
    VCFirst* vcFirst = [[VCFirst alloc] init];
    UINavigationController* nav = [[UINavigationController alloc] initWithRootViewController:vcFirst];
    vcFirst.title = @"控制器一";
    self.window.rootViewController = nav;
    nav.navigationBar.translucent = NO;
    [self.window makeKeyAndVisible];
}
#import <UIKit/UIKit.h>

NS_ASSUME_NONNULL_BEGIN

//第一视图控制器
@interface VCFirst : UIViewController {
    //视图对象
    UIImageView* _imageView;
}

@end
#import "VCFirst.h"
#import "VCSecond.h"

@interface VCFirst ()

@end

@implementation VCFirst

- (void)viewDidLoad {
    [super viewDidLoad];
    // Do any additional setup after loading the view.
    _imageView = [[UIImageView alloc] init];
    _imageView.frame = CGRectMake(40, 40, 260, 380);
    _imageView.image = [UIImage imageNamed:@"images (1).jpg"];
    [self.view addSubview:_imageView];
    self.view.backgroundColor = [UIColor whiteColor];
}

- (void) touchesBegan:(NSSet<UITouch *> *)touches withEvent:(UIEvent *)event {

    //定义一个动画变换对象,层动画对象
    //类方法获取动画对象
    CATransition* amin = [CATransition animation];
    //设置动画的时间长度
    amin.duration = 1;
    //设置动画的类型,决定动画的效果形式
    //reveal 消失
    //pageCurl 翻页
    //pageUncurl 翻回
    //suckEffect 飞毯
    //fade 溶解
    //ripplEffect 水波纹
    amin.type = @"rippleEffect";
    //设置动画的子类型,例如动画的方向
    amin.subtype = kCATransitionFromLeft;
    //设置动画的轨迹模式
    amin.timingFunction = [CAMediaTimingFunction functionWithName: kCAMediaTimingFunctionEaseInEaseOut];

    //将动画设置对象添加到动画上
    [self.navigationController.view.layer addAnimation:amin forKey:nil];

    //创建控制器二
    VCSecond* vcSecond = [[VCSecond alloc] init];
    //推出到前台显示
    [self.navigationController pushViewController:vcSecond animated:YES];
}
#import <UIKit/UIKit.h>
NS_ASSUME_NONNULL_BEGIN
//第二视图控制器
@interface VCSecond : UIViewController {
UIImageView* _imageView;
}
@end
#import "VCSecond.h"

@interface VCSecond ()

@end

@implementation VCSecond

- (void)viewDidLoad {
    [super viewDidLoad];
    // Do any additional setup after loading the view.
    self.title = @"控制器二";
    _imageView = [[UIImageView alloc] init];
    _imageView.frame = CGRectMake(40, 40, 260, 380);
    _imageView.image = [UIImage imageNamed:@"images (5).jpg"];
    [self.view addSubview:_imageView];
    self.view.backgroundColor = [UIColor whiteColor];
}

//点击屏幕空白处,返回到控制器一
- (void) touchesBegan:(NSSet<UITouch *> *)touches withEvent:(UIEvent *)event {
    CATransition* ami = [CATransition animation];
    ami.duration = 1;
    ami.type = @"rippleEffect";
    ami.subtype = kCATransitionFromRight;
    ami.timingFunction = [CAMediaTimingFunction functionWithName: kCAMediaTimingFunctionEaseOut];
    [self.navigationController.view.layer addAnimation:ami forKey:nil];
    [self.navigationController popViewControllerAnimated:YES];
}
效果如下:

不难看出:
CATransition:动画对象
duration:设置动画时间长度
type:设置动画类型
timingFunction:设置动画运动类型
subType:设置动画子类型


 341
341


 被折叠的 条评论
为什么被折叠?
被折叠的 条评论
为什么被折叠?
 到【灌水乐园】发言


