


 本文介绍了如何使用PyQt5库设计一个包含视频显示区域、输入框和按钮的界面,展示了如何设置布局、添加组件以及处理视频流。同时提到了如何配合Qtdesigner工具使用。
标题
使用PyQt5等库创建应用界面
整体架构流程
首先在脑中或图纸上设计好界面样板,随后逐个添加
先添加所需的组件,随后对组件的大小、位置、背景颜色等进行设置
用于工程时,可使用connect方法将界面组件和主程序方法建立链接
实例代码(仅界面设计,不包含于主程序的链接)
import sys
from PyQt5.QtWidgets import QApplication, QWidget, QPushButton, QVBoxLayout, QHBoxLayout, QLabel, QLineEdit, QTextEdit
from PyQt5.QtGui import QImage, QPixmap
from PyQt5.QtCore import QTimer
import cv2

class VideoPlayer(QWidget):
    def __init__(self):
        super().__init__()
        self.setWindowTitle("Video Player")

        # Left layout for video display
        self.video_label = QLabel()
        self.video_label.setFixedSize(640, 480)  # Adjust size as needed

        left_layout = QVBoxLayout()
        left_layout.addWidget(self.video_label)

        # Right layout for other widgets
        self.question_label = QLabel("Question:")
        self.question_textbox = QLineEdit()
        self.question_textbox.setFixedHeight(200)  # Adjust height as needed
        self.result_label = QLabel("Result:")
        self.result_textbox = QTextEdit()
        self.result_textbox.setFixedHeight(100)  # Adjust height as needed

        self.start_button = QPushButton("Start Recording")
        self.stop_button = QPushButton("Stop Recording")
        self.recognize_button = QPushButton("Start Recognition")
        self.next_button = QPushButton("Next Question")

        right_layout = QVBoxLayout()
        right_layout.addWidget(self.question_label)
        right_layout.addWidget(self.question_textbox)
        right_layout.addWidget(self.result_label)
        right_layout.addWidget(self.result_textbox)
        right_layout.addWidget(self.start_button)
        right_layout.addWidget(self.stop_button)
        right_layout.addWidget(self.recognize_button)
        right_layout.addWidget(self.next_button)

        # Main layout combining left and right layouts
        main_layout = QHBoxLayout()
        main_layout.addLayout(left_layout)
        main_layout.addLayout(right_layout)

        self.setLayout(main_layout)

        # Set up video capture
        self.video_capture = cv2.VideoCapture(0)
        self.timer = QTimer()
        self.timer.timeout.connect(self.update_frame)
        self.timer.start(30)

        self.recording = False

    def update_frame(self):
        ret, frame = self.video_capture.read()
        if ret:
            rgb_image = cv2.cvtColor(frame, cv2.COLOR_BGR2RGB)
            h, w, ch = rgb_image.shape
            bytes_per_line = ch * w
            qt_image = QImage(rgb_image.data, w, h, bytes_per_line, QImage.Format_RGB888)
            pixmap = QPixmap.fromImage(qt_image)
            self.video_label.setPixmap(pixmap)

    def start_recording(self):
        self.recording = True
        # Add your recording logic here

    def stop_recording(self):
        self.recording = False
        # Add your stop recording logic here

    def start_recognition(self):
        if self.recording:
            # Add your recognition logic here
            pass

    def next_question(self):
        # Add logic to load the next question
        pass

    def closeEvent(self, event):
        self.video_capture.release()
        event.accept()

if __name__ == '__main__':
    app = QApplication(sys.argv)
    window = VideoPlayer()
    window.show()
    sys.exit(app.exec_())
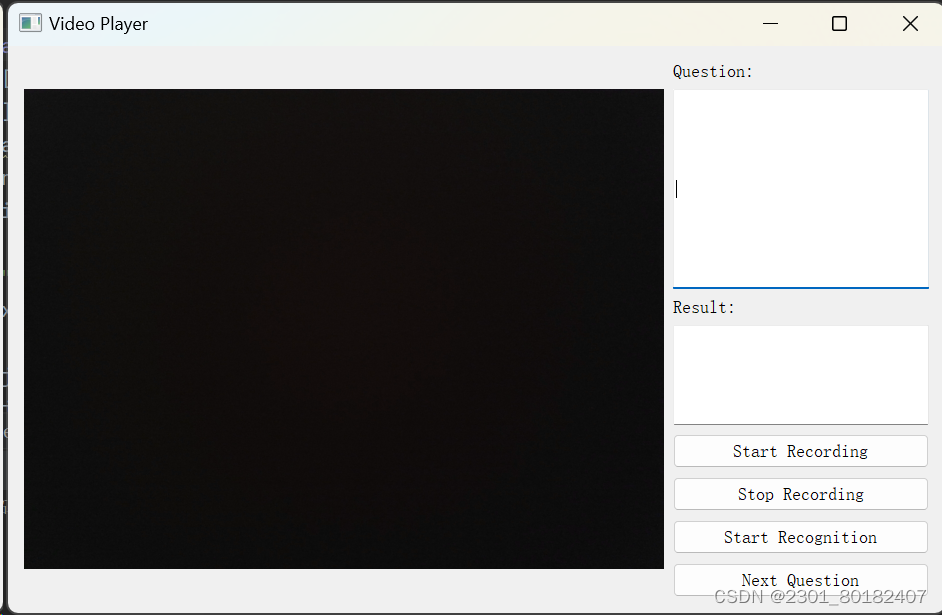
界面效果图如下:
小结
PyQt5是一个方便使用且好掌握的库,但是通常要搭配其他库的使用。
仅从设计界面的简单要求来看的话,可以使用Qt designer辅助创建


 5万+
5万+

 被折叠的 条评论
为什么被折叠?
被折叠的 条评论
为什么被折叠?
 到【灌水乐园】发言


