


一、背景介绍
1.1 爬取目标
熟悉我的小伙伴都了解,我之前开发过2款软件:
【GUI软件】小红书搜索结果批量采集,支持多个关键词同时抓取!
【GUI软件】小红书详情数据批量采集,含笔记内容、转评赞藏等,支持多笔记同时采集!
现在介绍的这个软件,相当于以上2个软件的结合版,即根据关键词爬取笔记的详情数据。
开发界面软件的目的:方便不懂编程代码的小白用户使用,无需安装python,无需改代码,双击打开即用!
软件界面截图: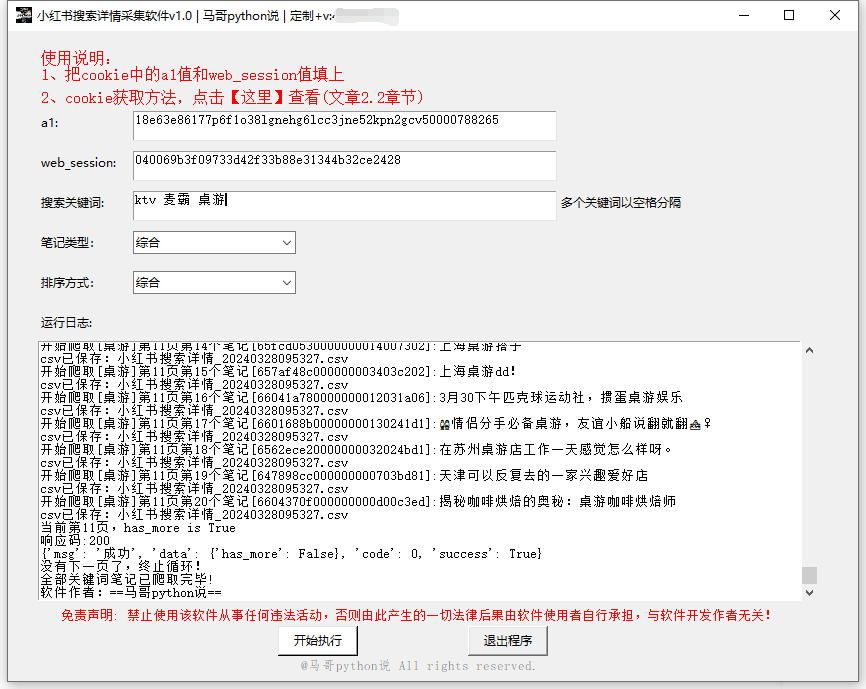
爬取结果截图:
结果截图1:
结果截图2: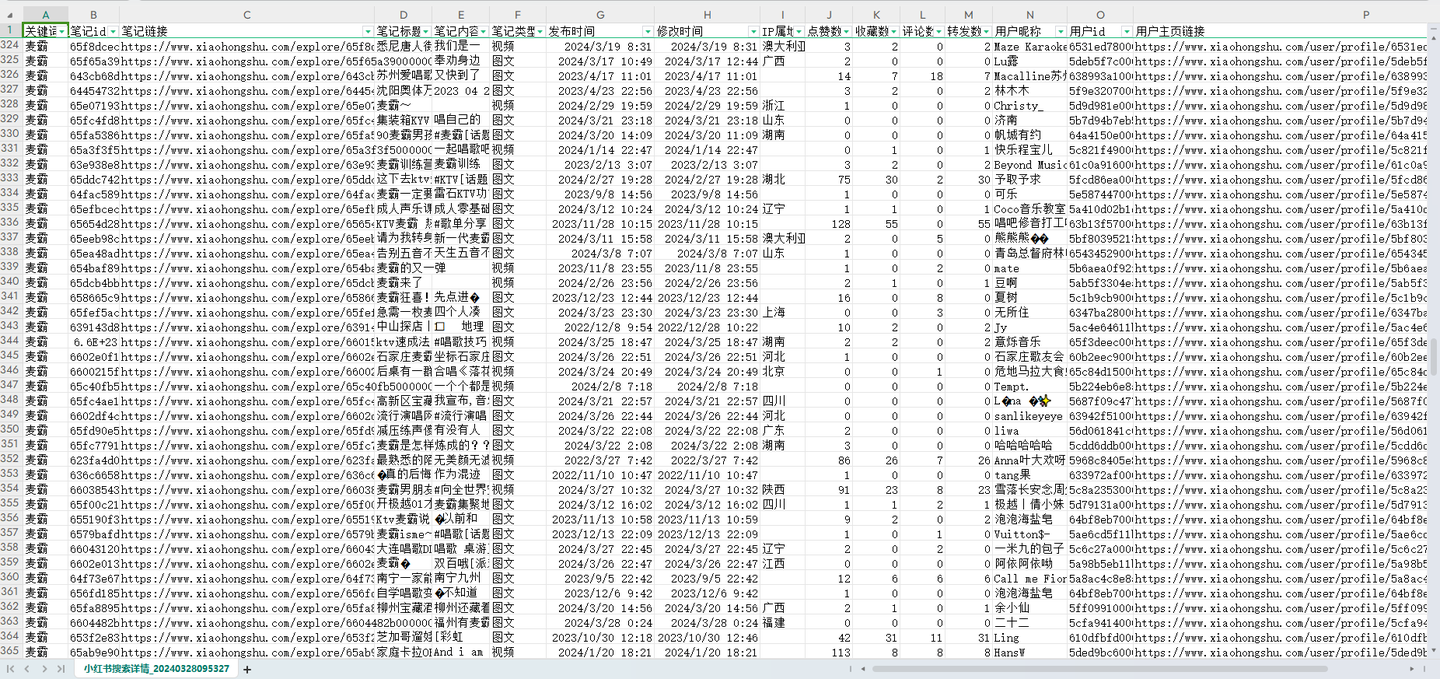
结果截图3: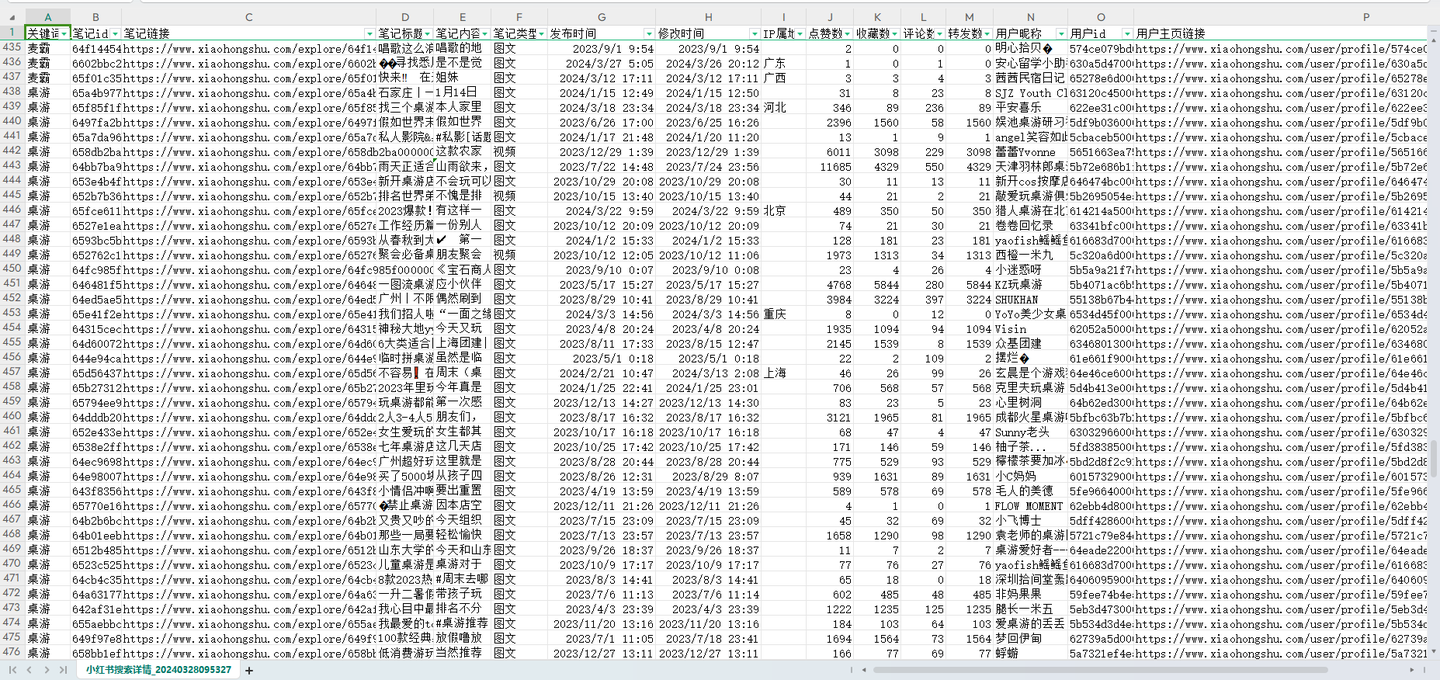
以上。
1.2 演示视频
软件使用演示:(不懂编程的小白直接看视频,了解软件作用即可,无需看代码)
【软件演示】爬小红书搜索详情软件
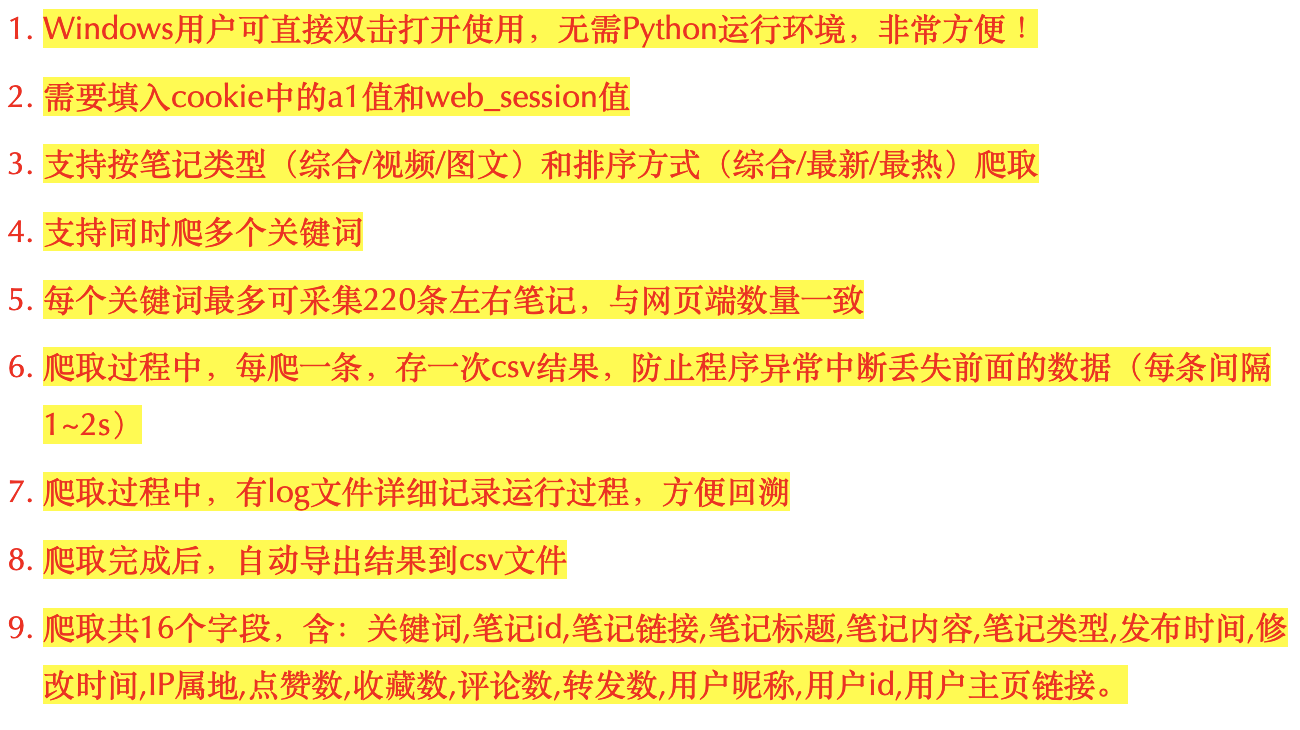
1.3 软件说明
几点重要说明:
以上。
二、代码讲解
2.1 爬虫采集-搜索接口
首先,定义接口地址作为请求地址:
# 请求地址
url = 'https://edith.xiaohongshu.com/api/sns/web/v1/search/notes'
定义一个请求头,用于伪造浏览器:
# 请求头
h1 = {
	'Accept': 'application/json, text/plain, */*',
	'Accept-Encoding': 'gzip, deflate, br',
	'Accept-Language': 'zh-CN,zh;q=0.9,en;q=0.8,en-GB;q=0.7,en-US;q=0.6',
	'Content-Type': 'application/json;charset=UTF-8',
	'Cookie': '换成自己的cookie值',
	'Origin': 'https://www.xiaohongshu.com',
	'Referer': 'https://www.xiaohongshu.com/',
	'Sec-Ch-Ua': '"Microsoft Edge";v="119", "Chromium";v="119", "Not?A_Brand";v="24"',
	'Sec-Ch-Ua-Mobile': '?0',
	'Sec-Ch-Ua-Platform': '"macOS"',
	'Sec-Fetch-Dest': 'empty',
	'Sec-Fetch-Mode': 'cors',
	'Sec-Fetch-Site': 'same-site',
	'User-Agent': 'Mozilla/5.0 (Macintosh; Intel Mac OS X 10_15_7) AppleWebKit/537.36 (KHTML, like Gecko) Chrome/119.0.0.0 Safari/537.36 Edg/119.0.0.0',
}
加上请求参数,告诉程序你的爬取条件是什么:
# 请求参数
post_data = {
	"keyword": search_keyword,
	"page": page,
	"page_size": 20,
	"search_id": v_search_id,
	"sort": v_sort,
	"note_type": v_note_type,
	"image_scenes": "FD_PRV_WEBP,FD_WM_WEBP",
}
2.2 爬虫采集-详情接口
首先,定义接口地址作为请求地址:
# 请求地址
url = 'https://edith.xiaohongshu.com/api/sns/web/v1/feed'
定义一个请求头,用于伪造浏览器:
# 请求头
h1 = {
	'Accept': 'application/json, text/plain, */*',
	'Accept-Encoding': 'gzip, deflate, br',
	'Accept-Language': 'zh-CN,zh;q=0.9,en;q=0.8,en-GB;q=0.7,en-US;q=0.6',
	'Content-Type': 'application/json;charset=UTF-8',
	'Cookie': '换成自己的cookie值',
	'Origin': 'https://www.xiaohongshu.com',
	'Referer': 'https://www.xiaohongshu.com/',
	'Sec-Ch-Ua': '"Microsoft Edge";v="119", "Chromium";v="119", "Not?A_Brand";v="24"',
	'Sec-Ch-Ua-Mobile': '?0',
	'Sec-Ch-Ua-Platform': '"macOS"',
	'Sec-Fetch-Dest': 'empty',
	'Sec-Fetch-Mode': 'cors',
	'Sec-Fetch-Site': 'same-site',
	'User-Agent': 'Mozilla/5.0 (Macintosh; Intel Mac OS X 10_15_7) AppleWebKit/537.36 (KHTML, like Gecko) Chrome/119.0.0.0 Safari/537.36 Edg/119.0.0.0',
}
加上请求参数,告诉程序你的爬取条件是什么:
# 请求参数
post_data = {
	"source_note_id": note_id,
	"image_formats": ["jpg", "webp", "avif"],
	"extra": {"need_body_topic": "1"}
}
下面就是发送请求和接收数据:
# 发送请求
r = requests.post(url, headers=h1, data=data_json)
# 接收数据
json_data = r.json()
逐个解析字段数据,以"笔记标题"为例:
# 笔记标题
try:
	title = json_data['data']['items'][0]['note_card']['title']
except:
	title = ''
熟悉xhs的朋友都知道,有些笔记是没有标题的,所以这里加上try保护,防止程序报错导致中断运行。
其他字段同理,不再赘述。
下面就是发送请求和接收数据:
# 发送请求
r = requests.post(url, headers=h1, data=data_json.encode('utf8'))
print(r.status_code)
# 以json格式接收返回数据
json_data = r.json()
定义一些空列表,用于存放解析后字段数据:
# 定义空列表
note_id_list = []  # 笔记id
note_title_list = []  # 笔记标题
note_type_list = []  # 笔记类型
like_count_list = []  # 点赞数
user_id_list = []  # 用户id
user_name_list = []  # 用户昵称
循环解析字段数据,以"笔记标题"为例:
# 循环解析
for data in json_data['data']['items']:
	# 笔记标题
	try:
		note_title = data['note_card']['display_title']
	except:
		note_title = ''
	print('note_title:', note_title)
	note_title_list.append(note_title)
其他字段同理,不再赘述。
最后,是把数据保存到csv文件:
# 把数据保存到Dataframe
df = pd.DataFrame(
	{
		'关键词': search_keyword,
		'页码': page,
		'笔记id': note_id_list,
		'笔记链接': ['https://www.xiaohongshu.com/explore/' + i for i in note_id_list],
		'笔记标题': note_title_list,
		'笔记类型': note_type_list,
		'点赞数': like_count_list,
		'用户id': user_id_list,
		'用户主页链接': ['https://www.xiaohongshu.com/user/profile/' + i for i in user_id_list],
		'用户昵称': user_name_list,
	}
)
if os.path.exists(result_file):
	header = False
else:
	header = True
# 把数据保存到csv文件
df.to_csv(result_file, mode='a+', index=False, header=header, encoding='utf_8_sig')
完整代码中,还含有:判断循环结束条件、js逆向解密、笔记类型(综合/视频图文)筛选、排序方式筛选(综合/最新/最热)等关键实现逻辑。
2.3 cookie说明
其中,cookie是个关键参数。
cookie里的a1和web_session获取方法,如下: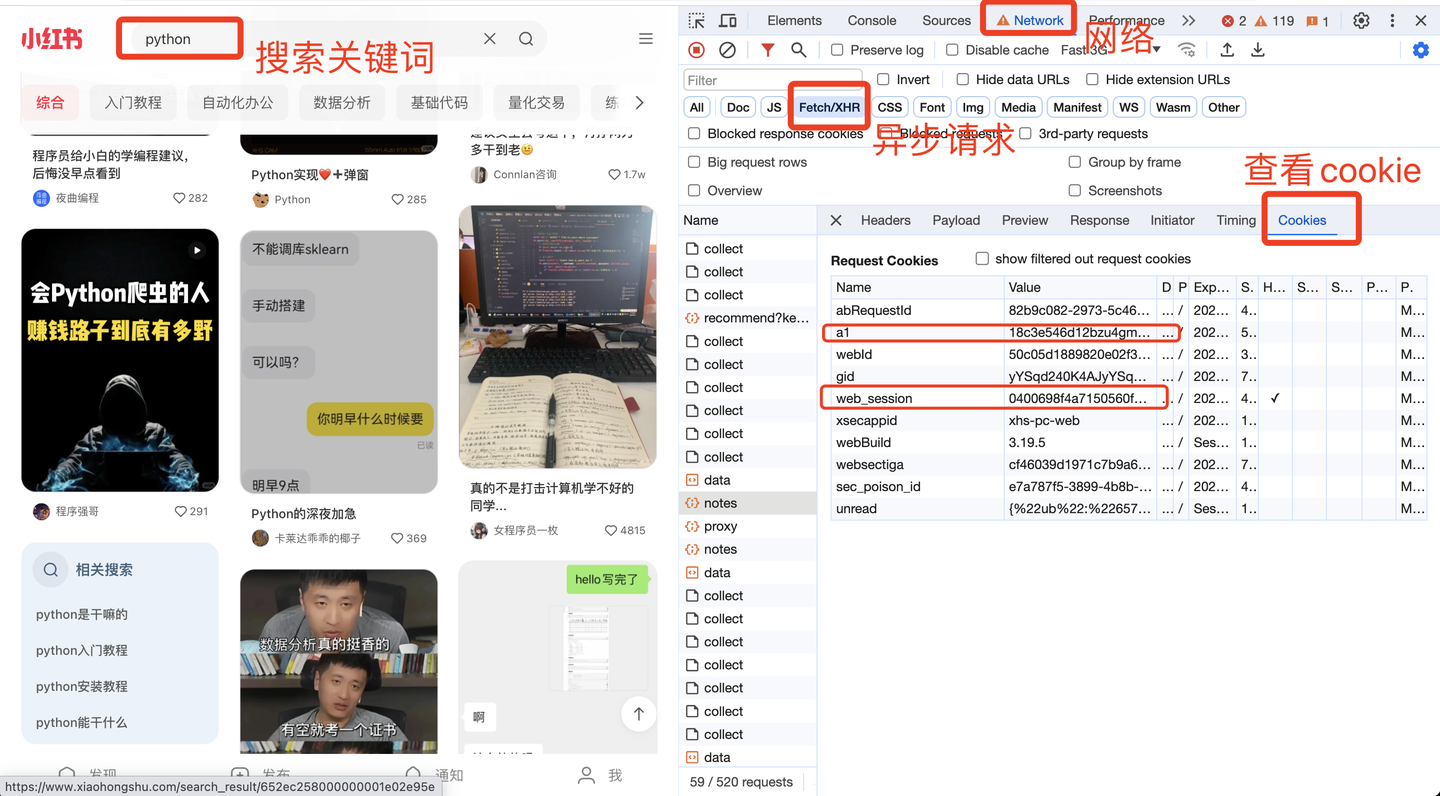
这两个值非常重要,软件界面需要填写!!
开发者模式的打开方法:页面空白处->右键->检查。
2.4 软件界面模块
主窗口部分:
# 创建主窗口
root = tk.Tk()
root.title('小红书搜索详情采集软件v1.0 | 马哥python说 |')
# 设置窗口大小
root.minsize(width=850, height=650)
输入控件部分:
# 搜索关键词
tk.Label(root, justify='left', text='搜索关键词:').place(x=30, y=160)
entry_kw = tk.Text(root, bg='#ffffff', width=60, height=2, )
entry_kw.place(x=125, y=160, anchor='nw')  # 摆放位置
底部版权部分:
# 版权信息
copyright = tk.Label(root, text='@马哥python说 All rights reserved.', font=('仿宋', 10), fg='grey')
copyright.place(x=290, y=625)
以上。
2.5 日志模块
好的日志功能,方便软件运行出问题后快速定位原因,修复bug。
核心代码:
def get_logger(self):
	self.logger = logging.getLogger(__name__)
	# 日志格式
	formatter = '[%(asctime)s-%(filename)s][%(funcName)s-%(lineno)d]--%(message)s'
	# 日志级别
	self.logger.setLevel(logging.DEBUG)
	# 控制台日志
	sh = logging.StreamHandler()
	log_formatter = logging.Formatter(formatter, datefmt='%Y-%m-%d %H:%M:%S')
	# info日志文件名
	info_file_name = time.strftime("%Y-%m-%d") + '.log'
	# 将其保存到特定目录,ap方法就是寻找项目根目录,该方法博主前期已经写好。
	case_dir = r'./logs/'
	info_handler = TimedRotatingFileHandler(filename=case_dir + info_file_name,
						when='MIDNIGHT',
						interval=1,
						backupCount=7,
						encoding='utf-8')
日志文件截图: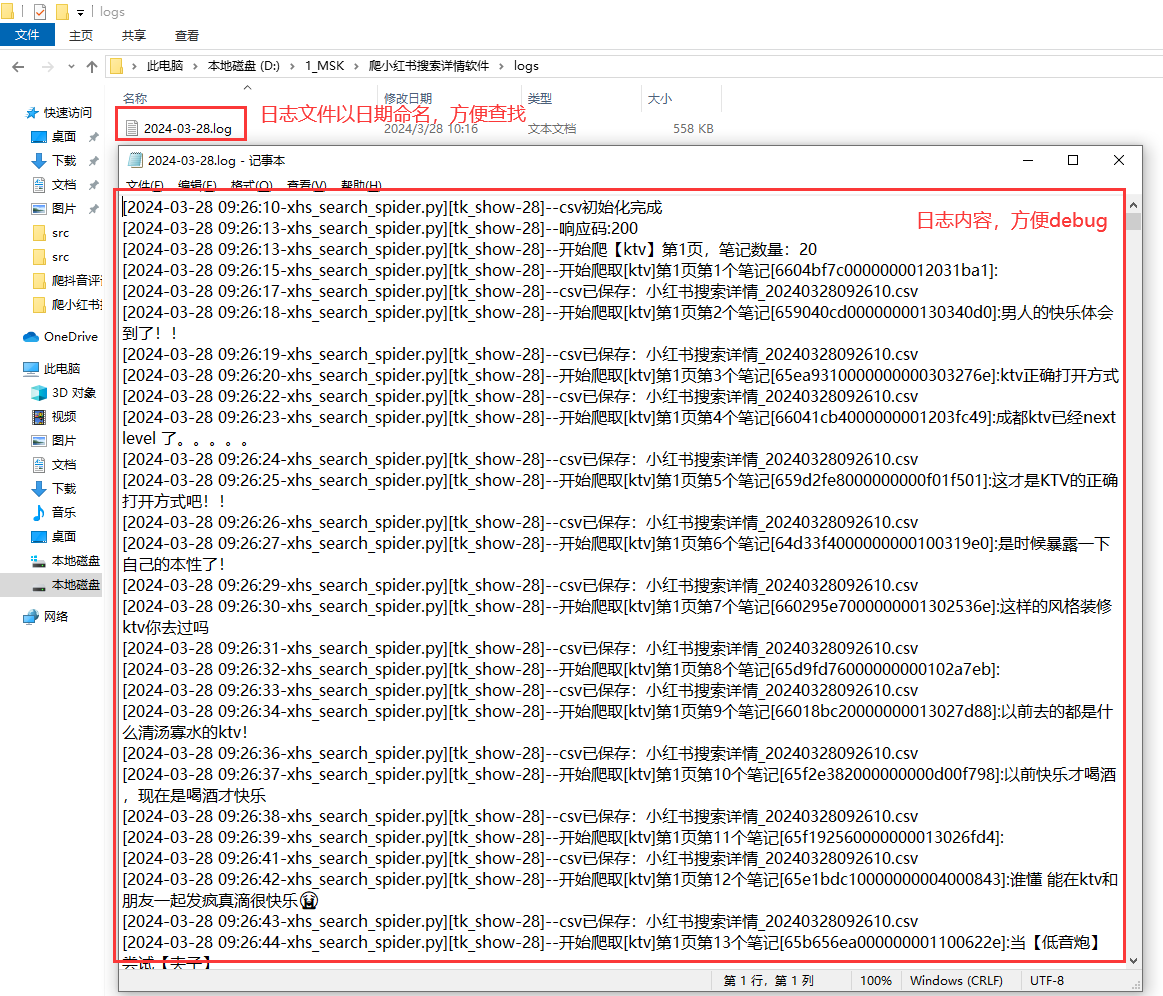
以上。
三、获取源码及软件
完整python源码及exe软件,微信公众号"老男孩的平凡之路“后台回复”爬小红书搜索详情软件"即可获取。点击直达


 494
494


 被折叠的 条评论
为什么被折叠?
被折叠的 条评论
为什么被折叠?
 到【灌水乐园】发言


