史上最全SpringBoot教程,从零开始带你深入♂学习(十四)——集成SpringSecurity(1)

最后

对于很多Java工程师而言,想要提升技能,往往是自己摸索成长,不成体系的学习效果低效漫长且无助。

整理的这些资料希望对Java开发的朋友们有所参考以及少走弯路,本文的重点是你有没有收获与成长,其余的都不重要,希望读者们能谨记这一点。

再分享一波我的Java面试真题+视频学习详解+技能进阶书籍

美团二面惜败,我的凉经复盘(附学习笔记+面试整理+进阶书籍)

本文已被CODING开源项目:【一线大厂Java面试题解析+核心总结学习笔记+最新讲解视频+实战项目源码】收录

需要这份系统化的资料的朋友,可以点击这里获取

领取资料

重点学习以下几个:
  • WebSecurityConfigurerAdapter:自定义Security策略

  • AuthenticationManagerBuilder:自定义认证策略

  • @EnableWebSecurity:开启WebSecurity模式

Spring Security的两个主要目标是 “认证” 和 “授权”(访问控制)。

“认证”(Authentication)

“授权” (Authorization)

环境搭建

===================================================================

领取资料

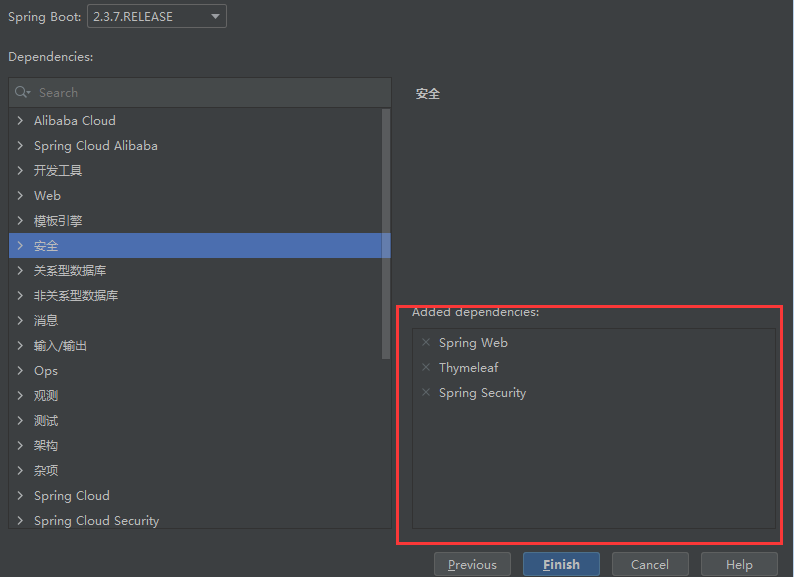
1、新建springboot项目,添加一下模块
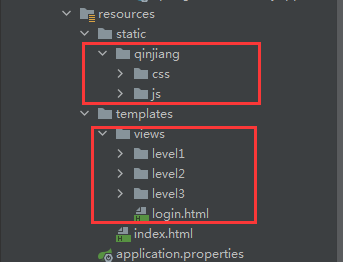
image

2、添加素材

下载SpringSecurity素材:https://www.kuangstudy.com/app/code

image

领取资料

3、编写controller层

package com.study.controller;

//加群1025684353一起吹水聊天

import org.springframework.stereotype.Controller;

import org.springframework.web.bind.annotation.PathVariable;

import org.springframework.web.bind.annotation.RequestMapping;

@Controller

public class RouterController {

@RequestMapping({“/”,“/index”})

public String index(){

return “index”;

}

@RequestMapping(“/toLogin”)

public String toLogin(){

return “views/login”;

}

//添加参数,实现多页面跳转

@RequestMapping(“/level1/{id}”)

public String level1(@PathVariable(“id”) int id){

return “views/level1/”+id;

}

@RequestMapping(“/level2/{id}”)

public String level2(@PathVariable(“id”) int id){

return “views/level2/”+id;

}

//加群1025684353一起吹水聊天

@RequestMapping(“/level3/{id}”)

public String level3(@PathVariable(“id”) int id){

return “views/level3/”+id;

}

}

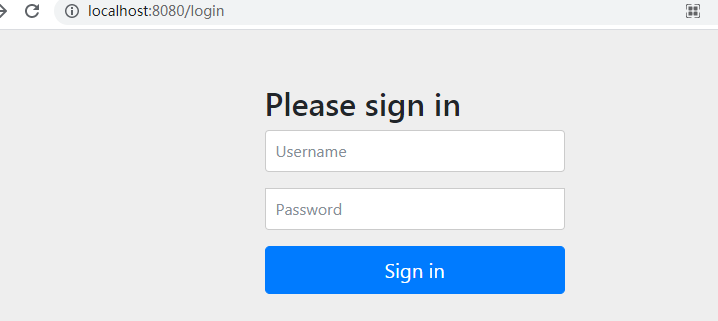
运行测试:输入localhost:8080

领取资料

发现,页面自动跳转到login页面,那么只要引入SpringSecurity模块,输入任何页面都会自动跳转到SpringSecurity默认提供的login页面。

image

角色认证授权

=====================================================================

新建一个SecurityConfig配置类,继承WebSecurityConfigurerAdapter,再添加@EnableWebSecurity注解

package com.study.config;

import org.springframework.security.config.annotation.authentication.builders.AuthenticationManagerBuilder;

import org.springframework.security.config.annotation.web.builders.HttpSecurity;

import org.springframework.security.config.annotation.web.configuration.EnableWebSecurity;

import org.springframework.security.config.annotation.web.configuration.WebSecurityConfigurerAdapter;

import org.springframework.security.crypto.bcrypt.BCryptPasswordEncoder;

//拦截器

@EnableWebSecurity

public class SecurityConfig extends WebSecurityConfigurerAdapter {

//加群1025684353一起吹水聊天

//权限拦截

@Override

protected void configure(HttpSecurity http) throws Exception {

//首页所有人可以访问,功能页只有对应权限的人才可以访问

// 认证请求

http.authorizeRequests()

//请求地址(“/”):首页 所有人都可以访问

.antMatchers(“/”).permitAll()

//求情地址(“/level1/**”):level1目录下所有页面 只有vip1权限的角色可以访问

.antMatchers(“/level1/**”).hasAnyRole(“vip1”)

.antMatchers(“/level2/**”).hasAnyRole(“vip2”)

.antMatchers(“/level3/**”).hasAnyRole(“vip3”)

//除此之外,所有请求都必须要认证才能访问

// 所有请求

.anyRequest().authenticated();

//没有权限默认会到登录页面,需要开启登录的页面

http.formLogin();

}

//认证

@Override

protected void configure(AuthenticationManagerBuilder auth) throws Exception {

//auth.jdbcAuthentication():数据库

//内存里认证

//这些数据正常应该从数据库中读取 密码加密方式,防止反编译

auth.inMemoryAuthentication().passwordEncoder(new BCryptPasswordEncoder())

//设置用户密码和赋予权限 密码编码

.withUser(“study”).password(new BCryptPasswordEncoder().encode(“123456”)).roles(“vip2”,“vip3”)

.and() //拼接多个用户

.withUser(“root”).password(new BCryptPasswordEncoder().encode(“123456”)).roles(“vip1”,“vip2”,“vip3”)

.and()//加群1025684353一起吹水聊天

.withUser(“guest”).password(new BCryptPasswordEncoder().encode(“123456”)).roles(“vip3”);

}

//----------------------------------------------------------------------

// 链接数据库

// private DataSource dataSource;

//

// @Override

// protected void configure(AuthenticationManagerBuilder auth) throws Exception {

// auth.jdbcAuthentication()

// .dataSource(dataSource)

// .withDefaultSchema()

// .withUser(“user”).password(“password”).roles(“USER”)

// .and()

// .withUser(“admin”).password(“password”).roles(“USER”,“ADMIN”);

//

// }

}

控制显示和隐藏

======================================================================

领取资料

最后

学习视频:

大厂面试真题:

本文已被CODING开源项目:【一线大厂Java面试题解析+核心总结学习笔记+最新讲解视频+实战项目源码】收录

需要这份系统化的资料的朋友,可以点击这里获取

习视频:

[外链图片转存中…(img-nts5hpmd-1715509789304)]

大厂面试真题:

[外链图片转存中…(img-GZiBSGqC-1715509789304)]

本文已被CODING开源项目:【一线大厂Java面试题解析+核心总结学习笔记+最新讲解视频+实战项目源码】收录

需要这份系统化的资料的朋友,可以点击这里获取

  • 27
    点赞
  • 24
    收藏
    觉得还不错? 一键收藏
  • 0
    评论
### 回答1: Spring Security是一个强大的安全框架,可以在Spring Boot应用程序中使用。Spring Boot可以轻松地集成Spring Security,为应用程序提供认证和授权的功能。 要集成Spring Security,需要完成以下步骤: 1.添加Spring Security依赖项:在pom.xml文件中添加Spring Security依赖项。 2.配置Spring Security:创建一个Security配置类,并在其中定义安全规则。 3.启用Spring Security:在应用程序的启动类中使用@EnableWebSecurity注释启用Spring Security。 通过这些步骤,您可以为Spring Boot应用程序添加安全性,并保护它免受未经授权的访问。 ### 回答2: Spring Boot是一个相当流行的Java框架,它能够极大地简化Java开发者的工作,并且支持大量的集成,其中包括集成Spring SecuritySpring Security是一个强大的框架,用于保护Web应用程序的安全性。在本文中,我们将讨论Spring Boot和Spring Security集成。 一、集成Spring Security依赖 要集成Spring Security,我们需要在我们的Spring Boot应用程序中添加Spring Security的依赖项。我们可以使用 Maven 或 Gradle 来管理我们的项目依赖关系。 在下面的示例中,我们将使用Maven。在pom.xml文件中,添加以下依赖: ``` <dependency> <groupId>org.springframework.boot</groupId> <artifactId>spring-boot-starter-security</artifactId> </dependency> ``` 二、配置Spring Security 完成依赖注入后,我们需要配置Spring Security,以确保我们的应用程序与身份验证和授权有关的所有部分都按照预期进行工作。 我们可以通过创建一个配置类来完成此操作。 首先,我们需要创建一个@Configuration注释的类,并使用@EnableWebSecurity注释进行注释。 然后,我们可以扩展WebSecurityConfigurerAdapter类,并覆盖configure方法。 ``` @Configuration @EnableWebSecurity public class SecurityConfig extends WebSecurityConfigurerAdapter { // security配置具体实现 @Override protected void configure(HttpSecurity http) throws Exception { http.authorizeRequests() .anyRequest().authenticated() .and() .formLogin() .and() .httpBasic(); } } ``` 在上面的示例中,我们创建了一个名为SecurityConfig的类,并使用@EnableWebSecurity注释进行注释。我们还覆盖了WebSecurityConfigurerAdapter的configure方法,并定义了我们的HTTP安全配置。 在此示例中,我们允许任何请求进行身份验证,并定义了基本身份验证。 三、添加用户和角色 我们已经定义了我们的安全配置,但还没有定义任何用户和角色。我们可以通过使用 @Configuration注释和@ConfigurationProperties注释来添加用户和角色。 我们可以先定义一个自定义属性的Java类,如下: ``` @ConfigurationProperties(prefix = "myapp") public class SecurityProperties { private String username; private String password; private String role; // getter和setter方法 } ``` 然后,在我们的配置类中,我们可以使用 Java Config 的方式将其注入到类中: ``` @Configuration @EnableWebSecurity @EnableConfigurationProperties(SecurityProperties.class) public class SecurityConfig extends WebSecurityConfigurerAdapter { @Autowired private SecurityProperties securityProperties // security配置具体实现 @Override protected void configure(AuthenticationManagerBuilder auth) throws Exception { auth .inMemoryAuthentication() .withUser(securityProperties.getUsername()) .password("{noop}" + securityProperties.getPassword()) .roles(securityProperties.getRole()); } } ``` 上面的示例中,我们首先使用@EnableConfigurationProperties注释了SecurityProperties类,并将其自动注入到我们的配置类中。然后,我们将使用该类中的属性来创建内存身份验证,然后配置用户名,密码和角色,这将使用我们在配置文件中定义的账号密码。 四、使用自定义登录页面 Spring Security提供了默认的登录页面,但如果我们希望使用自己的自定义登录页面,则需要添加一个控制器来处理登录请求,并在配置类中进行设置。 ``` @Controller public class LoginController { @GetMapping("/login") public String getLoginPage() { return "login"; } } @Configuration @EnableWebSecurity @EnableConfigurationProperties(SecurityProperties.class) public class SecurityConfig extends WebSecurityConfigurerAdapter { @Autowired private SecurityProperties securityProperties // security配置具体实现 @Override protected void configure(HttpSecurity http) throws Exception { http .authorizeRequests() // 添加需要放过的静态资源 .antMatchers("/", "/home", "/register").permitAll() .anyRequest().authenticated() .and() .formLogin() .loginPage("/login") // 设置自定义登录页面 .permitAll() .and() .httpBasic() .and() .logout() .permitAll(); } } ``` 上面的示例中,我们创建了一个名为LoginController的控制器,用于处理登录请求。 然后,我们在configure方法中定义了需要允许所有用户访问的页面。 最后,我们配置了自定义登录页面,并将其设置为/login。 总结 在这篇文章中,我们讨论了如何集成 Spring SecuritySpring Boot 的应用程序中。 我们首先添加了Spring Security的依赖项,并创建了一个配置类。 然后,我们添加了用户和角色,并定义了如何使用自定义登录页面。 通过完成这些步骤,我们可以确保我们的应用程序安全,并保护客户端免受攻击。 ### 回答3: Spring Boot是一种用于轻松构建Java应用程序的框架,而Spring Security是一个用于保护应用程序的身份验证和授权框架。在这里,我们将讨论如何将Spring Boot集成Spring Security。 首先,我们需要在pom.xml文件中添加Spring Security依赖项: ``` <dependency> <groupId>org.springframework.boot</groupId> <artifactId>spring-boot-starter-security</artifactId> </dependency> ``` 接下来,我们需要配置Spring Security。这可以通过创建一个类来完成,并使用@Configuration注释来进行注释。我们还需要扩展WebSecurityConfigurerAdapter类。 ``` @EnableWebSecurity @Configuration public class SecurityConfig extends WebSecurityConfigurerAdapter { @Override protected void configure(HttpSecurity http) throws Exception { http.authorizeRequests() .antMatchers("/", "/home").permitAll() .antMatchers("/admin").hasRole("ADMIN") .anyRequest().authenticated() .and() .formLogin() .loginPage("/login") .permitAll() .and() .logout() .permitAll(); } @Autowired public void configureGlobal(AuthenticationManagerBuilder auth) throws Exception { auth.inMemoryAuthentication() .withUser("user").password("{noop}password").roles("USER") .and() .withUser("admin").password("{noop}password").roles("USER", "ADMIN"); } } ``` 在此示例中,我们启用了Web Security,并配置了以下内容: 1. 除了主页之外的所有页面都需要身份验证 2. 如果用户拥有ADMIN角色,则允许访问/admin页面 3. 禁用跨站点请求伪造(CSRF)保护 4. 配置表单登录和跳转页面 5. 使用内存身份验证管理器配置了两个用户 现在,我们可以通过以下方式测试Spring Security: 1. 启动应用程序 2. 访问http://localhost:8080/login 3. 输入用户名和密码(user/password 或 admin/password) 4. 尝试访问http://localhost:8080/admin 如果用户拥有ADMIN角色,则允许访问/admin页面,否则将显示403错误页面。 总之,Spring Boot集成Spring Security是一种用于保护应用程序的身份验证和授权框架。我们可以轻松地使用Spring Security通过添加依赖项和配置文件来保护我们的应用程序。

“相关推荐”对你有帮助么?

  • 非常没帮助
  • 没帮助
  • 一般
  • 有帮助
  • 非常有帮助
提交
评论
添加红包

请填写红包祝福语或标题

红包个数最小为10个

红包金额最低5元

当前余额3.43前往充值 >
需支付:10.00
成就一亿技术人!
领取后你会自动成为博主和红包主的粉丝 规则
hope_wisdom
发出的红包
实付
使用余额支付
点击重新获取
扫码支付
钱包余额 0

抵扣说明:

1.余额是钱包充值的虚拟货币,按照1:1的比例进行支付金额的抵扣。
2.余额无法直接购买下载,可以购买VIP、付费专栏及课程。

余额充值