


部署前准备
本文以rocky9.1部署Cobbler 3.3.4版本为例进行实验。
Cobbler服务器IP地址:192.168.8.100
一、安装软件
# dnf install -y epel-release #安装epel源
#关闭防火墙和selinux
# systemctl stop firewalld && systemctl disable firewalld
# sed -i 's/^SELINUX=.*/SELINUX=disabled/g' /etc/selinux/config
# reboot
二、部署Cobbler
1、安装软件
# dnf -y install cobbler dhcp-server
# dnf -y install syslinux dnf-plugins-core pykickstart
2、配置cobbler
(1)修改Cobbler主配置文件
# 生成密文密码
# openssl passwd -1
default_password_crypted: "$1$hNAtwYE4$.l1apMwOWpCDpSmE.MBdG0" --复制生成的秘钥
修改cobbler的配置文件
# vi /etc/cobbler/settings.yaml
#设置root密码
![]()
# cobbler接管dhcp
manage_dhcp: true
manage_dhcp_v4: true
#cobbler服务器地址
server: 192.168.8.100 #这里的地址填写为本机地址
#tftp地址
next_server_v4: 192.168.100.128
#cobbler接管tftp
manage_tftpd: true
#当bios首选启动项是pxe时,此项设置为true,可避免重启反复安装系统,否则为false
pxe_just_once: true
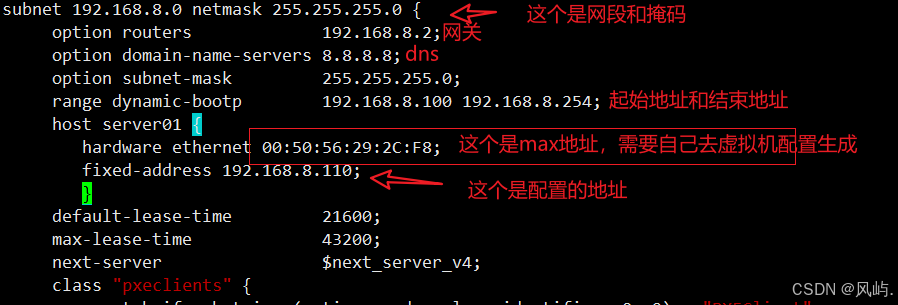
(2)修改dhcp模版文件
# vi /etc/cobbler/dhcp.template
cobbler同步配置
# systemctl enable --now cobblerd
# cobbler sync
(4)启动dhcp、tftp、http服务
# systemctl enable --now tftp httpd dhcpd
2.生成引导程序
# cobbler mkloaders
# 查看
# ls /var/lib/cobbler/loaders/
grub libcom32.c32 linux.c32 menu.c32
ldlinux.c32 libutil.c32 memdisk pxelinux.0
3.导入系统镜像
![]()
--我这里使用的是7.9的centos
# 挂载光盘镜像
# mount /dev/cdrom /mnt/
# 导入系统镜像资源,并查看
# cobbler import --name=CentOS-7-x86_64 --path=/mnt --arch=x86_64
查看是否导入成功镜像

5.同步配置编写应答文件
# systemctl restart cobblerd
# cobbler sync
vi /var/lib/cobbler/templates/centos7.9.ks
---
# version=CentOS7.9
ignoredisk --only-use=nvme0n1
# 清除分区信息
clearpart --all --initlabel
# 使用文本安装模式
text
# 使用CDROM安装介质,这里修改为通过Cobbler服务器获取安装源
url --url=$tree
reboot
# 键盘布局
keyboard --vckeymap=cn --xlayouts='cn'
# 系统语言
lang en_US.UTF-8
selinux --disabled
firewall --disabled
# 网络配置,设置固定IP地址,根据实际情况修改
network --bootproto=static --device=ens33 --ipv6=auto --activate --ip=192.168.8.110 --netmask=255.255.255.0 --gateway=192.168.8.2 --nameserver=223.5.5.5
# Root密码,使用之前生成的密文密码
rootpw --iscrypted $1$DIHD97KH$ISZKImSJP459QF9uwc/Ud.
# 首次启动运行设置代理
firstboot --enable
# 不配置X Window系统
skipx
# 系统服务,关闭chronyd服务
services --disabled="chronyd"
# 系统时区
timezone Asia/Shanghai --isUtc --nontp
# 磁盘分区信息
zerombr
part /boot --fstype="ext4" --ondisk=nvme0n1 --size=1024
part /swap --fstype="swap" --ondisk=nvme0n1 --size=2048
part / --fstype="xfs" --ondisk=nvme0n1 --grow --size=1
%packages
@base
@^minimal-environment
%end
# 修改yum源为国内源,这里以阿里云源为例
# 清空原文件内容
sed -i '' /etc/yum.repos.d/CentOS-Base.repo
# 追加[base]部分配置
sed -i '$a\[base\]\nname=CentOS-$releasever - Base\nbaseurl=https://mirrors.aliyun.com/centos/$releasever/os/$basearch/\ngpgcheck=1\ngpgkey=file:///etc/pki/rpm-gpg/RPM-GPG-KEY-CentOS-7' /etc/yum.repos.d/CentOS-Base.repo
# 追加[updates]部分配置
sed -i '$a\[updates\]\nname=CentOS-$releasever - Updates\nbaseurl=https://mirrors.aliyun.com/centos/$releasever/updates/$basearch/\ngpgcheck=1\ngpgkey=file:///etc/pki/rpm-gpg/RPM-GPG-KEY-CentOS-7' /etc/yum.repos.d/CentOS-Base.repo
%end
%post
#!/bin/sh
# 设置允许root用户ssh登录
echo "PermitRootLogin yes" >>/etc/ssh/sshd_config
systemctl restart sshd
%end
%anaconda
pwpolicy root --minlen=6 --minquality=1 --notstrict --nochanges --notempty
pwpolicy user --minlen=6 --minquality=1 --notstrict --nochanges --emptyok
pwpolicy luks --minlen=6 --minquality=1 --notstrict --nochanges --notempty
%end
重启cobbler,同步配置
# systemctl restart cobblerd
# cobbler sync
测试
新建或使用原有虚拟机,设置与Cobbler服务器同在一个网络,设置好BIOS中的启动顺序为先网络,后硬盘启动,进行无人执守安装测试。


 被折叠的 条评论
为什么被折叠?
被折叠的 条评论
为什么被折叠?
 到【灌水乐园】发言


