


栈和堆是我们Rust代码在运行时可以使用的内存部分。Rust是一种内存安全的编程语言。为了确保Rust是内存安全的,它引入了所有权、引用和借用等概念。要理解这些概念,我们必须首先了解如何在栈和堆中分配和释放内存。
栈
栈可以被看作一堆书。当我们添加更多书时,我们把它们放在堆叠的顶部。当我们需要一本书时,我们从顶部拿一本。栈按顺序插入值。它获取它们并以相反的顺序移除值。
添加数据称为入栈,移除数据称为出栈。这种现象在编程中被称为后进先出(LIFO)。存储在栈上的数据在编译时必须具有固定大小。Rust默认为原始类型在栈上分配内存。
让我们通过一个示例来直观地展示如何在栈上分配和释放内存。
fn foo() {
    let y = 999;
    let z = 333;
}

fn main() {
    let x = 111;

    foo();
}
-
在上面的例子中,我们首先调用函数main()。 main() 函数有一个变量绑定 x。
-
当 main() 执行时,我们将一个单独的 32 位整数(x)分配给堆栈帧。
| Address | Name | Value |
|---|---|---|
| 0 | x | 111 |
在表中,Address列指的是RAM的内存地址。它从0开始,并且到你的计算机拥有多少RAM(字节数)为止。Name列指的是变量,Value列指的是变量的值。
当调用foo()时,将分配一个新的栈帧。foo()函数有两个变量绑定,y 和 z。
| Address | Name | Value |
|---|---|---|
| 2 | z | 333 |
| 1 | y | 999 |
| 0 | x | 111 |
- 实际上,计算机在现实中不会使用数字0、1和2来表示地址值。这些地址根据值的不同会相隔几个字节。
- 在
foo()完成后,其堆栈帧将被释放。
| Address | Name | Value |
|---|---|---|
| 0 | x | 111 |
- 最后,main() 完成了,一切都消失了。Rust 自动在堆栈内外分配和释放内存。
堆
与堆栈相反,大多数时候,我们需要将变量(内存)传递给不同的函数,并使它们的存活时间比单个函数的执行时间更长。这时候我们就可以使用堆了。
我们可以使用 Box<T> 类型在堆上分配内存。例如:
fn main() {
    let x = Box::new(100);
    let y = 222;

    println!("x = {}, y = {}", x, y);
}
x = 100, y = 222
| Address | Name | Value |
|---|---|---|
| 1 | y | 222 |
| 0 | x | ??? |
和之前一样,我们在堆栈上分配两个变量 x 和 y。但是,当调用 Box::new() 时,x 的值会在堆上分配。因此,x 的实际值是指向堆的指针。这里使用????来表示;
| Address | Name | Value |
|---|---|---|
| 5678 | 100 | |
| … | … | … |
| 1 | y | 222 |
| 0 | x | → 5678 |
在这里,变量 x 持有一个指向地址→ 5678 的指针,这是用于演示的任意地址。Heap 可以按任意顺序分配和释放。
因此它可能以不同的地址结束。
- 当 x 被释放时,它首先释放在堆上分配的内存。
| Address | Name | Value |
|---|---|---|
| 1 | y | 222 |
| 0 | x | ??? |
一旦main()完成,我们释放栈帧,所有东西都会被清空,释放所有内存。我们可以通过转移所有权使内存存活更久,堆可以比分配 Box 的函数存活更长时间。
栈和堆的区别
| Stack | Heap |
|---|---|
| 访问堆栈中的数据更快。 | 访问堆中的数据速度较慢。 |
| 栈上内存管理可预测且简单 | 堆上内存管理(任意大小)较为复杂。 |
| Rust默认在栈上进行分配 | 使用Box来分配堆内存。 |
| 函数的原始类型和局部变量在栈上分配 | 动态大小的数据类型,如String、Vec、Box等,在堆上分配。 |
Vector
Vector 是一种动态(可调整大小)的数据结构,可以存储相同类型的元素列表。作为一种可调整大小的数据结构,vector可以在运行时增长和收缩。
创建Vector
let v = vec![1, 2, 3];
- 使用 了
vec!宏创建并初始化了一个vector,元素为1,2,3三个整数; vec!宏通过给定的初始元素可以自动推断其类型,从而确定vector的类型为Vec<i32>;- 当然,我们也可以手动显式的指明类型,比如:
let v:Vec<u8> = vec![1,2,3];
打印输出vec中的元素,我们可以使用println!()宏并使用{:?}格式化;
fn main() {
    let v = vec![1, 2, 3, 4];
    println!("{:?}", v);
}
访问Vector元素
通过索引访问
vector中的每个元素都与一个唯一的数字序列相关联。这个数字被称为向量索引。我们可以使用向量索引访问向量的元素。假设我们有一个颜色向量。
let colors = vec!["blue","red","green"];
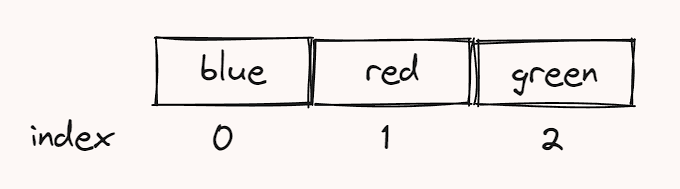
我们可以使用它们对应的向量索引来访问单个矢量元素。例如:
colors[0] - 访问索引为 0 的元素(第一个元素)
colors[1] - 访问索引为 1 的元素(第二个元素)
colors[2] - 访问索引为 2 的元素(第三个元素)
fn main() {
    let colors = vec!["blue", "red", "green"];

    // method 1: access vector elements using vector index
    println!("first color = {}", colors[0]);
    println!("second color = {}", colors[1]);
    println!("third color = {}", colors[2]);
}
通过get方法访问
还是之前的代码:
let colors = vec!["blue", "red", "green"];
我们可以使用 get() 方法访问该向量的元素。get() 方法不会直接返回向量元素,而是返回一个类型为Option<T>的枚举。结果要么是 Some(T),要么是 None。
colors.get(0)- 返回索引为 0 的 Some 值
colors.get(1)- 返回索引为 1 的 Some 值
colors.get(2)- 返回索引为 2 的 Some 值
colors.get(3)will returnNone
fn main() {
    let colors = vec!["blue", "red", "green"];

    // method 2: access vector elements using get() method and vector index
    println!("first color = {:?}", colors.get(0));
    println!("second color = {:?}", colors.get(1));
    println!("third color = {:?}", colors.get(2));
}
输出:
first color = Some(“blue”)
second color = Some(“red”)
third color = Some(“green”)
向Vector中添加元素
我们可以通过在Rust中创建可变向量来向向量添加值。 我们可以在将向量分配给变量之前使用mut关键字使其可变。 例如,
let mut v = vec![2,4,6,8,10];
使用push()方法添加元素;
fn main() {
    let mut number = vec![2, 4, 6, 8, 10];
    println!("{:?}:", number);

    number.push(12);
    number.push(14);

    println!("修改后的vector:{:?}", number);
}
移除Vector中的元素
我们可以通过将Vector变为可变,并使用remove()方法来从矢量中移除值。例如,
fn main() {
    let mut even_numbers = vec![2, 4, 6, 8, 10];

    println!("original vector = {:?}", even_numbers);

    // remove value from the vector in its second index
    even_numbers.remove(2);

    println!("changed vector = {:?}", even_numbers);
}
遍历Vector
可以使用for循环来遍历vector中的元素;
fn main() {
    let colors = vec!["blue", "red", "green"];

    let mut index = 0;

    for color in colors {
        println!("Index: {} -- Value: {}", index, color);
        index = index + 1;
    }
}
应优先选择 for 循环而不是 [] 运算符来访问向量元素,因为使用 [] 访问会产生运行时成本,需要进行越界检查。
使用vec::new()创建Vector
let v:Vec<i32> = Vec::new();
在这里,我们创建一个空的向量来保存 i32 类型的值。
Vec<i32>- 向量的类型,其中i32是向量中所有元素的数据类型Vec::new()- 使用new()方法初始化一个空向量
fn main() {
    // vector creation with Vec::new() method
    let mut v: Vec<i32> = Vec::new();

    // push values to a mutable vector
    v.push(10);
    v.push(20);

    println!("v = {:?}", v);
}
Rust String
Rust中的字符串是以UTF-8编码的Unicode字符序列。
例如,“Rust编程”是一个字符串,其中每个字符都是有效的Unicode字符。即“R”,“u”,“s”,“t”,“ ”等等。
使用String::from()创建字符串
let word = String::from("Hello, World!");
在这里,我们创建一个新的字符串并将其分配给word变量。我们还提供了"Hello, World!"的默认值。
字符串是在堆内存中分配的,并具有动态(可调整大小)的特性。因此,在编译时大小未知。
fn main() {
    // string creation using String::from() method
    let word = String::from("Hello, World!");

    println!("word = {}", word);
}
可变字符串
let mut word = String::from("cat");
由于使用了mut关键字,我们可以再次修改字符串
fn main() {
    let mut word = String::from("cat");

    println!("original string = {}", word);

    word.push_str(" dog");

    println!("changed string = {}", word);
}
original string = cat
changed string = cat dog
字符串切片
我们可以在Rust中对字符串进行切片,以引用字符串的一部分。字符串切片允许我们引用字符串的一部分。例如:
fn main() {
    let w = String::from("Hello Rust!");

    let slice = &w[0..5];

    println!("string = {}", w);

    println!("slice:{}", slice);
}
在这里,&word[0..5] 是对存储在变量 w 中的字符串进行切片的表示法,从起始索引 0(包括)到结束索引 5(不包括)。切片语法中的 &(和)表示这是一个字符串引用,而不是实际数据。
切片也用于访问存储在数组和向量中的数据的部分。
字符串中的迭代器
我们可以使用字符串类型的chars()方法来迭代字符串。例如,
fn main() {
    let str = String::from("Hello");

    for char in str.chars() {
        println!("{}",char);
    }
}
在这里,我们使用 chars() 方法迭代所有字符并打印每个字符。
当然,你也可以创建一个空字符串之后再使用push()方法添加元素;
fn main() {
    // create an empty string
    let mut word = String::new();

    println!("original string = {}", word);

    // append a string to the word variable
    word.push_str("Hello, World!");

    println!("changed string = {}", word);
}
Rust 中的 String 和 str 有什么区别?
在 Rust 中,我们可以将字符串分为两种类型:String 和 str。
String
- 是一种在堆数据结构中分配内存的数据类型。
- 具有固定的大小并且可以修改。
- str
- 是存储在内存中某处的字符串的视图。
- 也称为字符串切片,只能使用指针如
&str进行处理。
HashMap
Rust HashMap 数据结构允许我们以键-值对的方式存储数据。以下是 HashMap 的一些特点:
- 每个值都与相应的键相关联。
- 键是唯一的,而值可以重复。
- 可以使用它们对应的键访问值。
使用
HashMap包含在了conllections标准库中,所以在使用之前需要先导入相关的库,
use std::collections::HashMap;
- 使用
new()方法创建一个HashMap;
let mut info:HashMap<i32,String> = HashMap::new();
- 声明一个可变变量
infoHashMap<i32, String>-HashMap的类型,其中键是Integer,值是StringHashMap::new()- 创建一个新的HashMap
同样,也可以使用{:?}宏来打印HashMap的内容;
// import HashMap from Rust standard collections library
use std::collections::HashMap;

fn main() {
    // create a new HashMap
    let mut info: HashMap<i32, String> = HashMap::new();

    println!("HashMap = {:?}", info);
}
HashMap中的一些基本操作
1. 添加元素
使用insert()方法向Map中插入元素:
use std::collections::HashMap;

fn main() {
    let mut fruits: HashMap<i32, String> = HashMap::new();

    // add key-value in a hashmap
    fruits.insert(1, String::from("Apple"));
    fruits.insert(2, String::from("Banana"));

    println!("fruits = {:?}", fruits);
}
注意,只有变量声明为
mut才有可能向HashMap添加新的键值对。
2. 访问元素
可以使用get()方法访问HashMap中的元素;
use std::collections::HashMap;
fn main() {
    let mut mobile: HashMap<i32, String> = HashMap::new();
    mobile.insert(1, String::from("Apple"));
    mobile.insert(2, String::from("Xiaomi"));
    mobile.insert(3, String::from("Huawei"));

    let first_mobile = mobile.get(&1);
    let second_mobile = mobile.get(&2);
    let third_mobile = mobile.get(&3);
    let third_mobile = fruits.get(&4);

    println!("first  = {:?}", first_mobile);
    println!("second  = {:?}", second_mobile);
    println!("third  = {:?}", third_mobile);
}
get()方法的输出是一个Option枚举,这意味着如果作为参数传递的键匹配,它将返回一些值;- 如果不匹配,则返回
None。- 在上面的例子中,
let third_mobile = fruits.get(&4)返回None,因为键&4没有匹配到哈希映射中的任何内容。
3. 移除元素
可以使用remove()方法从HashMap中移除元素;
use std::collections::HashMap;

fn main() {
    let mut fruits: HashMap<i32, String> = HashMap::new();

    // insert values in a hashmap
    fruits.insert(1, String::from("Apple"));
    fruits.insert(2, String::from("Banana"));

    println!("fruits before remove operation = {:?}", fruits);

    // remove value in a hashmap
    fruits.remove(&1);

    println!("fruits after remove operation = {:?}", fruits);
}
在这里,我们使用
remove()方法从hashmap中删除键为1的元素。
4. 修改元素
我们可以使用insert()方法对使用了mut声明的可变HashMap进行再次修改;
use std::collections::HashMap;

fn main() {
    let mut fruits: HashMap<i32, String> = HashMap::new();

    // insert values in a hashmap
    fruits.insert(1, String::from("Apple"));
    fruits.insert(2, String::from("Banana"));

    println!("Before update = {:?}", fruits);

    // change value of hashmap with key of 1
    fruits.insert(1, String::from("Mango"));

    println!("After update = {:?}", fruits);
}
一个个列举就到这了,下面是一些其他常用方法,请自己多练:
英文版看起更加协调和舒服,原汁原味就不翻译了。
| Method | Description |
|---|---|
len() | Returns the length of the HashMap. |
contains_key() | Checks if a value exists for the specified key. |
iter() | Returns an iterator over the entries of a HashMap. |
values() | Returns an iterator over the values of a HashMap. |
keys() | Returns an iterator over the keys of a HashMap. |
clone() | Creates and returns a copy of the HashMap. |
HashSet
HashSet 在 Rust 中实现了集合数据结构。就像集合一样,它允许我们存储没有重复的值。
同样,在使用之前,我们需要导入相对应的依赖:
use std::collections::HashSet;
我们使用use声明导入了HashSet模块。它应该位于程序顶部。现在,我们可以使用HashSet模块的new()方法来创建一个hashset。
let mut color: HashSet<String> = HashSet::new();
let mut color- 声明一个可变变量color
HashSet<String>- 哈希集的类型,其中值的类型为字符串
HashSet::new()- 创建一个新的哈希集
// import HashSet from Rust standard collections library
use std::collections::HashSet;

fn main() {
    // create a new HashSet
    let mut color: HashSet<String> = HashSet::new();

    println!("HashSet = {:?}", color);
}
基本操作
1. 添加元素
还是可以使用insert()方法来添加元素:
use std::collections::HashSet;

fn main() {
    let mut colors: HashSet<&str> = HashSet::new();

    // insert values in a HashSet
    colors.insert("Red");
    colors.insert("Yellow");
    colors.insert("Green");

    println!("colors = {:?}", colors);
}
colors = {“Green”, “Yellow”, “Red”}
在这里,输出的元素以不同的顺序显示。这是因为 hashset 不保证值的插入顺序,也就是无序的。
2.在Rust中检查HashSet中是否存在值
我们使用 contains() 方法来检查值是否存在于哈希集中。如果指定的元素存在于哈希集中,则该方法返回 true,否则返回 false。让我们看一个例子,
use std::collections::HashSet;

fn main() {
    let mut colors: HashSet<&str> = HashSet::new();

    colors.insert("Red");
    colors.insert("Yellow");

    println!("colors = {:?}", colors);

    // check for a value in a HashSet
    if colors.contains("Red") {
        println!("We have the color \"Red\" in the HashSet.")
    }
}
colors = {“Red”, “Yellow”}
We have the color “Red” in the HashSet.
在上面的示例中,我们使用colors.contains("Red")作为 if 语句的条件。这里,元素 Red 存在于 hashset 中,所以条件为 true。因此,我们获得了期望的输出。
3. 移除元素
我们可以使用 remove() 方法从 hashset 中移除指定的元素。例如,
use std::collections::HashSet;

fn main() {
    let mut colors: HashSet<&str> = HashSet::new();

    colors.insert("Red");
    colors.insert("Yellow");
    colors.insert("Green");

    println!("colors before remove operation = {:?}", colors);

    // remove value from a HashSet
    colors.remove("Yellow");

    println!("colors after remove operation = {:?}", colors);
}
4. 使用for循环遍历
use std::collections::HashSet;

fn main() {
    let mut colors: HashSet<&str> = HashSet::new();

    colors.insert("Red");
    colors.insert("Yellow");
    colors.insert("Green");

    // iterate over a hashset
    for color in colors {
        // print each value in the hashset
        println!("{}", color);
    }
}
在这里,我们迭代名为colors的哈希集,并打印每个元素。
5.使用初始值值创建HashSet
我们还可以在创建时使用 from() 方法创建一个带有默认值的哈希集。例如,
use std::collections::HashSet;

fn main() {
    // Create HashSet with default set of values using from() method
    let numbers = HashSet::from([2, 7, 8, 10]);

    println!("numbers = {:?}", numbers);
}
在这里,我们使用HashSet::from()方法创建一个带有默认值的哈希集,并将其打印到屏幕上。
6. 其他方法
| Method | Description |
|---|---|
len() | returns the length of a hashset |
is_empty() | checks if the hashset is empty |
clear() | removes all elements from the hashset |
drain() | returns all the elements as an iterator and clears the hashset |
7.计算两个集合的并集
我们可以使用 union() 方法来查找两个集合的并集。例如,
use std::collections::HashSet;

fn main() {
    let hashset1 = HashSet::from([2, 7, 8]);
    let hashset2 = HashSet::from([1, 2, 7]);

    // Union of hashsets
    let result: HashSet<_> = hashset1.union(&hashset2).collect();

    println!("hashset1 = {:?}", hashset1);
    println!("hashset2 = {:?}", hashset2);
    println!("union = {:?}", result);
}
hashset1 = {7, 8, 2}
hashset2 = {2, 7, 1}
union = {2, 7, 8, 1}
union() 方法返回一个迭代器,因此我们使用了collect() 方法来获取实际结果。
8. 计算交集
我们可以使用 Intersection() 方法来查找两个集合之间的交集。例如,
use std::collections::HashSet;

fn main() {
    let hashset1 = HashSet::from([2, 7, 8]);
    let hashset2 = HashSet::from([1, 2, 7]);

    // Intersection of hashsets
    let result: HashSet<_> = hashset1.intersection(&hashset2).collect();

    println!("hashset1 = {:?}", hashset1);
    println!("hashset2 = {:?}", hashset2);
    println!("intersection = {:?}", result);
}
9.Difference()
我们可以使用 Difference() 方法来查找两个集合之间的差异。例如,
use std::collections::HashSet;

fn main() {
    let hashset1 = HashSet::from([1, 2, 3, 4]);
    let hashset2 = HashSet::from([4, 3, 2]);

    // Difference between hashsets
    let result: HashSet<_> = hashset1.difference(&hashset2).collect();

    println!("hashset1 = {:?}", hashset1);
    println!("hashset2 = {:?}", hashset2);
    println!("difference = {:?}", result);
}
我们可以使用 symmetric_difference() 方法来找到两个集合之间的对称差异。对称差异返回的是两个集合中各自独有的元素,而不包括两个集合共有的元素。
use std::collections::HashSet;

fn main() {
    let hashset1 = HashSet::from([2, 7, 8]);
    let hashset2 = HashSet::from([1, 2, 7, 9]);

    // Symmetric difference of hashsets
    let result: HashSet<_> = hashset1.symmetric_difference(&hashset2).collect();

    println!("hashset1 = {:?}", hashset1);
    println!("hashset2 = {:?}", hashset2);
    println!("symmetric difference = {:?}", result);
}
hashset1 = {8, 7, 2}
hashset2 = {2, 9, 1, 7}
symmetric difference = {8, 9, 1}


 1004
1004

 被折叠的 条评论
为什么被折叠?
被折叠的 条评论
为什么被折叠?
 到【灌水乐园】发言


