


客户端初始化
1.引入依赖
<dependency>
    <groupId>org.elasticsearch.client</groupId>
    <artifactId>elasticsearch-rest-high-level-client</artifactId>
</dependency>
2.覆盖默认es版本
在父工程里面指定,因为父工程可以全部匹配,这里用老版本呢是因为新版本api变化太大,而且企业中多用老版本,所以使用老版本。
  <properties>
      <maven.compiler.source>11</maven.compiler.source>
      <maven.compiler.target>11</maven.compiler.target>
      <elasticsearch.version>7.12.1</elasticsearch.version>
  </properties>
3.初始化RestHightClient
RestHighLevelClient client = new RestHighLevelClient(RestClient.builder(
        HttpHost.create("http://192.168.150.101:9200")
));
商品mapping映射
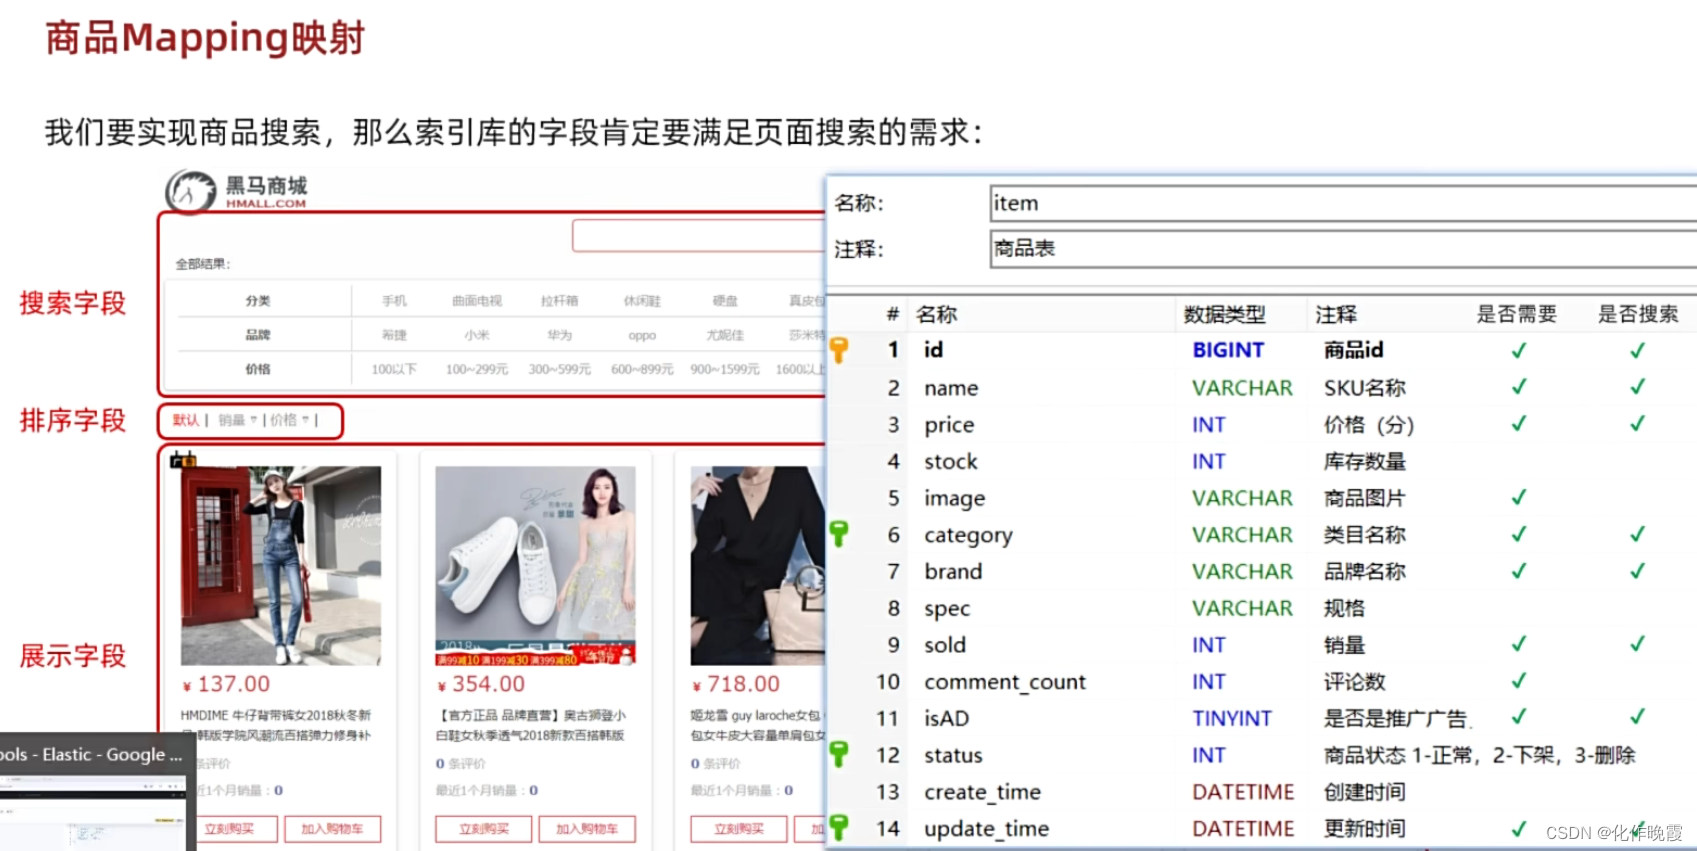
#商品索引库
PUT /hmall
{
  "mappings": {
    "properties": {
      "id":{
        "type": "keyword"
      },
      "name":{
        "type": "text",
        "analyzer": "ik_smart"
      },
      "price":{
        "type": "integer"
      },
      "image":{
        "type": "keyword",
        "index": false
      },
      "category":{
        "type": "keyword"
      },
      "brand":{
        "type": "keyword"
      },
      "sold":{
        "type": "integer"
      },
      "commentCount":{
        "type": "integer",
        "index":false
      },
      "isAD":{
        "type": "boolean"
      },
      "updateTime":{
        "type": "date"
      }
    }
  }
}
索引库操作
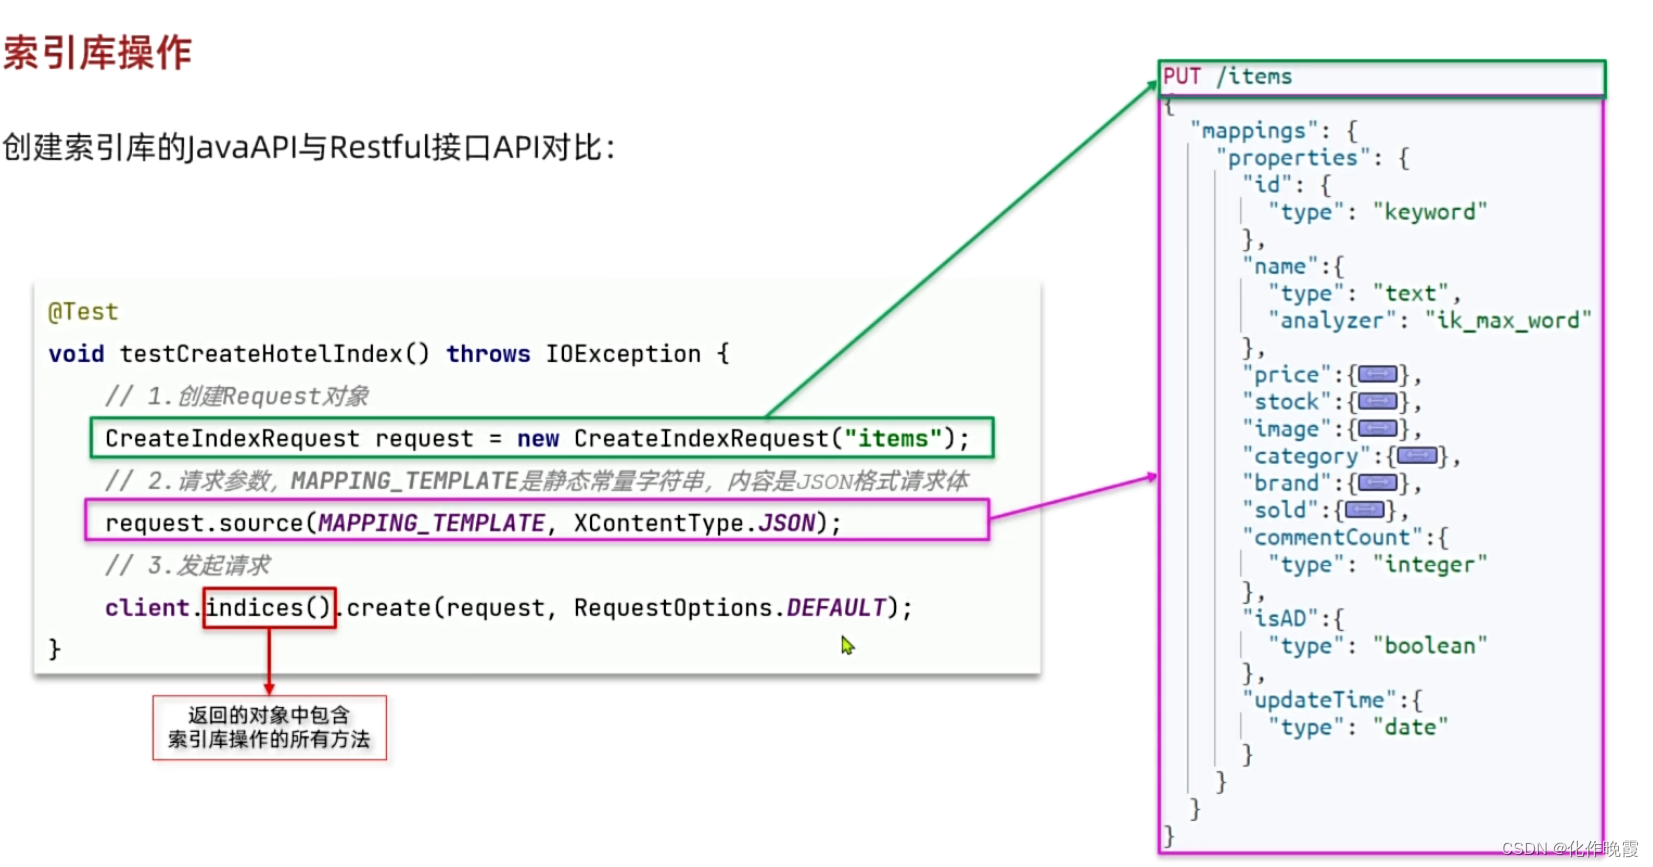
public class ElasticTest {
private RestHighLevelClient client;
@Test
void CreatIndex() throws IOException {
//准备Request对象
CreateIndexRequest request = new CreateIndexRequest("items");
//准备请求参数
request.source(Mapping, XContentType.JSON);
//发送请求
client.indices().create(request, RequestOptions.DEFAULT);
}
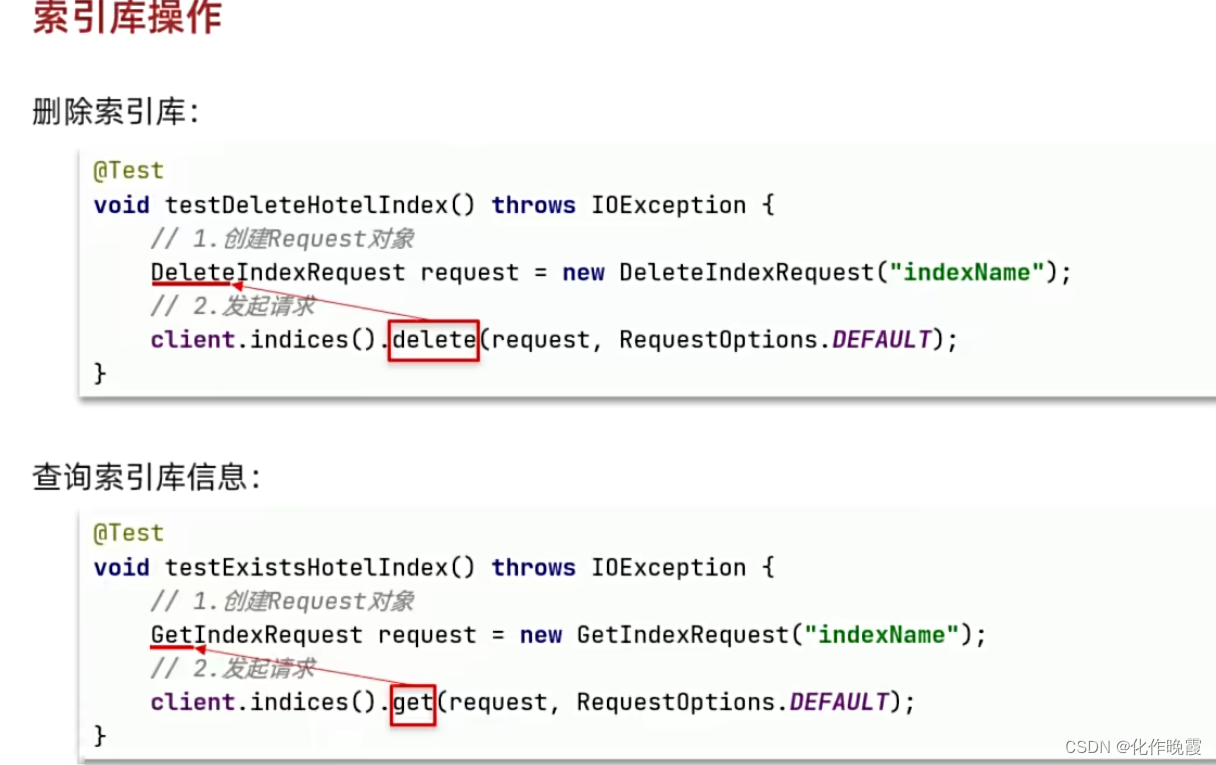
@Test
void GetIndex() throws IOException {
//创建对象
GetIndexRequest request = new GetIndexRequest("items");
boolean exists = client.indices().exists(request,RequestOptions.DEFAULT);
System.out.println("exists = "+exists);
}
@Test
void DeleteIndex() throws IOException {
//创建对象
DeleteIndexRequest request = new DeleteIndexRequest("items");
client.indices().delete(request,RequestOptions.DEFAULT);
}
@BeforeEach
void setUp(){
client = new RestHighLevelClient(RestClient.builder(
HttpHost.create("http://192.168.202.129:9200")
));
}
@AfterEach
void tearDown() throws IOException {
if(client != null){
client.close();
}
}
private static final String Mapping = "{\n" +
" \"mappings\": {\n" +
" \"properties\": {\n" +
" \"id\":{\n" +
" \"type\": \"keyword\"\n" +
" },\n" +
" \"name\":{\n" +
" \"type\": \"text\",\n" +
" \"analyzer\": \"ik_smart\"\n" +
" },\n" +
" \"price\":{\n" +
" \"type\": \"integer\"\n" +
" },\n" +
" \"image\":{\n" +
" \"type\": \"keyword\",\n" +
" \"index\": false\n" +
" },\n" +
" \"category\":{\n" +
" \"type\": \"keyword\"\n" +
" },\n" +
" \"brand\":{\n" +
" \"type\": \"keyword\"\n" +
" },\n" +
" \"sold\":{\n" +
" \"type\": \"integer\"\n" +
" },\n" +
" \"commentCount\":{\n" +
" \"type\": \"integer\",\n" +
" \"index\":false\n" +
" },\n" +
" \"isAD\":{\n" +
" \"type\": \"boolean\"\n" +
" },\n" +
" \"updateTime\":{\n" +
" \"type\": \"date\"\n" +
" }\n" +
" }\n" +
" }\n" +
"}";
}以上便是增删查的所有实现代码。
文档操作
新增文档
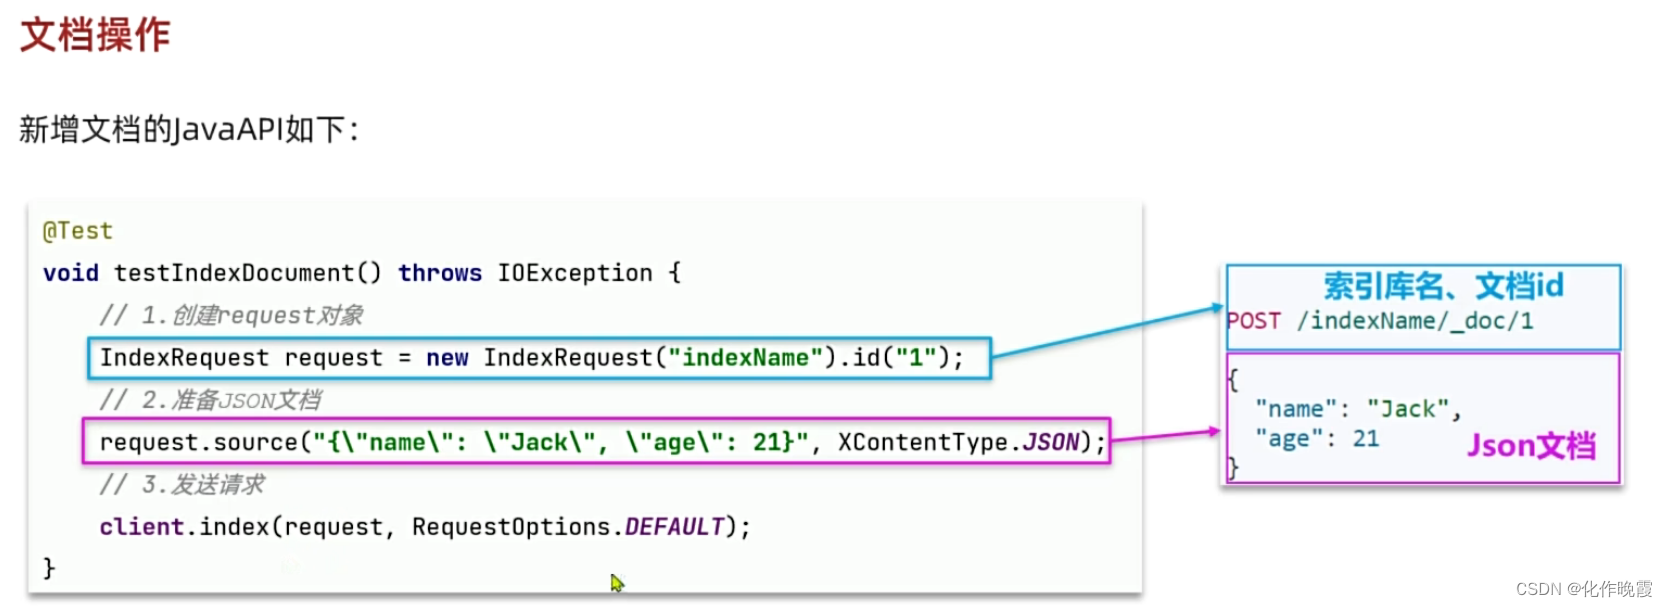
@Test
void testAddDocument() throws IOException {
    // 1.根据id查询商品数据
    Item item = itemService.getById(100002644680L);
    // 2.转换为文档类型
    ItemDoc itemDoc = BeanUtil.copyProperties(item, ItemDoc.class);
    // 3.将ItemDTO转json
    String doc = JSONUtil.toJsonStr(itemDoc);

    // 1.准备Request对象
    IndexRequest request = new IndexRequest("items").id(itemDoc.getId());
    // 2.准备Json文档
    request.source(doc, XContentType.JSON);
    // 3.发送请求
    client.index(request, RequestOptions.DEFAULT);
}
记得在类上加
@SpringBootTest(properties = "spring.profiles.active=local")
但是现在存在一个bug就是不管在任何服务单体项目下加上这个就会爆java.lang.IllegalStateException: Failed to load ApplicationContext
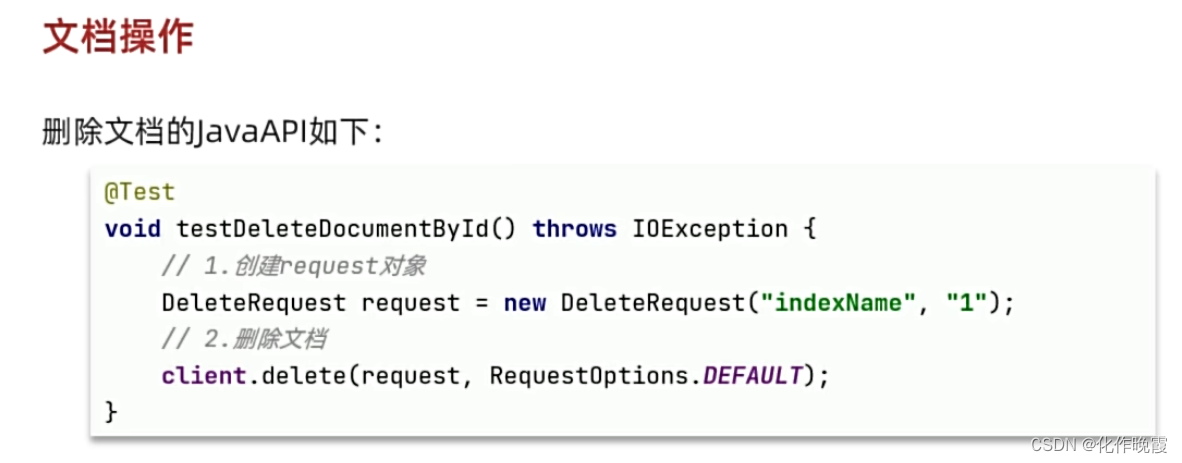
删除文档
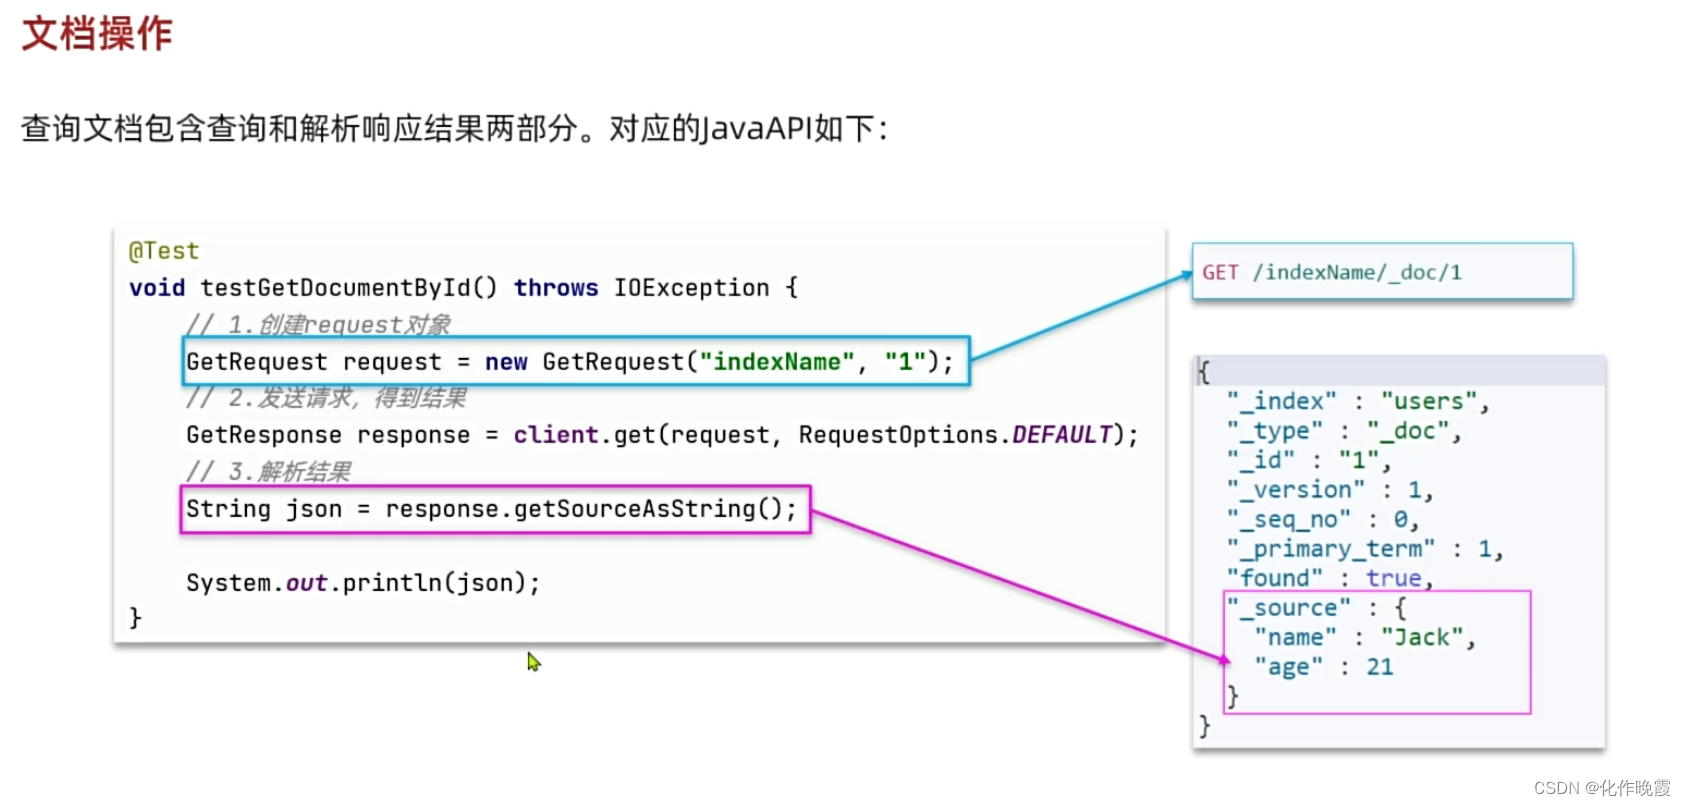
查询文档
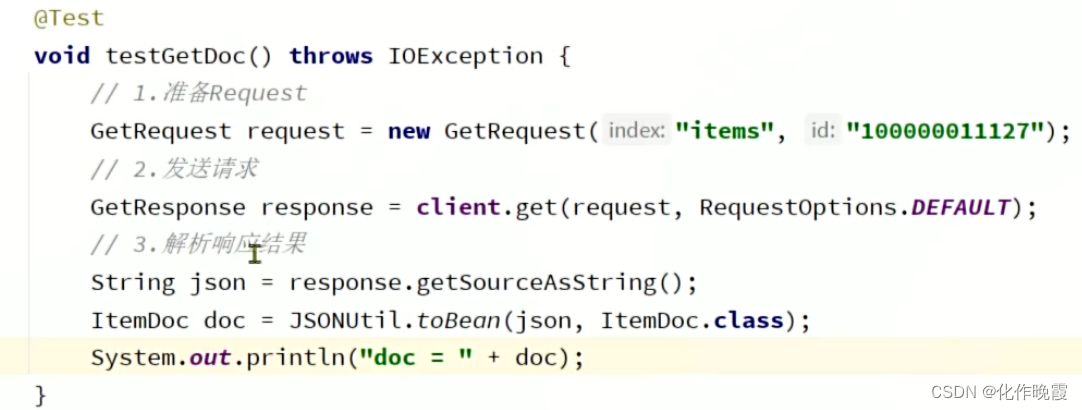
糊涂包里面的toBean是把json转化为你想要的类型
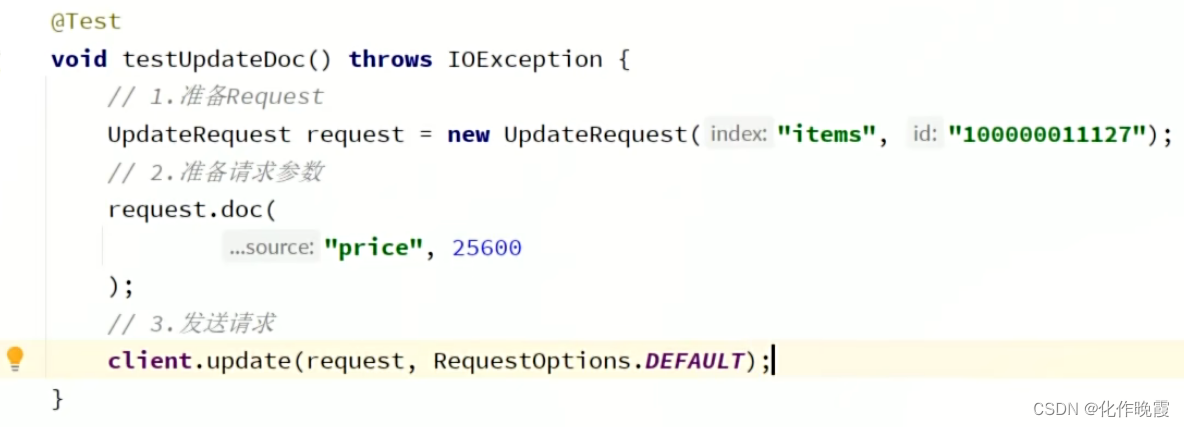
修改文档
第一种全量修改就是直接新增文档,相当于覆盖之前的文档
第二种,局部修改就是下面这种request.doc()调用这个方法。
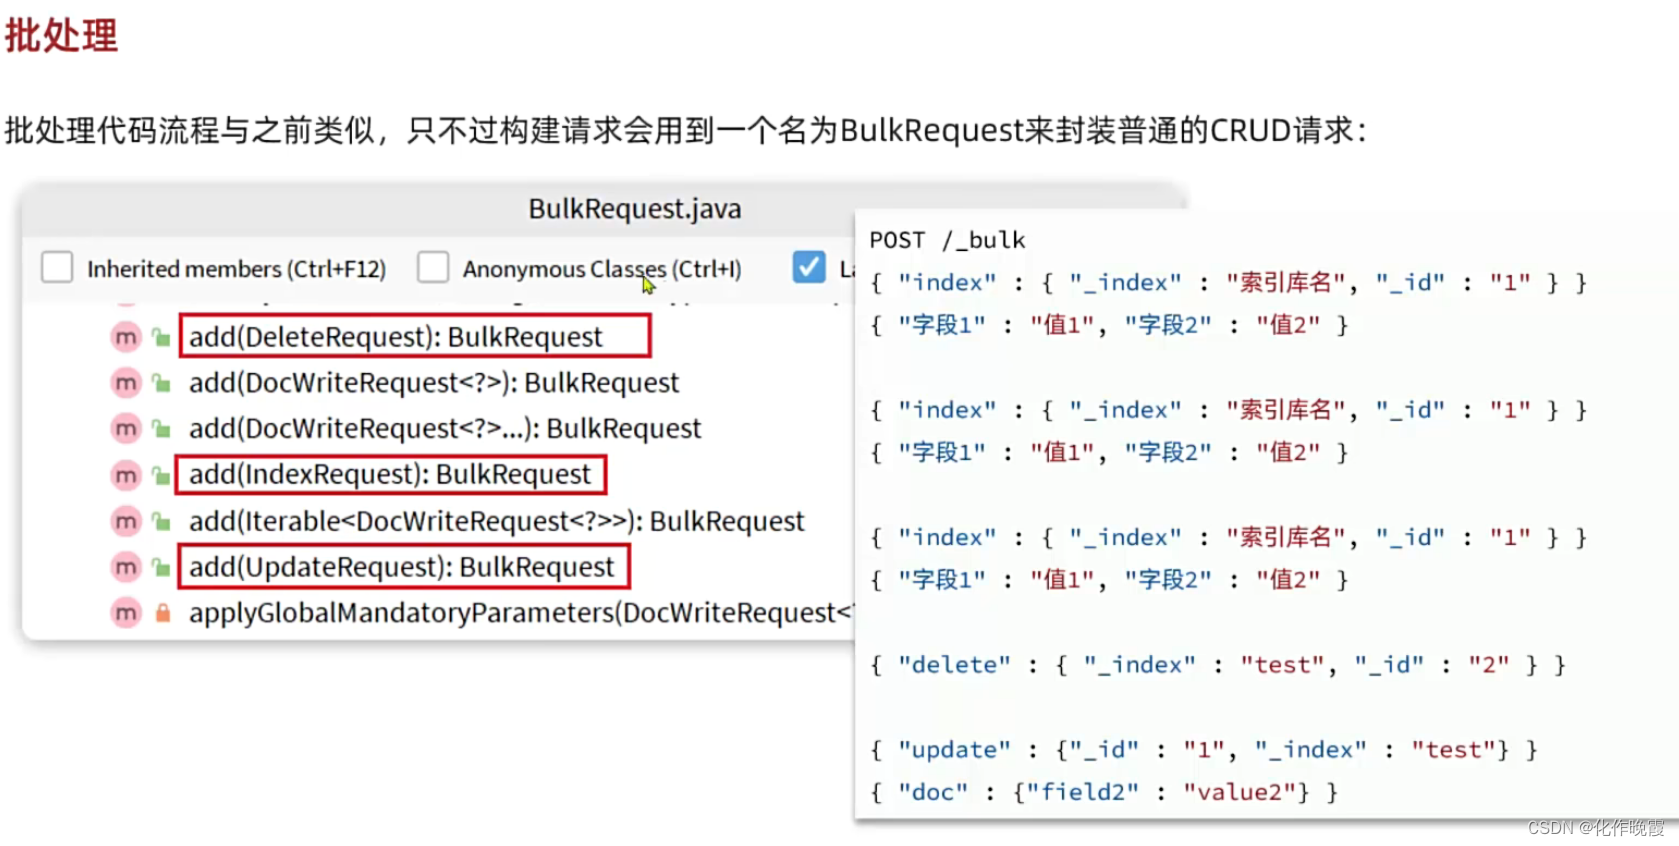
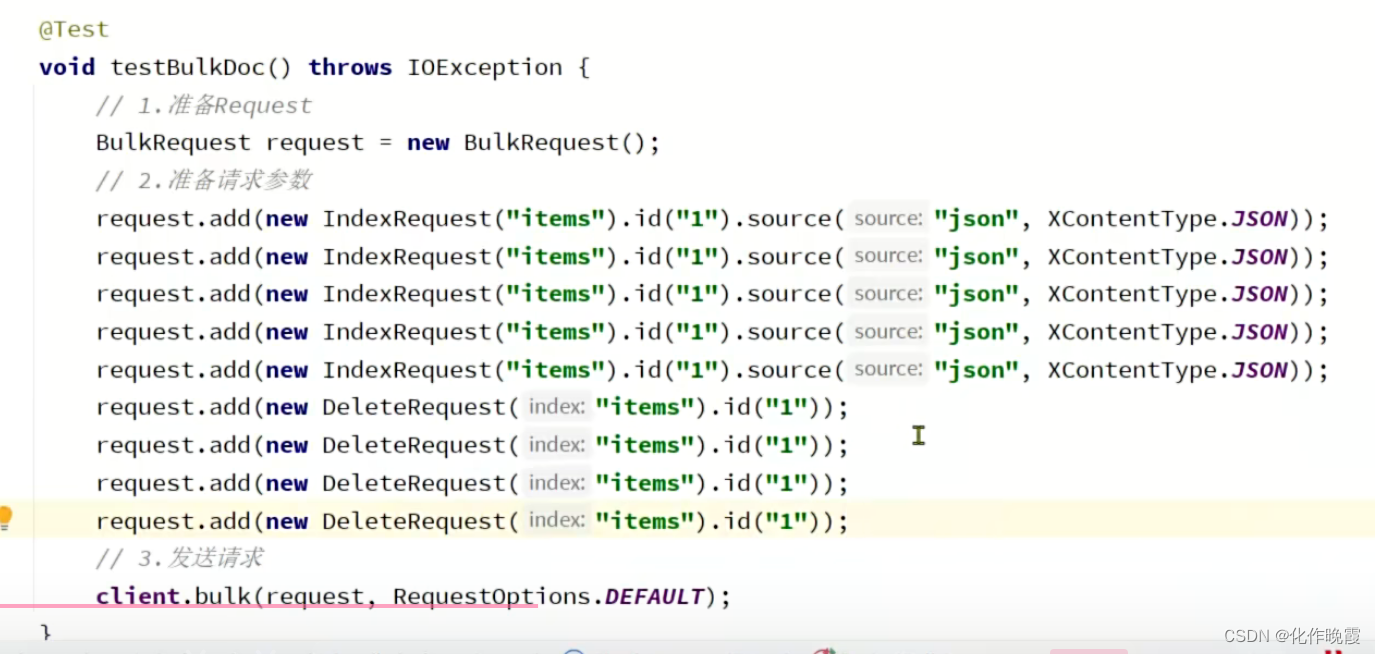
批处理
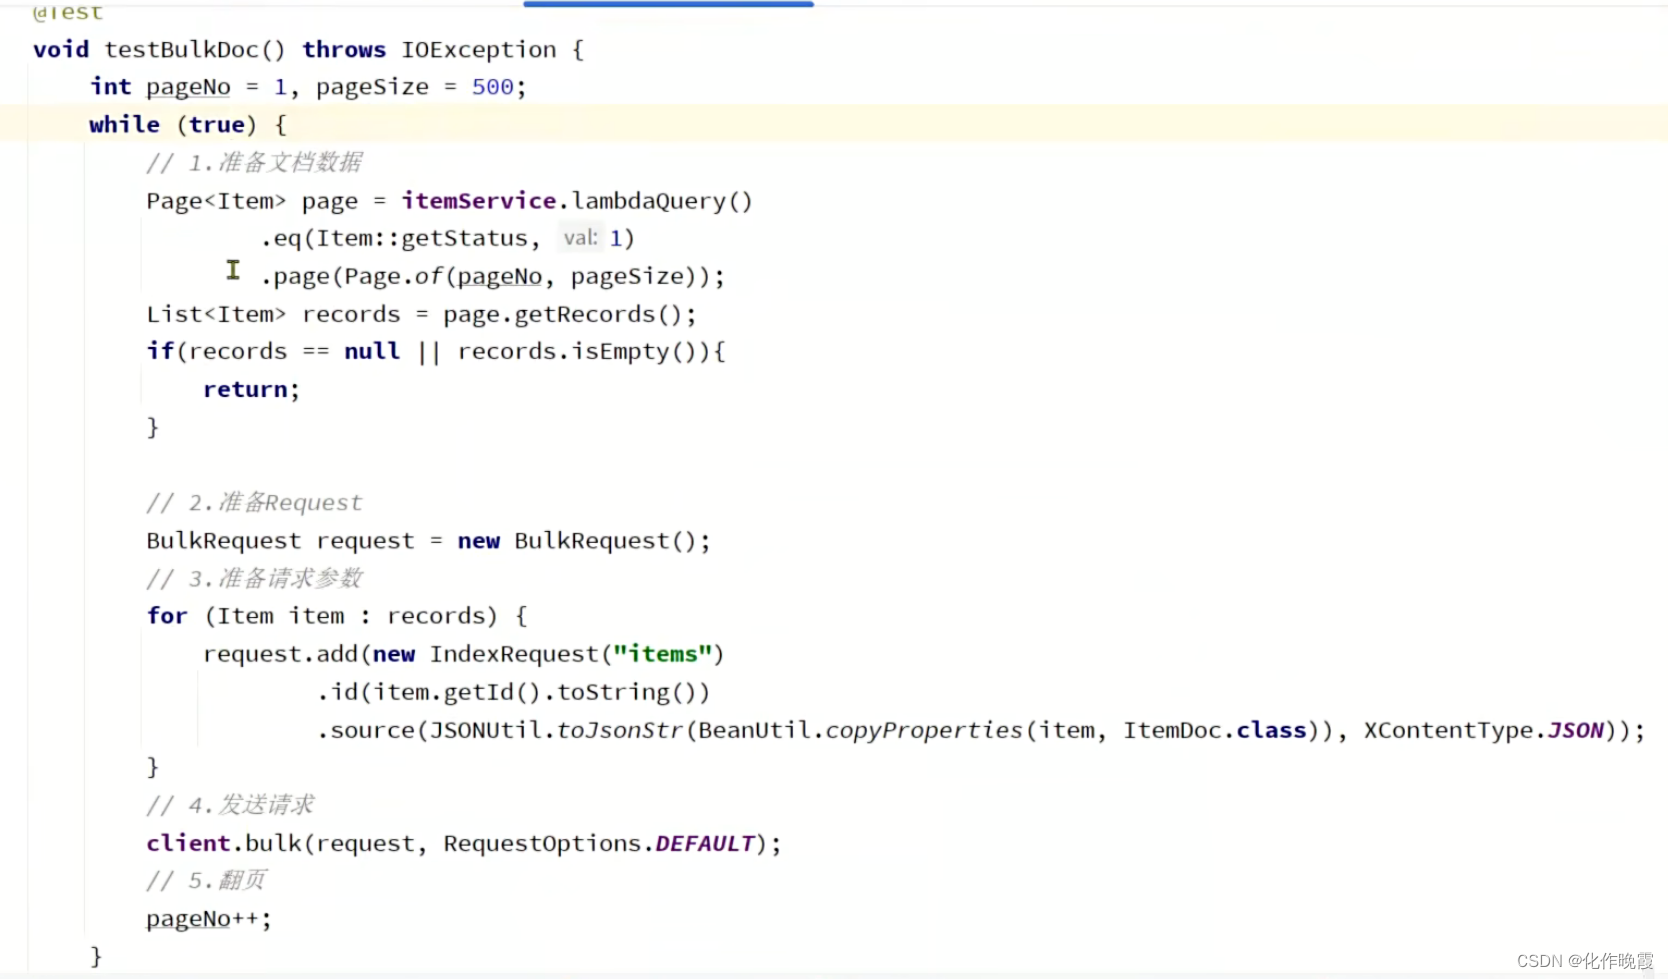
page.getRecords就是得到了这一页数据,变为了List<Item>类型的数据。
DSL查询
叶子查询
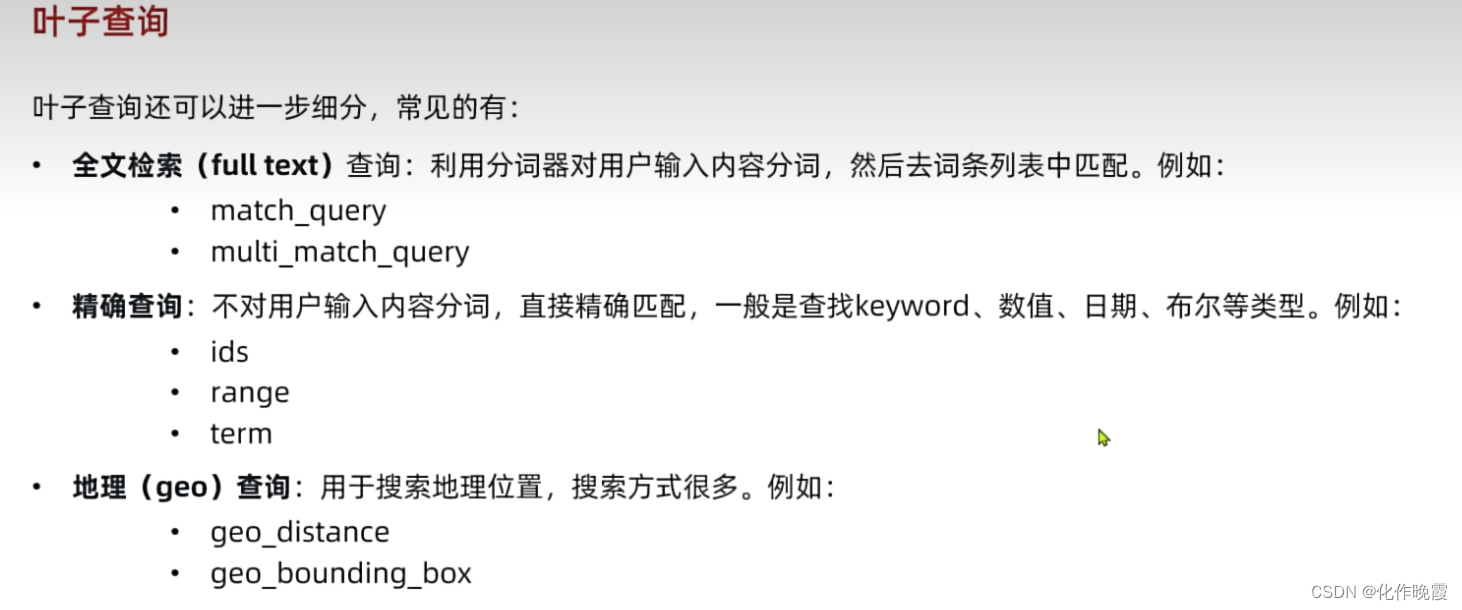
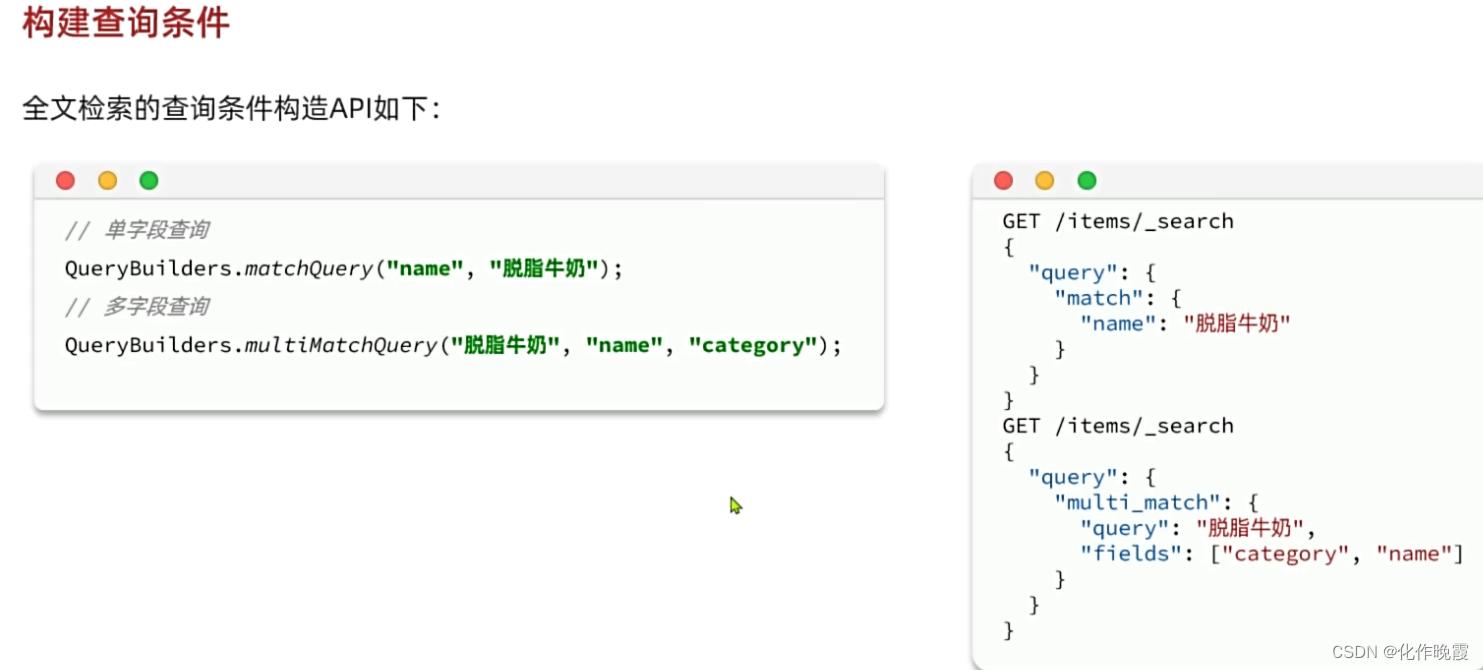
全文检索
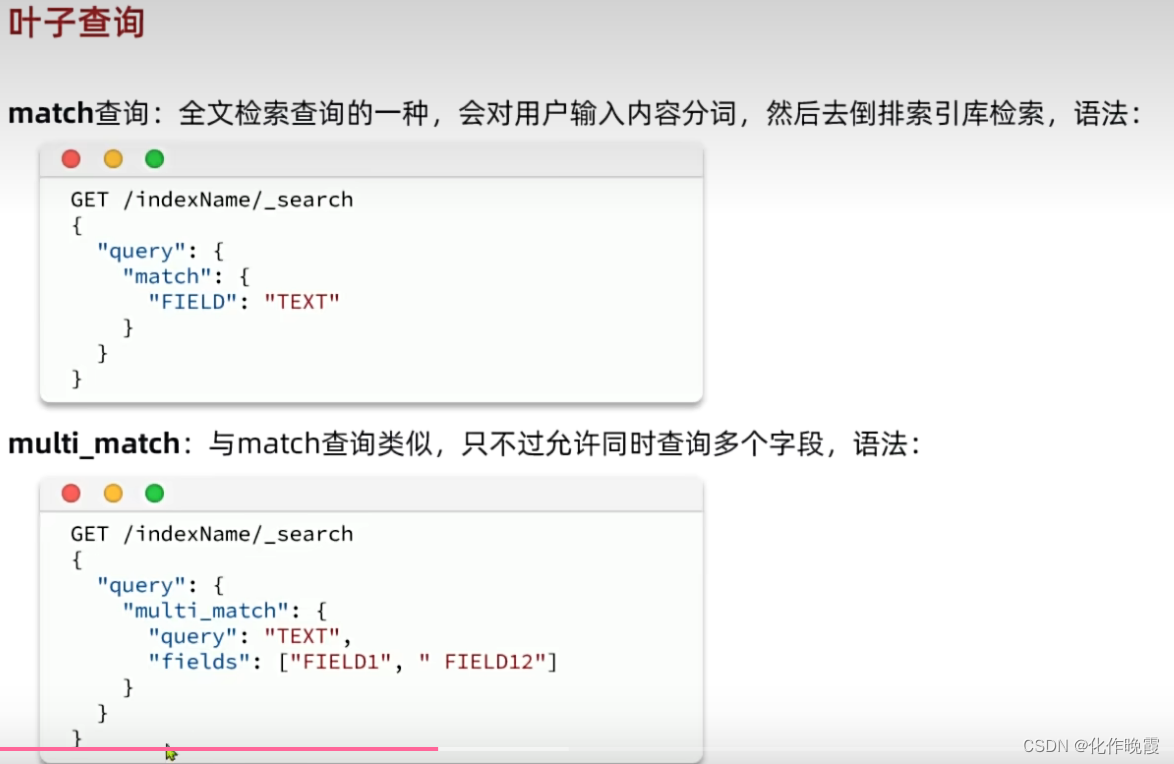
match查询
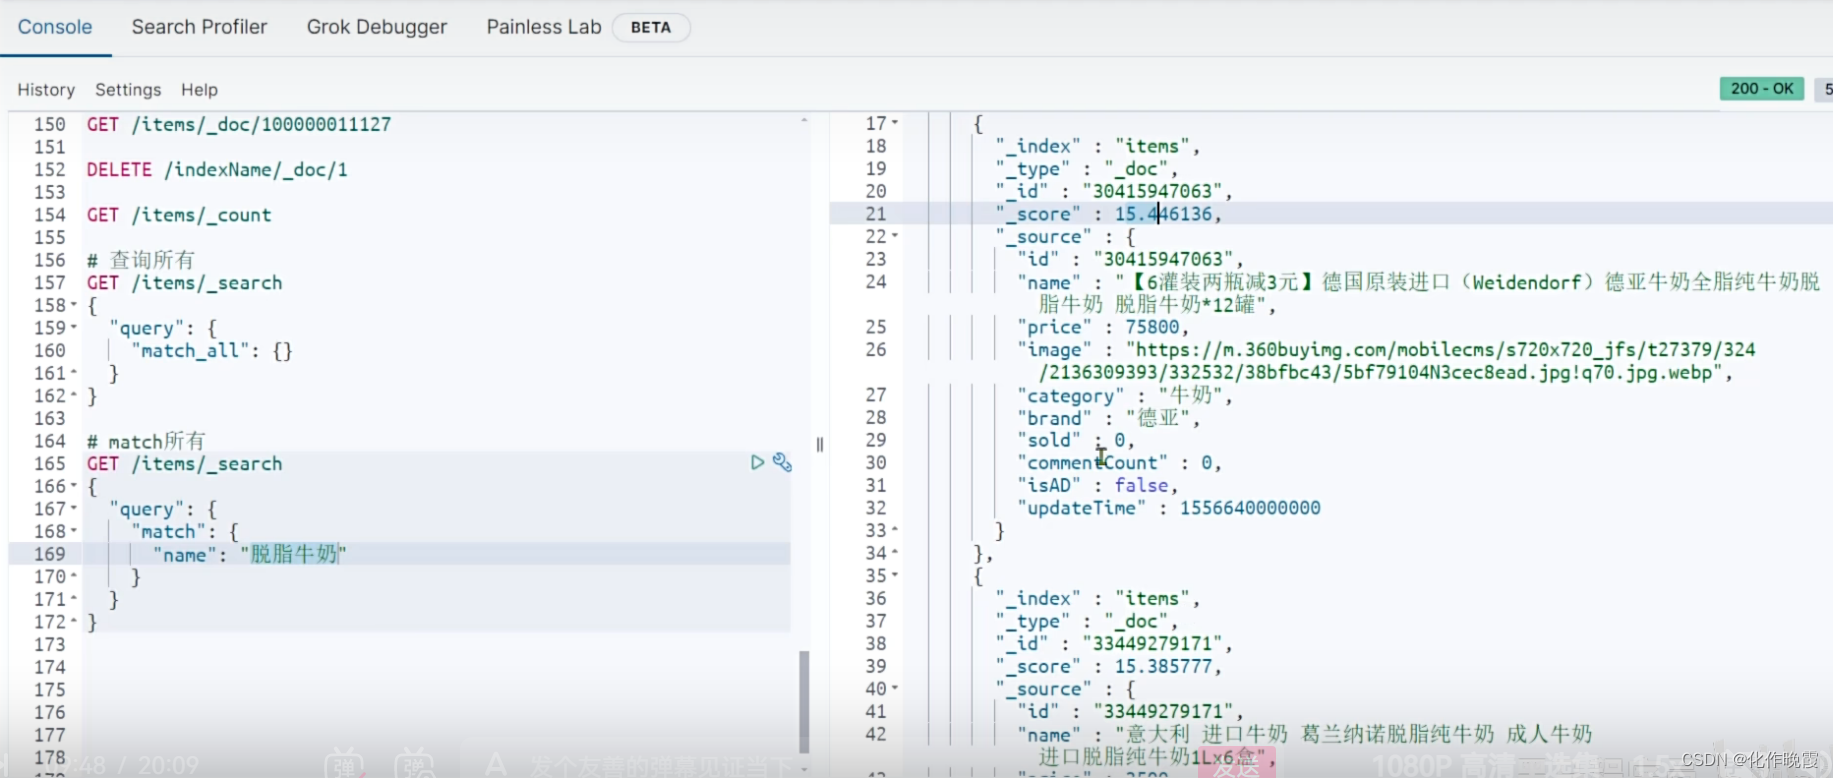
GET /items/_search
{
  "query": {
    "match": {
      "name": "脱脂牛奶"
    }
  }
}
FIELD是你要查询的字段,TEXT是用户输入的信息。
multi_match查询
GET /items/_search
{
  "query": {
    "multi_match": {
      "query": "脱脂牛奶"
      , "fields": ["name"]
    }
  }
}
TEXT是用户输入的信息,FIELD1,FIELD2是你选择要查询的字段。
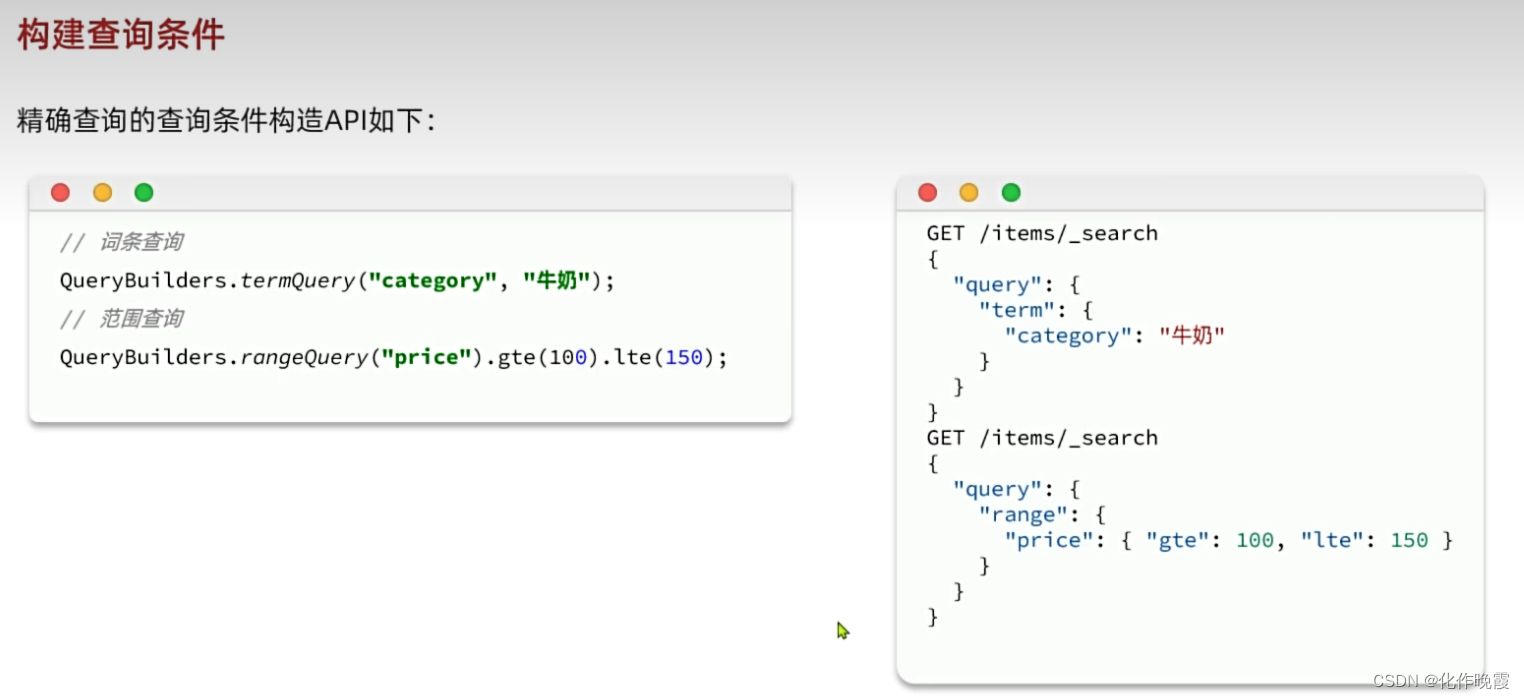
精确查询
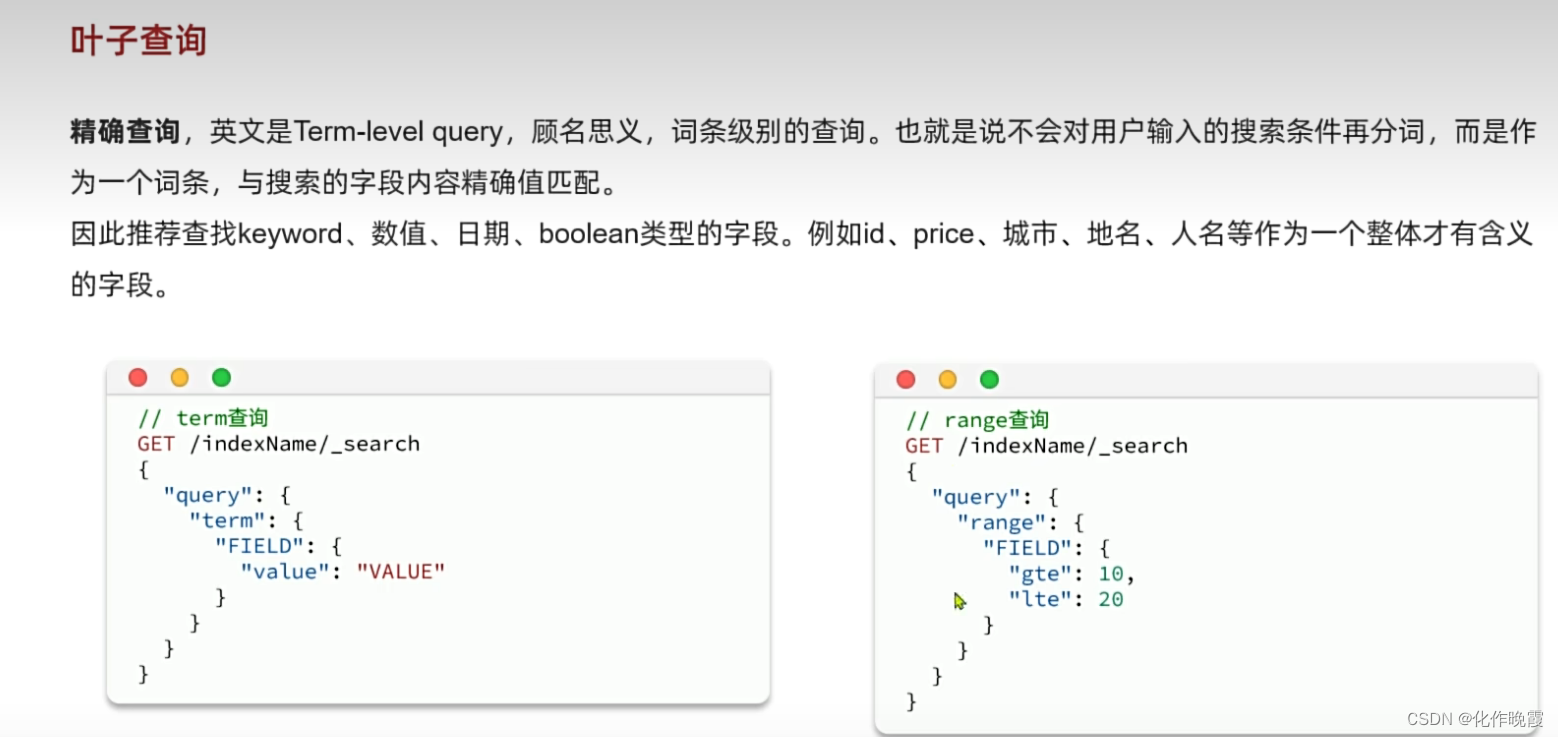
term
FIELD就是一个字段。
VALUE就是用户输入的内容。
GET /items/_search
{
  "query": {
    "term": {
      "brand": {
        "value": "德雅"
      }
    }
  }
}
range
范围查询
gte是最小值
lte是最大值
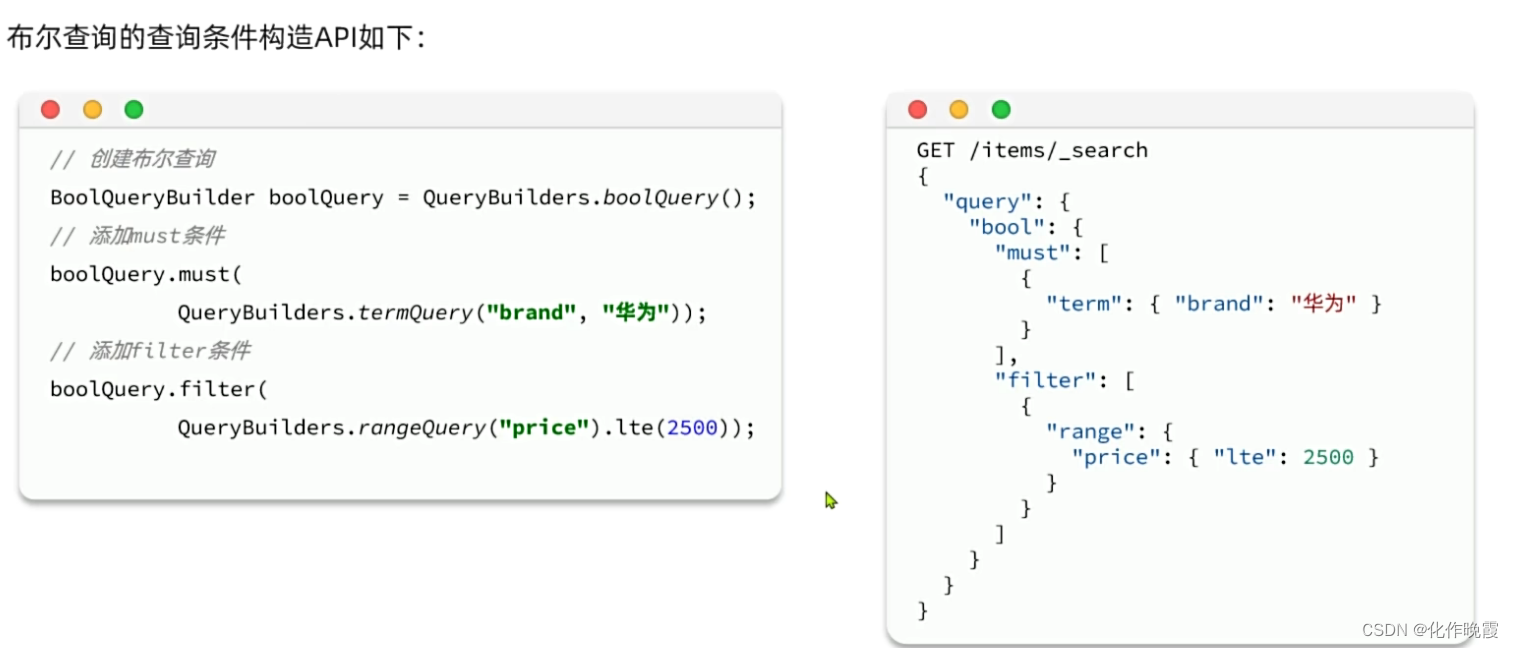
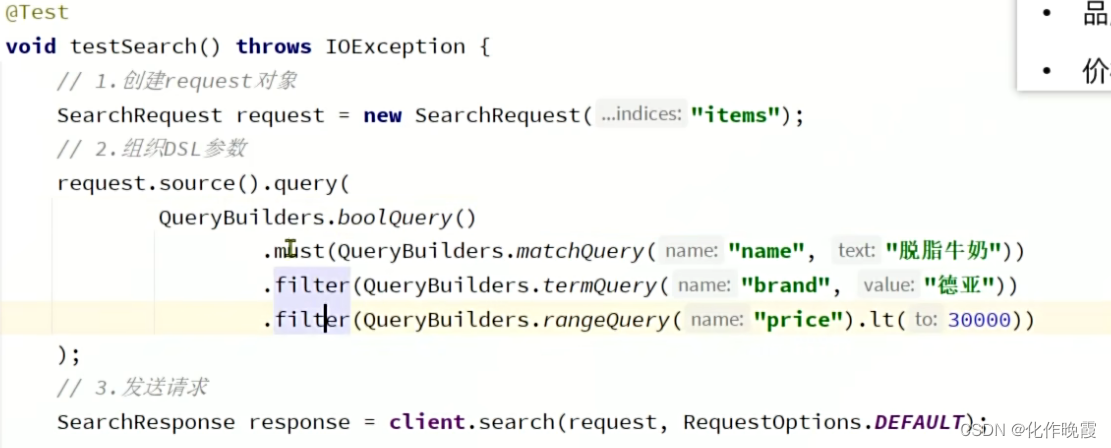
复合查询
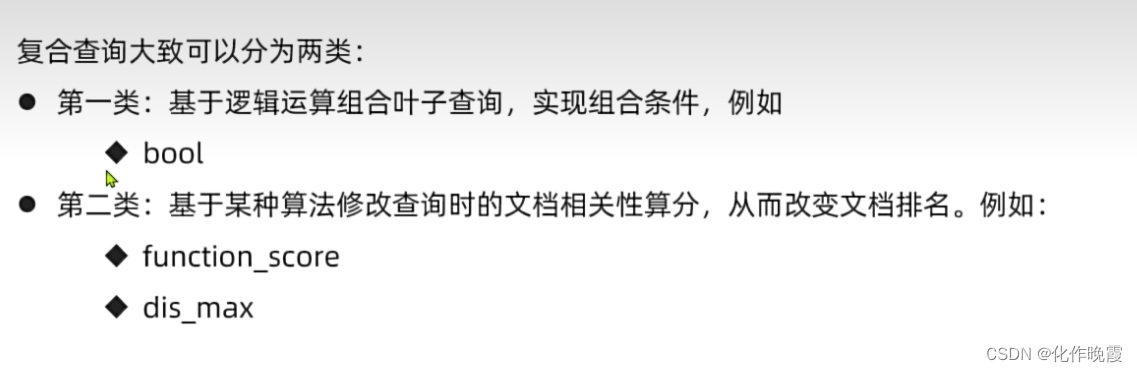
第一类
案例:搜索智能手机,但品牌必须是华为,价格在900到1599
GET /items/_search
{
  "query": {
    "bool":{
      "must": [
        {
          "match": {
            "name": "智能手机"
          }
        }
      ],
      "filter": [
        {
          "term": {
            "brand": "华为"
          }
        },
        {
          "range": {
            "price": {
              "gte": 900,
              "lte": 1599
            }
          }
        }
      ]
    }
  }
}
第二类
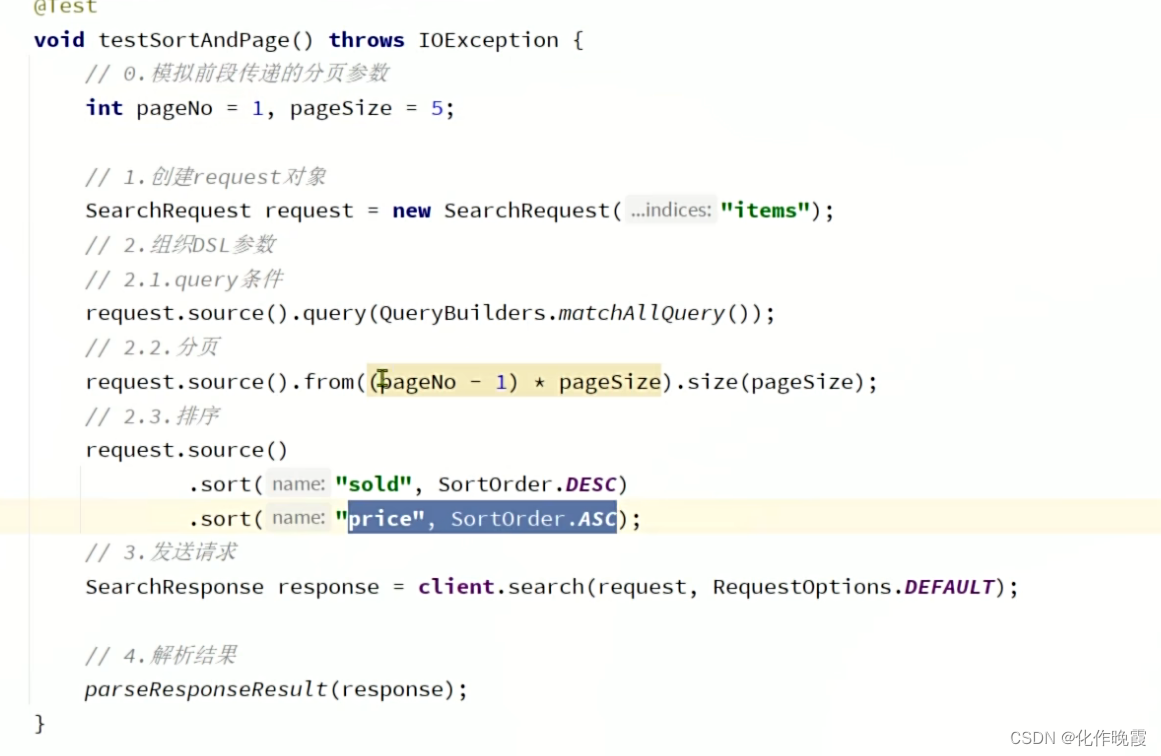
排序和分页
排序
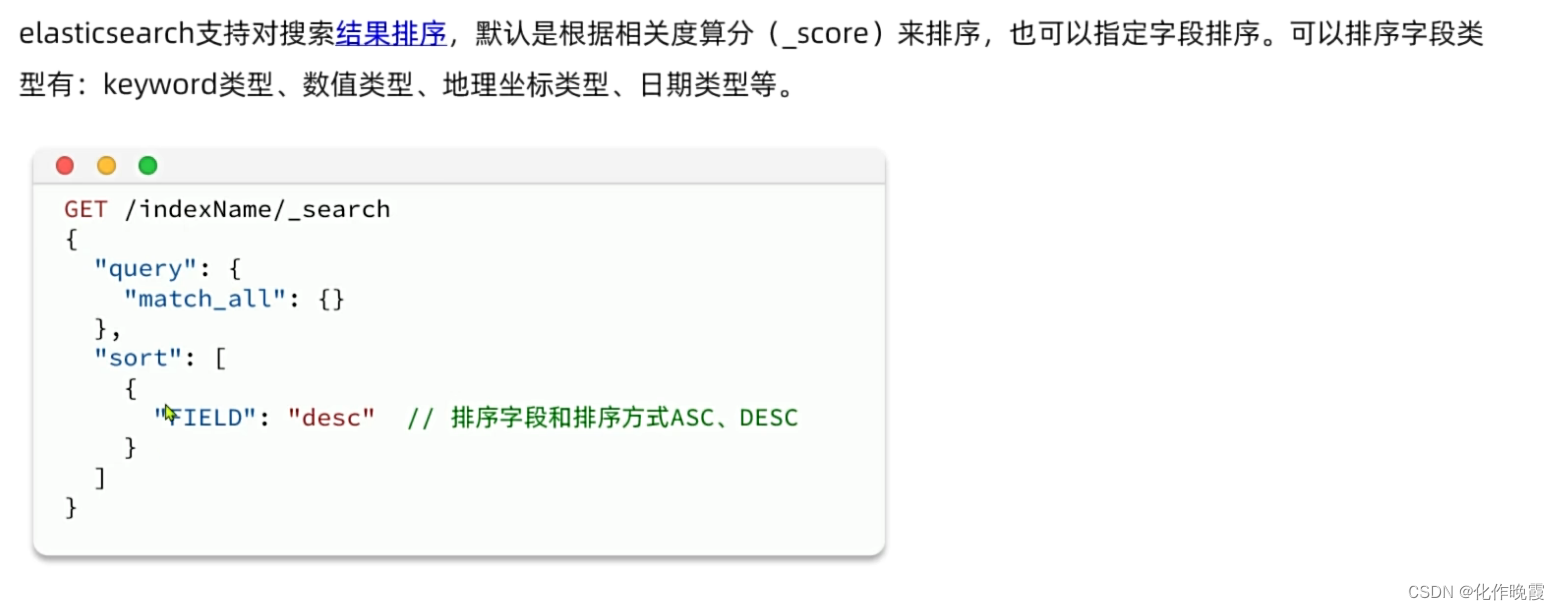
案例:搜索商品,按照销量降序排序,销量一样的则按照价格升序。
GET /items/_search
{
  "query": {
    "match_all": {}
  },
  "sort": [
    {
      "sold": "desc"
      },
      {
        "price": "asc"
      }
  ]
}
分页
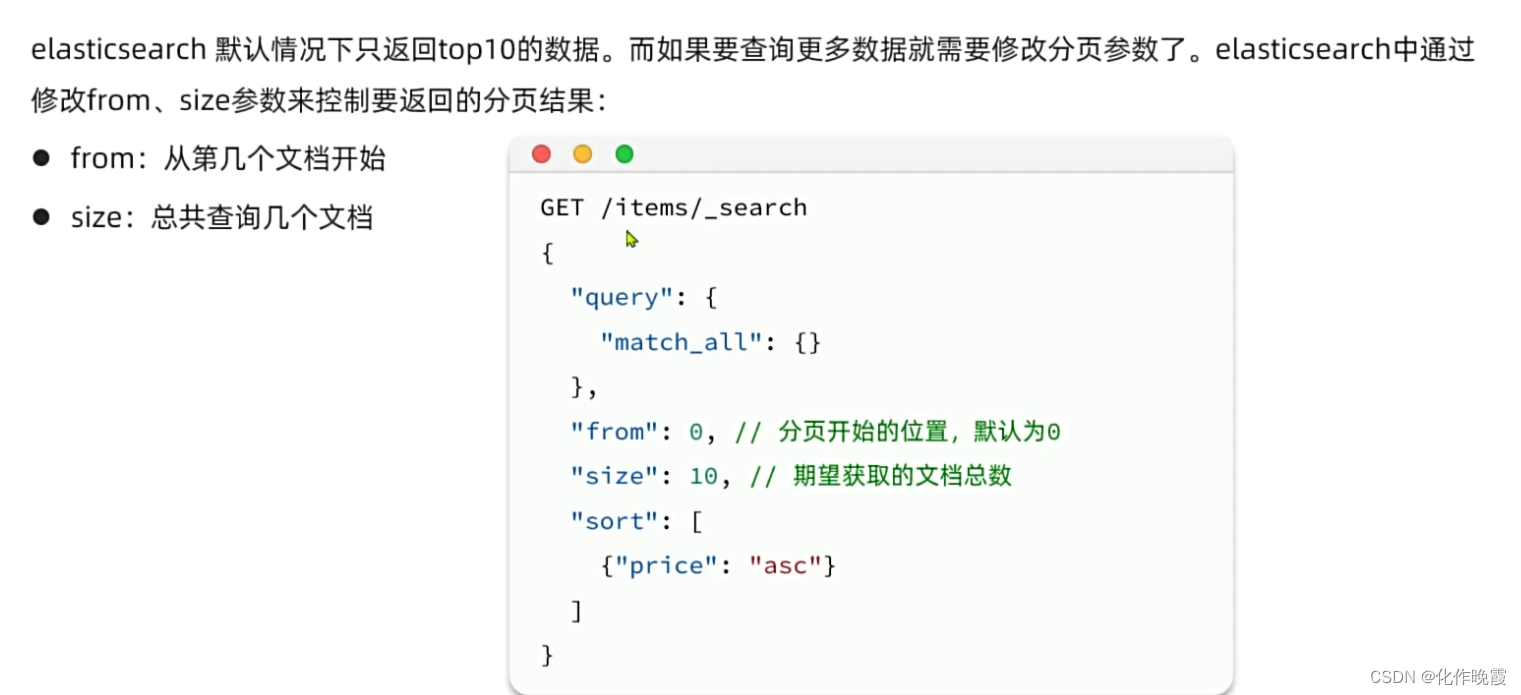
案例:搜索商品,查询出销量排名前十的商品,销量一样的时候,按照价格升序
GET /items/_search
{
  "query": {
    "match_all": {}
  },
  "sort": [
    {
      "sold": "desc"
      },
      {
        "price": "asc"
      }
  ]
  , "from": 0,
  "size": 10
}
总体感觉就是es就是另一种搜索功能强大的mysql。
只不过查询返回的数据不好处理。
深度分页问题
es的数据一般会采用分片存储,就是把一个索引中的数据分成n份存储在不同的节点上。查询数据时需要汇总各个分片的数据。
假如查询第100页,每页查10条。
假如我查990——1000,这里es的实现思路是,我先对数据排序,再找出990——1000,先找出前990个
因为数据是混乱保存在节点上的,不能保证每个节点上数据量一样。我们需要在每个分片的前1000找出来合在一起,然后再排序筛选,但是数据量当页码越深,压力就越大。

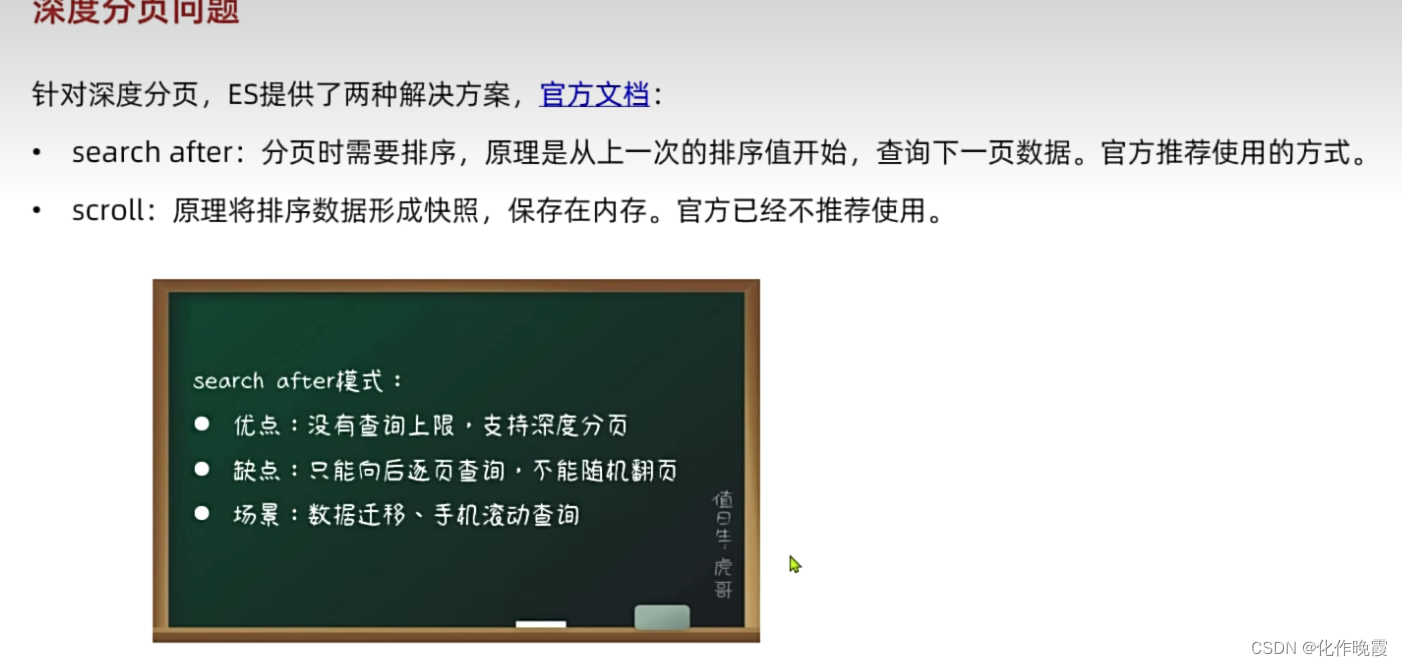
一般来说是对业务进行了限制,不让查那么多数据。
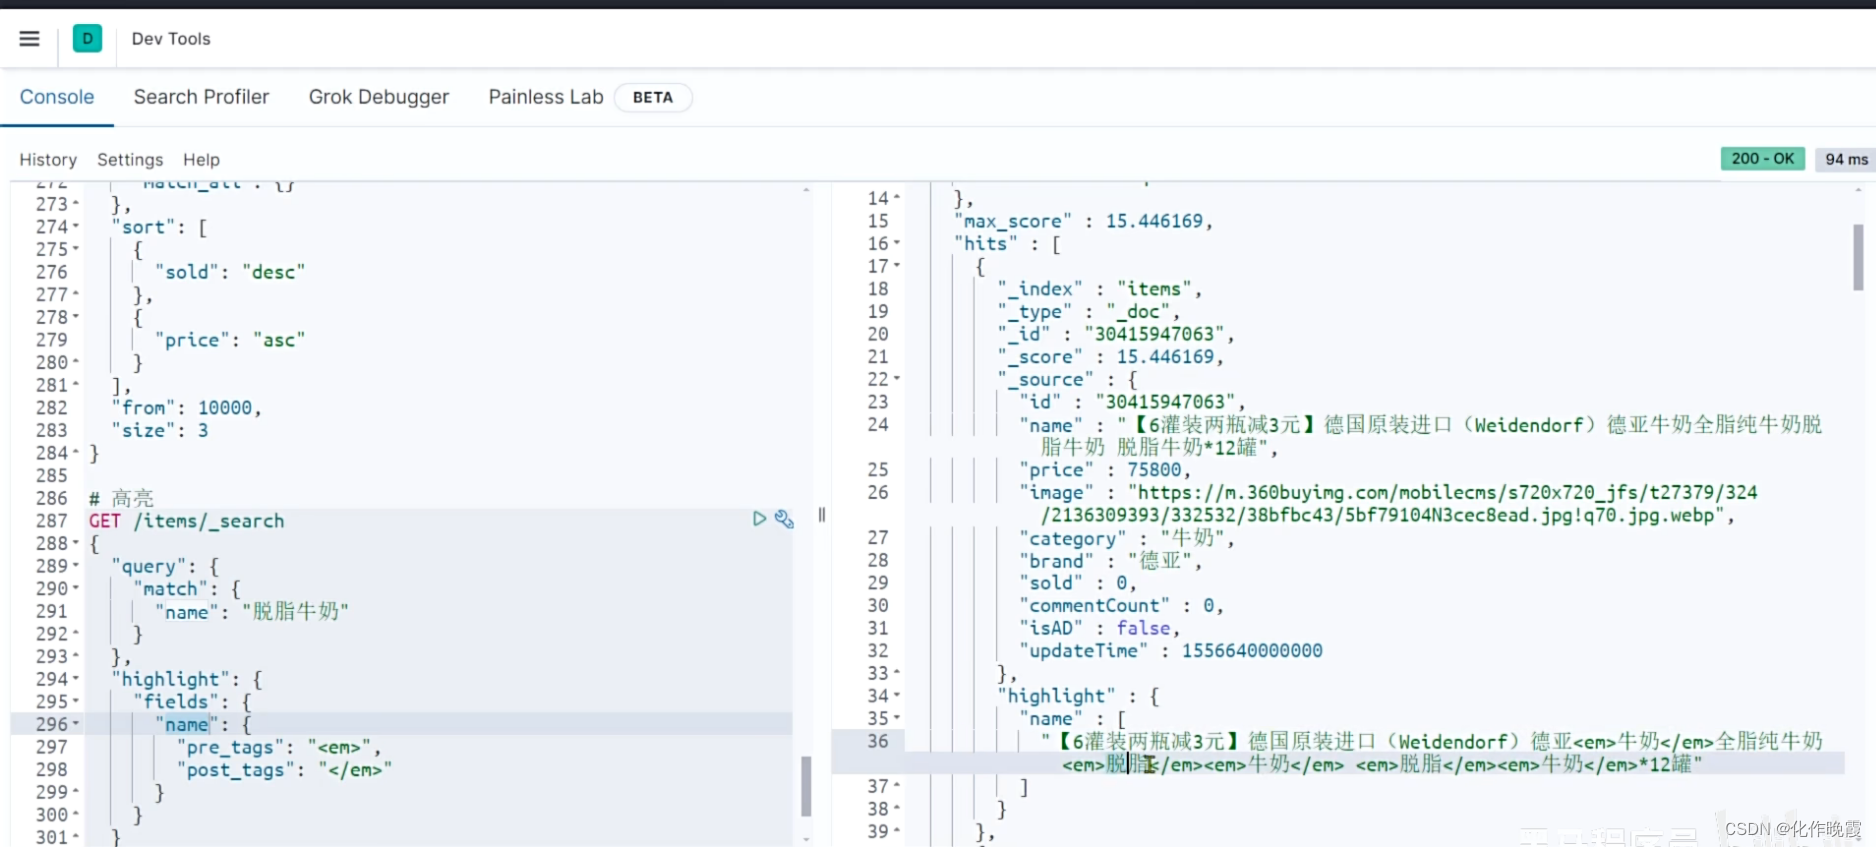
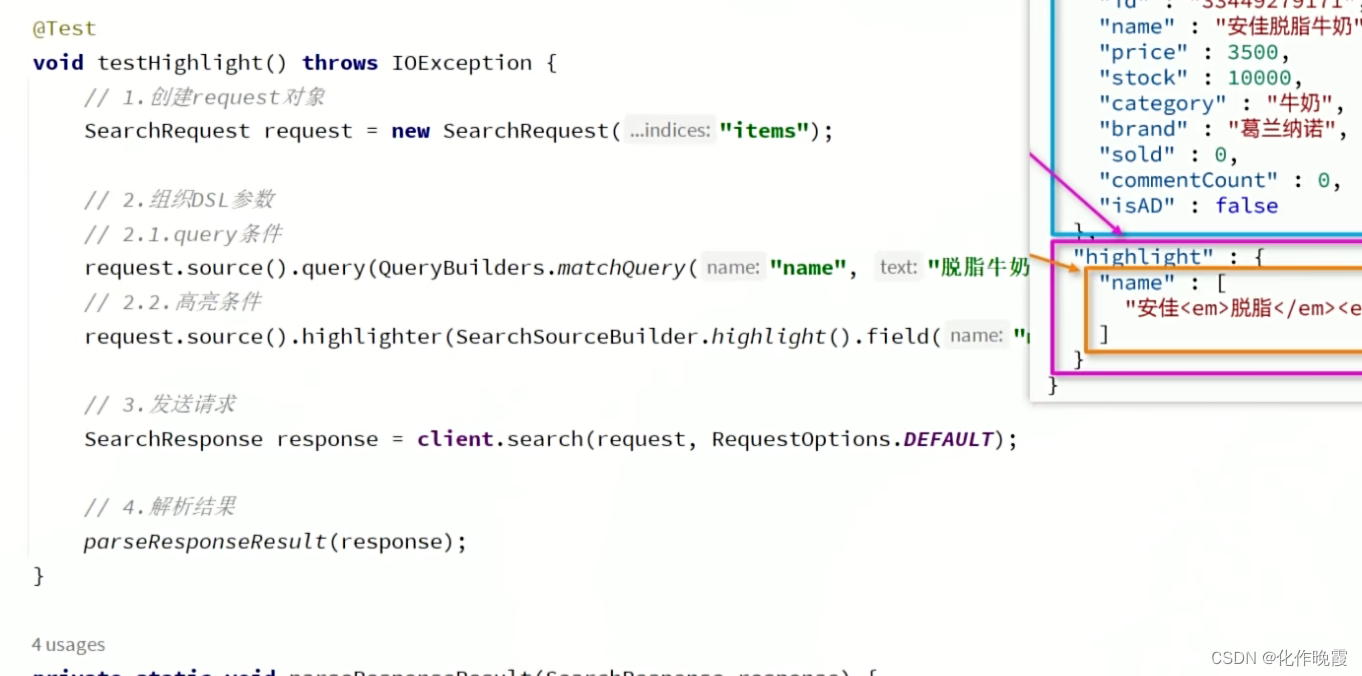
高亮显示
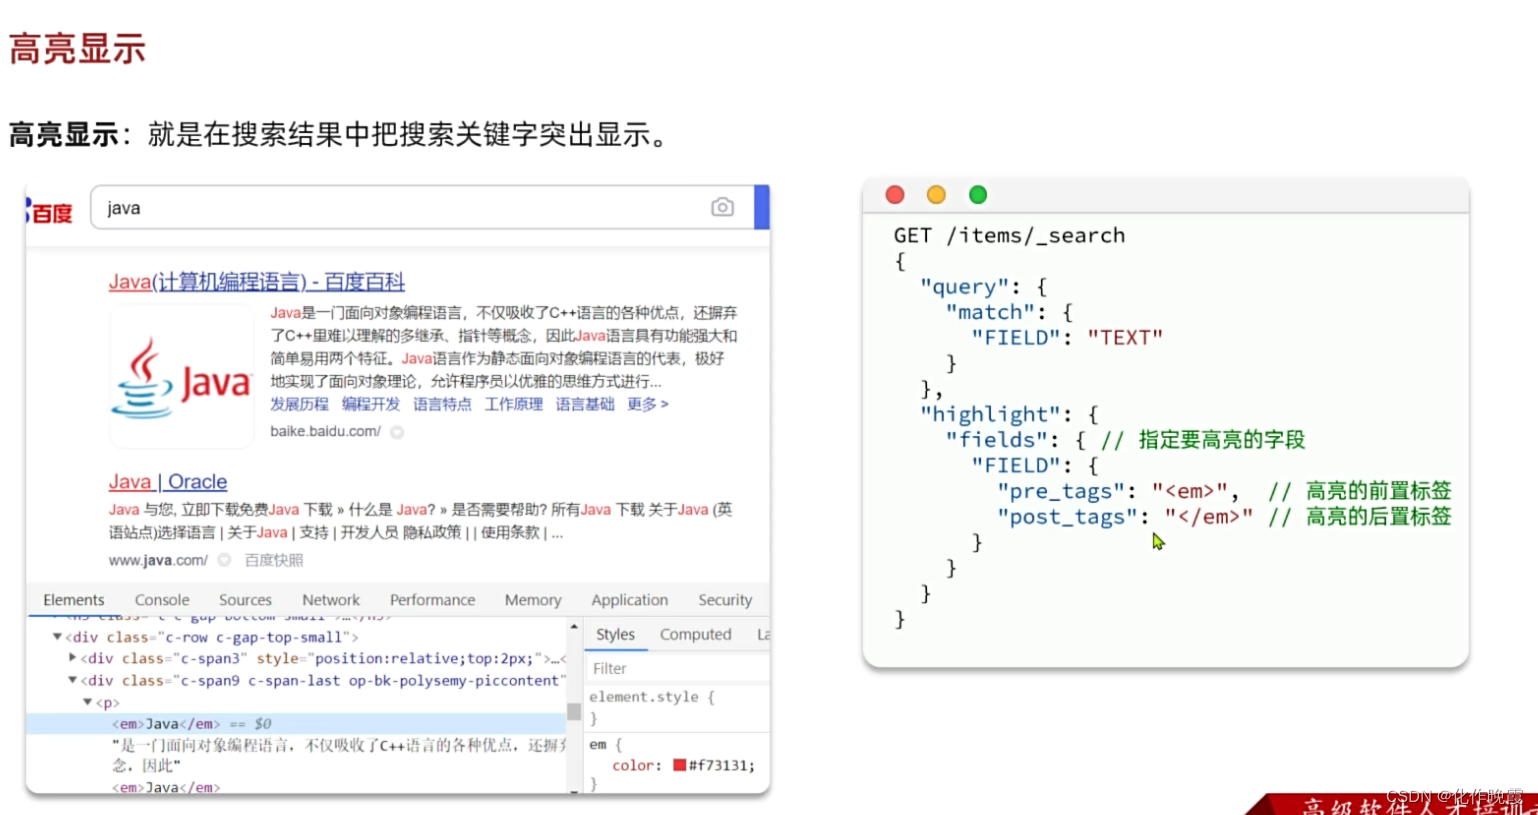
GET /items/_search
{
  "query": {
    "match": {
      "name": "脱脂牛奶"
    }
  },
  "highlight": {
    "fields": {
      "name": {
        "pre_tags": "<em>",
        "post_tags": "</em>"
      }
    }
  }
}
JavaRestClient查询
快速入门
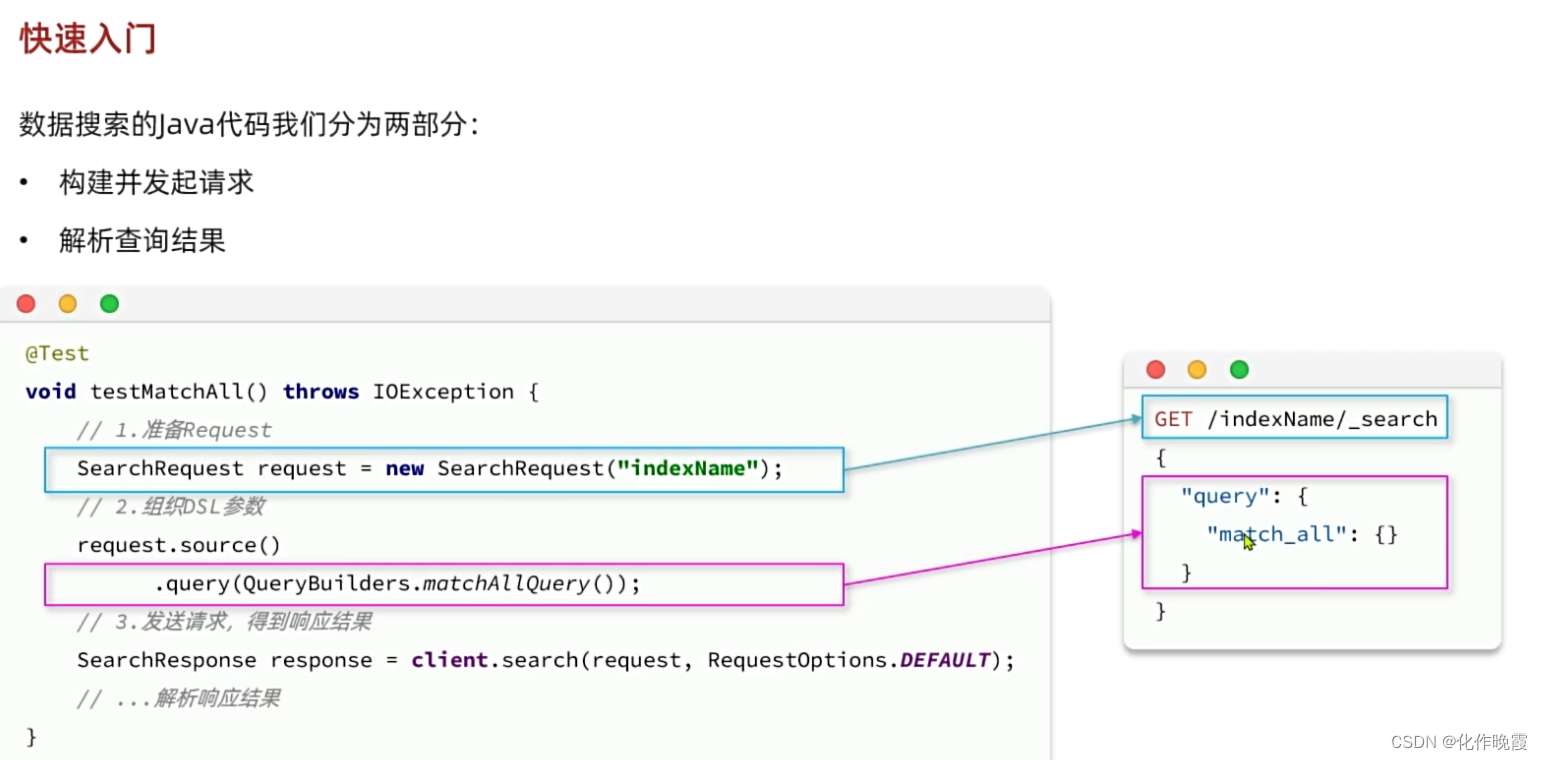
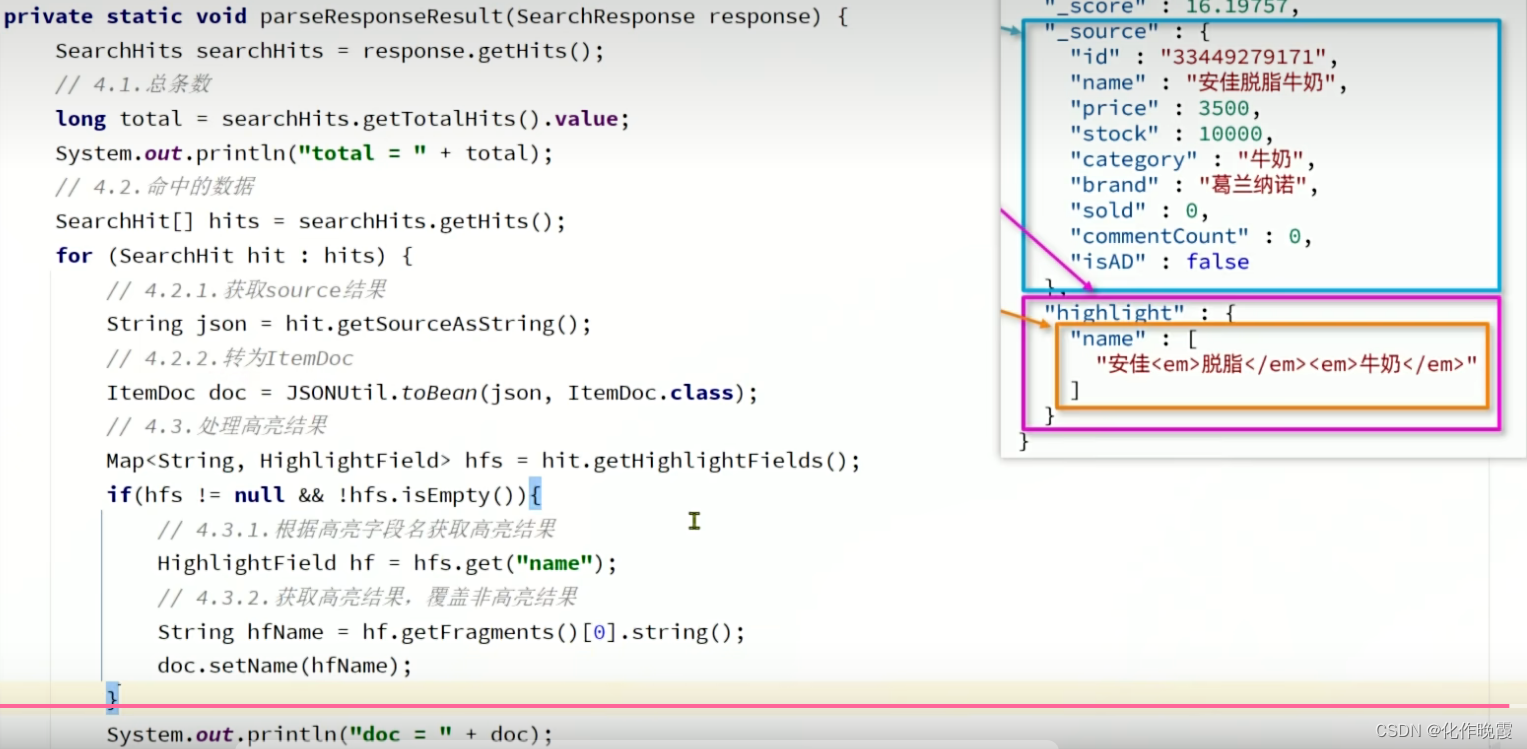
我们得到的response就是一个大的json结构,所以我们需要解析
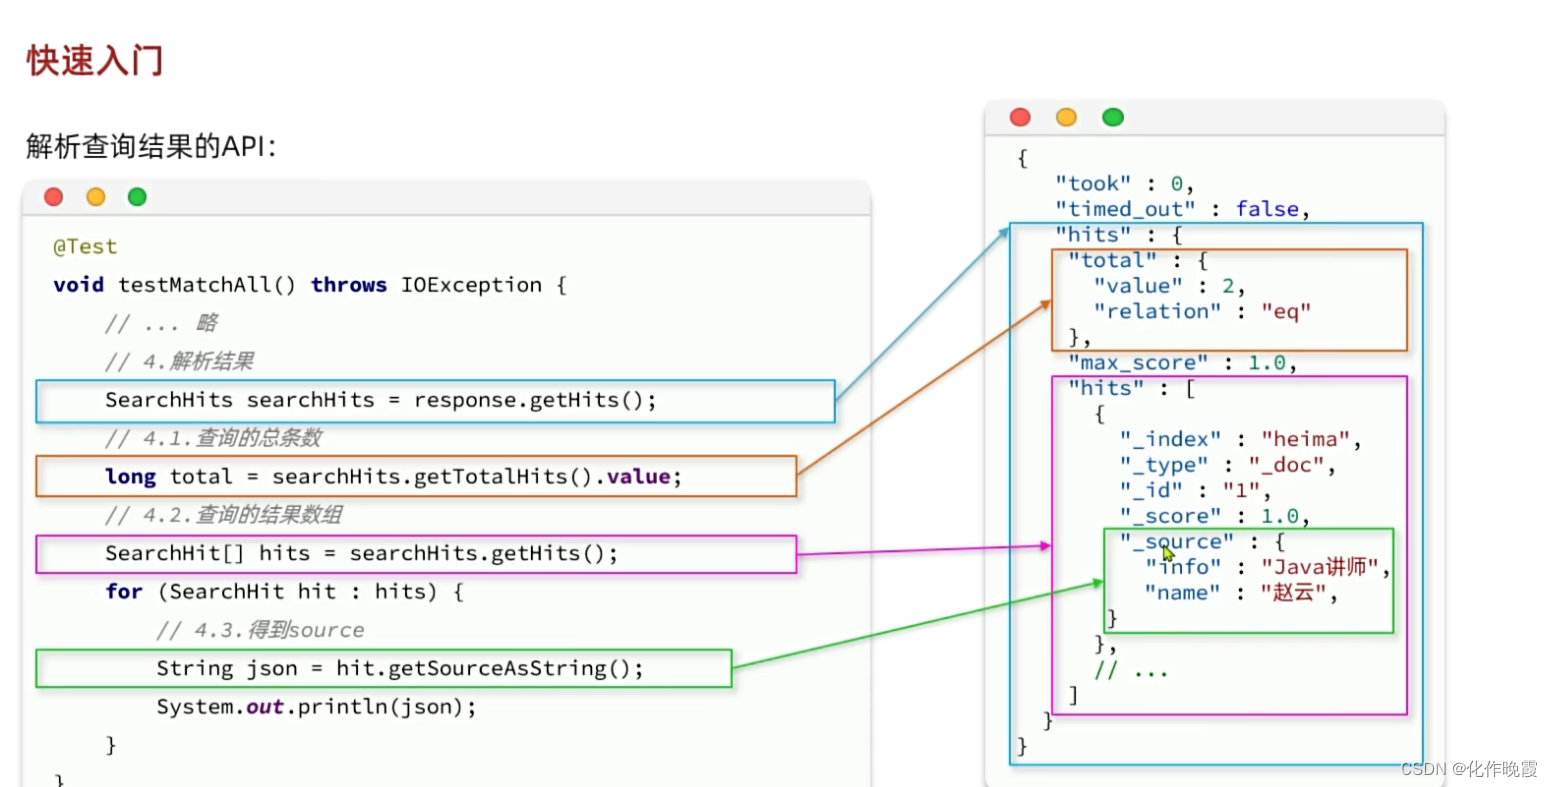
我们是为了拿到hit的部分
转化为ItemDoc
ItemDoc doc = JSONUtil.toBean(json,ItemDoc.class);
构建查询条件
排序和分页

高亮显示

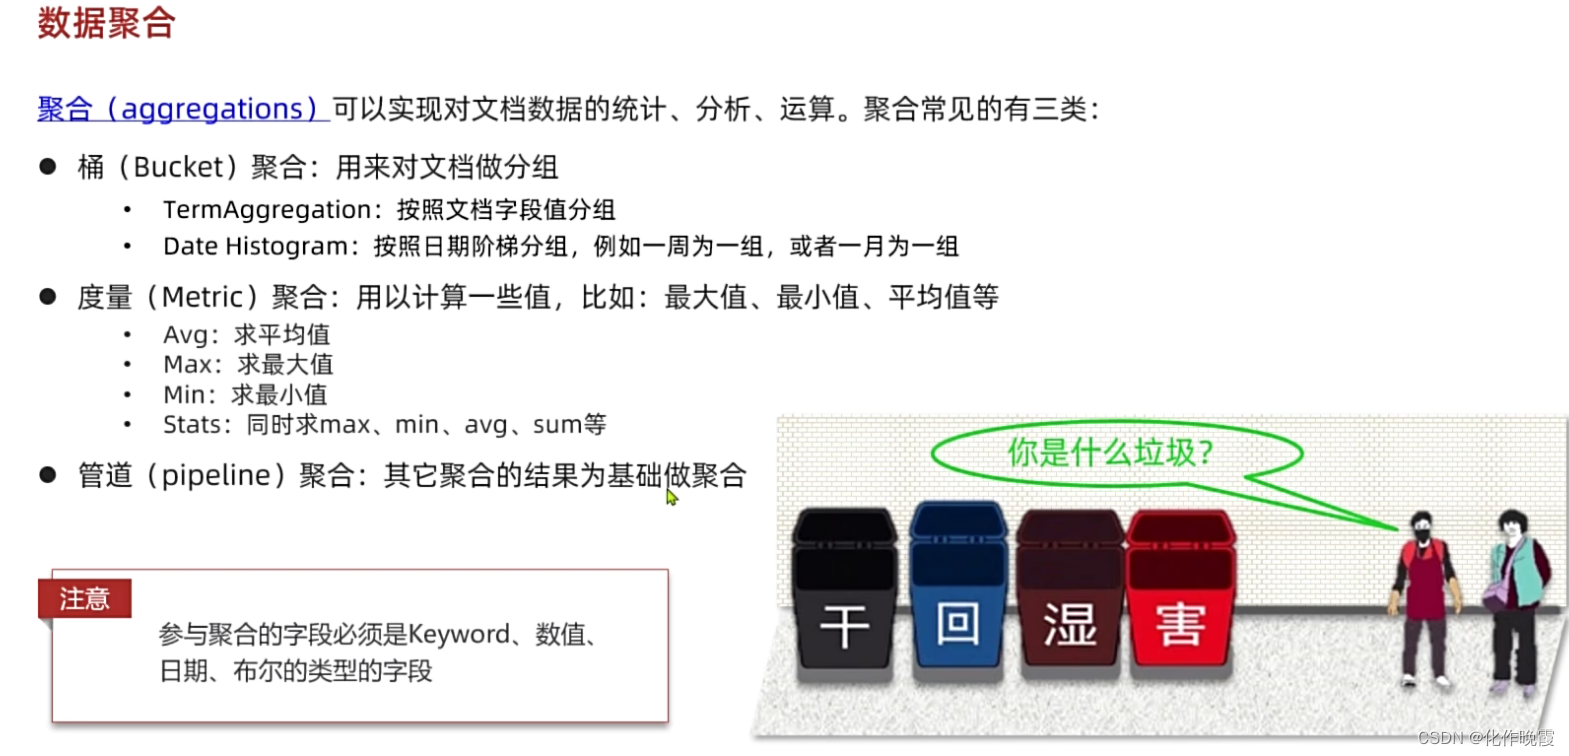
数据聚合
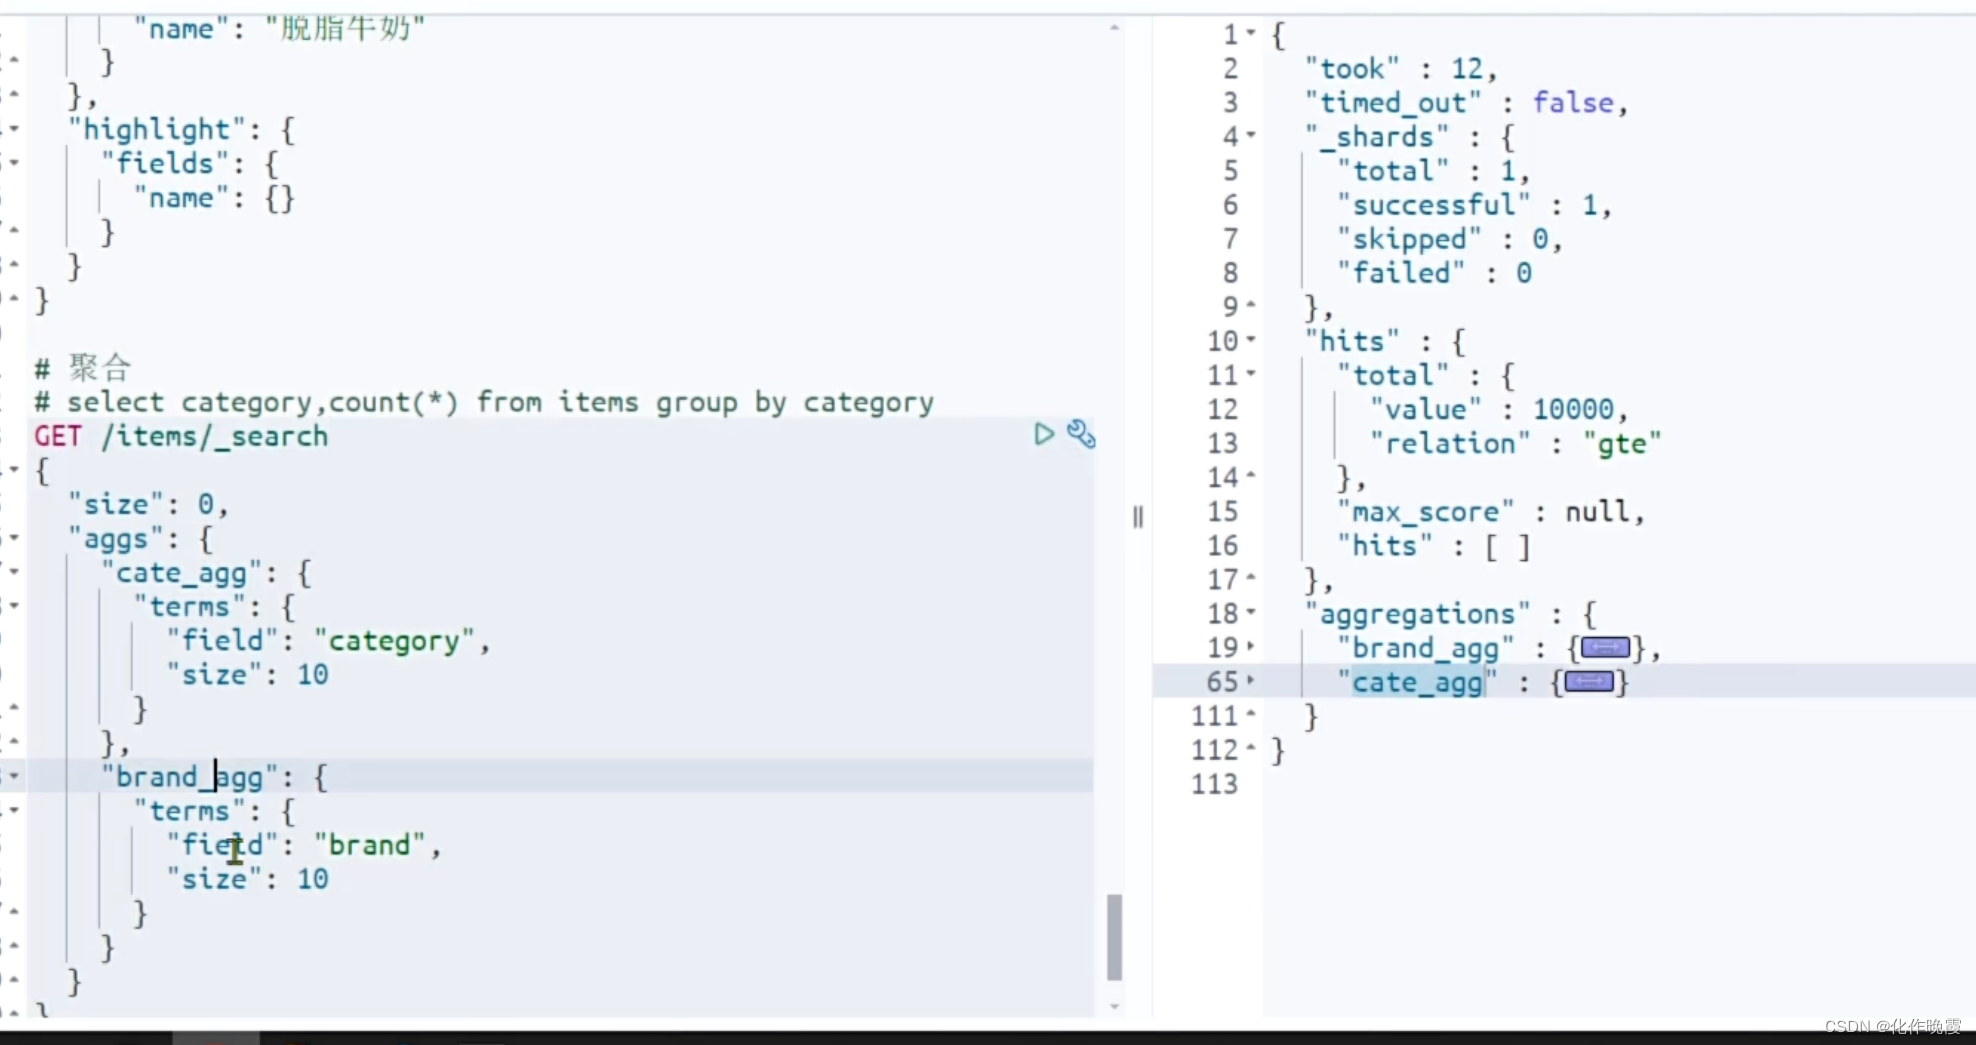
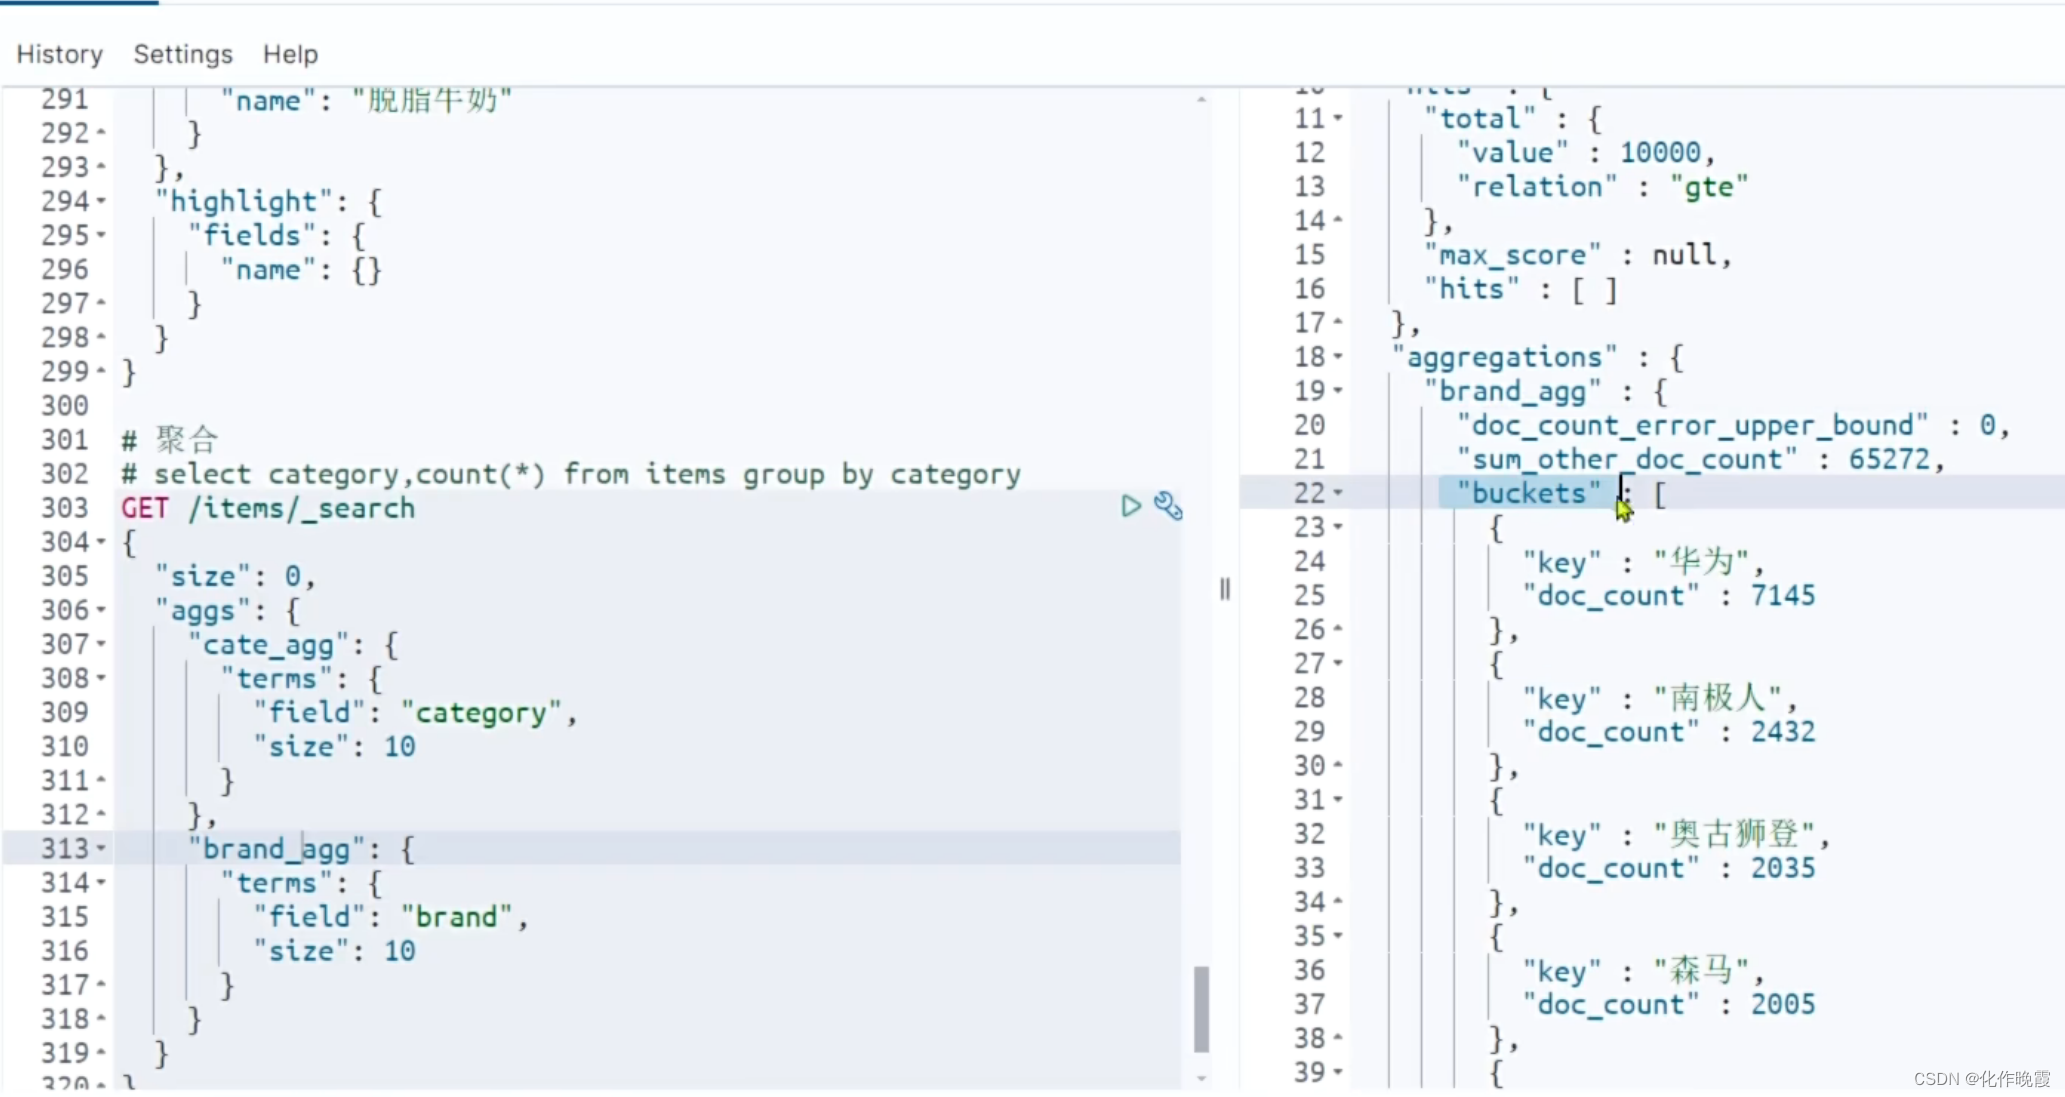
DSL实现聚合
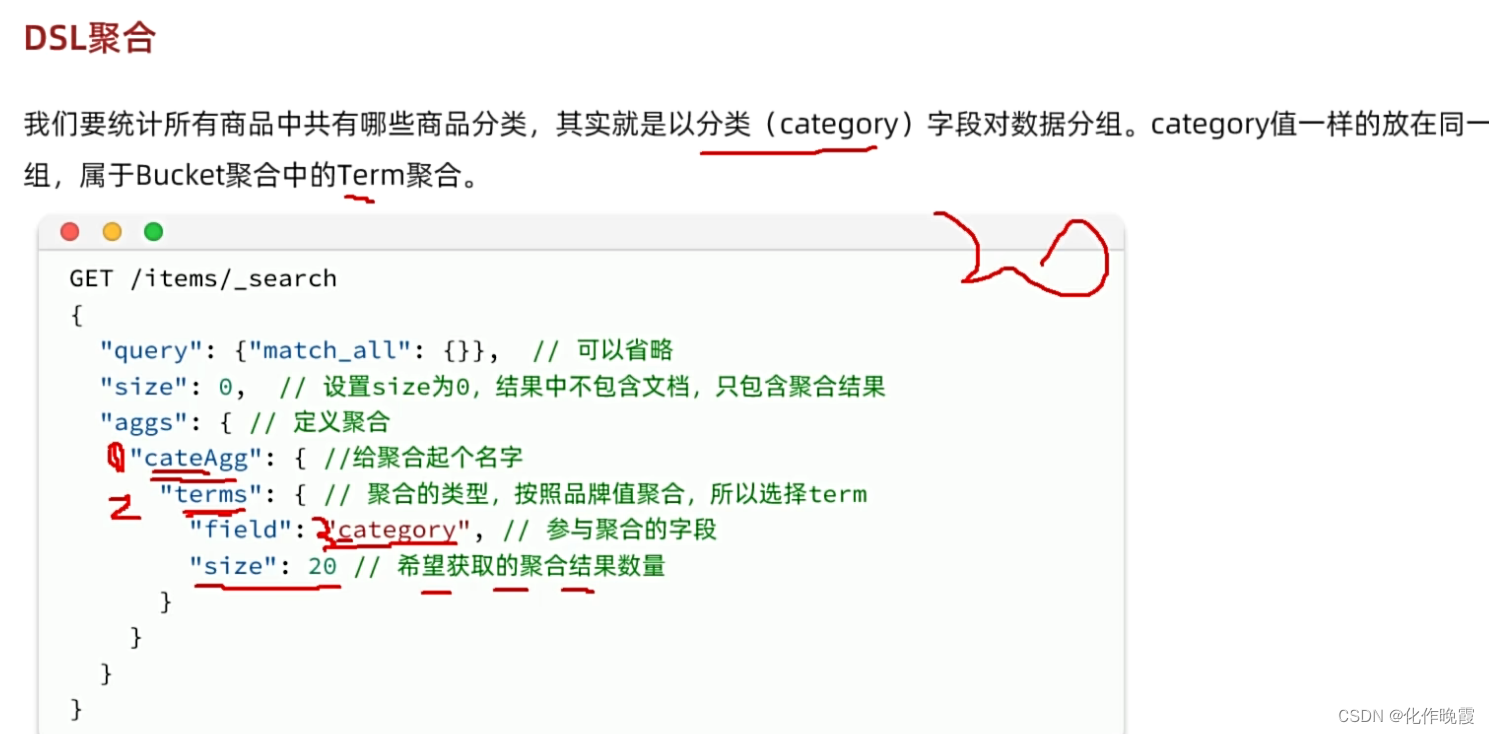
GET /hmall/_search
{
"size": 0,
"aggs": {
"cate_agg": {
"terms": {
"field": "category",
"size": 10
}
},
"brand_agg": {
"terms": {
"field": "brand",
"size": 10
}
}
}
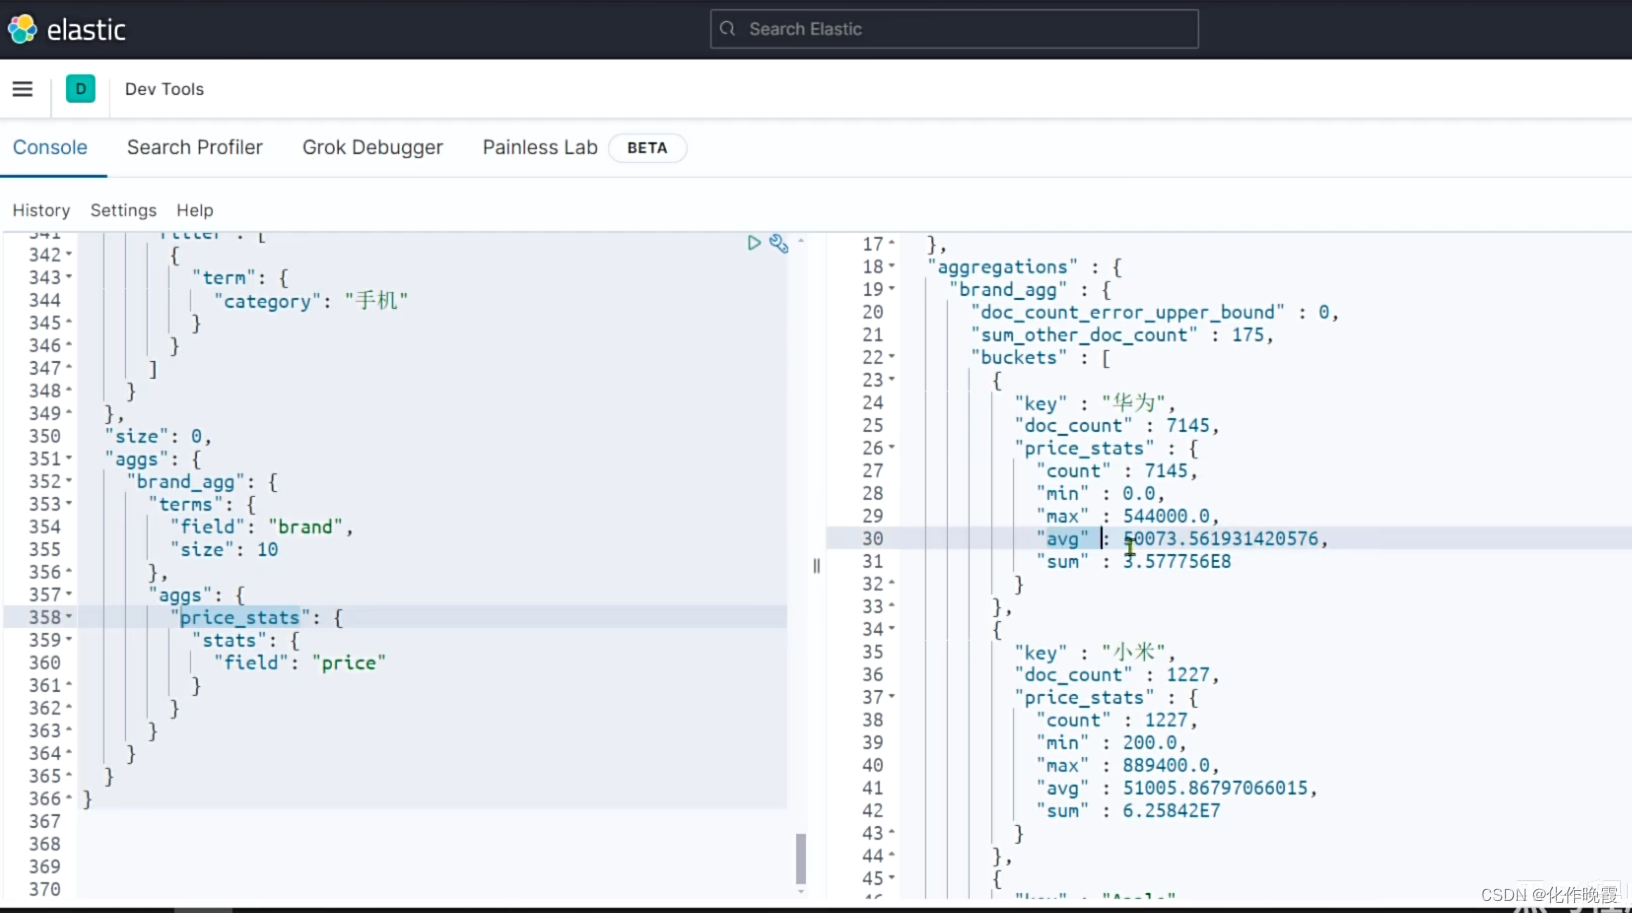
}分组聚合,查询出来的结果就是这样,brand_agg与cate_agg里面装的是数据
我们再打开更里面的数据发现里面是桶,桶里面是数据。
案例:手机价格大于三千的品牌数量。
GET /hmall/_search
{
"query": {
"bool": {
"filter": [{"term": {"category": "手机"}},
{"range": {"price": {"gte": 300000}}}
]
}
},
"size": 0,
"brand_agg": {
"terms": {
"field": "brand",
"size": 10
}
}
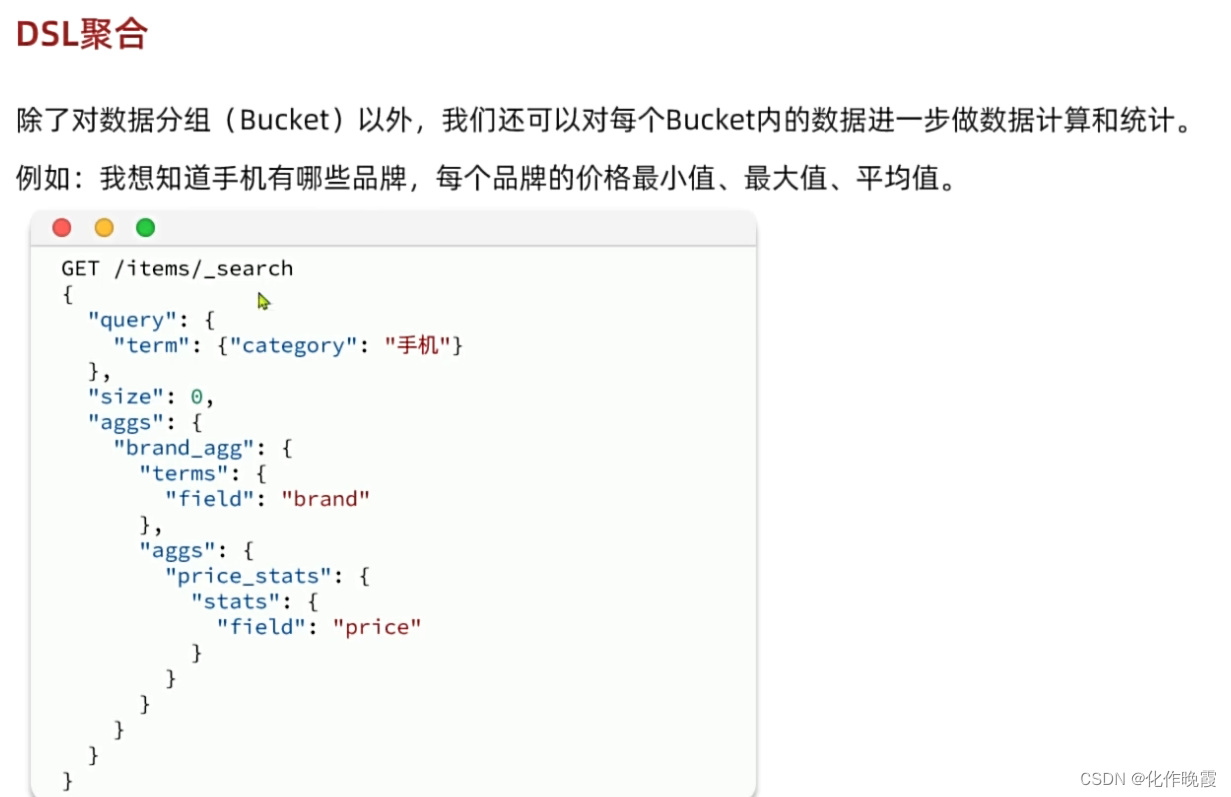
}下面这种类型就是聚合嵌套聚合,原本平级的aggs现在需要嵌套使用。
Java客户端实现聚合
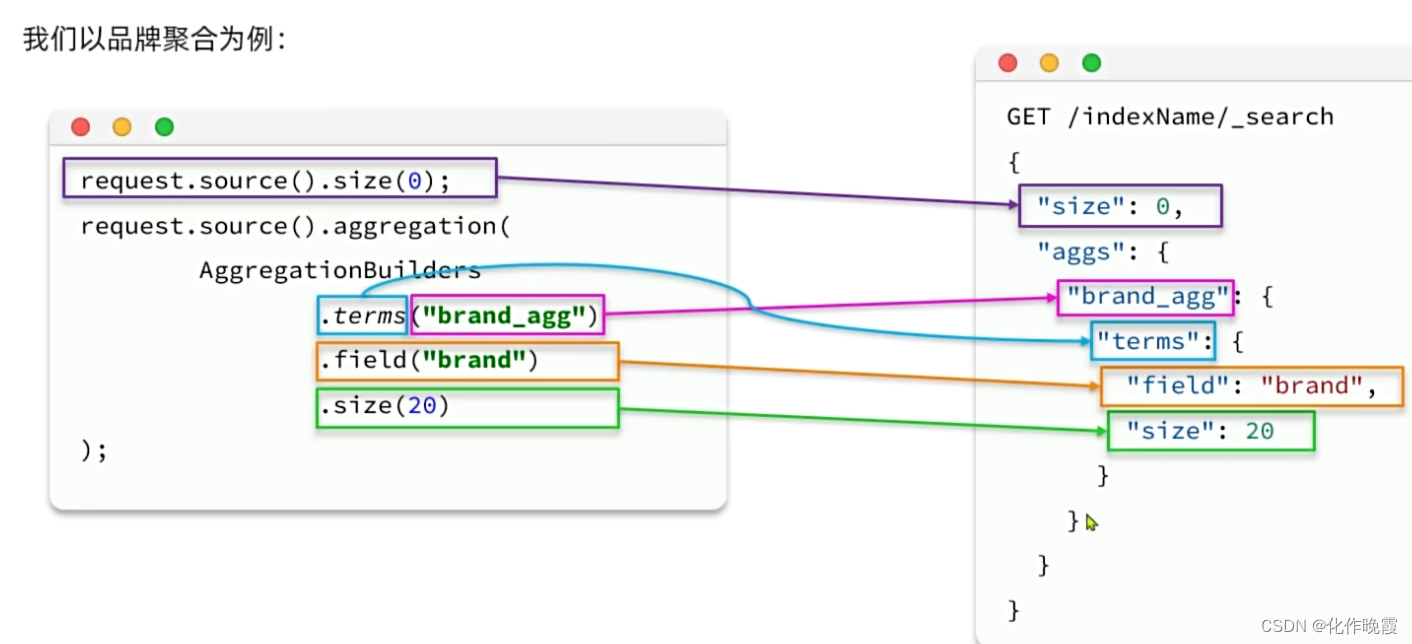
最重要的就是解析结果
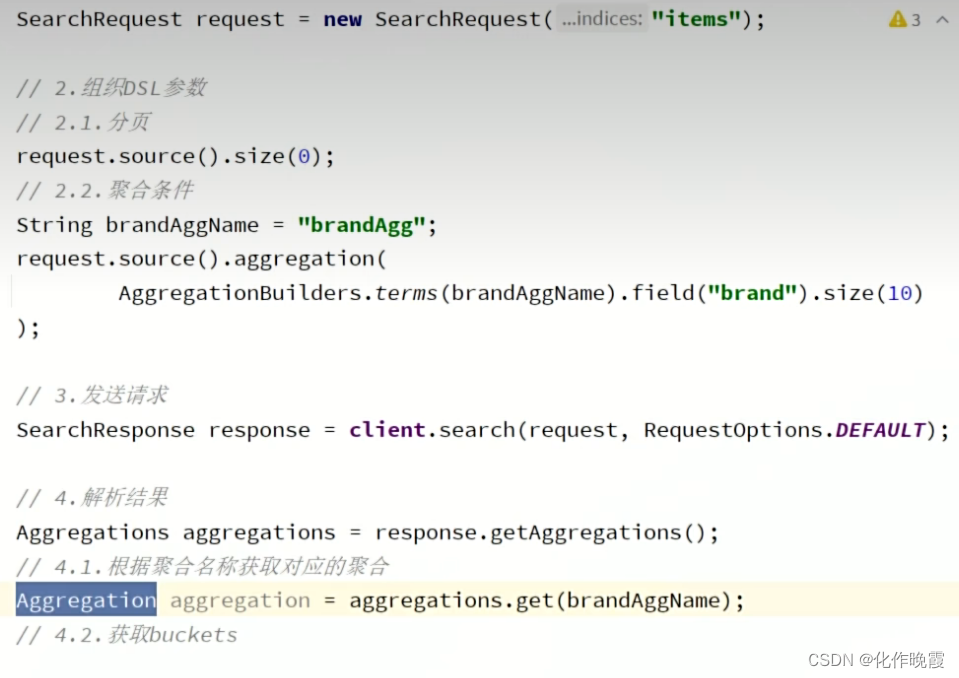
这里我们用Aggregation是所有聚合的父亲,并没有实现桶,所以我们用Terms接收。

切记不同的聚合类型要用不同的去接收。


 6503
6503


 被折叠的 条评论
为什么被折叠?
被折叠的 条评论
为什么被折叠?
 到【灌水乐园】发言


