


| 主机名 | ip | 软件 | |
| 1 | nginx1 | 192.168.100.100 | Nginx,lvs,zabbx-server,zabbix-agent,elasticsearch,logstash |
| 2 | nginx2 | 192.168.100.102 | Nginx,lvs,elk,zabbix-agent,elasticsearch-head,kibana,logstash,nod |
| 3 | tom1 | 192.168.100.103 | Tomcat,redis,mariadb,rsync |
| 4 | tom2 | 192.168.100.104 | Tomcat,redis,mariadb,rsync |
| 5 | tom3 | 192.168.100.105 | Tomcat,redis,mariadb,rsync |
| 6 | tom4 | 192.168.100.106 | Tomcat,redis,mariadb,rsync |
一、两台nginx服务部署并Session复制
1、关闭所有防护墙
systemctl stop firewalld
iptables -F
setenforce 0
Nginx 服务器配置:
yum -y install pcre-devel zlib-devel openssl-devel gcc-c++
2、创建nginx管理用户
useradd -s /sbin/nologin -M nginx
3、解包、配置、编译、安装nginx
tar xf nginx-1.16.0.tar.gz -C /usr/src/
cd /usr/src/nginx-1.16.0/

./configure --prefix=/usr/local/nginx --user=nginx --group=nginx --with-file-aio --with-http_stub_status_module --with-http_ssl_module --with-http_flv_module --with-http_gzip_static_module && make && make install
--prefix=/usr/local/nginx #指定安装目录
--user=nginx --group=nginx
#指定运行的用户和组
--with-file-aio #启用文件修改支持
--with-http_stub_status_module
#启用状态统计
--with-http_ssl_module #启用ssl模块
--with-http_flv_module #启用flv模块,提供寻求内存使用基于时间的偏移量文件
--with-http_gzip_static_module
#启用gzip静态压缩
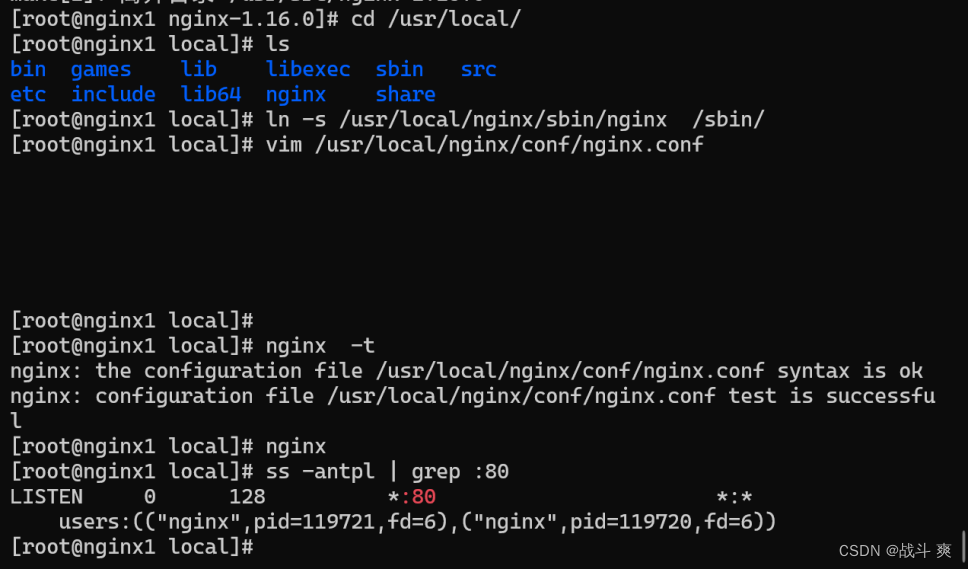
4、优化nginx管理命令
ln -s /usr/local/nginx/sbin/nginx /sbin/

5、修改nginx配置文件
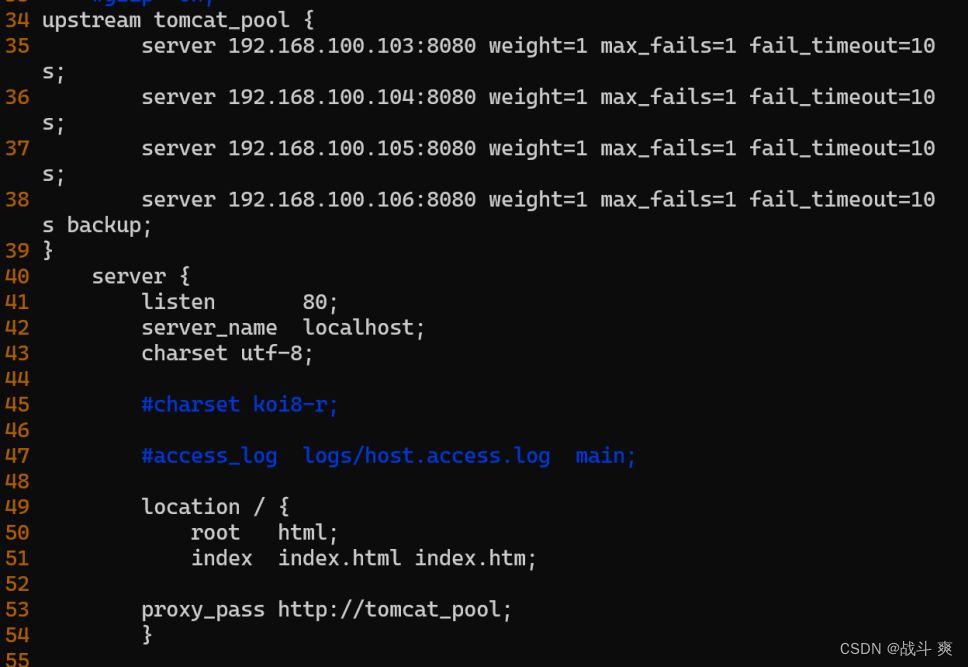
vim /usr/local/nginx/conf/nginx.conf
配置如下:
34 upstream tomcat_pool {
35 server 192.168.100.103:8080 weight=1 max_fails=1 fail_timeout=10 s;
36 server 192.168.100.104:8080 weight=1 max_fails=1 fail_timeout=10 s;
37 server 192.168.100.105:8080 weight=1 max_fails=1 fail_timeout=10 s;
38 server 192.168.100.106:8080 weight=1 max_fails=1 fail_timeout=10 s backup; //预留的备份机器
39 }
40 listen 80;
41 server_name localhost;
42 charset utf-8;
43
44 location / {
45 root html;
46 index index.html index.htm;
47 proxy_pass http://tomcat_pool;
48 }
6、启动nginx
nginx -t
nginx
ss -antpl | grep :80
第二台机器同理
二、安装配置Tomcat服务部署并Session复制、共享:
需要java环境
[root@tom1 ~]# java -version
openjdk version "1.8.0_392"
OpenJDK Runtime Environment (build 1.8.0_392-b08)
OpenJDK 64-Bit Server VM (build 25.392-b08, mixed mode)
[root@tom1 ~]# which java
/usr/bin/java
[root@tom1 ~]# rm -rf /usr/bin/java
[root@tom1 ~]# tar xf jdk-8u91-linux-x64.tar.gz
[root@tom1 ~]# mv jdk1.8.0_91/ /usr/bin/java
[root@tom1 ~]# vim /etc/profile
vim /etc/profile
末行添加
export JAVA_HOME=/usr/bin/java
PATH=$PATH:$JAVA_HOME/bin
[root@tom1 java]# source /etc/profile
[root@tom1 ~]# java -version

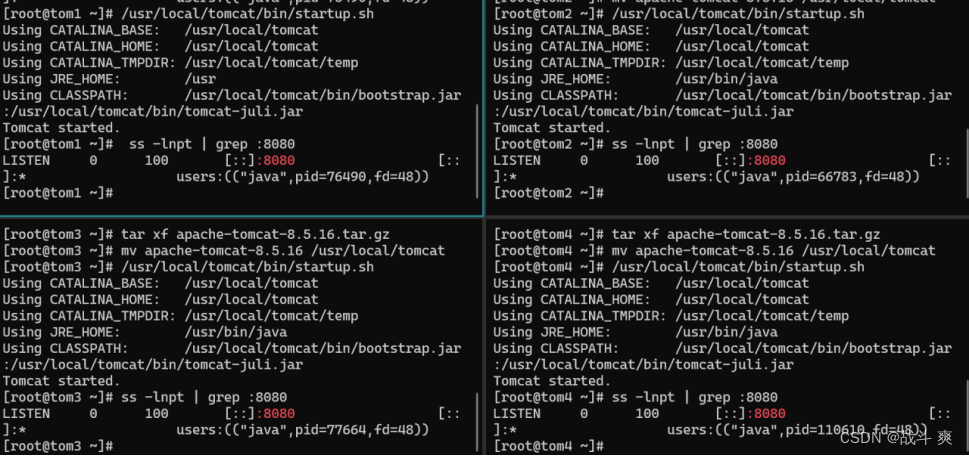
四台均安装配置Tomcat
1、解压apache-tomcat-8.5.16.tar.gz 包
tar xf apache-tomcat-8.5.16.tar.gz
2、解压后生成apache-tomcat-8.5.16文件夹,将该文件夹移动到/usr/local下,并改名为tomcat
mv apache-tomcat-8.5.16 /usr/local/tomcat
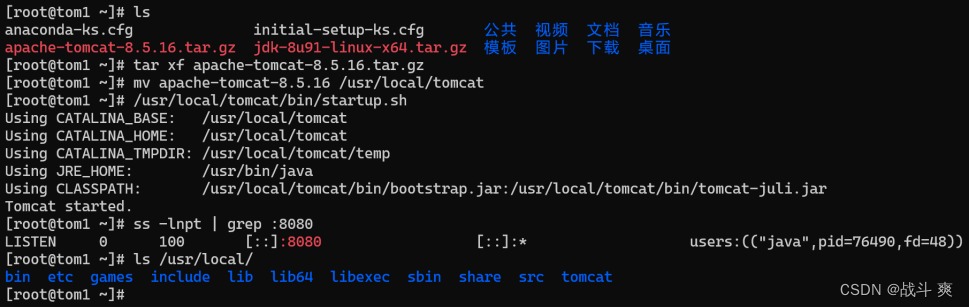
3、启动Tomcat
/usr/local/tomcat/bin/startup.sh
4、查看Tomcat 默认运行在8080端口
ss -lnpt | grep :8080
浏览器访问测试
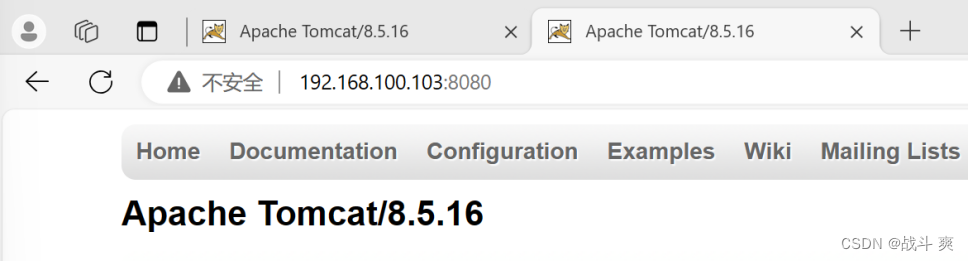
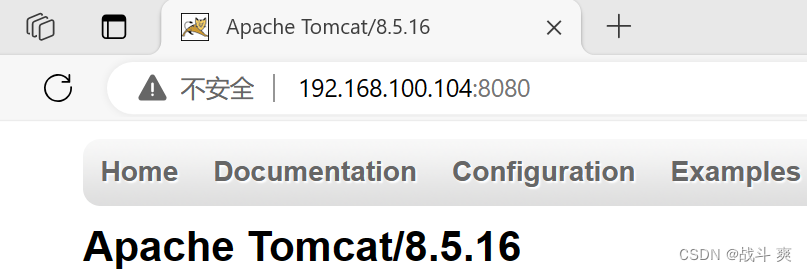

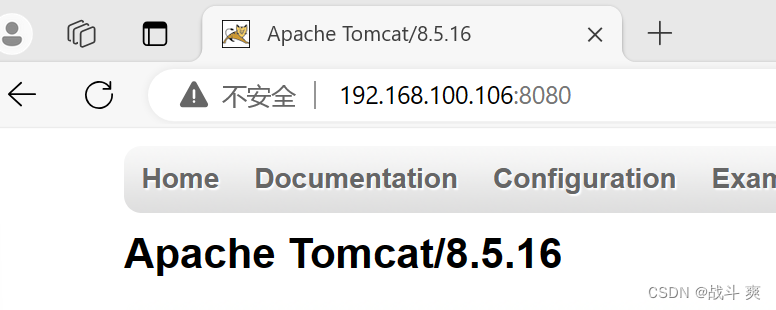
负载均衡测试:
浏览器访问测试
http://192.168.100.100

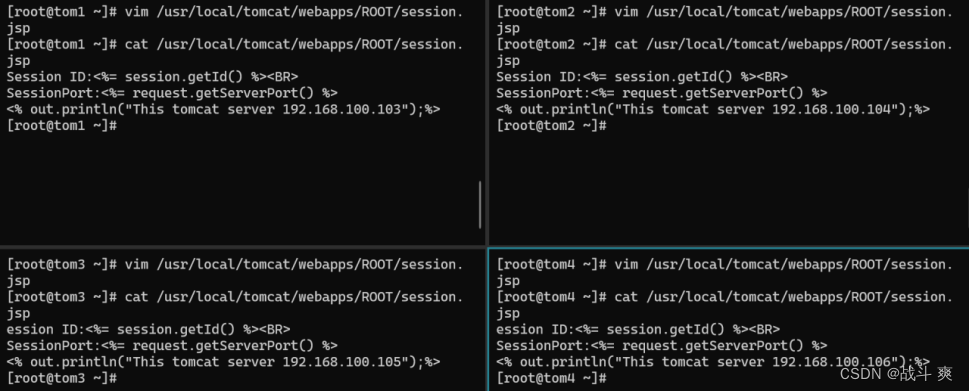
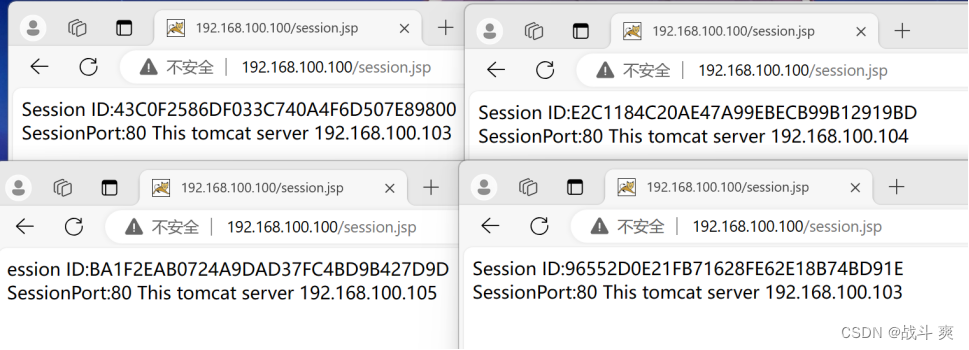
建立session.jsp的测试页面
[root@tom3 src]# vim /usr/local/tomcat/webapps/ROOT/session.jsp
Session ID:<%= session.getId() %><BR>
SessionPort:<%= request.getServerPort() %>
<% out.println("This tomcat server 192.168.100.103");%>
[root@nginx ~]# vim /usr/local/nginx/conf/nginx.conf

访问测试:
192.168.100.100/session.jsp四次访问,session各不相同
192.168.100.106是预留的备份机器
(1)当其他所有的非backup机器出现故障的时候,才会请求backup机器,因此这台机器的访问压力最低。
(2)后续网页更新tomcat升级优先从192.168.100.106这台机器部署
Tomcat支持Session集群,可在各Tomcat服务器间复制全部session信息,当后端一台Tomcat服务器宕机后,Nginx重新调度用户请求分配到另外一台服务器,客户端可从另一台Tomcat服务上获取用户的session信息。
Session集群可在Tomcat服务器规模(一般10台以下)不大时使用,否则会导致Session复制时性能代价过高;
四台修改Tomcat配置文件
vim /usr/local/tomcat/conf/server.xml
配置如下:
将Engine这一行修改为:
<Engine name="Catalina" defaultHost="localhost">
128 <Engine name="Catalina" defaultHost="localhost" jvmRoute="tom1"> #tomcat2 配置为jvmRoute="bdqn3"
134 <Cluster className="org.apache.catalina.ha.tcp.SimpleTcpCluster"/> #去掉注释

tail -2 /usr/local/tomcat/webapps/ROOT/WEB-INF/web.xml
<distributable/> #添加内容
</web-app>

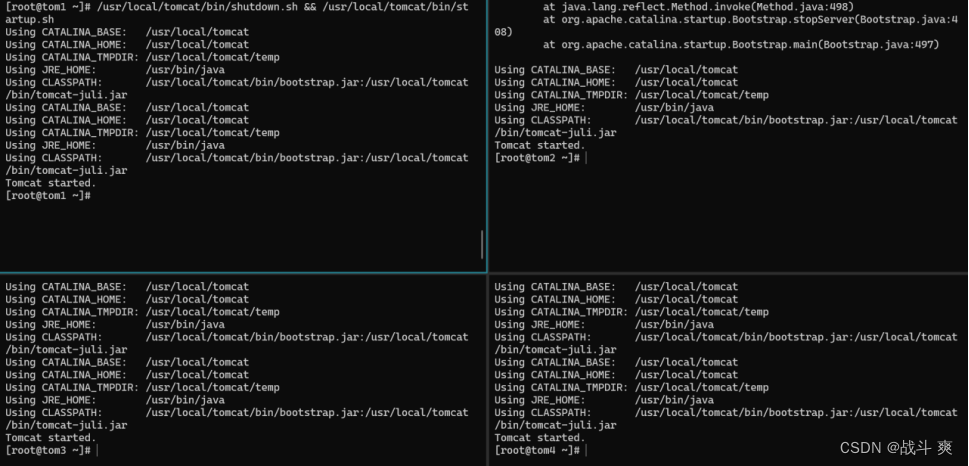
/usr/local/tomcat/bin/shutdown.sh && /usr/local/tomcat/bin/startup.sh
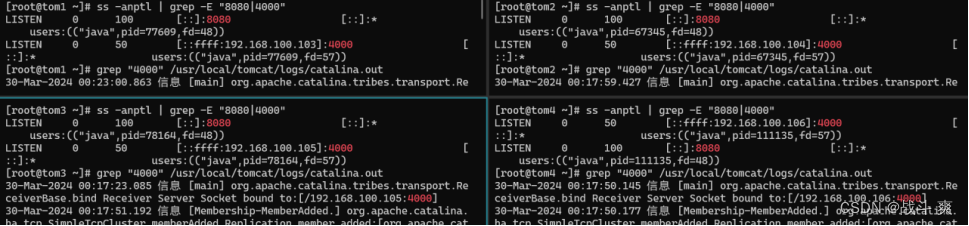
ss -anptl | grep -E "8080|4000"
grep "4000" /usr/local/tomcat/logs/catalina.out
浏览器访问测试
刷新后session ID未发生变化,但是node标签及IP地址在变化

5、Session服务器之Redis
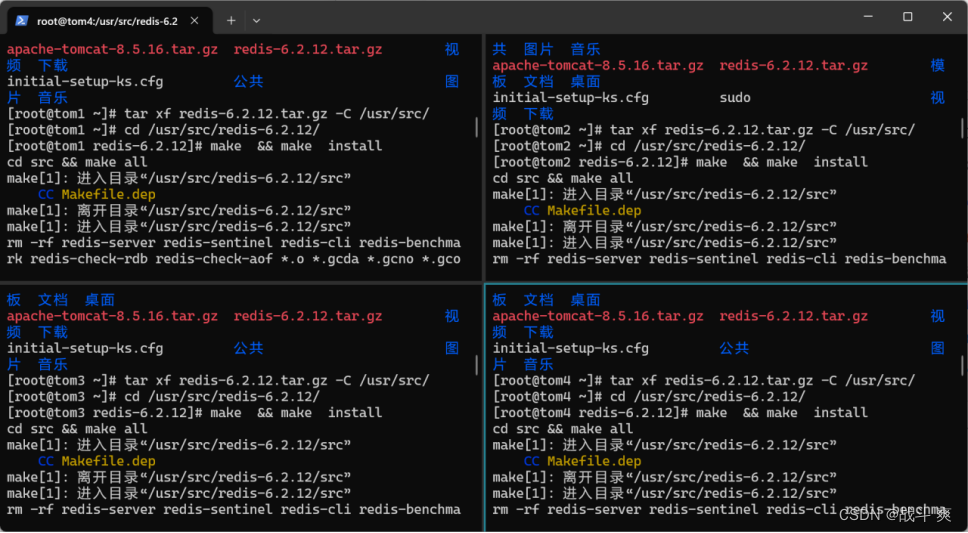
安装部署redis:(四个tomcat服务均安装)
安装依赖: yum -y install wget gcc gcc-c++ make tar openssl openssl-devel cmake zlib-devel pcre-devel
tar xf redis-6.2.12.tar.gz -C /usr/src/
cd /usr/src/redis-6.2.12/
make && make install
mkdir -p /usr/local/redis/{bin,etc,var}
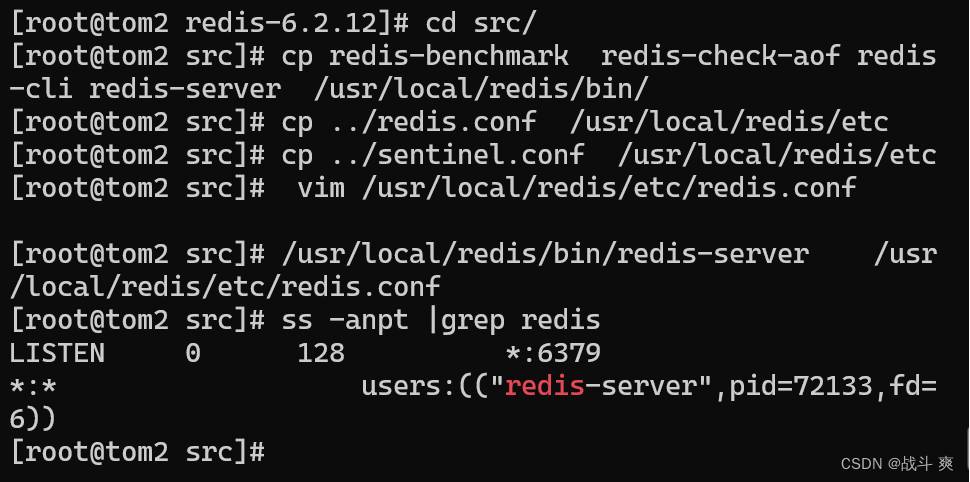
cd src/
cp redis-benchmark redis-check-aof redis-cli redis-server /usr/local/redis/bin/
cp ../redis.conf /usr/local/redis/etc
cp ../sentinel.conf /usr/local/redis/etc
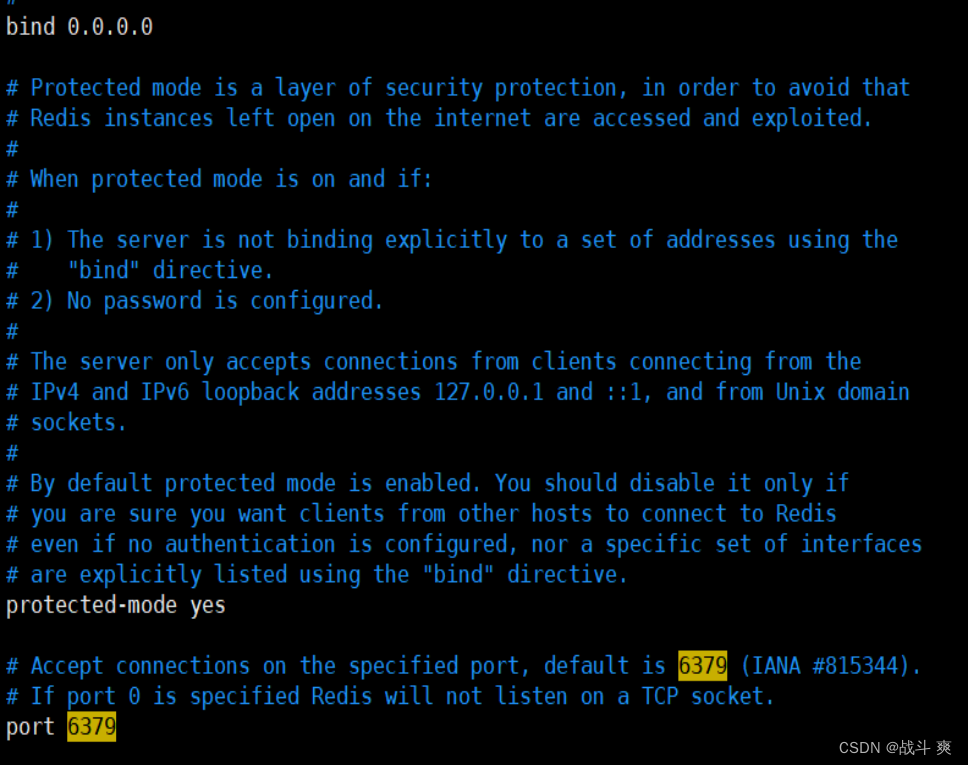
vim /usr/local/redis/etc/redis.conf //修改配置文件
daemonize no 改为 daemonize yes //是否把redis-server启动在后台,默认是“否”。若改成yes,会生成一个pid文件
bind 127.0.0.1 改为 bind 0.0.0.0 //任意主机都可访问
其他的看需要修改
killall -9 redis-server
启动redis:
/usr/local/redis/bin/redis-server
/usr/local/redis/etc/redis.conf
ss -anpt |grep redis
监控redis共享session:
/usr/local/redis/bin/redis-cli -p 6379 monitor

将tomcat需要调用redis的jar包放入tomcat/lib
cp tomcat-redis-session-manage-tomcat7.jar tomcat-juli.jar commons-logging-1.1.3.jar commons-pool2-2.2.jar jedis-2.5.2.jar /usr/local/tomcat/lib

修改context.xml文件以支持调用redis
vim /usr/local/tomcat/conf/context.xml
配置如下:
在Context段中加入以下内容
<Context>
<Valve className="com.orangefunction.tomcat.redissessions.RedisSessionHandlerValve" />
<Manager className="com.orangefunction.tomcat.redissessions.RedisSessionManager"
host="192.168.100.103" # //redis的IP地址
port="6379" # //redis的端口
database="0"
maxInactiveInterval="60" />
</Context>

/usr/local/tomcat/bin/shutdown.sh &&
/usr/local/tomcat/bin/startup.sh
netstat -anpt | grep :6379

浏览器访问测试 http://192.168.100.100/session.jsp

刷新一次:这样就锁定在了105的session id
同理也可以反过来锁定103的session id
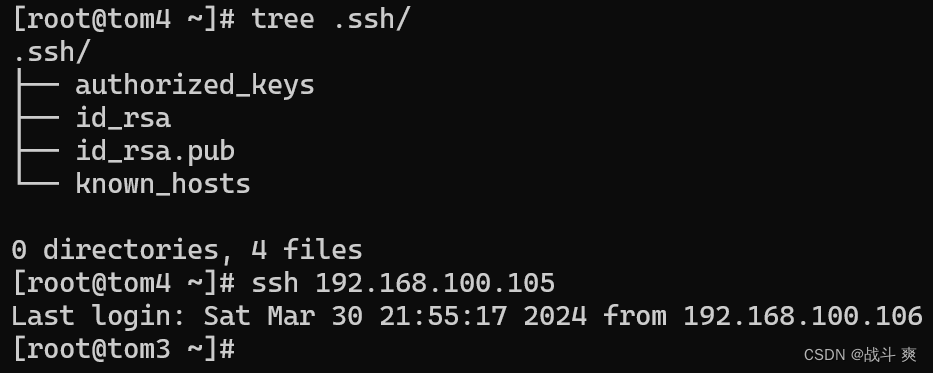
三、rsync远程同步(tom4做服务端,其余客户端)
1.服务端对其他三台进行免密登录
2.查看有无rsync并安装

3.修改配置文件
vim /etc/rsyncd.conf
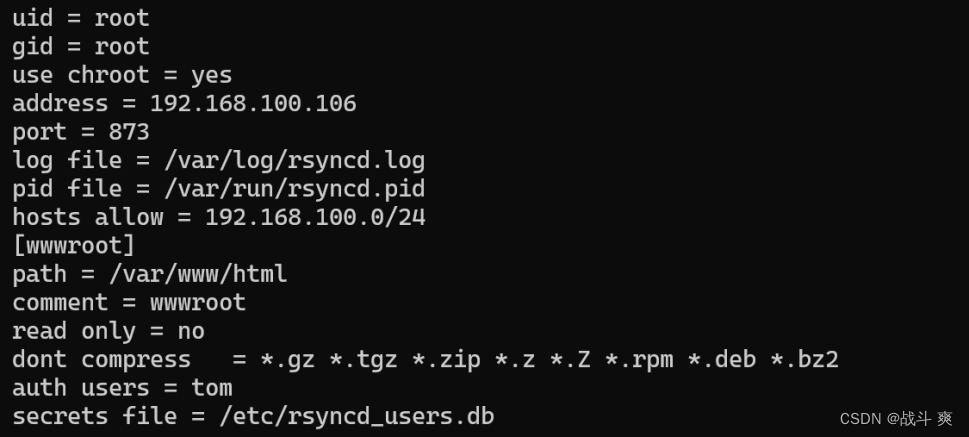
4、建立读取同步账户和密码文件
vim /etc/rsyncd_users.db
tom:123123
chmod 600 /etc/rsyncd_users.db
mkdir -p /var/www/html
rsync --daemon
netstat -lanpt |grep rsync
touch /var/www/html/1.txt

5.(客户端)发起端进行同步:
[root@tom2 ~]# export RSYNC_PASSWORD=123123
[root@tom2 ~]# rsync -avz --delete tom@192.168.100.106::wwwroot /root/wwwroot
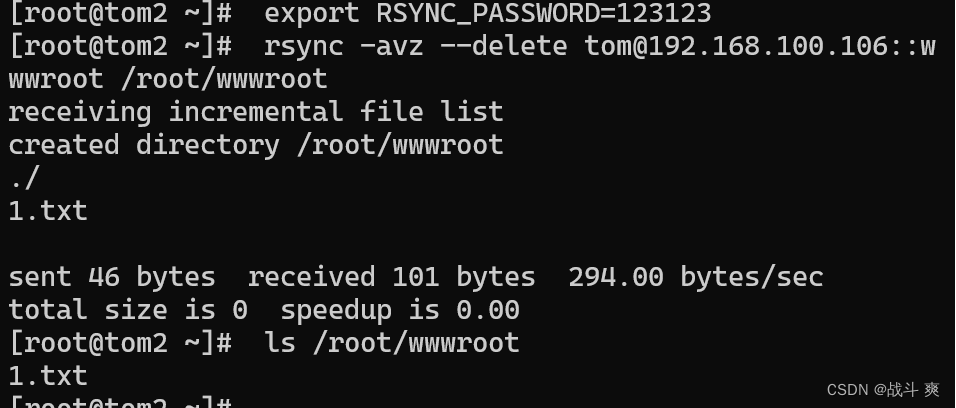
6、发现源更新数据自动触发更新
客户端:
上传 inotify-tools-3.14.tar.gz
tar xf inotify-tools-3.14.tar.gz
cd inotify-tools-3.14
./configure && make && make install (解决依赖,yum -y install gcc-c++)
cd
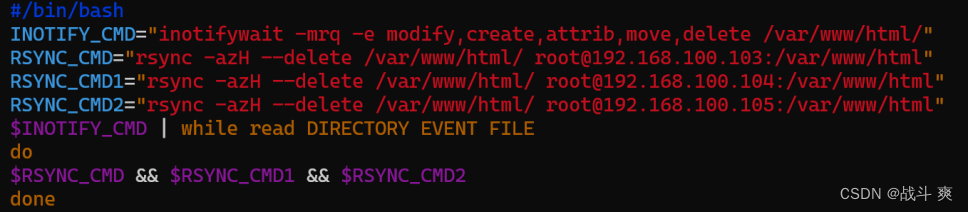
vim /root/rsync.sh
监听脚本:
#/bin/bash
INOTIFY_CMD="inotifywait -mrq -e modify,create,attrib,move,delete /var/www/html/"
RSYNC_CMD="rsync -azH --delete /var/www/html/ root@192.168.100.103:/var/www/html"
RSYNC_CMD1="rsync -azH --delete /var/www/html/ root@192.168.100.104:/var/www/html"
RSYNC_CMD2="rsync -azH --delete /var/www/html/ root@192.168.100.105:/var/www/html"
$INOTIFY_CMD | while read DIRECTORY EVENT FILE
do
$RSYNC_CMD && $RSYNC_CMD1 && $RSYNC_CMD2
done
8、执行脚本,
chmod +x rsync.sh
./rsync.sh
sh b.sh 保持执行状态,新建一个窗口
执行这个脚本sh rsync.sh
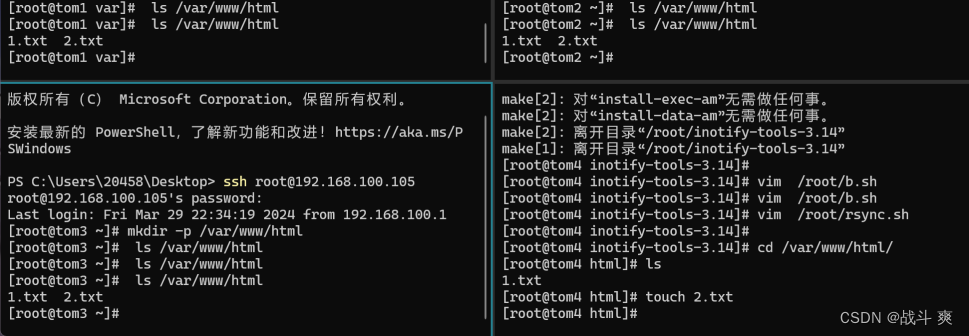
步骤三:在源端的存储位置建立新的文件
客户端验证:验证是否成功
四、keepalived+LVS(DR)搭建部署
创建虚拟vip
cp /etc/sysconfig/network-scripts/ifcfg-lo /etc/sysconfig/network-scripts/ifcfg-lo:0
修改vip
vim /etc/sysconfig/network-scripts/ifcfg-lo:0
配置如下:
DEVICE=lo:0
IPADDR=192.168.100.250
NETMASK=255.255.255.255
ONBOOT=yes
NAME=loopback:0

6、重启网卡
systemctl restart network
7、添加路由
route add -host 192.168.100.250/32 dev lo:0
8、查看路由:
route -n
看到如下即可:
Kernel IP routing table
Destination Gateway Genmask Flags Metric Ref Use Iface
192.168.100.250 0.0.0.0 255.255.255.255 UH 0 0 0 lo

LVS服务器主库配置:
1、安装keepalived ipvsadm
yum -y install keepalived ipvsadm
2、修改keepalived
vim /etc/keepalived/keepalived.conf
配置如下:
! Configuration File for keepalived
global_defs {
router_id LVS_DEVEL1
}
vrrp_instance master {
state MASTER
interface ens33
virtual_router_id 51
priority 100
advert_int 1
authentication {
auth_type PASS
auth_pass 1111
}
virtual_ipaddress {
192.168.100.250
}
}
virtual_server 192.168.100.250 80 {
delay_loop 6
lb_algo rr
lb_kind DR
#persistence_timeout 50
protocol TCP
real_server 192.168.100.100 80 {
weight 1
HTTP_GET {
url {
path /
}
connect_timeout 3
nb_get_retry 3
delay_before_retry 3
}
}
real_server 192.168.100.102 80 {
weight 1
HTTP_GET {
url {
path /
}
connect_timeout 3
nb_get_retry 3
delay_before_retry 3
}
}
}
3、启动服务
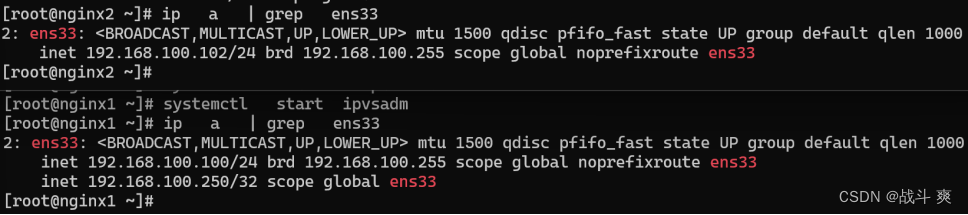
touch /etc/sysconfig/ipvsadm
systemctl start keepalived
systemctl start ipvsadm
4、master和backup加载ip_vs模块
modprobe ip_vs
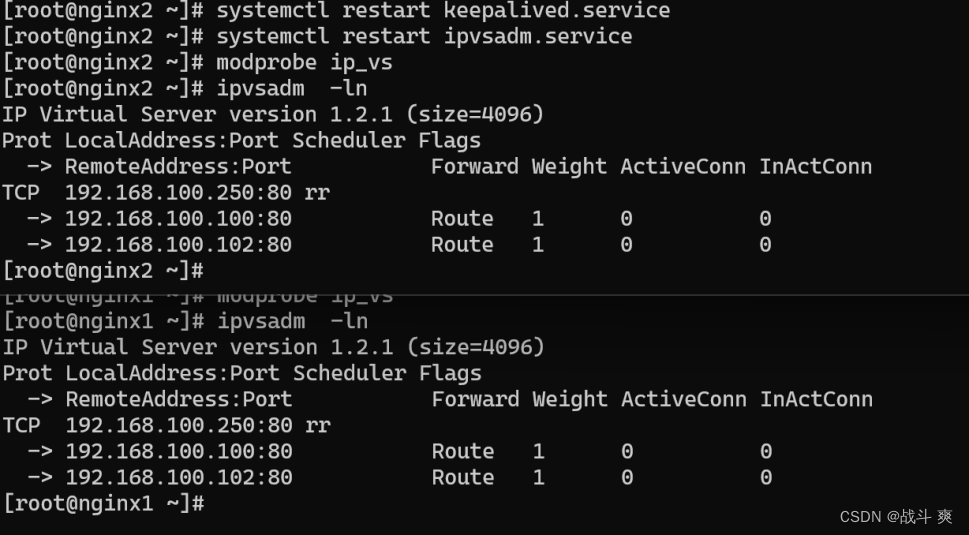
5、查看lvs节点状态
ipvsadm -ln
看到如下即可:
IP Virtual Server version 1.2.1 (size=4096)
Prot LocalAddress:Port Scheduler Flags
-> RemoteAddress:Port Forward Weight ActiveConn InActConn
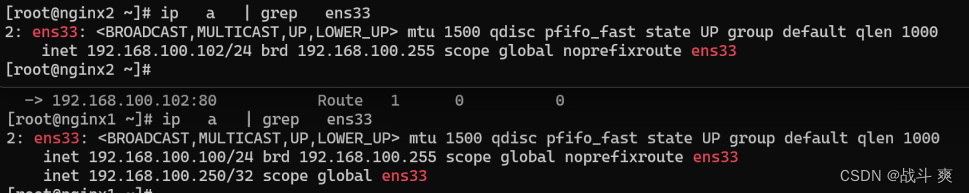
TCP 192.168.100.250:80 rr
-> 192.168.100.100:80 Route 1 0 0
-> 192.168.100.102:80 Route 1 0 0
LVS服务器备库配置:
1、安装keepalived ipvsadm
yum -y install keepalived ipvsadm
2、修改keepalived
vim /etc/keepalived/keepalived.conf
配置如下:
! Configuration File for keepalived
global_defs {
router_id LVS_DEVEL2
}
vrrp_instance backup {
state BACKUP
interface ens33
virtual_router_id 51
priority 99
advert_int 1
authentication {
auth_type PASS
auth_pass 1111
}
virtual_ipaddress {
192.168.100.250
}
}
virtual_server 192.168.100.250 80 {
delay_loop 6
lb_algo rr
lb_kind DR
#persistence_timeout 50
protocol TCP
real_server 192.168.100.100 80 {
weight 1
HTTP_GET {
url {
path /
}
connect_timeout 3
nb_get_retry 3
delay_before_retry 3
}
}
real_server 192.168.100.102 80 {
weight 1
HTTP_GET {
url {
path /
}
connect_timeout 3
nb_get_retry 3
delay_before_retry 3
}
}
}
3、启动服务
touch /etc/sysconfig/ipvsadm
systemctl start keepalived
systemctl start ipvsadm
4、master和backup加载ip_vs模块
modprobe ip_vs
5、查看lvs节点状态
ipvsadm -ln
看到如下即可:
IP Virtual Server version 1.2.1 (size=4096)
Prot LocalAddress:Port Scheduler Flags
-> RemoteAddress:Port Forward Weight ActiveConn InActConn
TCP 192.168.100.250:80 rr
-> 192.168.100.100:80 Route 1 0 0
-> 192.168.100.102:80 Route 1 0 0
宕机测试验证:vip的跳转
在LVS主库服务器上查看

五、Zabbix监控nginx(监控nginx1跟nginx2)
| 192.168.100.100 | nginx1 server agent |
| 192.168.100.102 | nginx2 agent |
配置本地hosts文件(为后面监控其他服务器做准备)
vim /etc/hosts
配置如下:
192.168.100.100 nginx1
192.168.100.102 nginx2
192.168.100.103 tom1
192.168.100.104 tom2
192.168.100.105 tom3
192.168.100.106 tom4
192.168.100.107 db1
192.168.100.108 db2
安装lamp平台及所需要的依赖
yum install -y httpd mariadb-server mariadb mariadb-devel php php-mbstring php-mysql php-bcmath php-gd php-xmlrpc php-ldap php-xml libevent libevent-devel net-snmp net-snmp-devel libxml2 libxml2-devel ntpdate curl-devel gcc-c++
启动LAMP对应服务
systemctl start mariadb
systemctl enable mariadb
systemctl start httpd
vim /etc/httpd/conf/httpd.conf
![]()
因为之前nginx已经启动更换端口号为81
执行semanage port -l|grep http命令

更换以内端口号
systemctl enable httpd
mysqladmin -u root password 123123
删除后重新部署java环境
[root@nginx1 ~]# java -version
[root@nginx1 ~]# javac -version
bash: javac: 未找到命令...
相似命令是: 'java'
[root@nginx1 ~]# which java
/usr/bin/java
[root@nginx1 ~]# rm -rf /usr/bin/java
[root@nginx1 ~]# tar xf jdk-8u91-linux-x64.tar.gz
[root@nginx1 ~]# mv jdk1.8.0_91/ /usr/local/java
[root@nginx1 ~]# vim /etc/profile

[root@nginx1 ~]# source /etc/profile
[root@nginx1 ~]# java -version
java version "1.8.0_91"
Java(TM) SE Runtime Environment (build 1.8.0_91-b14)
Java HotSpot(TM) 64-Bit Server VM (build 25.91-b14, mixed mode)
[root@nginx1 ~]# javac -version
javac 1.8.0_91
源码安装zabbix(解包、配置、编译、安装)
wget https://cdn.zabbix.com/zabbix/sources/oldstable/3.4/zabbix-3.4.11.tar.gz
tar xf zabbix-3.4.11.tar.gz -C /usr/src/
cd /usr/src/zabbix-3.4.11/
./configure --prefix=/usr/local/zabbix --enable-server --enable-agent --with-mysql --enable-ipv6 --with-net-snmp --with-libcurl --with-libxml2 --enable-java && make -j2 && make install
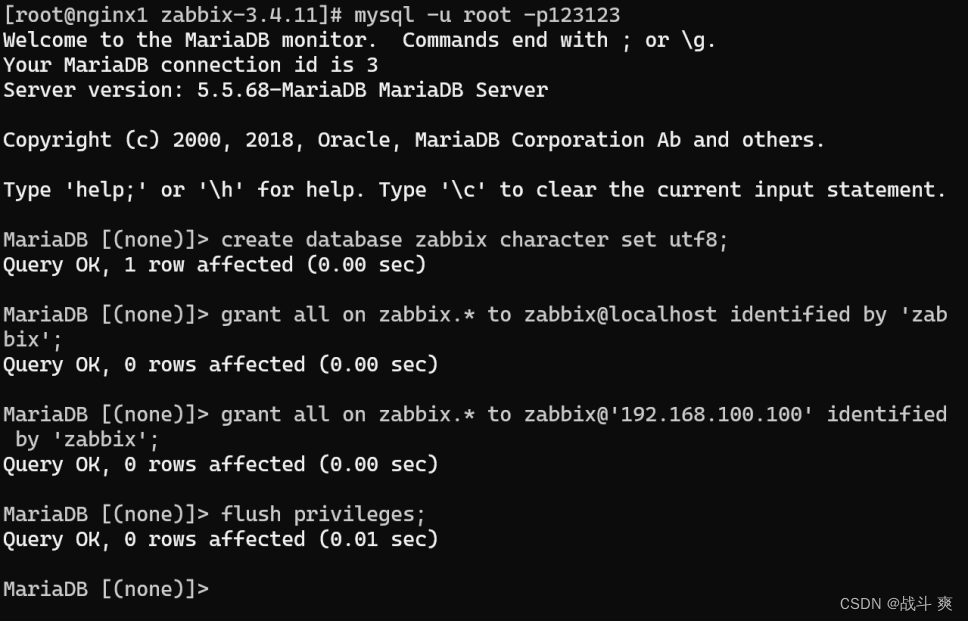
Mariadb数据库授权
mysql -u root -p123123
create database zabbix character set utf8;
grant all on zabbix.* to zabbix@localhost identified by 'zabbix';
grant all on zabbix.* to zabbix@'192.168.100.100' identified by 'zabbix';
//此步骤是为zabbix_server启动授权
flush privileges;
cd /usr/src/zabbix-3.4.11/
导入zabbix需要的mysql数据
mysql -uzabbix -pzabbix zabbix < database/mysql/schema.sql
mysql -uzabbix -pzabbix zabbix < database/mysql/images.sql
mysql -uzabbix -pzabbix zabbix < database/mysql/data.sql
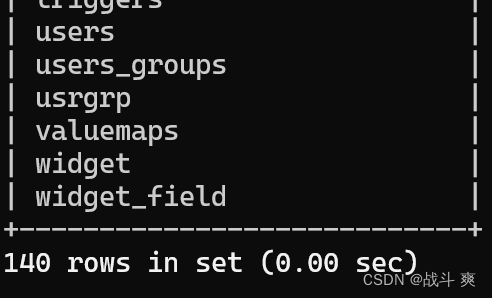
登录查看
mysql -u root -p123123
use zabbix;
show tables;
创建zabbix程序用户并授权防止权限报错
useradd -M -s /sbin/nologin zabbix
cd /usr/local/zabbix/
mkdir logs
chown -R zabbix:zabbix ../zabbix/
cp -p etc/zabbix_server.conf{,.bak} 做备份操作
cp -p etc/zabbix_agentd.conf{,.bak}
修改zabbix配置文件
cd /usr/local/zabbix/etc
vim zabbix_server.conf(服务端)
配置如下:
38 LogFile=/usr/local/zabbix/logs/zabbix_server.log
68 PidFile=/tmp/zabbix_server.pid
85 DBHost=192.168.100.100
95 DBName=zabbix
111 DBUser=zabbix
118 DBPassword=zabbix
126 DBSocket=/var/lib/mysql/mysql.sock
586 Include=/usr/local/zabbix/etc/zabbix_server.conf.d/*.conf
注 释:
LogFile=/usr/local/zabbix/logs/zabbix_server.log #指定zabbix日志位置
PidFile=/tmp/zabbix_server.pid #指定zabbix pid文件位置
DBHost=192.168.100.100 #指定数据库主机
DBName=zabbix #指定数据库名为zabbix
DBUser=zabbix #指定用户为zabbix
DBPassword=zabbix #指定密码为zabbix
DBSocket=/var/lib/mysql/mysql.sock #指定mariadb数据库的sock文件
Include=/usr/local/zabbix/etc/zabbix_server.conf.d/*.conf
vim zabbix_agentd.conf(客户端)
配置如下:
11 PidFile=/tmp/zabbix_agentd.pid
30 LogFile=/usr/local/zabbix/logs/zabbix_agentd.log
93 Server=127.0.0.1,192.168.100.100
134 ServerActive=192.168.100.100
145 Hostname=zab-ser #指定zabbixserver主机名
265 Include=/usr/local/zabbix/etc/zabbix_agentd.conf.d/*.conf
ln -s /usr/local/zabbix/sbin/* /usr/local/bin
zabbix_server 命令做软连接之后启动
zabbix_agentd
配置php与apache
mv /usr/src/zabbix-3.4.11/frontends/php/ /var/www/html/zabbix
chown -R apache:apache /var/www/html/zabbix
修改php配置文件
vim /etc/php.ini
配置如下:
384 max_execution_time = 300 ##单位秒,通过POST、GET以及PUT方式接收数据时间进行限制
394 max_input_time = 300 ##php程序上传文件解析数据时的时间限制
405 memory_limit = 128M ##设置php程序的内存限制
672 post_max_size = 32M ##POST 方式请求数据所允许的最大大小
854 extension=bcmath.so ##加载zabbix程序需要加载的扩展模块bcmath.so手动添加
878 date.timezone = Asia/Shanghai ##时区
重启httpd服务,查看端口
systemctl restart httpd
netstat -anpt | egrep ':10050|:10051|:81'
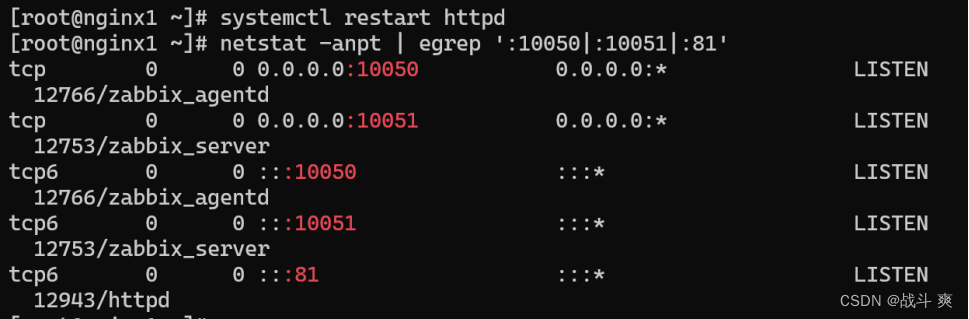
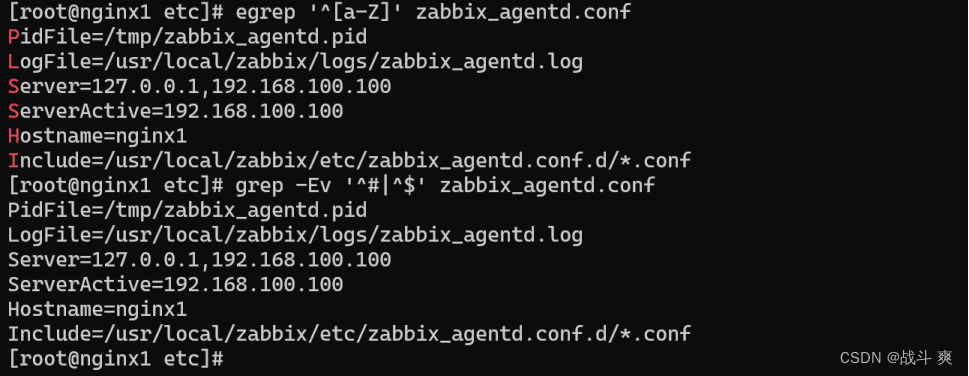
[root@zab-ser etc]# egrep '^[a-Z]' zabbix_agentd.conf
[root@zab-ser etc]# grep -Ev '^#|^$' zabbix_agentd.conf

刷新界面,显示中文信息

2、解决中文乱码问题
cd /var/www/html/zabbix/fonts/
上传一个字体,如下

替换字体,更改属组
chown -R apache:apache *
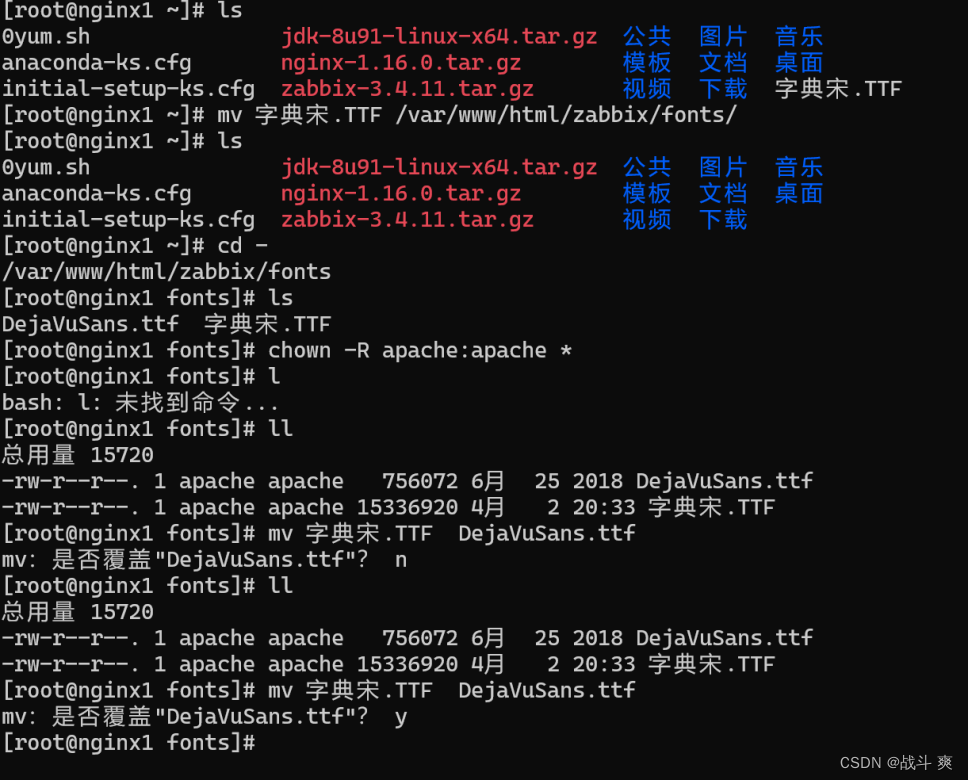
刷新验证:(已经变成中文了)
监控linux主机:
【agent端配置】(监控第二台linux服务器)
wget https://cdn.zabbix.com/zabbix/sources/oldstable/3.4/zabbix-3.4.11.tar.gz
1、源码安装zabbix(解包、编译、配置、安装)
yum -y install libxml2-devel libcurl-devel pcre-devel ntpdate curl-devel gcc-c++ zlib-devel pcre-devel //安装依赖包
ntpdate s1a.time.edu.cn //联网时间同步清华大学源
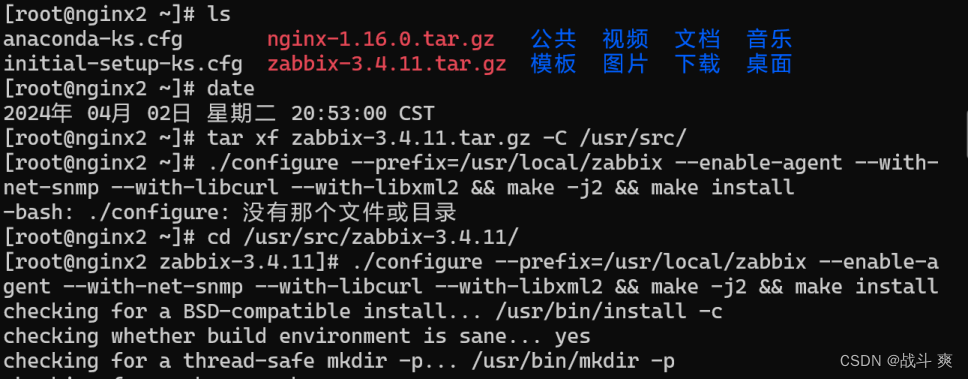
tar xf zabbix-3.4.11.tar.gz -C /usr/src/
cd /usr/src/zabbix-3.4.11/
./configure --prefix=/usr/local/zabbix --enable-agent --with-net-snmp --with-libcurl --with-libxml2 && make -j2 && make install
注释:--enable-agent 启用agent
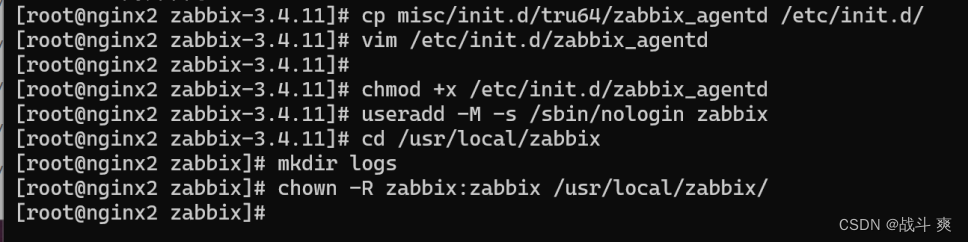
cp misc/init.d/tru64/zabbix_agentd /etc/init.d/ //复制启动脚本
vim /etc/init.d/zabbix_agentd
24 DAEMON=/usr/local/zabbix/sbin/zabbix_agentd //更改为安装路径

chmod +x /etc/init.d/zabbix_agentd //添加执行权限
useradd -M -s /sbin/nologin zabbix //创建程序用户
cd /usr/local/zabbix
mkdir logs
chown -R zabbix:zabbix /usr/local/zabbix/
//授权安装目录

2、改agent配置文件
cp /usr/local/zabbix/etc/zabbix_agentd.conf{,.bak}
vim /usr/local/zabbix/etc/zabbix_agentd.conf
配置如下:
11 PidFile=/tmp/zabbix_agentd.pid
93 Server=192.168.100.100
134 ServerActive=192.168.100.100
145 Hostname=nginx2
30 LogFile=/usr/local/zabbix/logs/zabbix_agentd.log
265Include=/usr/local/zabbix/etc/zabbix_agentd.conf.d/*.conf
3、启动服务
service zabbix_agentd start //启动agent客户端
Zabbix agent started.
netstat -antp | grep 10050
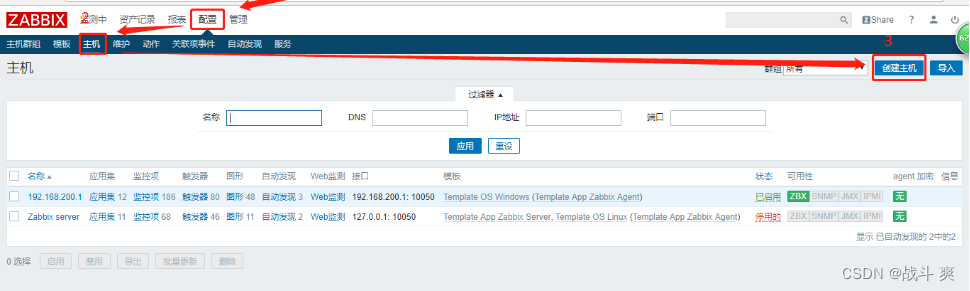
图形操作:
配置--->主机--->创建主机
nginx2--->linux server--->192.168.100.100--->添加
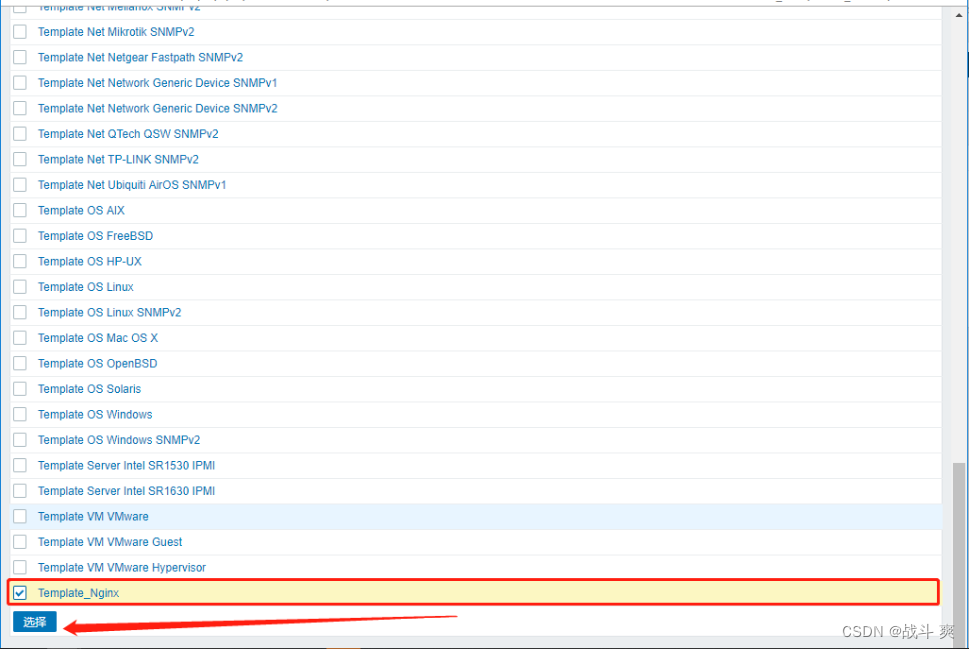
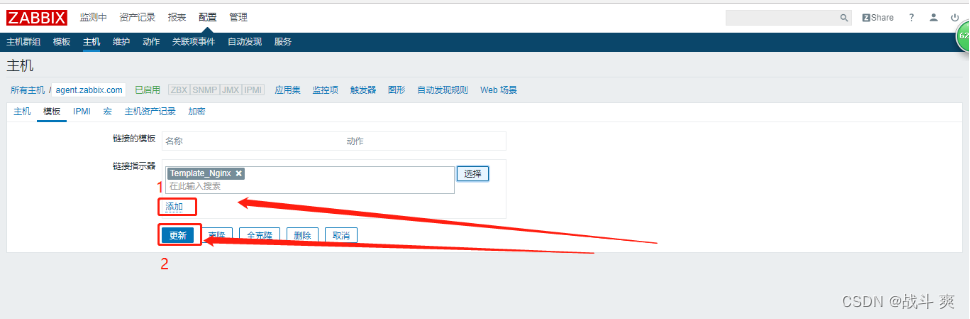
配置模板:添加之后更新
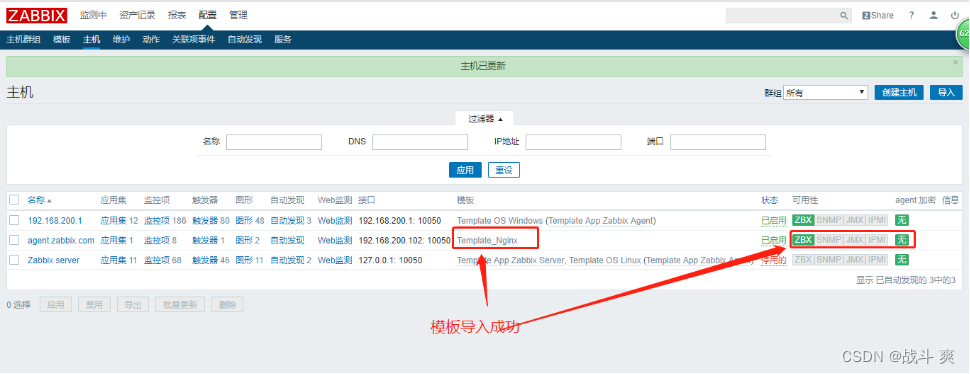
刷新到ZBX变绿,如下:

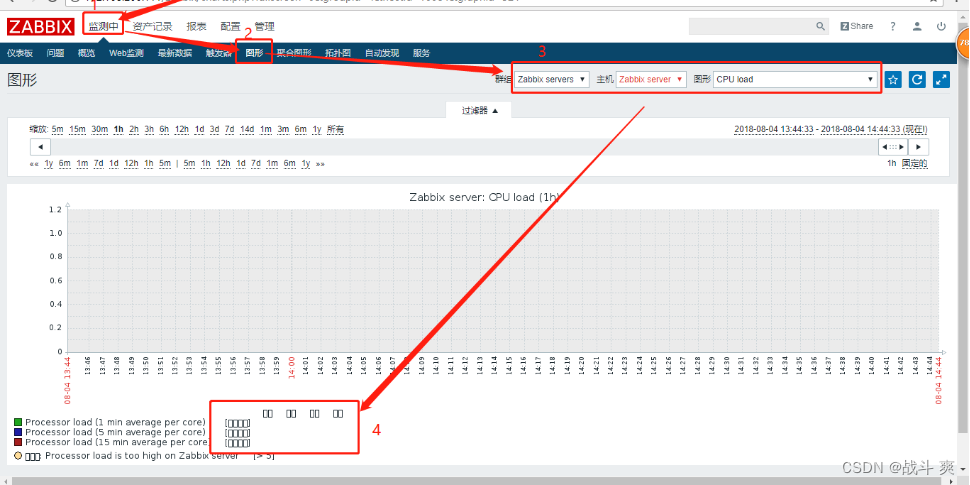
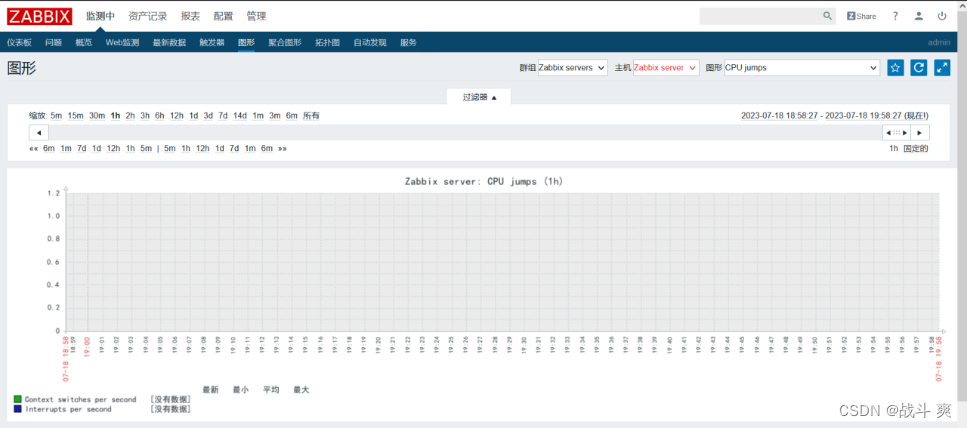
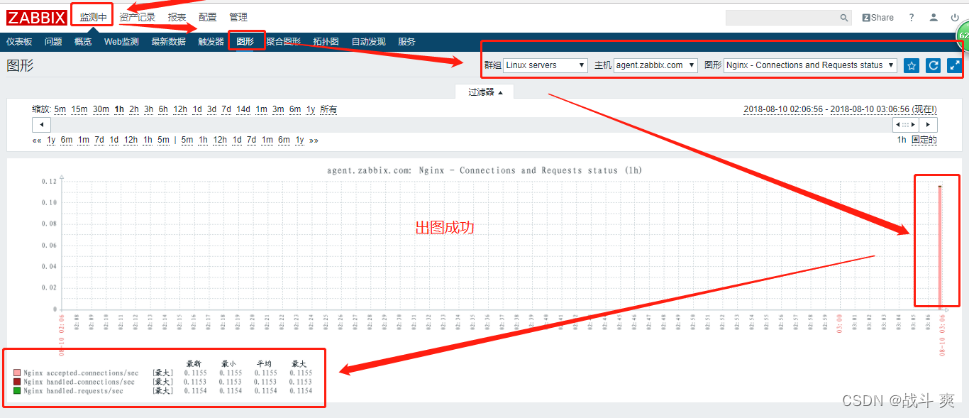
监测--->图形--->群组--->主机--->图形选择查看(此内存)

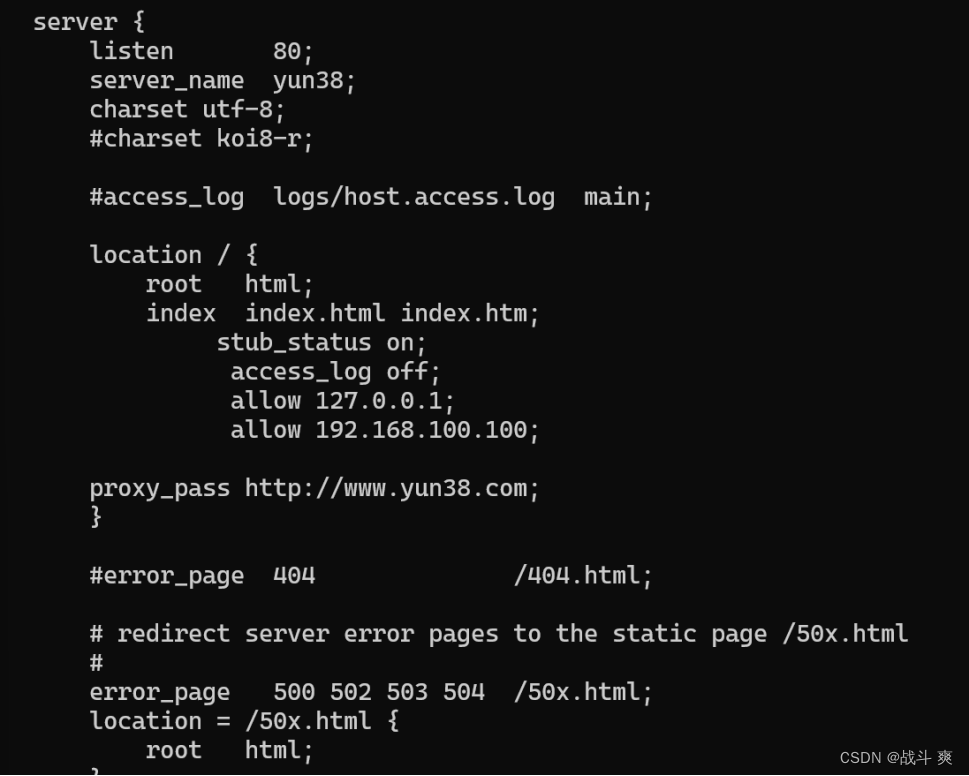
修改nginx的配置文件
vim /usr/local/nginx/conf/nginx.conf
配置如下:
user nginx;
worker_processes auto;
error_log /var/log/nginx/error.log;
pid /run/nginx.pid;
include /usr/share/nginx/modules/*.conf;
events {
worker_connections 1024;
}
http {
log_format main '$remote_addr - $remote_user [$time_local] "$request" '
'$status $body_bytes_sent "$http_referer" '
'"$http_user_agent" "$http_x_forwarded_for"';
access_log /var/log/nginx/access.log main;
sendfile on;
tcp_nopush on;
tcp_nodelay on;
keepalive_timeout 65;
types_hash_max_size 2048;
include /etc/nginx/mime.types;
default_type application/octet-stream;
# Load modular configuration files from the /etc/nginx/conf.d directory.
# See http://nginx.org/en/docs/ngx_core_module.html#include
# for more information.
include /etc/nginx/conf.d/*.conf;
server {
listen 80 default_server;
listen [::]:80 default_server;
server_name _;
root /usr/share/nginx/html;
# Load configuration files for the default server block.
include /etc/nginx/default.d/*.conf;
location / {
root html;
index index.html;
stub_status on; //开启stub模块
access_log off; //关闭access_log
allow 127.0.0.1; //允许自身ip
allow 192.168.100.100; //此处设置的是zabbix server的ip地址
}
//添加如下信息
error_page 404 /404.html;
location = /40x.html {
}
error_page 500 502 503 504 /50x.html;
location = /50x.html {
}
}
}
[root@nginx2 ~]# nginx -t
nginx: the configuration file /etc/nginx/nginx.conf syntax is ok
nginx: configuration file /etc/nginx/nginx.conf test is successful
[root@nginx2 ~]# killall -HUP nginx //开启nginx
[root@nginx2 ~]# curl 192.168.100.100/nginx-status //测试获取nginx信息
Active connections: 1
server accepts handled requests
1 1 1
Reading: 0 Writing: 1 Waiting: 0

2、///创建脚本存放路径
mkdir /usr/local/zabbix/scripts
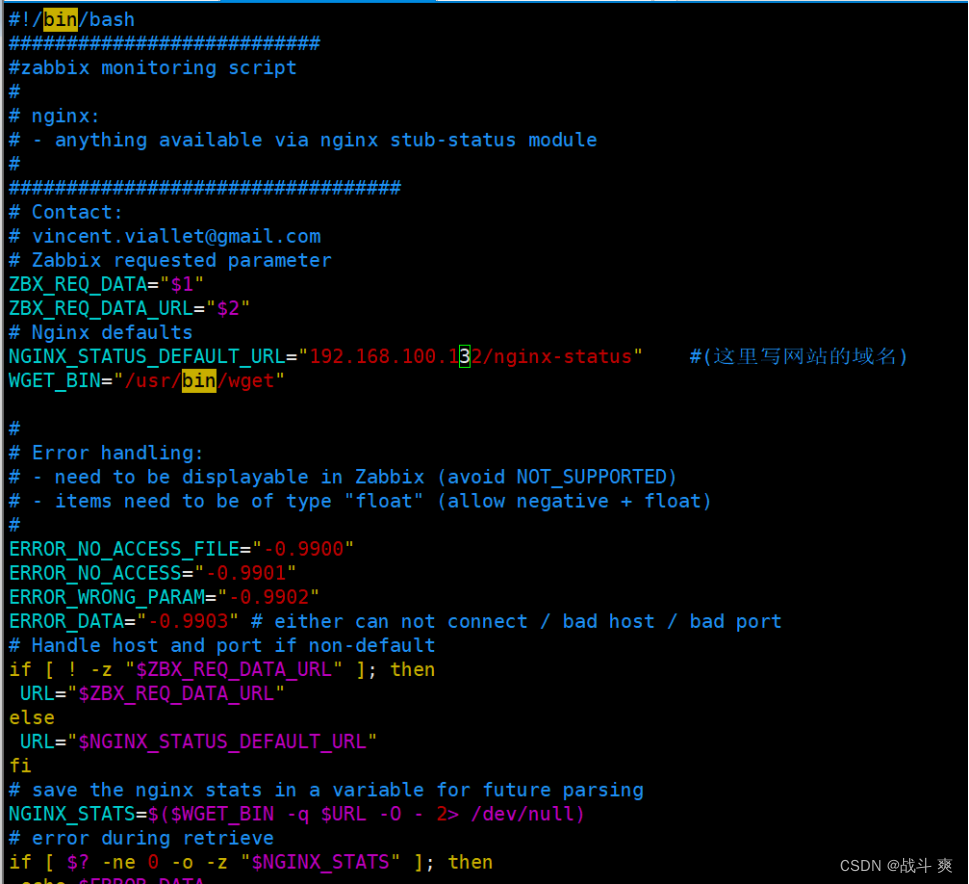
编写zabbix监控nginx的脚本
vim /usr/local/zabbix/scripts/nginx-check.sh
#!/bin/bash
###########################
#zabbix monitoring script
#
# nginx:
# - anything available via nginx stub-status module
#
##################################
# Contact:
# vincent.viallet@gmail.com
# Zabbix requested parameter
ZBX_REQ_DATA="$1"
ZBX_REQ_DATA_URL="$2"
# Nginx defaults
NGINX_STATUS_DEFAULT_URL="192.168.100.100" #(这里写网站的域名)
WGET_BIN="/usr/bin/wget"
#
# Error handling:
# - need to be displayable in Zabbix (avoid NOT_SUPPORTED)
# - items need to be of type "float" (allow negative + float)
#
ERROR_NO_ACCESS_FILE="-0.9900"
ERROR_NO_ACCESS="-0.9901"
ERROR_WRONG_PARAM="-0.9902"
ERROR_DATA="-0.9903" # either can not connect / bad host / bad port
# Handle host and port if non-default
if [ ! -z "$ZBX_REQ_DATA_URL" ]; then
URL="$ZBX_REQ_DATA_URL"
else
URL="$NGINX_STATUS_DEFAULT_URL"
fi
# save the nginx stats in a variable for future parsing
NGINX_STATS=$($WGET_BIN -q $URL -O - 2> /dev/null)
# error during retrieve
if [ $? -ne 0 -o -z "$NGINX_STATS" ]; then
echo $ERROR_DATA
exit 1
fi
#
# Extract data from nginx stats
#
case $ZBX_REQ_DATA in
active_connections) echo "$NGINX_STATS" | head -1 | cut -f3 -d' ';;
accepted_connections) echo "$NGINX_STATS" | grep -Ev '[a-zA-Z]' | cut -f2 -d' ';;
handled_connections) echo "$NGINX_STATS" | grep -Ev '[a-zA-Z]' | cut -f3 -d' ';;
handled_requests) echo "$NGINX_STATS" | grep -Ev '[a-zA-Z]' | cut -f4 -d' ';;
reading) echo "$NGINX_STATS" | tail -1 | cut -f2 -d' ';;
writing) echo "$NGINX_STATS" | tail -1 | cut -f4 -d' ';;
waiting) echo "$NGINX_STATS" | tail -1 | cut -f6 -d' ';;
*) echo $ERROR_WRONG_PARAM; exit 1;;
esac
exit 0
为脚本授权
chmod +x /usr/local/zabbix/scripts/nginx-check.sh

3、配置agent.conf文件
vim /usr/local/zabbix/etc/zabbix_agentd.conf
配置如下:
UnsafeUserParameters=1
UserParameter=nginx[*],/usr/local/zabbix/scripts/nginx-check.sh "$1"
266 UnsafeUserParameters=1 //启用自定义
267 UserParameter=nginx[*],/usr/local/zabbix/scripts/nginx-check.sh "$1" //引用nginx脚本

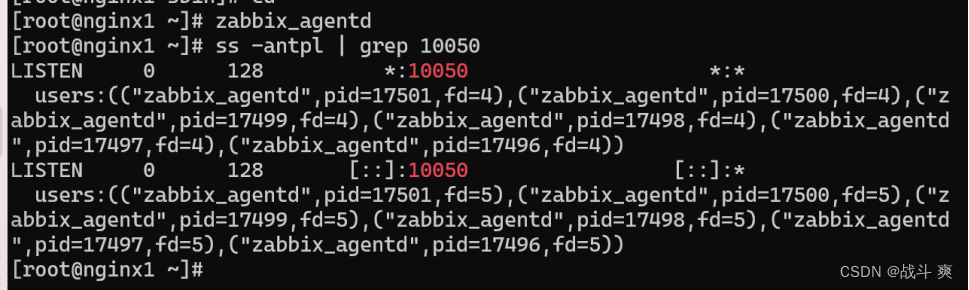
4、重启zabbix_agentd
killall -9 zabbix_agentd
zabbix_agentd
ss -antpl | grep 10050
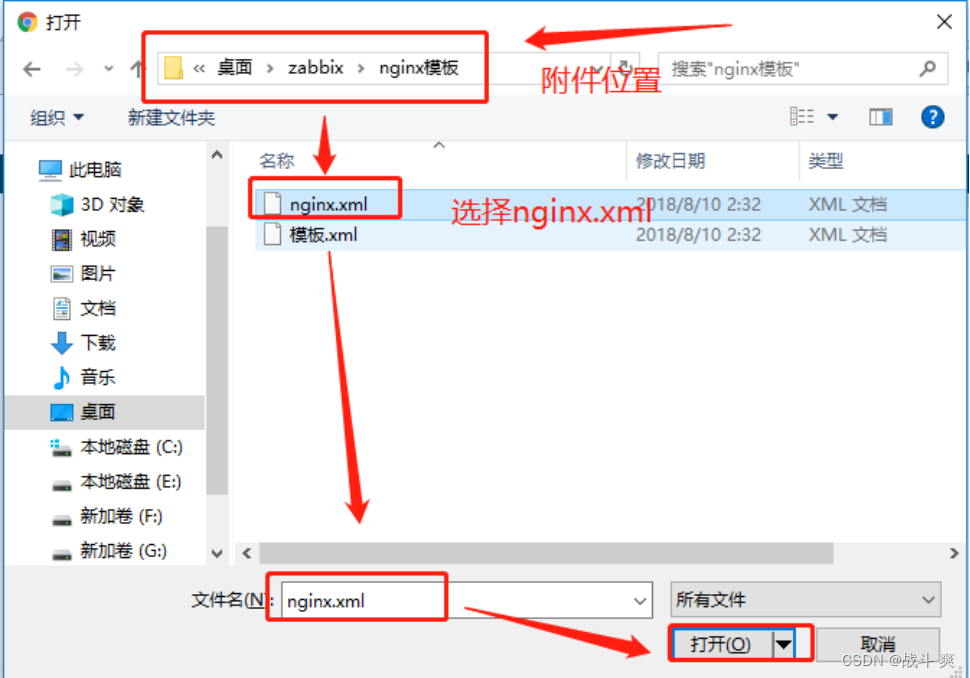
1.导入模板
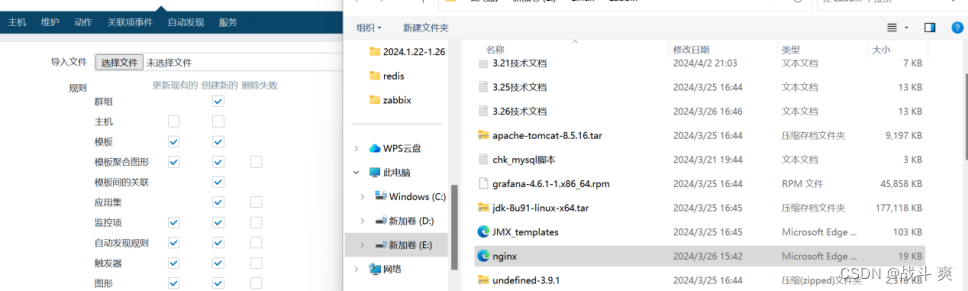
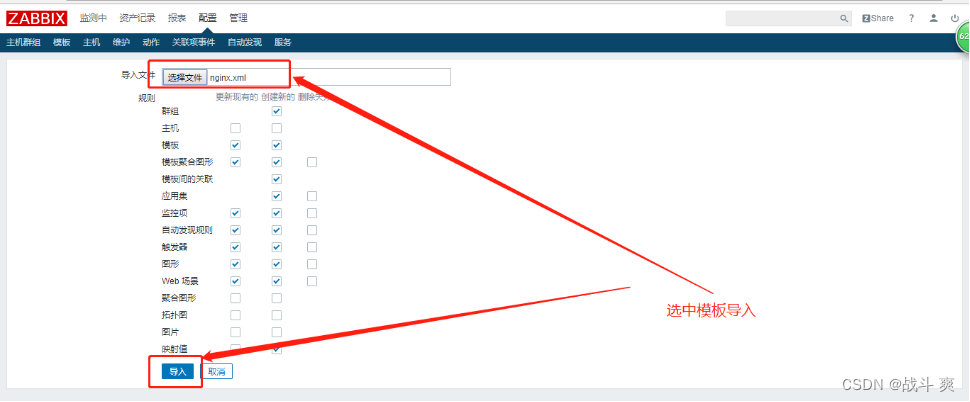
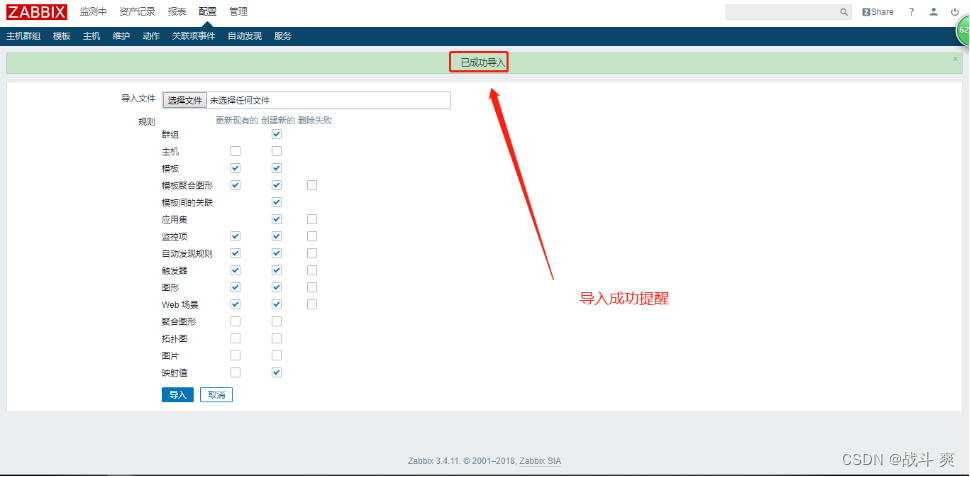
2.创建主机并添加导入的模板


等待一会查看主机效果
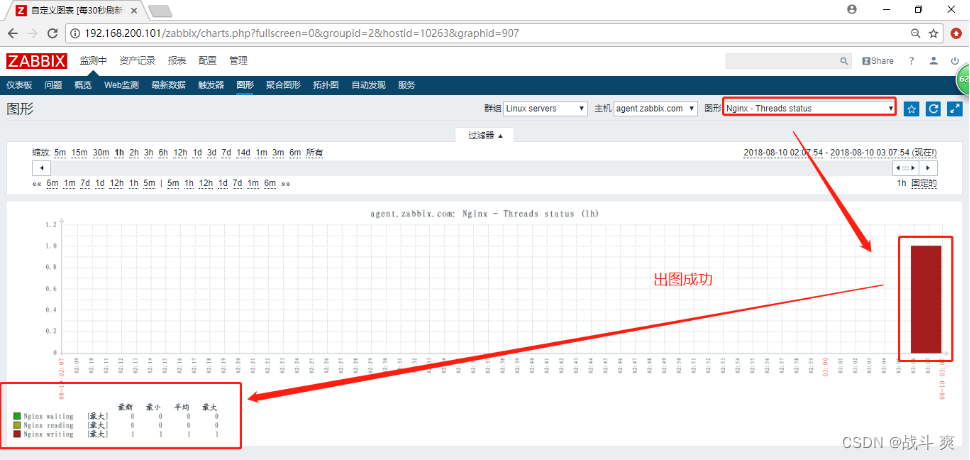
查看web出图效果
八、ELK elasticsearch + logstash + kibana 日志收集分析
nginx2配置:
1、上传安装包
elasticsearch-5.5.0.rpm
elasticsearch-head.tar.gz
kibana-5.5.1-x86_64.rpm
logstash-5.5.1.rpm
node-v8.2.1-linux-x64.tar.gz
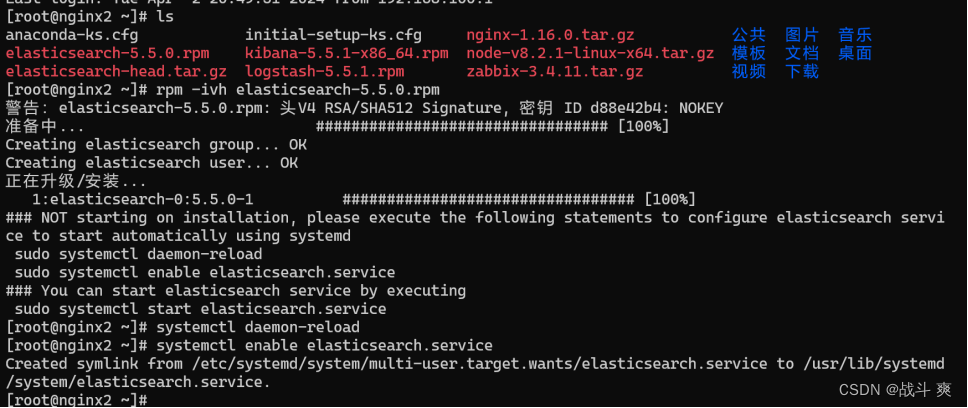
2、安装elasticsearch软件
rpm -ivh elasticsearch-5.5.0.rpm
3.重新识别系统中的服务并且设置为开机自启动
systemctl daemon-reload
systemctl enable elasticsearch.service
4、修改配置文件
vim /etc/elasticsearch/elasticsearch.yml
配置如下:
17s cluster.name: my-elk-cluster
23s node.name: nginx2
33s path.data: /data/elk_data
37s path.logs: /var/log/elasticsearch
43s bootstrap.memory_lock: false
55s network.host: 0.0.0.0
59s http.port: 9200
68s discovery.zen.ping.unicast.hosts: ["nginx2", "nginx1"]
//最后两行添加
89s http.cors.enabled: true
90s http.cors.allow-origin: "*"
5、优化运行内存
vim /etc/elasticsearch/jvm.options
配置如下:
xms512m
xmx512m
6、创建目录并且把用户和组都改为elasticsearch
mkdir -p /data/elk_data
chown elasticsearch:elasticsearch /data/elk_data/
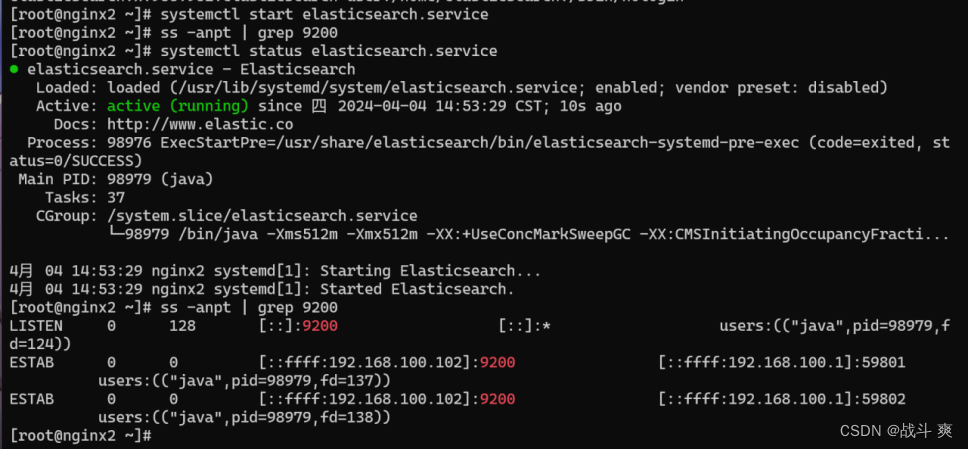
7.启动elasticsearch.服务并且查看端口
systemctl start elasticsearch.service
ss -anpt | grep 9200
【nginx1配置】
1、安装elasticsearch软件
rpm -ivh elasticsearch-5.5.0.rpm
2.重新识别系统中的服务并且设置为开机自启动
systemctl daemon-reload
systemctl enable elasticsearch.service
3、修改配置文件
vim /etc/elasticsearch/elasticsearch.yml
配置如下图:
17s cluster.name: my-elk-cluster
23s node.name: nginx1
33s path.data: /data/elk_data
37s path.logs: /var/log/elasticsearch
43s bootstrap.memory_lock: false
55s network.host: 0.0.0.0
59s http.port: 9200
68s discovery.zen.ping.unicast.hosts: ["nginx1","nginx2"]
4、优化运行内存
vim /etc/elasticsearch/jvm.options
配置如下:
xms512m
xmx512m
5、创建目录并且把用户和组都改为elasticsearch
mkdir -p /data/elk_data
chown elasticsearch:elasticsearch /data/elk_data/
6.启动elasticsearch.服务并且查看端口
systemctl start elasticsearch.service
cd /etc/init.d ./elasticsearch.service start
ss -anpt | grep 9200

【客户端访问】
1、访问节点
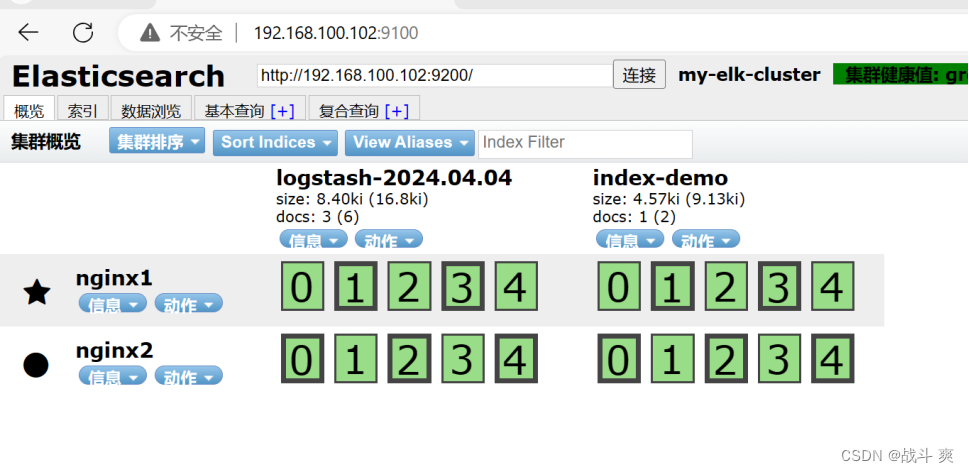
http://192.168.100.100:9200/
http://192.168.100.102:9200
2、检查集群健康状态为green代表健康
http://192.168.100.100:9200/_cluster/health?prettyc
配置elasticsearch集群:
nginx2
1、安装node-v8.2.1-linux-x64
tar xf node-v8.2.1-linux-x64.tar.gz -C /usr/local/
做链接
ln -s /usr/local/node-v8.2.1-linux-x64/bin/node /usr/bin/node
ln -s /usr/local/node-v8.2.1-linux-x64/bin/npm /usr/local/bin/
查看版本
node -v
npm -v
2、安装elasticsearch-head插件
tar xf elasticsearch-head.tar.gz -C /data/elk_data/
cd /data/elk_data/
修改用户和组
chown -R elasticsearch:elasticsearch elasticsearch-head/
cd到elasticsearch-head/下
cd elasticsearch-head/
安装npm
npm install

3、配置_site文件
cd到site/下并且把app.js做个备份然后编辑
cd _site/
cp app.js{,.bak} 做备份
vim app.js
配置如下:(第4329行,改成本机ip)
this.base_uri = this.config.base_uri || this.prefs.get("app-base_uri") || "http://192.168.100.102:9200";
4、启动npm并且启动elasticsearch
npm run start & systemctl start elasticsearch
ss -lnpt | grep 9100
客户端:访问ip查看节点
http://192.168.100.102:9100/

5、插入数据测试类型为test
curl -XPUT
'localhost:9200/index-demo/test/1?pretty&pretty' -H 'Content-Type: application/json' -d '{ "user": "zhangsan","mesg":"hello word" }'
客户端
刷新http://192.168.100.102:9100/
查看索引,发生了变化

6、安装logstash
rpm -ivh logstash-5.5.1.rpm
7、启动logstash服务并且做一个软链接
systemctl start logstash
ln -s /usr/share/logstash/bin/logstash /usr/local/bin/
8、使用logstash将信息写入到elasticsearch中
logstash -e 'input {stdin{} } output { elasticsearch { hosts=> ["192.168.100.102:9200"]} }'
客户端
刷新http://192.168.100.102:9100/
查看索引,发生了变化
配置收集系统日志:
【nginx2】
1、cd到logstash写入配置文件
cd /etc/logstash/conf.d/
vim systemc.conf
配置如下:
input {
file {
path => "/usr/local/nginx/logs/access.log"
type => "access"
start_position => "beginning"
}
file {
path => "/usr/local/nginx/logs/error.log"
type => "error"
start_position => "beginning"
}
}
output {
if [type] == "access" {
elasticsearch {
hosts => ["192.168.100.102:9200"]
index => "nginx1_access-%{+YYYY.MM.dd}"
}
}
if [type] == "error" {
elasticsearch {
hosts => ["192.168.100.102:9200"]
index => "nginx1_error-%{+YYYY.MM.dd}"
}
}
}
2、重启logstash
systemctl restart logstash
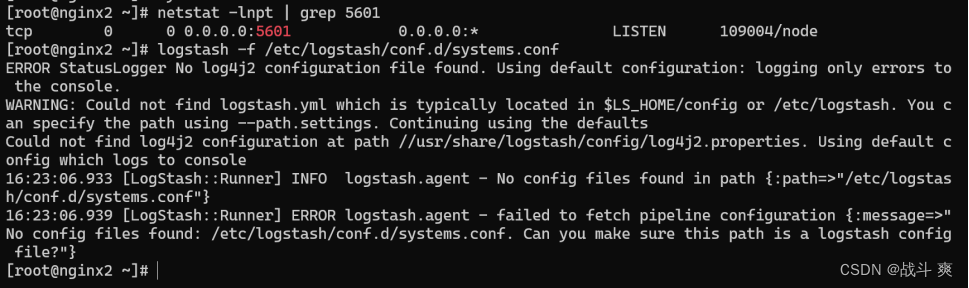
3、加载systemc.conf文件并查看是否到es当中
logstash -f systems.conf
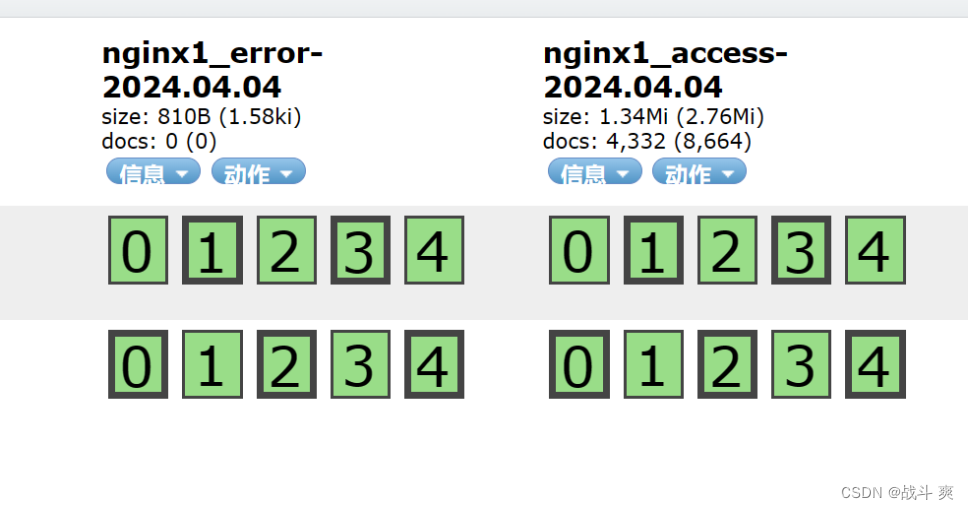
客户端
刷新http://192.168.100.102:9100/
查看索引,发生了变化

安装kibana:
【nginx2】
1、 rpm -ivh kibana-5.5.1-x86_64.rpm
systemctl enable kibana.service 设置开机自启
2、修改配置文件并启动服务
vim /etc/kibana/kibana.yml
配置如下:
2s server.port: 5601
7s server.host: "0.0.0.0"
21s elasticsearch.url: "http://192.168.100.102:9200"
30s kibana.index: ".kibana"
3、启动服务并且查看端口
systemctl restart kibana.service
netstat -lnpt | grep 5601
logstash -f /etc/logstash/conf.d/systems.conf
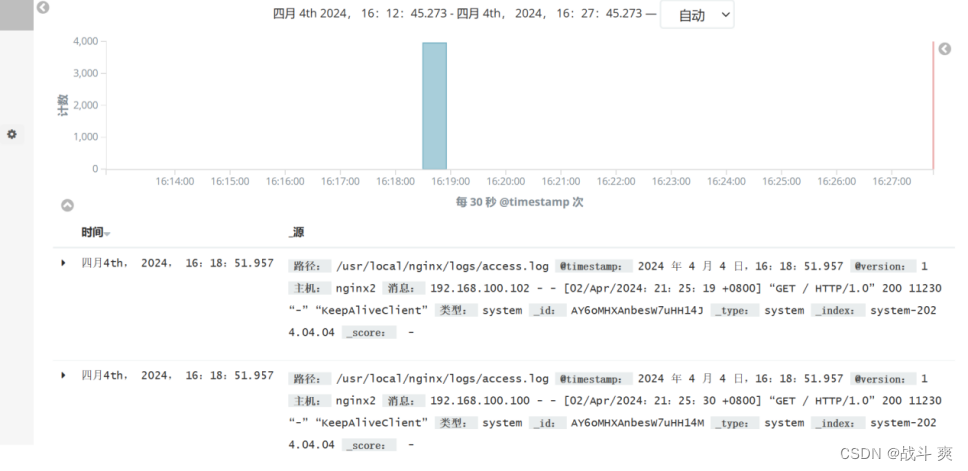
客户端访问:
192.168.100.102:5601
创建信息:输入system-* 系统日志

验 证:
创建成功,这下就可以观察分析系统日志了!
安装apache:
【tom1/2/3/4】
下载安装 logstash-5.5.1.rpm
rpm -ivh logstash-5.5.1.rpm
启动服务并做优化
systemctl enable logstash.service
systemctl start logstash.service
ln -s /usr/share/logstash/bin/logstash /usr/local/bin/
5、修改配置文件
cd到logstash下
cd /etc/logstash/conf.d/
vim nginx1_log.conf
配置如下:
input {
file {
path => "/usr/local/nginx/logs/access.log"
type => "access"
start_position => "beginning"
}
file {
path => "/usr/local/nginx/logs/error.log"
type => "error"
start_position => "beginning"
}
}
output {
if [type] == "access" {
elasticsearch {
hosts => ["192.168.100.102:9200"]
index => "nginx1_access-%{+YYYY.MM.dd}"
}
}
if [type] == "error" {
elasticsearch {
hosts => ["192.168.100.102:9200"]
index => "nginx1_error-%{+YYYY.MM.dd}"
}
}
}
5、logstash -f nginx1_log.conf //加载文件

至此结束!!!
感谢曾经的自己!!!


 3309
3309

 被折叠的 条评论
为什么被折叠?
被折叠的 条评论
为什么被折叠?
 到【灌水乐园】发言


