


目录
3.5 lambda 表达式创建 Runnable 子类对象
一、认识线程(Thread)
1 概念
1.1线程是什么
一个线程就是一个“执行流”,每个线程之间都可以按照顺序执行自己的代码,多个线程之间“同时”执行着多分代码。
1.2 进程和线程的区别
·进程是包含线程的,每个进程至少有一个线程存在,即主线程。
·进程和进程之间不共享内存空间. 同一个进程的线程之间共享同一个内存空间。

1.3Java 的线程 和 操作系统线程的关系
2 第一个多线程程序
class MyThread extends Thread {
    @Override
    public void run() {
        //线程的入口方法
        while (true) {
            System.out.println("hello thread");
            try {
                Thread.sleep(1000);
            } catch (InterruptedException e) {
                throw new RuntimeException(e);
            }
        }

    }
}
public class Text1 {
    public static void main(String[] args) throws InterruptedException {
        Thread thread = new MyThread();
        //start 和 run 都是Thread的成员
        //run只是描述了线程的入口(线程要做什么任务)
        //start则是在真正调用了系统的API,在系统中创建出线程,让线程在调用run
        thread.start();
        while (true) {
            System.out.println("hello main");
            Thread.sleep(1000);
        }
    }
}
· 每一个线程都是一个独立的执行流。
·多个线程之间是“并发”执行的。
这里我们使用jconsole命令观察线程
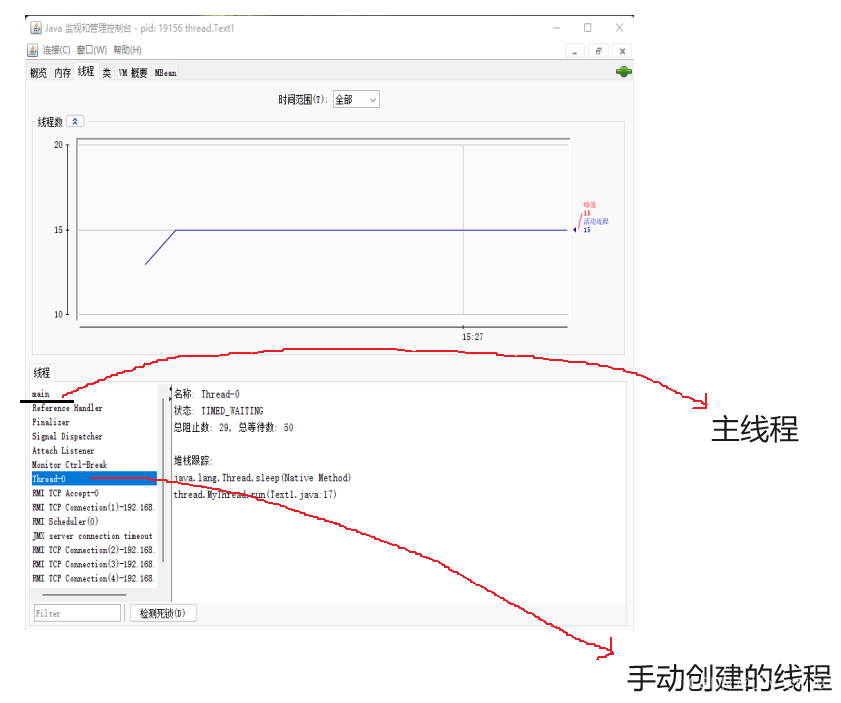
此时,可以看到在jconsole,一个Java进程即使是最简单,里面也包含了很多线程。
这里的”并发“是并行+并发。
并发:在操作系统中,一个时间段有几个程序处于已启动运行到结束运行之间,并且这几个程序都是在同一个处理机制上运行,同一时刻只能有一条指令执行,但是有多个进程被快速轮换执行,在宏观上多个程序是同时执行的,但是在微观上不是同时运行的,只是把时间分成若干段,让进程快速交替执行。
并行:当系统有一个即以上的CPU时,当一个CPU执行一个进程时,另一个CPU可以执行另一个进程,两个进程互补抢占CPU资源,可以同时进行,这种就称为并行。
3 创建线程
3.1 继承Thread类,重写run
class MyThread extends Thread {
    @Override
    public void run() {
        //线程的入口方法
        while (true) {
            System.out.println("hello thread");
            try {
                Thread.sleep(1000);
            } catch (InterruptedException e) {
                throw new RuntimeException(e);
            }
        }

    }
}
public class Text1 {
    public static void main(String[] args) throws InterruptedException {
        Thread thread = new MyThread();
        thread.start();
        while (true) {
            System.out.println("hello main");
            Thread.sleep(1000);
        }
    }
}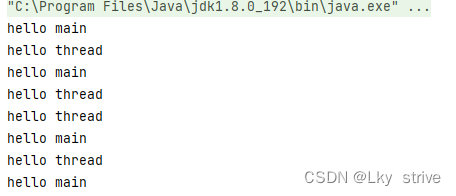
此时可以看到两个线程分成两路,并发执行。
3.2 实现 Runnable 接口,重写run
class MyRunnable implements Runnable {
    @Override
    public void run() {
        while (true) {
            System.out.println("hello thread");
            try {
                Thread.sleep(1000);
            } catch (InterruptedException e) {
                e.printStackTrace();
            }
        }
    }
}
public class Text2 {
    public static void main(String[] args) {
        //创建Thread类实例,调用Thread的构造方法时将Runnable对象作为target参数
        Thread thread = new Thread(new MyRunnable());
        //调用start方法
        thread.start();
        while (true) {
            System.out.println("hello main");
            try {
                Thread.sleep(1000);
            } catch (InterruptedException e) {
                e.printStackTrace();
            }
        }
    }
}
3.3 匿名内部类创建 Thread 子类对象
public class Text3 {
    public static void main(String[] args) {
        Thread thread = new Thread() {
            @Override
            public void run() {
                while (true) {
                    System.out.println("hello Thread");
                    try {
                        Thread.sleep(1000);
                    } catch (InterruptedException e) {
                        e.printStackTrace();
                    }
                }
            }
        };
        thread.start();
        while (true) {
            System.out.println("hello main");
            try {
                Thread.sleep(1000);
            } catch (InterruptedException e) {
                e.printStackTrace();
            }
        }
    }
}
3.4匿名内部类创建 Runnable 子类对象
public class Text4 {
    public static void main(String[] args) {
        Thread thread = new Thread(new Runnable() {
            @Override
            public void run() {
                while (true) {
                    System.out.println("hello Thread");
                    try {
                        Thread.sleep(1000);
                    } catch (InterruptedException e) {
                        e.printStackTrace();
                    }
                }
            }
        });
        thread.start();
        while (true) {
            System.out.println("hello main");
            try {
                Thread.sleep(1000);
            } catch (InterruptedException e) {
                e.printStackTrace();
            }
        }
    }
}
3.5 lambda 表达式创建 Runnable 子类对象
public class Text5 {
    public static void main(String[] args) {
        Thread thread = new Thread(()-> {
            while (true) {
                System.out.println("hello Thread");
                try {
                    Thread.sleep(1000);
                } catch (InterruptedException e) {
                    throw new RuntimeException(e);
                }
            }
        });
        thread.start();
        while (true) {
            System.out.println("hello main");
            try {
                Thread.sleep(1000);
            } catch (InterruptedException e) {
                throw new RuntimeException(e);
            }
        }
    }
}
二、 Thread 类及常见方法
1 Thread 的常见构造方法
|
方法
|
说明
|
|
Thread()
|
创建线程对象
|
|
Thread(Runnable target)
|
使用
Runnable
对象创建线程对象
|
|
Thread(String name)
|
创建线程对象,并命名
|
|
Thread(Runnable target, String name)
|
使用
Runnable
对象创建线程对象,并命名
|
Thread thread1 = new Thread();
Thread thread2 = new Thread(new MyRunnable());
Thread thread3 = new Thread("这是我的名字");
Thread thread4 = new Thread(new MyRunnable(), "这是我的名字");
public class Text {
public static void main(String[] args) {
Thread thread = new Thread(()->{
while (true) {
System.out.println("hello Thread");
try {
Thread.sleep(1000);
} catch (InterruptedException e) {
e.printStackTrace();
}
}
},"这是新线程");
thread.start();
}
}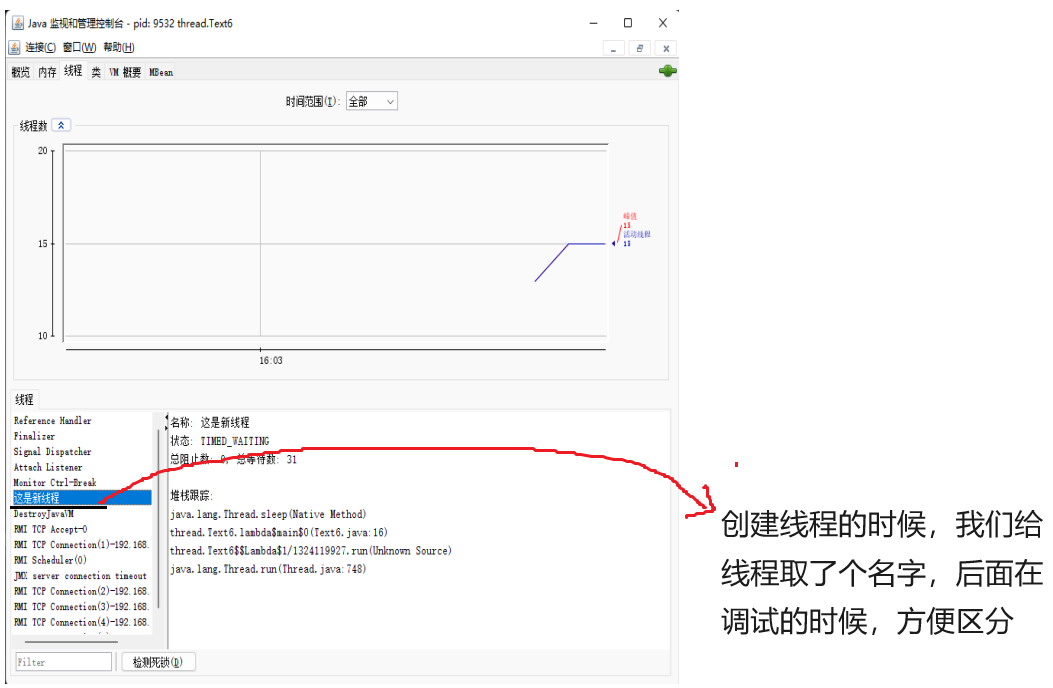
我们使用jconsole命令观察线程,此时会发现main不见了?这是因为main执行完了,当线程的入口方法执行结束,这个线程自然就销毁了。对于主线程来说,入口方法就是main方法。thread.start()这个方法,一瞬间就执行完了。
2 Thread 的几个常见属性
|
属性
|
获取方法
|
|
ID
|
getId()
|
|
名称
|
getName()
|
|
状态
|
getState()
|
|
优先级
|
getPriority()
|
|
是否后台线程
|
isDaemon()
|
|
是否存活
|
isAlive()
|
|
是否被中断
|
isInterrupted()
|
ID:线程的身份标识,表示一个进程中唯一的一个线程。
名称:名称是各中调试工具用到。
状态:表示线程当前所处的一个情况。
优先级:优先级高的线程理论上来说更容易被调度到。
关于后台线程:JVM会在一个进程的所有非后台线程结束后,才会结束运行。
是否存活:看run方法是否运行结束了。
我们输出这个程序
public class Text {
    public static void main(String[] args) {
        Thread thread = new Thread(()->{
            while (true) {
                System.out.println("hello Thread");
                try {
                    Thread.sleep(1000);
                } catch (InterruptedException e) {
                    e.printStackTrace();
                }
            }
        },"这是新线程");
        thread.start();
    }
}
此时我们将thread这个线程设置为后台线程,我们再次输出。
public class Text {
    public static void main(String[] args) {
        Thread thread = new Thread(()->{
            while (true) {
                System.out.println("hello Thread");
                try {
                    Thread.sleep(1000);
                } catch (InterruptedException e) {
                    e.printStackTrace();
                }
            }
        },"这是新线程");
        //设置thread为后台线程
        thread.setDaemon(true);
        thread.start();
    }
}
我们可以发现改为后台线程后,主线程飞快执行完了,此时没有其他前台线程了。因此进程结束,thread还来不及执行,就完了。
总结:默认情况下一个线程是前台线程,在一个Java进程中,如果前台线程没有执行结束,此时整个进程一定不会结束的,相比之下,后台线程不结束,不会影响整个进程的结束。
使用isAlive判定内核线程是不是已经没了。即回调方法执行完毕,线程就没了。
public class Text {
    public static void main(String[] args) {
        Thread thread = new Thread(()->{
            System.out.println("线程开始");
            try {
                Thread.sleep(1000);
            } catch (InterruptedException e) {
                e.printStackTrace();
            }
            System.out.println("线程结束");
        });
        thread.start();
        System.out.println(thread.isAlive());
        try {
            Thread.sleep(3000);
        } catch (InterruptedException e) {
            e.printStackTrace();
        }
        System.out.println(thread.isAlive());
    }
}
注意:true和线程开始谁先打印不一定,因为线程是并发执行的,并发调度顺序不确定,取决于系统的调度器。(这里大概率先打印true,因为在调用start之后,新的线程被创建有一定的开销,创建过程中,主线程就执行println)。
3 启动一个线程
上面我们说过如何让通过重写run方法创建一个线程对象,但是线程对象被创建出来并不意味着线程就开始运行了。
因此启动一个线程的方法就是1.重写run方法来指定线程需要做的事情。2.调用start()方法执行线程。所谓的run方法,只是描述了该线程要执行的内容(会在start创建好线程之后自动被调用)。
4 中断一个线程
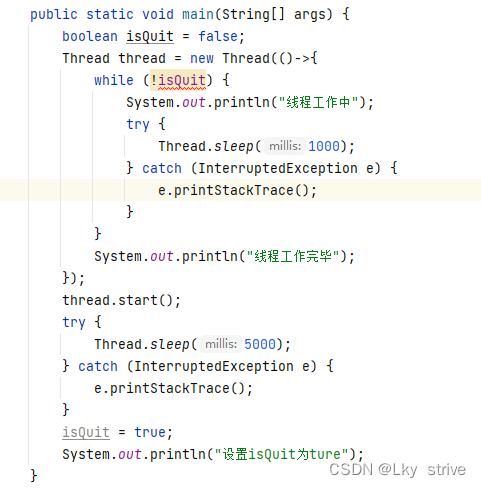
4.1通过共享标记
public class Text {
    //使用一个成员变量isQuit来作为标志位
    private static boolean isQuit = false;
    public static void main(String[] args) {
        Thread thread = new Thread(()->{
            while (!isQuit) {
                System.out.println("线程工作中");
                try {
                    Thread.sleep(1000);
                } catch (InterruptedException e) {
                    e.printStackTrace();
                }
            }
            System.out.println("线程工作完毕");
        });
        thread.start();
        try {
            Thread.sleep(5000);
        } catch (InterruptedException e) {
            e.printStackTrace();
        }
        isQuit = true;
        System.out.println("设置isQuit为ture");
    }
}
此时通过设置isQuit为ture可以让当前程序跳出循环,也就中断了一个线程。
这里我们使用一个成员变量isQuit作为标志物,当我们把isQuit改为main方法中的局部变量时,会出现报错。
这是因为lambda表达式有一个语法规则,变量捕获,lambda表达式里面的代码可以自动捕获上层作用域涉及到的局部变量。变量捕获就是让lambda表达式把当前作用域中的变量在lambda中复制一份。
在Java中变量捕获有一个前提就是必须只能捕获一个final或者实际上时final的变量。所以上述程序报错的原因就是修改了isQuit为true。
public class Text {
    public static void main(String[] args) {
        //这里虽然没有使用final,但是却没有修改内容,所以实际上就是final
        boolean isQuit = false;
        Thread thread = new Thread(()->{
            //在lambda表达式中,有一个语法规则变量捕获,
            while (!isQuit) {
                System.out.println("线程工作中");
                try {
                    Thread.sleep(1000);
                } catch (InterruptedException e) {
                    e.printStackTrace();
                }
            }
            System.out.println("线程工作完毕");
        });
        thread.start();
        try {
            Thread.sleep(5000);
        } catch (InterruptedException e) {
            e.printStackTrace();
        }
        //isQuit = true;
        System.out.println("设置isQuit为ture");
    }
}
此时就可以通过了。
那为什么将isQuit改为成员变量就可以修改isQuit呢,这是因为将isQuit改为成员变量,此时的lambda访问这个成员就不再是变量捕获语法了,而是"内部类访问外部类属性",此时就没有final的限制了。
4.2 调用 interrupt() 方法来通知
public class Text {
    public static void main(String[] args) throws InterruptedException {
        Thread thread = new Thread(() -> {
            while (!Thread.currentThread().isInterrupted()) {
                System.out.println("线程运行中");
                try {
                    Thread.sleep(1000);
                } catch (InterruptedException e) {
                    e.printStackTrace();
                }
            }
        });
        thread.start();
        Thread.sleep(5000);
        System.out.println("让thread终止");
        //设置标志位
        thread.interrupt();
    }
}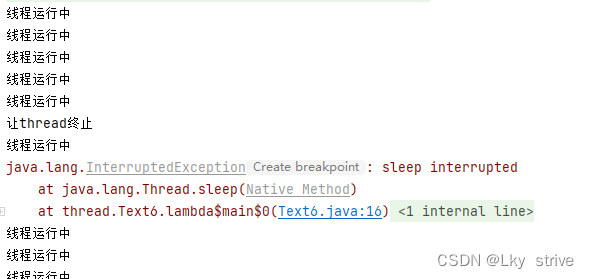
正常来说,sleep会休眠到时间到才能唤醒,这里给出interrupt就可以使sleep内部触发一个异常,从而提前被唤醒。但是sleep被唤醒后,上述的代码继续在运行。这就是一个机制,能够自由决定,接下来怎么处理。
public class Text {
    public static void main(String[] args) throws InterruptedException {
        Thread thread = new Thread(() -> {
            while (!Thread.currentThread().isInterrupted()) {
                System.out.println("线程运行中");
                try {
                    Thread.sleep(1000);
                } catch (InterruptedException e) {
                    //1.继续循环执行
                    e.printStackTrace();
                    //2.加一个break,立即结束
                    //break;
                    //3.做一些工作,等到完成后,在加一个break结束
                }
            }
        });
        thread.start();
        Thread.sleep(5000);
        System.out.println("让thread终止");
        //设置标志位
        thread.interrupt();
    }
}
5 线程等待
有时候,我们要等一个线程完成后才能进行下一步工作,所以要设置一个方法来确定等待线程的结束。用join实现线程等待效果。
thread.join工作过程:
1)如果thread线程正在运行中,此时调用join的线程会发生阻塞,一直阻塞到thread线程执行结束为止。
2)如何thread线程已经执行结束了,此时调用join,就直接返回,不会涉及到阻塞。
public class Text {
    public static void main(String[] args) throws InterruptedException {
        Thread thread1 = new Thread(()->{
            for (int i = 0;i < 10;i++) {
                System.out.println(Thread.currentThread().getName()+" :正在工作");
                try {
                    Thread.sleep(1000);
                } catch (InterruptedException e) {
                    e.printStackTrace();
                }
            }
            System.out.println(Thread.currentThread().getName()+" :工作结束");
        },"A");
        Thread thread2 = new Thread(()->{
            for (int i = 0; i < 10; i++) {
                System.out.println(Thread.currentThread().getName()+" :正在工作");
                try {
                    Thread.sleep(1000);
                } catch (InterruptedException e) {
                    e.printStackTrace();
                }
            }
            System.out.println(Thread.currentThread().getName()+" :工作结束");
        },"B");
        thread1.start();
        System.out.println("A先工作");
        thread1.join();
        System.out.println("A工作结束,B开始工作");
        thread2.start();
        System.out.println("B开始工作");
        thread2.join();
        System.out.println("B工作结束");
    }
}
| 方法 | 说明 |
| public void join() | 等待线程结束 |
| public void join(long millis) | 等待线程结束,最多等 millis 毫秒 |
6 获取当前线程引用
| 方法 | 说明 |
| ppublic static Thread currentThread(); | 返回当前线程对象的引用 |
public class Text {
    public static void main(String[] args) {
        Thread thread = Thread.currentThread();
        System.out.println(thread.getName());
    }
}
7 休眠当前线程
| 方法 | 说明 |
| public static void sleep(long millis) throws InterruptedException | 休眠当前线程 millis 毫秒 |
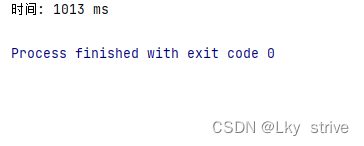
注意:sleep(1000)不是精确正好1000,因为有一个调度的开销。系统会按照1000这个时间来控制线程休眠,当1000时间到了就会唤醒这个状态。即(阻塞---就绪),但是当这个线程是就绪状态时,不能立即回到CPU上执行,中间有一个调度开销。
public class Text {
    public static void main(String[] args) throws InterruptedException {
        long start = System.currentTimeMillis();
        Thread.sleep(1000);
        long end = System.currentTimeMillis();
        System.out.println("时间: "+(end - start)+" ms");
    }
} 
三、线程的状态
对于进程来说最核心的就是就绪状态和阻塞状态,对于线程同样也是如此,在Java中线程还有一些其他状态。
线程的所有状态
1)NEW:Thread对象已经有了,start方法还没有被调用。
2)TERMINATED:Thread对象还在,但是线程已经没了。
public class Text {
    public static void main(String[] args) throws InterruptedException {
       Thread thread = new Thread(()->{
           for (int i = 0; i < 5; i++) {
               System.out.println("线程运行");
               try {
                   Thread.sleep(1000);
               } catch (InterruptedException e) {
                   e.printStackTrace();
               }
           }
       });
        //在调用start之前就是NEW状态
        System.out.println(thread.getState());
        thread.start();
        thread.join();
        //在线程结束之后就是TERMINATED状态
        System.out.println(thread.getState());
    }
}
3)RUNNABLE:就绪状态(线程已经在CPU上执行了/线程正在排队等待在CPU上执行)。
public class Text {
    public static void main(String[] args) throws InterruptedException {
       Thread thread = new Thread(()->{
          while (true) {
          //我们不加时间,让这个线程全力运行
          }
       });
       thread.start();
       for (int i = 0; i < 5; i++) {
            //此时的线程就是就绪状态
            System.out.println(thread.getState());
            Thread.sleep(1000);
       }
    }
}
4)TIMED_WAITING:阻塞状态,由于sleep这种固定时间方式产生的阻塞。
public class Text {
    public static void main(String[] args) throws InterruptedException {
       Thread thread = new Thread(()->{
          while (true) {
              //当我们加入时间之后,就会发生阻塞状态,这种就是由于sleep固定时间产生的阻塞
              try {
                  Thread.sleep(1000);
              } catch (InterruptedException e) {
                  e.printStackTrace();
              }
          }
       });
       thread.start();
       for (int i = 0; i < 5; i++) {
            //此时获取的状态就是TIMED_WAITING
            System.out.println(thread.getState());
            Thread.sleep(1000);
       }
    }
}
5)WAITING:阻塞状态,由于wait这种不固定时间方式产生的阻塞。
6)BLOCKED:阻塞状态,由于锁竞争导致的阻塞。
后面会介绍到
四、多线程带来的风险—线程安全
整个多线程中,最复杂的部分就是线程安全,也是最重要的部分。
1 线程安全的概念
有些代码在单个线程环境下运行是完全没问题的,但是让多个线程同时去执行,此时可能会出现bug,这种称为线程不安全。如果多线程环境下代码的运行和单线程一样符合我们的预期,则是说明这个线程是安全的。
public class Text {
    public static int count = 0;
    public static void main(String[] args) throws InterruptedException {
        Thread thread1 = new Thread(()->{
            for (int i = 0; i < 50000; i++) {
                count++;
            }
        });
        Thread thread2 = new Thread(()->{
            for (int i = 0; i < 50000; i++) {
                count++;
            }
        });
        thread1.start();
        thread2.start();
        thread1.join();
        thread2.join();
        System.out.println("count: "+count);
    }
}
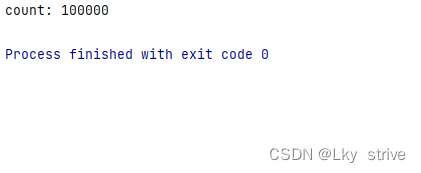
这种情况就是线程安全问题,我们预期的结果是1w,只要实际结果和预期结果不一样就是bug。
public class Text9 {
    public static int count = 0;
    public static void main(String[] args) throws InterruptedException {
        Thread thread1 = new Thread(()->{
            for (int i = 0; i < 50000; i++) {
                count++;
            }
        });
        Thread thread2 = new Thread(()->{
            for (int i = 0; i < 50000; i++) {
                count++;
            }
        });
        thread1.start();
        thread1.join();
        thread2.start();
        thread2.join();
        System.out.println("count: "+count);
    }
}
当我们将代码改成这样,就会达到我们预期的结果,这种意味者thread1在运行的过程中,thread2是不会运行的,也就是说不是“同时”进行的。
站在CPU的角度上count++这个操作本是上分成三个部分
1)把数据从内存读到CPU寄存器中
2)把寄存器中的数据进行+1
3)把寄存器中的数据保存到内存中
如果多个线程执行代码,由于线程之间的调度顺序是“随机”的,就会导致有些调度顺序下,上述逻辑就会出现问题。所以在多线程中,最困难的一点是线程的随机调度使两个线程执行逻辑的先后顺序存在多种可能,我们要保证所有可能的代码都是正确的。
2 线程不安全的原因
所以这里产生线程安全问题的原因:1)操作系统中,线程的调度顺序是随机的。2)两个线程,针对同一个变量修改。3)原子性(我们把一段代码想象成一个房间,每个线程都是要进入这个房间的人。如果没有任何机制保证,A进入房间之后,还没有出来;B 是不是也可以进入房间,打断 A 在房间里的隐私。这个就是不具备原子性的)。
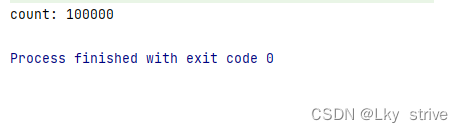
3 解决线程不安全
使用synchronized来给对象加锁
public class Text {
    public static int count = 0;
    public static void main(String[] args) throws InterruptedException {
        Object lock = new Object();
        Thread thread1 = new Thread(()->{
            for (int i = 0; i < 50000; i++) {
                synchronized (lock) {
                    count++;
                }
            }
        });
        Thread thread2 = new Thread(()->{
            for (int i = 0; i < 50000; i++) {
                synchronized (lock) {
                    count++;
                }
            }
        });
        thread1.start();
        thread2.start();
        thread1.join();
        thread2.join();
        System.out.println("count: "+count);
    }
}
五、synchronized
1 synchronized 的特性
1互斥
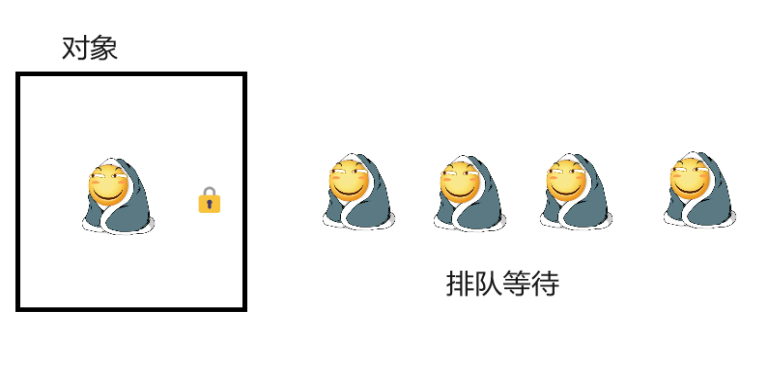
synchronized 会起到互斥效果,某个线程执行到某个对象的synchronized 中时,其他线程如果也执行到同一个对象synchronized 就会阻塞等待。
synchronized使用时,搭配一个代码块{ }进入就会加锁,出了就会解锁,在已经加锁的状态中,另一个线程尝试同样加这个锁,就会产生“锁冲突”,后一个线程就会阻塞等待,一直等到前一个线程解锁为止。()中表示需要一个用来加锁的对象,这个对象是啥不重要,重要的是通过这个对象来区分两个线程是否在竞争一个锁。
synchronized用的锁是存在Java对象头里的,一旦一个线程先上了锁,其他线程只能等待这个线程释放。
2 可重入
所谓的可重入锁,指的是一个线程,连续针对一把锁加锁两次,不会出现死锁,只要满足这个要求,就是可重入。

由于Java 中的 synchronized是可重入锁, 因此没有上面的问题。那上述代码中执行到}(2),此时的锁能否释放,答案是不能的。无论有多少层锁,都是要在最外层才能释放锁。在可重入锁的内部,包含了计数器,每次加一次锁,计数器就+1,每解锁一次就-1,直到减到0,才能释放锁。
2 关于死锁
1 一个线程,针对一把锁连续加锁两次,如果是不可重入锁,就会出现死锁,但是synchronized不会出现。
2 两个线程,两把锁,这种情况就会发生死锁。
public class Text {
    private static Object lock1 = new Object();
    private static Object lock2 = new Object();
    public static void main(String[] args) {
        Thread thread1 = new Thread(()->{
            synchronized (lock1) {
                try {
                    //此时的sleep很重要,确保t1和t2都拿到一把锁之后,在进行后续动作
                    Thread.sleep(1000);
                } catch (InterruptedException e) {
                    e.printStackTrace();
                }
                synchronized (lock2) {
                    System.out.println("t1 加锁成功");
                }
            }
        });
        Thread thread2 = new Thread(()->{
            synchronized (lock2) {
                try {
                    Thread.sleep(1000);
                } catch (InterruptedException e) {
                    e.printStackTrace();
                }
                synchronized (lock1) {
                    System.out.println("t2 加锁成功");
                }
            }
        });
        thread1.start();
        thread2.start();
    }
}
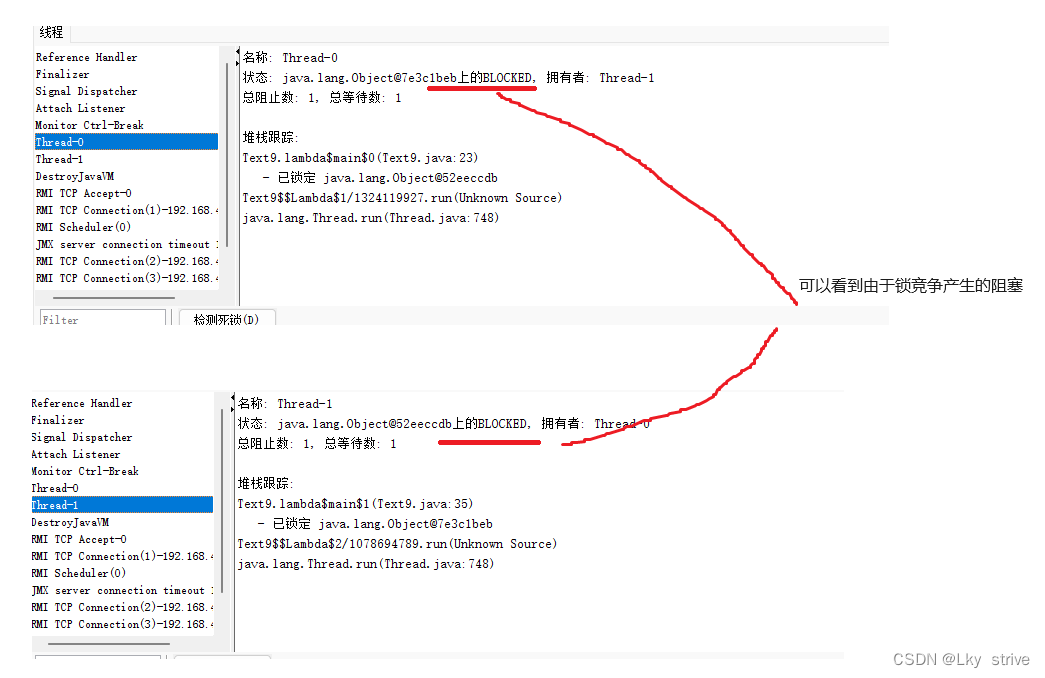
死锁代码中,两个synchronized是嵌套关系(在占用一把锁的前提下,获取另外一把锁,会出现死锁),并列关系(先释放前面的锁,在获取另一把锁,不会出现死锁)。
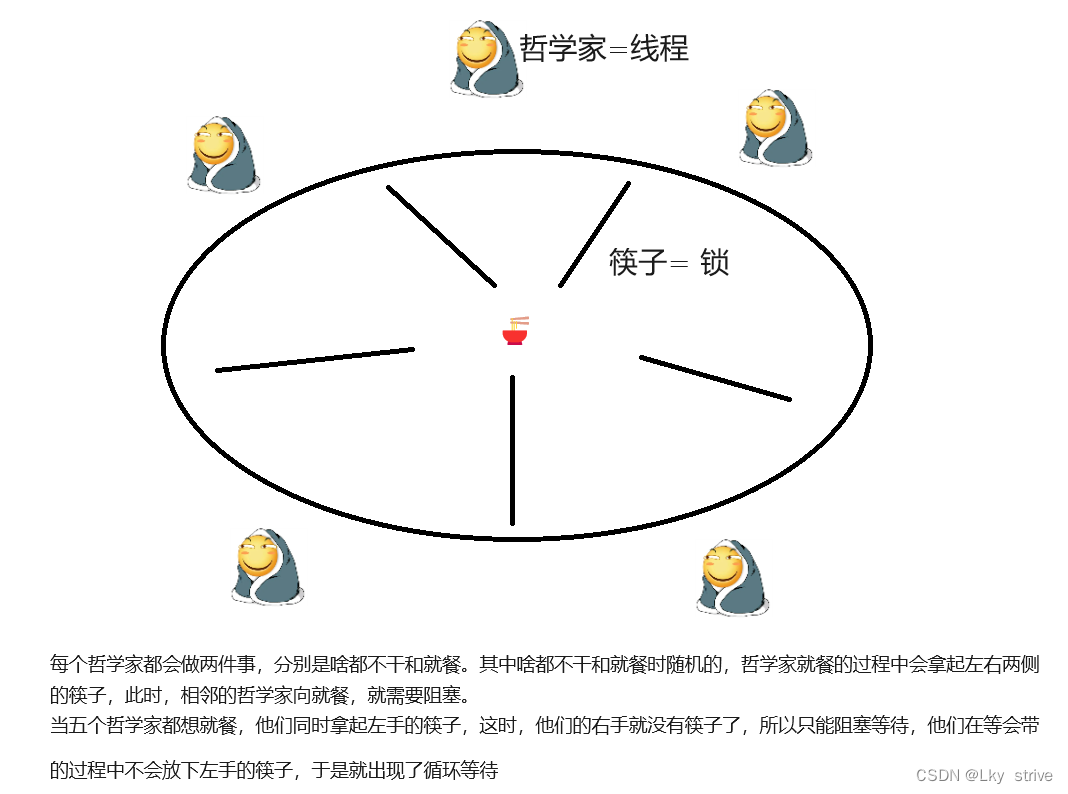
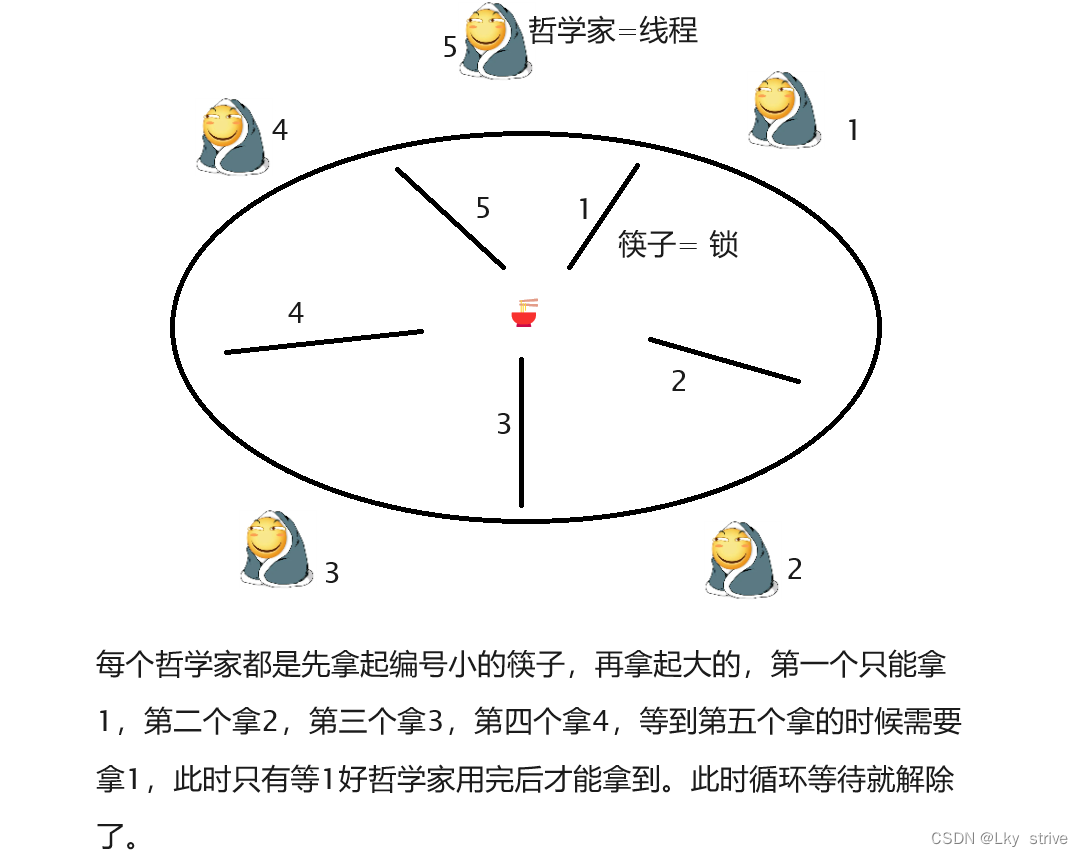
3 N个线程,M把锁,此时更容易出现死锁。(一个经典的描述模型,哲学家就餐问题)
3 死锁的四个必要条件
1 互斥使用:(锁的基本特征)当一个线程持有一把锁之后,另一个线程想获得锁就要阻塞等待。
2 不可抢占:(锁的基本特征)当锁已经的线程1拿到之后,线程2只能等线程1主动释放,不能抢。
3 请求保持:(代码结构)一个线程尝试获取多把锁(先拿到锁1,在尝试拿到锁2,获取的时候,锁1捕获释放)。
4 循环等待(代码结构)上述的哲学家就餐问题,形成环。
解决死锁的方案:4个条件破坏一个就可以了,由于1和2是synchronized的基本特征,无法干涉,所以只能修改3和4,对3来说,调整代码的结构就可以,避免编写嵌套式代码。对于4来说,可以约定加锁的顺序,就可以避免循环等待。
我们继续用哲学家就餐问题来解决4
4 synchronized的使用示例
synchronized不仅可以修饰代码块,还可以修饰一个实例方法或者一个静态方法。
class Counter {
    //第一种写法
    public int count;
    synchronized public void increase1() {
        count++;
    }
    //第二种写法
    public void increase2() {
        //这种就是使用this作为锁对象,谁调用这个方法谁就是this
        synchronized (this) {
            count++;
        }
    }
    //第三种写法
    synchronized public static void increase3() {
        count++;
    }
    //第四种写法
    public static void increase4() {
        //如果是修饰静态方法,相当于是针对类对象加锁
        synchronized (Counter.class) {
            count++;
        }
    }
}
public class Text9 {
    public static void main(String[] args) throws InterruptedException {
        Counter counter = new Counter();
        Thread thread1 = new Thread(()->{
            for (int i = 0; i < 50000; i++) {
                counter.increase2();
            }
        });
        Thread thread2 = new Thread(()->{
            for (int i = 0; i < 50000; i++) {
                counter.increase2();
            }
        });
        thread1.start();
        thread2.start();
        thread1.join();
        thread2.join();
        System.out.println(counter.count);
    }
}
在当前程序中类对象是唯一的,代码中写了一个Count类,此时在进程中一定只有一个Count的类对象。
六、volatile
1 保证内存的可见性
计算机在运行程序的时候,需要经常访问数据,这些依赖的数据往往会存储在内存中,CPU使用这个变量的时候,就会把这个内存中的数据,先读出来,然后放到CPU的寄存器中再参与运算。CPU进行大部分操作都很快,一旦操作到读/写内存,速度一下就降下来了。
为了解决上述问题提高效率,编译器就会代码做出优化,把一些本来要读内存的操作,优化成读取寄存器,减少了读内存的次数,也就提高了程序的效率。
public class Text {
    private static int isQuit = 0;
    public static void main(String[] args) {
        Thread thread1 = new Thread(()->{
            while (isQuit == 0) {

            }
            System.out.println("t1 退出");
        });
        thread1.start();
        Thread thread2 = new Thread(()->{
            System.out.println("请输入isQuit: ");
            //我们的预期是输入不为0的数,就会让thread1执行结束。
            Scanner scanner = new Scanner(System.in);
            isQuit = scanner.nextInt();
        });
        thread2.start();
    }
}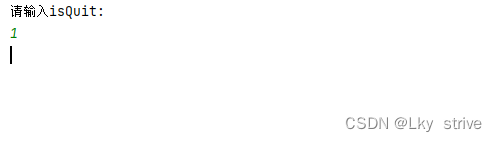
此时上述的代码和我们预期的不一样,我们通过jconsole命令观察线程。
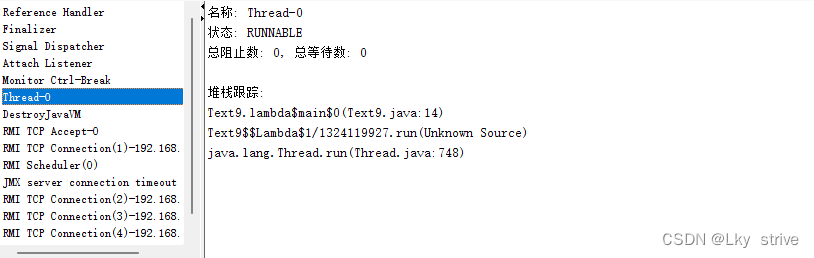
我们发现thread1正在执行,处于就绪状态,此处出现的问题,就是“内存可见性”情况引起的。

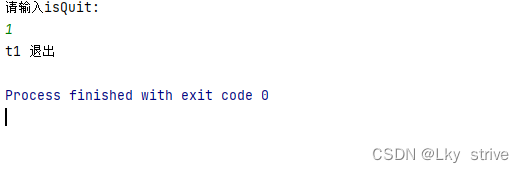
volatile就是解决方案,只要我们通过volatile这个关键词,让编译器不要优化就可以了。
public class Text {
    //给isQuit加上volatile就可以了
    private static volatile int isQuit = 0;
    public static void main(String[] args) {
        Thread thread1 = new Thread(()->{
            while (isQuit == 0) {

            }
            System.out.println("t1 退出");
        });
        thread1.start();
        Thread thread2 = new Thread(()->{
            System.out.println("请输入isQuit: ");
            //我们的预期是输入不为0的数,就会让thread1执行结束。
            Scanner scanner = new Scanner(System.in);
            isQuit = scanner.nextInt();
        });
        thread2.start();
    }
}
还有一种方法,我们给循环里加一个sleep,此时循环执行就变慢了,由于次数减少了,读取操作的开销就不大了,所以就没有优化的必要了,更推荐加volatile。
public class Text {
    private static int isQuit = 0;
    public static void main(String[] args) {
        Thread thread1 = new Thread(()->{
            while (isQuit == 0) {
                try {
                    Thread.sleep(10);
                } catch (InterruptedException e) {
                    throw new RuntimeException(e);
                }
            }
            System.out.println("t1 退出");
        });
        thread1.start();
        Thread thread2 = new Thread(()->{
            System.out.println("请输入isQuit: ");
            //我们的预期是输入不为0的数,就会让thread1执行结束。
            Scanner scanner = new Scanner(System.in);
            isQuit = scanner.nextInt();
        });
        thread2.start();
    }
}
2 volatile 不保证原子性
volatile 和 synchronized 有着本质的区别,synchronized 能保证原子性,volatile能保证内存的可见性。
class Counter {
    //去掉increase的synchronized,给count加上volatile,此时count的值就不是1w了
    volatile public int count = 0;
    public void increase() {
        count++;
    }
}
public class Text {
    public static void main(String[] args) throws InterruptedException {
        Counter counter = new Counter();
        Thread thread1 = new Thread(()->{
            for (int i = 0; i < 50000; i++) {
                counter.increase();
            }
        });
        Thread thread2 = new Thread(()->{
            for (int i = 0; i < 50000; i++) {
                counter.increase();
            }
        });
        thread1.start();
        thread2.start();
        thread1.join();
        thread2.join();
        System.out.println(counter.count);
    }
}
七、wait 和 notify
wait 和 notify是多线程中的一个重要机制,能够协调多个线程的执行顺序,与join不同的是,join是影响到线程的先后顺序。相比之下此处是希望线程不结束,也能够有先后顺序。
wait:等待,让指定的线程进入阻塞状态。
notify:通知,唤醒对应的阻塞状态的线程。
1 wait()方法
wait在执行的时候,需要做三件事
1)释放当前的锁
2)让线程进入阻塞
3)当前线程被唤醒时,重新获取到锁
注意:wait要搭配synchronized来使用,脱离synchronized使用wait会抛出异常。
public class Text {
    public static void main(String[] args) throws InterruptedException {
        Object object = new Object();
        synchronized (object) {
            System.out.println("等待中");
            object.wait();
            System.out.println("等待结束");
        }
    }
}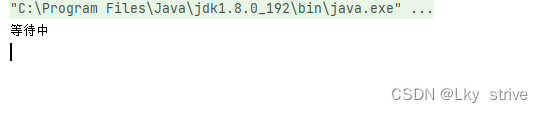
此时会发现在执行到object.wait()之后程序一直等待下去。我们继续打开jconsole命令观察线程,此时会发现处于waiting的阻塞状态,这个时候就需要用notify()方法来唤醒了。

2 notify()方法
notify 方法是唤醒等待的线程
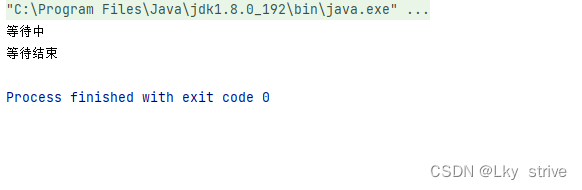
public class Text {
    public static void main(String[] args) throws InterruptedException {
        Object object = new Object();
        Thread thread1 = new Thread(()->{
            synchronized (object) {
                System.out.println("等待中");
                try {
                    //wait里面还可以带参数,避免wait一直死等
                    object.wait();
                } catch (InterruptedException e) {
                    e.printStackTrace();
                }
            }
        });
        Thread thread2 = new Thread(()->{
            try {
                Thread.sleep(3000);
            } catch (InterruptedException e) {
                e.printStackTrace();
            }
            synchronized (object) {
                System.out.println("等待结束");
                object.notify();
            }
        });
        thread1.start();
        thread2.start();
    }
}
使用wait 和 notify也可以避免"线程饿死"
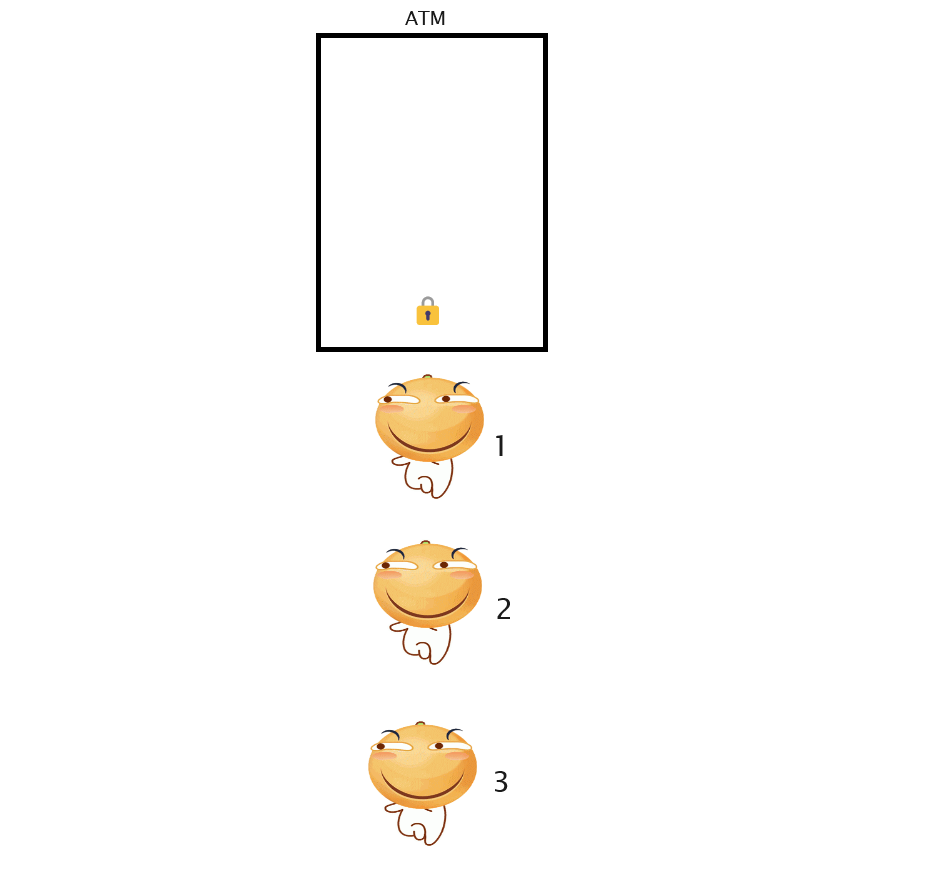
例如第1个人要去ATM取钱,发现ATM里面没有钱了,然后出去释放这个锁,此时其他人开始竞争这个锁,但是第1个人还想再试一下,结果他也能参与这个锁的竞争。这些人(也就是线程)等待这个锁,都是阻塞状态,还没有在CPU上执行,当第1个人释放锁后,其他线程想去CPU上执行还需要有一个系统调度的过程。而1已经在CPU上执行,并没有调度这个过程,所以此时1更容易再次拿到这个锁。
使用wait 和 notify就会避免这种情况,让1在发现没钱的时候进行wait,然后1号就不再参与后面锁的竞争,就能给其他线程提供机会了。
八、多线程案例
1 单例模式
单例=单个实例(对象),单例模式能够保证某个类在程序中只存在一份实例,而不会创建出多个实例。单例模式实现方式分为"饿汉"和"懒汉"两中。
1 饿汉模式:在加载的同时,创建实例。
class Singleton {
    //static成员在Singleton类被加载的时候,就会执行到这里的创建实例的操作
    private static Singleton instance = new Singleton();
    //通过这个方法来获取刚才的实例
    //后续想使用这个实例可以通过getInstance方法来获取
    public static Singleton getInstance() {
        return instance;
    }
    //将这个构造方法设置为私有的,类外的就无法new出这个类的对象了。
    private Singleton() {

    }
}
public class Text {
    public static void main(String[] args) {
        //getInstance是静态方法,可以直接通过了类名访问
        Singleton singleton1 = Singleton.getInstance();
    }
}
通过上述方式,就能够强制使用这个类的时候,创建出新的对象。
懒汉模式:类加载的时候不创建实例,第一次使用的时候才能创建实例。
class Singleton {
    private static Singleton instance = null;
    //首次调用getInstance的时候才会真正创建实例
    public static Singleton getInstance() {
        if (instance == null) {
           instance = new Singleton();
        }
        return instance;
    }
    private Singleton() {

    }
}
public class Text {
    public static void main(String[] args) {
        Singleton singleton1 = Singleton.getInstance();
    }
}
上述两种模式中"饿汉"是线程安全,"懒汉"是线程不安全。因为饿汉模式中的getInstance只进行读取,不修改。而懒汉模式中的getInstance即会读取,也会修改。
当多个线程,同时修改同一个变量,此时可能就会出现线程不安全。
当多个线程,同时读取同一个变量,这种情况不会出现线程不安全。
如果出现这中情况就是线程不安全,所以保证懒汉模式的线程安全,就是加锁。
class Singleton {
private static Singleton instance = null;
public static Singleton getInstance() {
//给整个if语句加锁,由于if是判定,new操作不是原子的,所以要给整个if加锁
synchronized (Singleton.class) {
if (instance == null) {
instance = new Singleton();
}
}
return instance;
}
private Singleton(){
}
}
public class Text {
public static void main(String[] args) {
Singleton singleton = Singleton.getInstance();
}
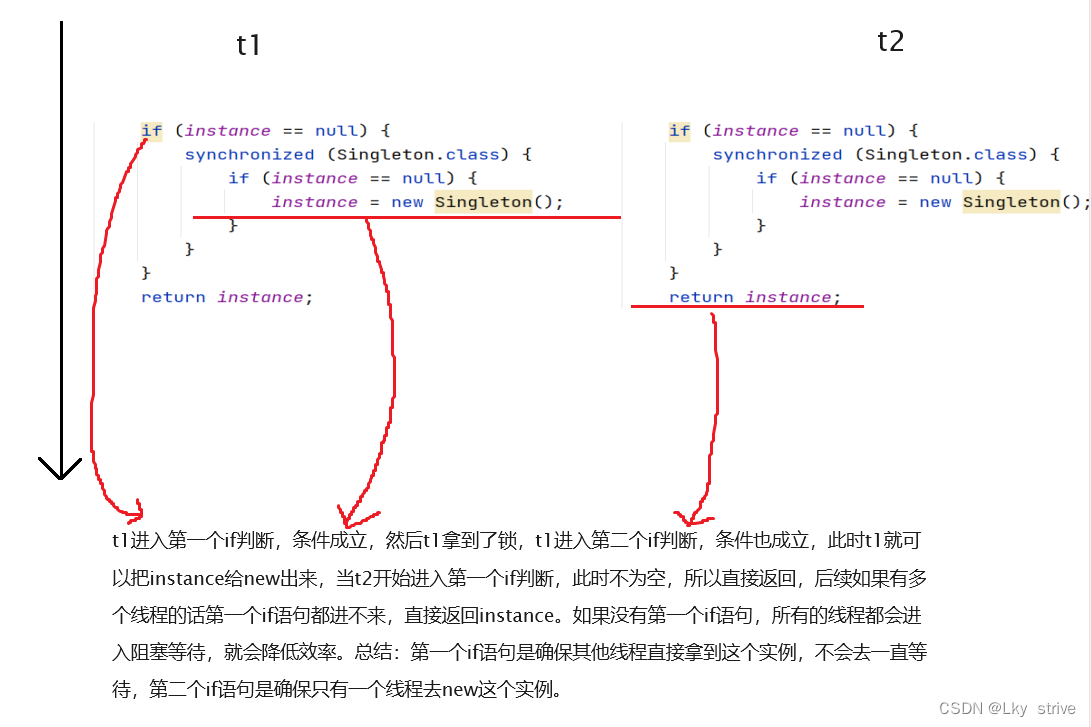
}在单例模式中,只是在首次使用的时候,会涉及到线程不安全的问题。,所以我们在加锁的外层,再加入一个if语句,判定下,当前这里的锁是否要加。
class Singleton {
private static Singleton instance = null;
public static Singleton getInstance() {
//如果对象已经有了,线程就安全,就不用在加锁,反之则需要加锁
//所以这里判定一下当前这里的锁是否要加
if (instance == null) {
//这里一旦加锁就会产生阻塞等待,这个阻塞可能会特别久
synchronized (Singleton.class) {
if (instance == null) {
instance = new Singleton();
}
}
}
return instance;
}
private Singleton(){
}
}
public class Text {
public static void main(String[] args) {
Singleton singleton = Singleton.getInstance();
}
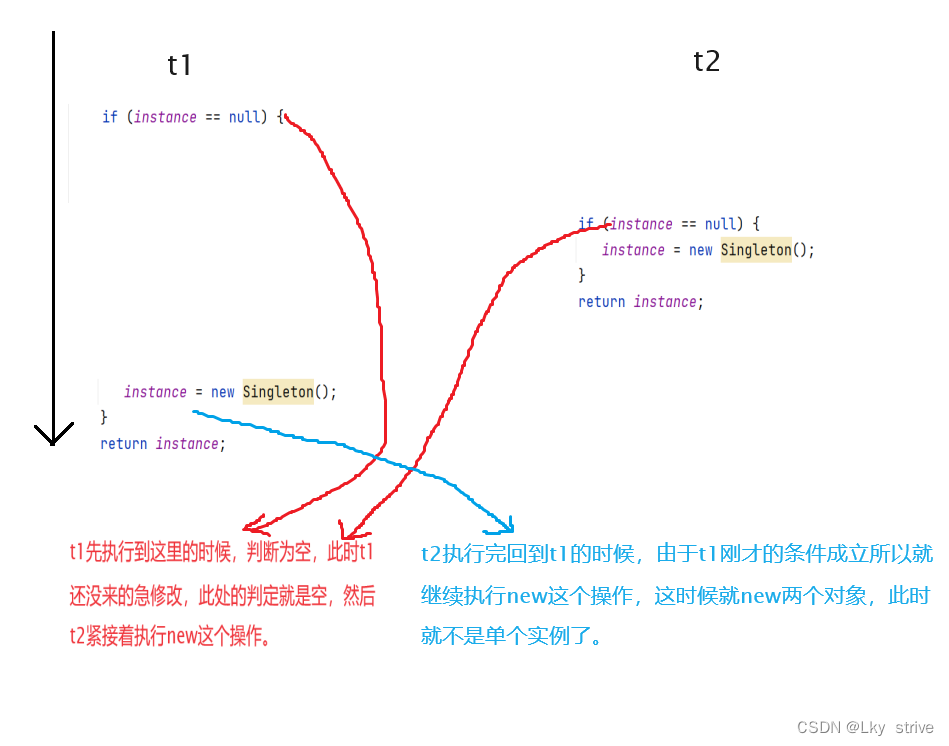
}上述代码同样的条件写了两遍,看起来没有任何意义,但是在这个地方是很重要的,下面举个例子。
2 指令重排序
指令重排序会对我们上述代码产生影响。什么叫指令重排序,例如,我们要去买东西香蕉和苹果,苹果离超市出口比较近,我们可以先买苹果再去买香蕉,也可以先买香蕉再去买苹果,显然先买香蕉再去买苹果这种效率更高。这就是指令重排序,再保证逻辑不变的前提下,能够大幅度提升效率。
在上述代码中,new这个操作会触发指令重排序,new这个操作会被拆分成三步。
1)申请内存空间
2)在内存空间上构造对象(构造方法)
3)把内存的地址赋值给instance这个引用
我们可按照123执行,也可以按照132执行,但是1一定是先执行,无论哪种顺序,再单线程下都是无所谓,但是多线程下就可能有问题了,下面我们具体说明。
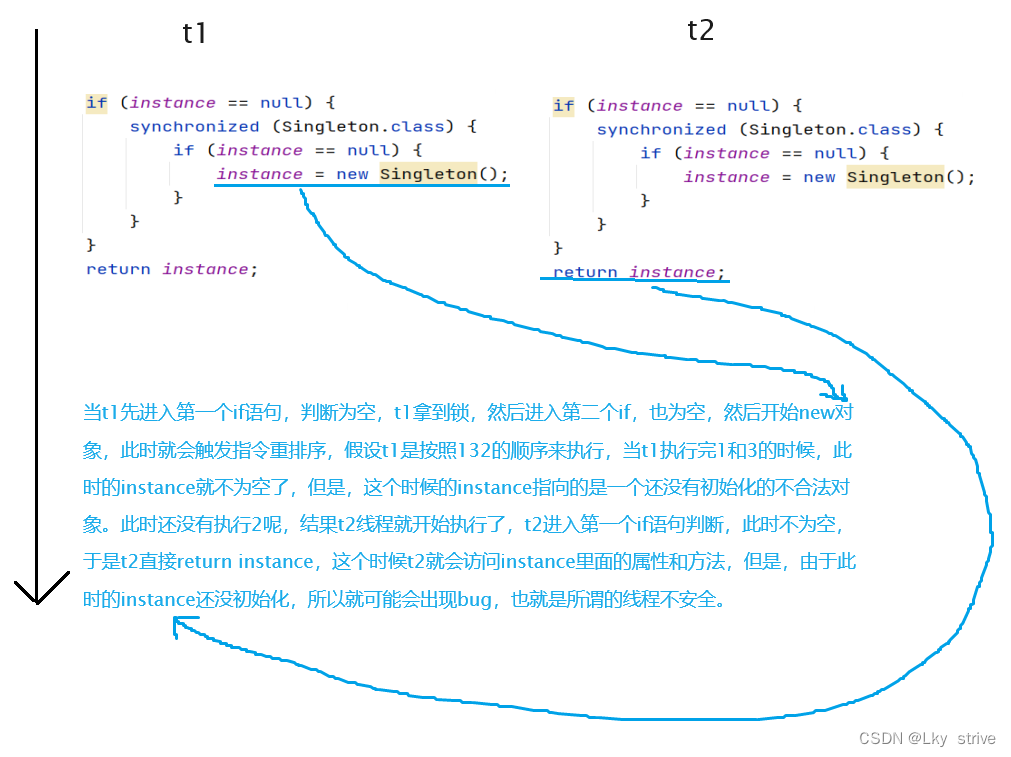
针对指令重排序的解决方案,就是加volatile,volatile修饰instance就可以保证instance在修改的过程中不会出现指令重排序。
class Singleton {
    //3加上volatile
    private static volatile Singleton instance = null;
    public static Singleton getInstance() {
        //2进行两次if判断
        if (instance == null) {
            //1正确的去加锁
            synchronized (Singleton.class) {
                if (instance == null) {
                    instance = new Singleton();
                }
            }
        }
        return instance;
    }
    private Singleton(){

    }
}
public class Text {
    public static void main(String[] args) {
        Singleton singleton = Singleton.getInstance();
    }
}
九、阻塞队列
1 什么是阻塞队列
阻塞队列是多线程代码中比较常用的一种数据结构,它是一种特殊的队列,阻塞队列是线程安全的,也遵循"先进先出"的原则。
阻塞队列带有阻塞特征:
1)如果队列为空,继续出队列就会发生阻塞,一直阻塞到其他线程往队列里添加元素为止。
2)如果队列为满,继续入队列也会发生阻塞,一直阻塞到其他线程从队列中取走元素为止。
阻塞队列最大意义就是用来实现"生产者消费模型"。
2 生产者消费模型
生产者消费模式就是通过一个容器来解决生产者和消费者的强耦合问题,所谓的耦合就是两者联系的越紧密,耦合越强。
生产者和消费者之间不用直接联系,而是直接通过阻塞队列来实现,生产者生产完数据不用等待消费者处理,直接扔给阻塞队列,消费者不用去找生产者要数据,直接从阻塞队列力拿就可以。
阻塞队列的好处:
1)相当于一个缓冲区,平衡生产者和消费者的处理能力。
比如在双11的时候,买东西的人特别多,服务器在同一时刻就可能会收到大量的支付请求,如果直接处理这些请求,服务器可能会扛不住。这个时候就可以把这些请求放到一个阻塞队列中,然后就由消费者线程慢慢处理每个支付请求。
2)能够使生产者和消费者之间解耦合。
比如在过年的时候一家人包饺子,一个人负责擀饺子皮,其他人负责包,擀饺子皮(A)的就是生产者,包饺子(B)的就是消费者。A直接把饺子皮给B,如果A包的特别快,给B饺子皮的时候,B手上还有饺子皮,此时A就需要停下等一等。所以加入一个盘子,A直接把饺子皮放到盘子里,B直接从盘子里拿,这样就有效的解决了耦合强的问题。
3 标准库中的阻塞队列
在Java标准库中提供了阻塞队列,可以直接使用标准库中的即可。
public class Text {
    public static void main(String[] args) throws InterruptedException {
        BlockingDeque<String> blockingDeque = new LinkedBlockingDeque<>();
        //入队列
        blockingDeque.put("123");
        //出队列,如果没有put直接take就会阻塞
        String ret = blockingDeque.take();
        System.out.println(ret);
        //到这里就会产生阻塞
        ret = blockingDeque.take();
        System.out.println(ret);
    }
}
4 阻塞队列的实现
class BlockingQueue {
private final String[] data = new String[100];
//用来记录对类中有效元素的个数。这里加上volatile是为了避免内存可见性问题
private volatile int size = 0;
//用来表示队列的起始位置
private volatile int head = 0;
//用来表示队列的结束位置的下一个位置
private volatile int tail = 0;
//入队列方法
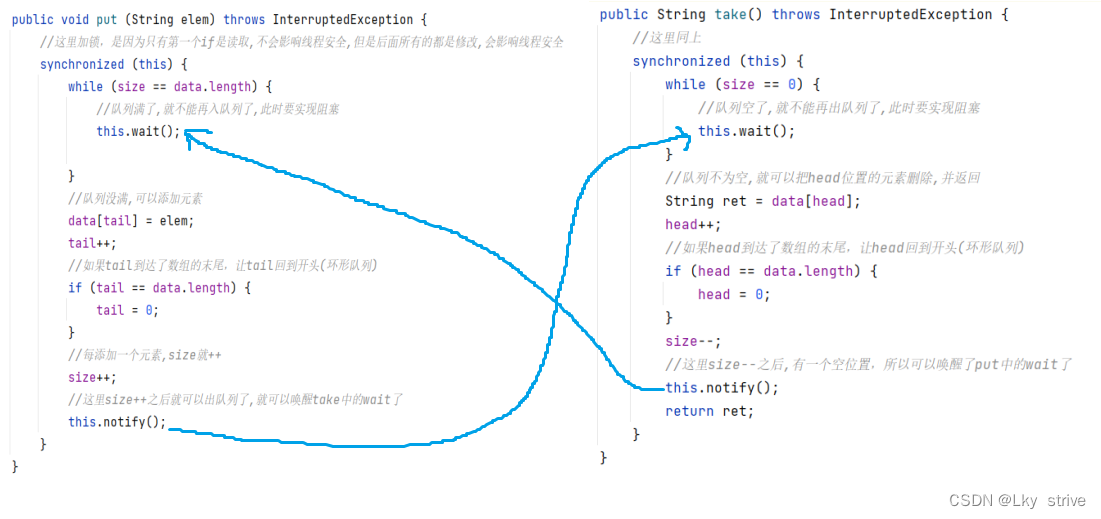
public void put (String elem) throws InterruptedException {
//这里加锁,是因为只有第一个if是读取,不会影响线程安全,但是后面所有的都是修改,会影响线程安全
synchronized (this) {
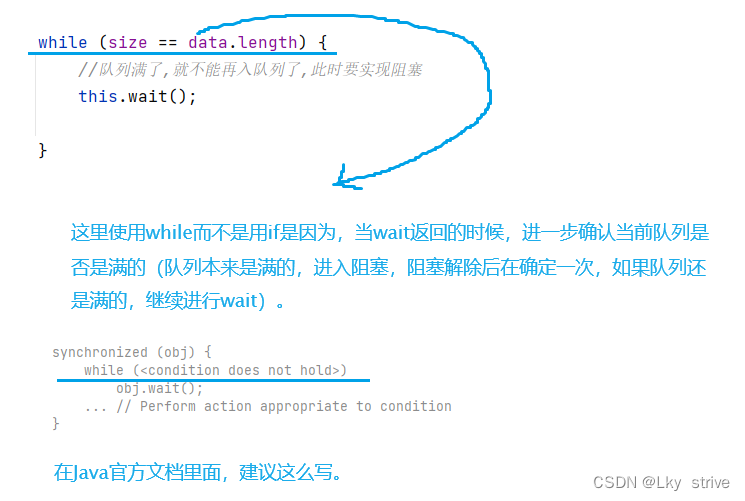
while (size == data.length) {
//队列满了,就不能再入队列了,此时要实现阻塞
this.wait();
}
//队列没满,可以添加元素
data[tail] = elem;
tail++;
//如果tail到达了数组的末尾,让tail回到开头(环形队列)
if (tail == data.length) {
tail = 0;
}
//每添加一个元素,size就++
size++;
//这里size++之后就可以出队列了,就可以唤醒take中的wait了
this.notify();
}
}
//出队列方法
public String take() throws InterruptedException {
//这里同上
synchronized (this) {
while (size == 0) {
//队列空了,就不能再出队列了,此时要实现阻塞
this.wait();
}
//队列不为空,就可以把head位置的元素删除,并返回
String ret = data[head];
head++;
//如果head到达了数组的末尾,让head回到开头(环形队列)
if (head == data.length) {
head = 0;
}
size--;
//这里size--之后,有一个空位置,所以可以唤醒了put中的wait了
this.notify();
return ret;
}
}
}
public class Text {
public static void main(String[] args) throws InterruptedException {
BlockingQueue blockingQueue = new BlockingQueue();
//生产者
Thread thread1 = new Thread(()->{
int num = 1;
while (true) {
try {
blockingQueue.put(num+"");
System.out.println("生产者元素: "+ num);
num++;
Thread.sleep(500);
} catch (InterruptedException e) {
throw new RuntimeException(e);
}
}
},"生产者");
//消费者
Thread thread2 = new Thread(()->{
while (true) {
try {
String result = blockingQueue.take();
System.out.println("消费元素: "+ result);
} catch (InterruptedException e) {
throw new RuntimeException(e);
}
}
},"消费者");
thread1.start();
thread2.start();
}
}
一个队列中,要么为空,要么为满,put和take只能一边阻塞。
如果put阻塞了,其他线程继续调用put也会阻塞,只能take来唤醒。
如果take阻塞了,其他线程继续调用take也会阻塞,只有靠put来唤醒。
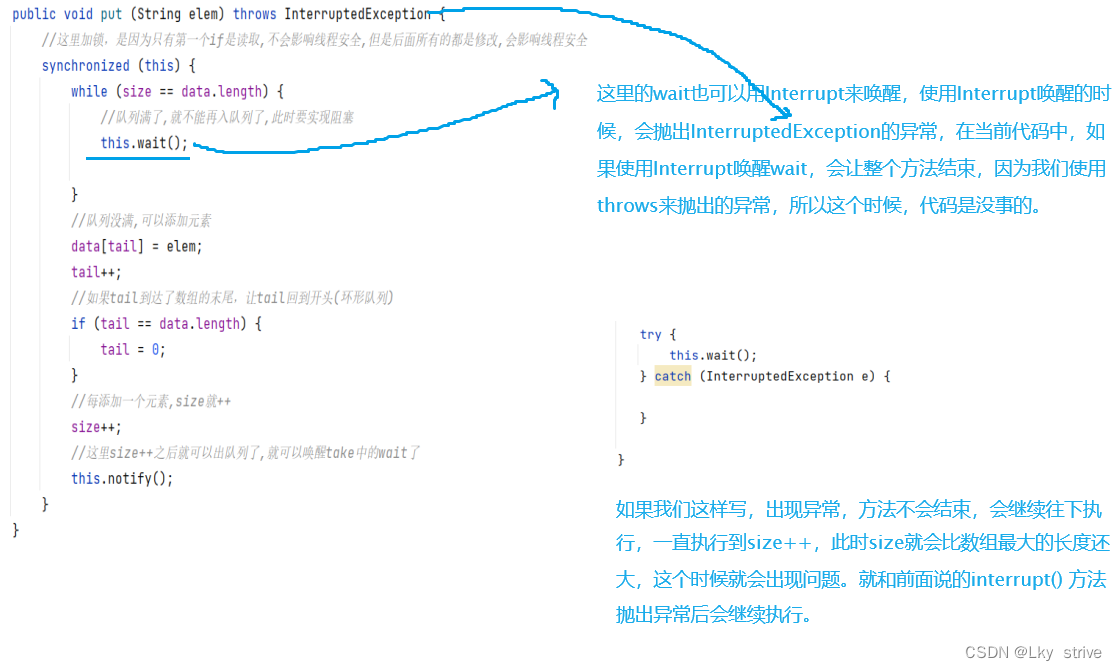
总结:在使用wait的时候,要注意当前的wait是通过notify环形的还是Interrupt唤醒的。
十、定时器
定时器:日常开发常见的组件,在约定一个时间,时间达到后执行某个代码的逻辑,定时器非常常见,尤其在进行网络通信的时候。
1 标准库中的定时器
public class Text {
    public static void main(String[] args) {
        Timer timer = new Timer();
        //TimerTask实现了Runnable接口
        timer.schedule(new TimerTask() {
            @Override
            public void run() {
                System.out.println("3000");
            }
            //当前安排的任务,这里的时间就是以当前时刻为基准,往后推xx ms时间
        },3000);
        System.out.println("开始运行");
    }
}
上述代码在输出3000之后并不会结束,是因为Timer内部的线程,组织了进程结束。
主线程执行schedule方法的时候,就把这个任务放到timer对象中了,此时,timer里面也包含一个线程(扫描线程),一旦时间到,扫描线程就会执行刚才安排的任务了。
2 定时器的实现
//通过这个类创建一个任务
class MyTimerTask implements Comparable<MyTimerTask>{
    //有一个执行的任务
    private Runnable runnable;
    //有一个执行任务的时间
    private long time;
    //这里的time是schedule方法传入的"相对时间"
    public MyTimerTask(Runnable runnable,long time) {
        this.runnable = runnable;
        //这里获取到了要执行任务的绝对时间戳
        //比如在9:00去调用schedule这个方法,执行时间是5分钟,此时这个任务就是9:05执行
        this.time = System.currentTimeMillis() + time;
    }

    @Override
    public int compareTo(MyTimerTask o) {
        //这样写,就是队首元素是最小时间的值
        return (int) (this.time - o.time);
    }
    public long getTime() {
        return time;
    }
    public Runnable getRunnable() {
        return runnable;
    }
}
//实现一个定时器
class MyTimer{
    //使用一个数据结构,保存所由要安排的任务
    private PriorityQueue<MyTimerTask> queue = new PriorityQueue<>();
    //使用这个作为锁的对象
    private Object lock = new Object();
    //这里的schedule就是把当前要完成的任务构造成一个任务对象,添加到队列里
    public void schedule(Runnable runnable,long time) {
        //这里要添加元素,所以加锁
        synchronized (lock) {
            //两种写法
            /*MyTimerTask task = new MyTimerTask(runnable,time);
            queue.offer(task);*/
            queue.offer(new MyTimerTask(runnable,time));
            lock.notify();
        }
    }
    public MyTimer() {
        //建立一个扫描线程
        Thread thread = new Thread(()->{
            //需要不停扫描队首元素,看是否到达时间
            while (true) {
                try {
                    //这里也是一样
                    synchronized (lock) {
                        //尽量使用while来作为判定,while的目的是在wait唤醒之前,再次确认下条件
                        while (queue.isEmpty()) {
                            //使用wait进行等待,这里的wait需要等添加新的任务,然后唤醒
                            lock.wait();
                        }
                        //获取到队首元素
                        MyTimerTask task = queue.peek();
                        //这里就可以比较当前的队首元素是否可以执行
                        long curTime = System.currentTimeMillis();
                        if (curTime >= task.getTime()) {
                            //当前时间达到了任务时间,就可以执行了
                            task.getRunnable().run();
                            //这个任务执行完就可以从队列中删除这个任务
                            queue.poll();
                        }else{
                            //让这个任务执行的时间减去当前时间,让这个任务等待这个任务执行的时间减去当前时间
                            lock.wait(task.getTime() - curTime);
                        }
                    }
                } catch (InterruptedException e) {
                    e.printStackTrace();
                }
            }
        });
        thread.start();
    }
}
public class Text {
    public static void main(String[] args) {
        MyTimer myTimer = new MyTimer();
        myTimer.schedule(new Runnable() {
            @Override
            public void run() {
                System.out.println("3000");
            }
        },3000);
        myTimer.schedule(new Runnable() {
            @Override
            public void run() {
                System.out.println("2000");
            }
        },2000);
        myTimer.schedule(new Runnable() {
            @Override
            public void run() {
                System.out.println("1000");
            }
        },1000);
        System.out.println("程序开始执行");
    }
}
以上就是我自己对多线程的所有总结,还有一个线程池,我想要写的更加详细,所以放在下一篇博客。


 227
227


 被折叠的 条评论
为什么被折叠?
被折叠的 条评论
为什么被折叠?
 到【灌水乐园】发言


